Python Program to Read an Excel File Using Openpyxl Module

Python Program to Read an Excel File Using openpyxl Library

In this article we are going to see how we can read excel sheets in Python language. To do this we will be using openpyxl library which is used to read and write to an excel file.

Python Program to Read an Excel File Using Openpyxl Module

In Python we have openpyxl library which is used to create, modify, read and write different types of excel files like xlsx/xlsm/xltx/xltm etc. When user operates with thousands of records in a excel file and want to pick out few useful information or want to change few records then he/she can do it very easily by using openpyxl library.

To use openpyxl library we first have to install it using pip.

Command : pip install openpyxl

After installation we can use the library to create and modify excel files.

Let’s see different programs to understand it more clearly.

Input File:

Python Program to Read and Excel File Using openpyxl Library

Program-1: Python Program to Print a Particular Cell Value of Excel File Using Openpyxl Module

Approach:

  • First of all we have to import the openpyxl module
  • Store the path to the excel workbook in a variable
  • Load the workbook using the load_workbook( ) function passing the path as a parameter
  • From the workbook object we created, we extract the active sheet from the active attribute
  • Then we create cell objects from the active sheet object
  • Print the value from the cell using the value attribute of the cell object

Program:

# Import the openpyxl library
import openpyxl as opxl

# Path to the excel file
path = "E:\\Article\\Python\\file1.xlsx"

# Created a workbook object that loads the workbook present
# at the path provided
wb = opxl.load_workbook(path)

# Getting the active workbook sheet from the active attribute
activeSheet = wb.active

# Created a cell object from the active sheet using the cell name
cell1 = activeSheet['A2']

# Printing the cell value
print(cell1.value)

Output:

Sejal

Program-2: Python Program to Print Total Number of Rows in Excel File Using Openpyxl Module

Approach:

  • First of all we have to import the openpyxl module
  • Store the path to the excel workbook in a variable
  • Load the workbook using the load_workbook( ) function passing the path as a parameter
  • From the workbook object we created, we extract the active sheet from the active attribute
  • Then we print the number of rows using the max_row attribute of the sheet object

Program:

# Import the openpyxl library
import openpyxl as opxl

# Path to the excel file
path = "E:\\Article\\Python\\file1.xlsx"

# Created a workbook object that loads the workbook present
# at the path provided
wb = opxl.load_workbook(path)

# Getting the active workbook sheet from the active attribute
activeSheet = wb.active

# Printing the number of rows in the sheet
print("Number of rows : ", activeSheet.max_row)

Output:

Number of rows :  7

Program-3: Python Program to Print Total Number of Columns in Excel File Using Openpyxl Module

Approach:

  • First of all we have to import the openpyxl module
  • Store the path to the excel workbook in a variable
  • Load the workbook using the load_workbook( ) function passing the path as a parameter
  • From the workbook object we created, we extract the active sheet from the active attribute
  • Then we print the number of columns using the max_column attribute of the sheet object

Program:

# Import the openpyxl library
import openpyxl as opxl

# Path to the excel file
path = "E:\\Article\\Python\\file1.xlsx"

# Created a workbook object that loads the workbook present
# at the path provided
wb = opxl.load_workbook(path)

# Getting the active workbook sheet from the active attribute
activeSheet = wb.active

# Printing the number of columns in the sheet
print("Number of columns : ", activeSheet.max_column)

Output:

Number of columns :  2

Program-4: Python Program to Print All Column Names of Excel File Using Openpyxl Module

Approach:

  • First of all we have to import the openpyxl module
  • Store the path to the excel workbook in a variable
  • Load the workbook using the load_workbook( ) function passing the path as a parameter
  • From the workbook object we created, we extract the active sheet from the active attribute
  • Then we find and store the number of columns in a variable cols
  • We run a for loop from 1 to cols+1 that creates cell objects and prints their value

Program:

# Import the openpyxl library
from ast import For
import openpyxl as opxl

# Path to the excel file
path = "E:\\Article\\Python\\file1.xlsx"

# Created a workbook object that loads the workbook present
# at the path provided
wb = opxl.load_workbook(path)

# Getting the active workbook sheet from the active attribute
activeSheet = wb.active

# Number of columns
cols = activeSheet.max_column

# Printing the column names using a for loop
for i in range(1, cols + 1):
    currCell = activeSheet.cell(row=1, column=i)
    print(currCell.value)

Output:

Name
Regd. No

Program-5: Python Program to Print First Column Value of Excel File Using Openpyxl Module

Approach:

  • First of all we have to import the openpyxl module.
  • Store the path to the excel workbook in a variable.
  • Load the workbook using the load_workbook( ) function passing the path as a parameter.
  • From the workbook object we created, we extract the active sheet from the active attribute.
  • Then we find and store the number of rows in a variable rows.
  • We run a for loop from 1 to rows+1 that creates cell objects and prints their value.

Program:

# Import the openpyxl library
from ast import For
import openpyxl as opxl

# Path to the excel file
path = "E:\\Article\\Python\\file1.xlsx"

# Created a workbook object that loads the workbook present
# at the path provided
wb = opxl.load_workbook(path)

# Getting the active workbook sheet from the active attribute
activeSheet = wb.active

# Number of rows
rows = activeSheet.max_row

# Printing the first column values using for loop
for i in range(1, rows + 1):
    currCell = activeSheet.cell(row=i, column=1)
    print(currCell.value)

Output:

Name
Sejal
Abhijit
Ruhani
Rahim
Anil
Satyam
Pushpa

Program-6: Python Program to Print a Particular Row Value of Excel File Using Openpyxl Module
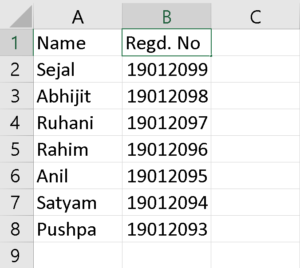
Approach:

  • First of all we have to import the openpyxl module.
  • Store the path to the excel workbook in a variable.
  • Load the workbook using the load_workbook( ) function passing the path as a parameter.
  • From the workbook object we created, we extract the active sheet from the active attribute.
  • We use a variable rowNum to store the row number we want to read values from and a cols variable that stores the total number of columns.
  • We run a for loop from 1 to cols+1 that creates cell objects of the specified rows and prints their value.

Program:

# Import the openpyxl library
from ast import For
import openpyxl as opxl

# Path to the excel file
path = "E:\\Article\\Python\\file1.xlsx"

# Created a workbook object that loads the workbook present
# at the path provided
wb = opxl.load_workbook(path)

# Getting the active workbook sheet from the active attribute
activeSheet = wb.active

# Number of columns
cols = activeSheet.max_column

# The row number we want to print from
rowNum = 2

# Printing the row
for i in range(1, cols + 1):
    currCell = activeSheet.cell(row=rowNum, column=i)
    print(currCell.value)

Output:

Sejal 19012099


Python – Variables

Python Variables

Python is not a “statically typed” language. We do not need to declare variables or their types before using them. When we first assign a value to a variable, it is generated. A variable is a name that is assigned to a memory location. It is the fundamental storage unit in a program.

In this post, we’ll go over what you need to know about variables in Python.

Variables in Python Language

1)Variable

Variables are simply reserved memory locations for storing values. This means that when you construct a variable, you reserve memory space.

The interpreter allocates memory and specifies what can be stored in reserved memory based on the data type of a variable. As a result, you can store integers, decimals, or characters in variables by assigning various data types to them.

2)Important points about variables

  • In Python we don’t have to give the type of information when defining a variable, unlike the other programming languages (C++ or Java). The variable form is assumed by Python implicitly on the basis of a variable value.
  • During program execution, the value stored in a variable may be modified.
  • A variable is simply the name given to a memory location, all operations performed on the variable have an impact on that memory location.

3)Initializing the value of the variable

There is no clear statement to reserve the memory space for Python variables. When you assign a value to a variable, the declaration occurs automatically. To allocate values to the variables, the same sign (=) is used.

The = operator’s left operand is the variable name and the operand’s right is the value in the variable. The = operator is the variable value.

Examples:

A=100
b="Hello"
c=4.5

4)Memory and reference

A variable in Python resembles a tag or a reference that points to a memory object.

As an example,

k=”BTechGeeks”

‘BTechGeeks’ is an string object in the memory, and k is a reference or tag the indicates that memory object.

5)Modifying the variable value

Let us try this:

p=4.5
p="Cirus"

Initially, p pointed to a float object, but now it points to a string object in memory. The variable’s type also changed; originally, it was a decimal (float), but when we assigned a string object to it, the type of p changed to str, i.e., a string.

If there is an object in memory but no vector pointing to it, the garbage collector can automatically free it. We forced the variable p to point to a string object, as in the preceding example, and then float 4.5 was left in memory with no variable pointing to it. The object was then immediately released by the garbage collector.

6)Assigning one variable with another variable

We can assign the value of one variable with another variable like

p="BtechGeeks"
q=p

Both the p and q variables now point to the same string object, namely, ‘BTechGeeks.’

Below is the implementation:

p = "BTechGeeks"
# assign variable q with p
q = p
# print the values
print("The value of p :", p)
print("The value of q :", q)

Output:

The value of p : BTechGeeks
The value of q : BTechGeeks

7)The following are the rules for creating variables in Python

  • A variable name must begin with a letter or an underscore.
  • A number cannot be the first character in a variable name.
  • Variable names can only contain alphanumeric characters and underscores (A-z, 0-9, and _ ).
  • Case matters when it comes to variable names (flag, Flag and FLAG Aare three different variables).
  • The reserved terms (keywords) are not permitted to be used in naming the variable.

Related Programs:

Python Data Persistence – Using range

Python Data Persistence – Using range

Python’s built-in range ( ) function returns an immutable sequence of numbers that can be iterated over by for loop. The sequence generated by the range ( ) function depends on three parameters.

The start and step parameters are optional. If it is not used, then the start is always 0 and the step is 1. The range contains numbers between start and stop-1, separated by a step. Consider an example 2.15:

Example

range (10) generates 0 , 1 , 2 , 3 , 4 , 5 , 6 , 7 , 8 , 9

range ( 1 , 5 ) results in 1 , 2 , 3 , 4

range ( 20 , 30 , 2 ) returns 20 , 22 , 24 , 26 , 28

We can use this range object as iterable as in example 2.16. It displays squares of all odd numbers between 11-20. Remember that the last number in the range is one less than the stop parameter (and step is 1 by default)

Example

#for-3.py
for num in range( 11 , 21 , 2 ):
sqr=num*num
print ( ' sqaure of { } is { } ' . format( num , sqr ) )

Output:

E:\python37>python for-3.py 
square of 11 is 121 
square of 13 is 169 
square of 15 is 225 
square of 17 is 289 
square of 19 is 361

In the previous chapter, you have used len ( ) function that returns a number of items in a sequence object. In the next example, we use len ( ) to construct a range of indices of items in a list. We traverse the list with the help of the index.

Example

#for-4.py
numbers=[ 4 , 7 , 2 , 5 , 8 ]
for indx in range(len(numbers)):
sqr=numbers[indx]*numbers[indx]
print ( ' sqaure of { } is { } ' . format ( numbers [ indx ] , sqr ) )

Output:

E:\python3 7 >python for - 4.py 
sqaure of 4 is 16 
sqaure of 7 is 49 
sqaure of 2 is 4 
sqaure of 5 is 25 
sqaure of 8 is 64 

E:\python37>

Have a look at another example of employing for loop over a range. The following script calculates the factorial value of a number. Note that the factorial of n (mathematical notation is n!) is the cumulative product of all integers between the range of 1 to n.

Example

#factorial.py
n=int ( input ( " enter number . . " ) )
#calculating factorial of n
f = 1
for i in range ( 1 , n+1 ):
f = f * i
print ( ' factorial of { } = { } ' . format ( n , f ) )

Output:

E:\python37>python factorial.py 
enter number..5 
factorial of 5 = 120

How To Scrape LinkedIn Public Company Data – Beginners Guide

How To Scrape LinkedIn Public Company Data

Nowadays everybody is familiar with how big the LinkedIn community is. LinkedIn is one of the largest professional social networking sites in the world which holds a wealth of information about industry insights, data on professionals, and job data.

Now, the only way to get the entire data out of LinkedIn is through Web Scraping.

Why Scrape LinkedIn public data?

There are multiple reasons why one wants to scrape the data out of LinkedIn. The scrape data can be useful when you are associated with the project or for hiring multiple people based on their profile while looking at their data and selecting among them who all are applicable and fits for the company best.

This scraping task will be less time-consuming and will automate the process of searching for millions of data in a single file which will make the task easy.

Another benefit of scraping is when one wants to automate their job search. As every online site has thousands of job openings for different kinds of jobs, so it must be hectic for people who are looking for a job in their field only. So scraping can help them automate their job search by applying filters and extracting all the information at only one page.

In this tutorial, we will be scraping the data from LinkedIn using Python.

Prerequisites:

In this tutorial, we will use basic Python programming as well as some python packages- LXML and requests.

But first, you need to install the following things:

  1. Python accessible here (https://www.python.org/downloads/)
  2. Python requests accessible here(http://docs.python-requests.org/en/master/user/install/)
  3. Python LXML( Study how to install it here: http://lxml.de/installation.html)

Once you are done with installing here, we will write the python code to extract the LinkedIn public data from company pages.

This below code will only run on python 2 and not above them because the sys function is not supported in it.

import json

import re

from importlib import reload

import lxml.html

import requests

import sys

reload(sys)

sys.setdefaultencoding('cp1251')


HEADERS = {'accept': 'text/html,application/xhtml+xml,application/xml;q=0.9,image/webp,*/*;q=0.8',

          'accept-encoding': 'gzip, deflate, sdch',

          'accept-language': 'en-US,en;q=0.8',

          'upgrade-insecure-requests': '1',

          'User-Agent': 'Mozilla/5.0 (X11; Linux x86_64) AppleWebKit/537.36 (KHTML, like Gecko) Chrome/45.0.2454.85 Safari/537.36'}

file = open('company_data.json', 'w')

file.write('[')

file.close()

COUNT = 0


def increment():

   global COUNT

   COUNT = COUNT+1


def fetch_request(url):

   try:

       fetch_url = requests.get(url, headers=HEADERS)

   except:

       try:

           fetch_url = requests.get(url, headers=HEADERS)

       except:

           try:

               fetch_url = requests.get(url, headers=HEADERS)

           except:

               fetch_url = ''

   return fetch_url


def parse_company_urls(company_url):


   if company_url:

       if '/company/' in company_url:

           parse_company_data(company_url)

       else:

           parent_url = company_url

           fetch_company_url=fetch_request(company_url)

           if fetch_company_url:

               sel = lxml.html.fromstring(fetch_company_url.content)

               COMPANIES_XPATH = '//div[@class="section last"]/div/ul/li/a/@href'

               companies_urls = sel.xpath(COMPANIES_XPATH)

               if companies_urls:

                   if '/company/' in companies_urls[0]:

                       print('Parsing From Category ', parent_url)

                       print('-------------------------------------------------------------------------------------')

                   for company_url in companies_urls:

                       parse_company_urls(company_url)

           else:

               pass


def parse_company_data(company_data_url):


   if company_data_url:

       fetch_company_data = fetch_request(company_data_url)

       if fetch_company_data.status_code == 200:

           try:

               source = fetch_company_data.content.decode('utf-8')

               sel = lxml.html.fromstring(source)

               # CODE_XPATH = '//code[@id="stream-promo-top-bar-embed-id-content"]'

               # code_text = sel.xpath(CODE_XPATH).re(r'<!--(.*)-->')

               code_text = sel.get_element_by_id(

                   'stream-promo-top-bar-embed-id-content')

               if len(code_text) > 0:

                   code_text = str(code_text[0])

                   code_text = re.findall(r'<!--(.*)-->', str(code_text))

                   code_text = code_text[0].strip() if code_text else '{}'

                   json_data = json.loads(code_text)

                   if json_data.get('squareLogo', ''):

                       company_pic = 'https://media.licdn.com/mpr/mpr/shrink_200_200' + \

                                     json_data.get('squareLogo', '')

                   elif json_data.get('legacyLogo', ''):

                       company_pic = 'https://media.licdn.com/media' + \

                                     json_data.get('legacyLogo', '')

                   else:

                       company_pic = ''

                   company_name = json_data.get('companyName', '')

                   followers = str(json_data.get('followerCount', ''))


                   # CODE_XPATH = '//code[@id="stream-about-section-embed-id-content"]'

                   # code_text = sel.xpath(CODE_XPATH).re(r'<!--(.*)-->')

                   code_text = sel.get_element_by_id(

                       'stream-about-section-embed-id-content')

               if len(code_text) > 0:

                   code_text = str(code_text[0]).encode('utf-8')

                   code_text = re.findall(r'<!--(.*)-->', str(code_text))

                   code_text = code_text[0].strip() if code_text else '{}'

                   json_data = json.loads(code_text)

                   company_industry = json_data.get('industry', '')

                   item = {'company_name': str(company_name.encode('utf-8')),

                           'followers': str(followers),

                           'company_industry': str(company_industry.encode('utf-8')),

                           'logo_url': str(company_pic),

                           'url': str(company_data_url.encode('utf-8')), }

                   increment()

                   print(item)

                   file = open('company_data.json', 'a')

                   file.write(str(item)+',\n')

                   file.close()

           except:

               pass

       else:

           pass
fetch_company_dir = fetch_request('https://www.linkedin.com/directory/companies/')

if fetch_company_dir:

   print('Starting Company Url Scraping')

   print('-----------------------------')

   sel = lxml.html.fromstring(fetch_company_dir.content)

   SUB_PAGES_XPATH = '//div[@class="bucket-list-container"]/ol/li/a/@href'

   sub_pages = sel.xpath(SUB_PAGES_XPATH)

   print('Company Category URL list')

   print('--------------------------')

   print(sub_pages)

   if sub_pages:

       for sub_page in sub_pages:

           parse_company_urls(sub_page)

else:

   pass

How to Code a Scraping Bot with Selenium and Python

How to Code a Scraping Bot with Selenium and Python

Selenium is a powerful tool for controlling web browsers through programs and performing browser automation. Selenium is also used in python for scraping the data. It is also useful for interacting with the page before collecting the data, this is the case that we will discuss in this article.

In this article, we will be scraping the investing.com to extract the historical data of dollar exchange rates against one or more currencies.

There are other tools in python by which we can extract the financial information. However, here we want to explore how selenium helps with data extraction.

The Website we are going to Scrape:

Understanding of the website is the initial step before moving on to further things.

Website consists of historical data for the exchange rate of dollars against euros.

In this page, we will find a table in which we can set the date range which we want.

That is the thing which we will be using.

We only want the currencies exchange rate against the dollar. If that’s not the case then replace the “usd” in the URL.

The Scraper’s Code:

The initial step is starting with the imports from the selenium, the Sleep function to pause the code for some time and the pandas to manipulate the data whenever necessary.

How to Code a Scraping Bot with Selenium and Python

Now, we will write the scraping function. The function will consists of:

  • A list of currency codes.
  • A start date.
  • An End date.
  • A boolean function to export the data into .csv file. We will be using False as a default.

We want to make a scraper that scrapes the data about the multiple currencies. We also have to initialise the empty list to store the scraped data.

How to Code a Scraping Bot with Selenium and Python 1

As we can see that the function has the list of currencies and our plan is to iterate over this list and get the data.

For each currency we will create a URL, instantiate the driver object, and we will get the page by using it.

Then the window function will be maximized but it will only be visible when we will keep the option.headless as False.

Otherwise, all the work will be done by the selenium without even showing you.

How to Code a Scraping Bot with Selenium and Python 2

Now, we want to get the data for any time period.

Selenium provides some awesome functionalities for getting connected to the website.

We will click on the date and fill the start date and end dates with the dates we want and then we will hit apply.

We will use WebDriverWait, ExpectedConditions, and By to make sure that the driver will wait for the elements we want to interact with.

The waiting time is 20 seconds, but it is to you whichever the way you want to set it.

We have to select the date button and it’s XPath.

The same process will be followed by the start_bar, end_bar, and apply_button.

The start_date field will take in the date from which we want the data.

End_bar will select the date till which we want the data.

When we will be done with this, then the apply_button will come into work.

How to Code a Scraping Bot with Selenium and Python 3

Now, we will use the pandas.read_html file to get all the content of the page. The source code of the page will be revealed and then finally we will quit the driver.

How to Code a Scraping Bot with Selenium and Python 4

How to handle Exceptions In Selenium:

The collecting data process is done. But selenium is sometimes a little unstable and fail to perform the function we are performing here.

To prevent this we have to put the code in the try and except block so that every time it faces any problem the except block will be executed.

So, the code will be like:

for currency in currencies:

        while True:

            try:

                # Opening the connection and grabbing the page

                my_url = f'https://br.investing.com/currencies/usd-{currency.lower()}-historical-data'

                option = Options()

                option.headless = False

                driver = webdriver.Chrome(options=option)

                driver.get(my_url)

                driver.maximize_window()


                # Clicking on the date button

                date_button = WebDriverWait(driver, 20).until(

                            EC.element_to_be_clickable((By.XPATH,

                            "/html/body/div[5]/section/div[8]/div[3]/div/div[2]/span")))


                date_button.click()


                # Sending the start date

                start_bar = WebDriverWait(driver, 20).until(

                            EC.element_to_be_clickable((By.XPATH,

                            "/html/body/div[7]/div[1]/input[1]")))


                start_bar.clear()

                start_bar.send_keys(start)


                # Sending the end date

                end_bar = WebDriverWait(driver, 20).until(

                            EC.element_to_be_clickable((By.XPATH,

                            "/html/body/div[7]/div[1]/input[2]")))


                end_bar.clear()

                end_bar.send_keys(end)


                # Clicking on the apply button

                apply_button = WebDriverWait(driver,20).until(

                      EC.element_to_be_clickable((By.XPATH,

                      "/html/body/div[7]/div[5]/a")))


                apply_button.click()

                sleep(5)


                # Getting the tables on the page and quiting

                dataframes = pd.read_html(driver.page_source)

                driver.quit()

                print(f'{currency} scraped.')

                break


            except:

                driver.quit()

                print(f'Failed to scrape {currency}. Trying again in 30 seconds.')

                sleep(30)

                Continue

For each DataFrame in this dataframes list, we will check if the name matches, Now we will append this dataframe to the list we assigned in the beginning.

Then we will need to export a csv file. This will be the last step and then we will be over with the extraction.

How to Code a Scraping Bot with Selenium and Python 5

Wrapping up:

This is all about extracting the data from the website.So far this code gets the historical data of the exchange rate of a list of currencies against the dollar and returns a list of DataFrames and several .csv files.

https://www.investing.com/currencies/usd-eur-historical-data

How to web scrape with Python in 4 minutes

Web Scraping:

Web scraping is used to extract the data from the website and it can save time as well as effort. In this article, we will be extracting hundreds of file from the New York MTA. Some people find web scraping tough, but it is not the case as this article will break the steps into easier ones to get you comfortable with web scraping.

New York MTA Data:

We will download the data from the below website:

http://web.mta.info/developers/turnstile.html

Turnstile data is compiled every week from May 2010 till now, so there are many files that exist on this site. For instance, below is an example of what data looks like.

You can right-click on the link and can save it to your desktop. That is web scraping!

Important Notes about Web scraping:

  1. Read through the website’s Terms and Conditions to understand how you can legally use the data. Most sites prohibit you from using the data for commercial purposes.
  2. Make sure you are not downloading data at too rapid a rate because this may break the website. You may potentially be blocked from the site as well.

Inspecting the website:

The first thing that we should find out is the information contained in the HTML tag from where we want to scrape it. As we know, there is a lot of code on the entire page and it contains multiple HTML tags, so we have to find out the one which we want to scrape and write it down in our code so that all the data related to it will be visible.

When you are on the website, right-click and then when you will scroll down you will get an option of “inspect”. Click on it and see the hidden code behind the page.

You can see the arrow symbol at the top of the console. 

If you will click on the arrow and then click any text or item on the website then the highlighted tag will appear related to the website on which you clicked.

I clicked on Saturday, September 2018 file and the console came in the blue highlighted part.

<a href=”data/nyct/turnstile/turnstile_180922.txt”>Saturday, September 22, 2018</a>

You will see that all the .txt files come in <a> tags. <a> tags are used for hyperlinks.

Now that we got the location, we will process the coding!

Python Code:

The first and foremost step is importing the libraries:

import requests

import urllib.request

import time

from bs4 import BeautifulSoup

Now we have to set the url and access the website:

url = '

http://web.mta.info/developers/turnstile.html’

response = requests.get(url)

Now, we can use the features of beautiful soup for scraping.

soup = BeautifulSoup(response.text, “html.parser”)

We will use the method findAll to get all the <a> tags.

soup.findAll('a')

This function will give us all the <a> tags.

Now, we will extract the actual link that we want.

one_a_tag = soup.findAll(‘a’)[38]

link = one_a_tag[‘href’]

This code will save the first .txt file to our variable link.

download_url = 'http://web.mta.info/developers/'+ link

urllib.request.urlretrieve(download_url,'./'+link[link.find('/turnstile_')+1:])

For pausing our code we will use the sleep function.

time.sleep(1)

To download the entire data we have to apply them for a loop. I am attaching the entire code so that you won’t face any problem.

I hope you understood the concept of web scraping.

Enjoy reading and have fun while scraping!

An Intro to Web Scraping with lxml and Python:

Sometimes we want that data from the API which cannot be accessed using it. Then, in the absence of API, the only choice left is to make a web scraper. The task of the scraper is to scrape all the information which we want in easily and in very little time.

The example of a typical API response in JSON. This is the response from Reddit.

 There are various kinds of python libraries that help in web scraping namely scrapy, lxml, and beautiful soup.

Many articles explain how to use beautiful soup and scrapy but I will be focusing on lxml. I will teach you how to use XPaths and how to use them to extract data from HTML documents.

Getting the data:

If you are into gaming, then you must be familiar with this website steam.

We will be extracting the data from the “popular new release” information.

Now, right-click on the website and you will see the inspect option. Click on it and select the HTML tag.

We want an anchor tag because every list is encapsulated in the <a> tag.

The anchor tag lies in the div tag with an id of tag_newreleasecontent. We are mentioning the id because there are two tabs on this page and we only want the information of popular release data.

Now, create your python file and start coding. You can name the file according to your preference. Start importing the below libraries:

import requests 

import lxml.html

If you don’t have requests to install then type the below code on your terminal:

$ pip install requests

Requests module helps us open the webpage in python.

Extracting and processing the information:

Now, let’s open the web page using the requests and pass that response to lxml.html.fromstring.

html = requests.get('https://store.steampowered.com/explore/new/') 

doc = lxml.html.fromstring(html.content)

This provides us with a structured way to extract information from an HTML document. Now we will be writing an XPath for extracting the div which contains the” popular release’ tab.

new_releases = doc.xpath('//div[@id="tab_newreleases_content"]')[0]

We are taking only one element ([0]) and that would be our required div. Let us break down the path and understand it.

  • // these tell lxml that we want to search for all tags in the HTML document which match our requirements.
  • Div tells lxml that we want to find div tags.
  • @id=”tab_newreleases_content tells the div tag that we are only interested in the id which contains tab_newrelease_content.

Awesome! Now we understand what it means so let’s go back to inspect and check under which tag the title lies.

The title name lies in the div tag inside the class tag_item_name. Now we will run the XPath queries to get the title name.

titles = new_releases.xpath('.//div[@class="tab_item_name"]/text()')


We can see that the names of the popular releases came. Now, we will extract the price by writing the following code:

prices = new_releases.xpath('.//div[@class="discount_final_price"]/text()')

Now, we can see that the prices are also scraped. We will extract the tags by writing the following command:

tags = new_releases.xpath('.//div[@class="tab_item_top_tags"]')

total_tags = []

for tag in tags:

total_tags.append(tag.text_content())

We are extracting the div containing the tags for the game. Then we loop over the list of extracted tags using the tag.text_content method.

Now, the only thing remaining is to extract the platforms associated with each title. Here is the the HTML markup:

The major difference here is that platforms are not contained as texts within a specific tag. They are listed as class name so some titles only have one platform associated with them:


<span class="platform_img win">&lt;/span>


While others have 5 platforms like this:


<span class="platform_img win"></span><span class="platform_img mac"></span><span class="platform_img linux"></span><span class="platform_img hmd_separator"></span> <span title="HTC Vive" class="platform_img htcvive"></span> <span title="Oculus Rift" class="platform_img oculusrift"></span>

The span tag contains platform types as the class name. The only thing common between them is they all contain platform_img class.

First of all, we have to extract the div tags containing the tab_item_details class. Then we will extract the span containing the platform_img class. Lastly, we will extract the second class name from those spans. Refer to the below code:

platforms_div = new_releases.xpath('.//div[@class="tab_item_details"]')

total_platforms = []

for game in platforms_div:    

temp = game.xpath('.//span[contains(@class, "platform_img")]')    

platforms = [t.get('class').split(' ')[-1] for t in temp]    

if 'hmd_separator' in platforms:        

platforms.remove('hmd_separator')   

 total_platforms.append(platforms)

Now we just need this to return a JSON response so that we can easily turn this into Flask based API.

output = []for info in zip(titles,prices, tags, total_platforms):    resp = {}    

resp['title'] = info[0]

resp['price'] = info[1]    

resp['tags'] = info[2]    

resp['platforms'] = info[3]    

output.append(resp)

We are using the zip function to loop over all of the lists in parallel. Then we create a dictionary for each game to assign the game name, price, and platforms as keys in the dictionary.

Wrapping up:

I hope this article is understandable and you find the coding easy.

Enjoy reading!


Simple Whatsapp Automation Using Python3 and Selenium

In this article, we will be using python and selenium to automate some messages on WhatsApp.

I hope the reader is well aware of python beforehand.

The first and the foremost step is to install python3 which you can download from https://www.python.org/  and follow up the install instruction. After the installation will be complete, install selenium for the automation of all the tasks we want to perform.

python3 -m pip install Selenium

Selenium Hello World:

After installing selenium, to check whether it is installed correctly or not, run the python code mentioned below and check if there are any errors.

from selenium import webdriver

import time

driver = webdriver.Chrome()

driver.get("http://google.com")

time.sleep(2)

driver.quit()

Save this code in a python file and name it according to your preference. If the program runs correctly without showing any errors, then the Google Chrome window will be opened automatically.

Automate Whatsapp:

Import the modules selenium and time like below.

from selenium import webdriver

import time

After the importing of the modules, the below code will open the WhatsApp web interface which will automatically ask you to scan the QR code and will be logged into your account.

driver = webdriver.Chrome()

driver.get("https://web.whatsapp.com")

print("Scan QR Code, And then Enter")

time.sleep(5)

The next step is entering the username to whom you want to send the message. In my case, I made a group named “WhatsApp bot” and then located an XPath using the inspect method and put it in.

As soon as the WhatsApp bot will be opened, it will automatically locate the WhatsApp bot and will enter that window.

user_name = 'Whatsapp Bot'

user = driver.find_element_by_xpath('//span[@title="{}"]'.format(user_name))

user.click()

After this, the message box will be opened and now you have to inspect the message box and enter the message you want to send. Later, you have to inspect the send button and click on it using the click() method. 

message_box = driver.find_element_by_xpath(‘//div[@class=”_2A8P4″]’)


message_box.send_keys(‘Hey, I am your whatsapp bot’)


message_box = driver.find_element_by_xpath(‘//button[@class=”_1E0Oz”]’)


message_box.click()

As soon as you execute this code, the message will be sent and your work is done.

I am attaching the whole code for your reference.

from selenium import webdriver

import time


driver = webdriver.Chrome(executable_path=””)

time.sleep(5)

user_name = 'Whatsapp Bot'

user = driver.find_element_by_xpath('//span[@title="{}"]'.format(user_name))

user.click()


message_box = driver.find_element_by_xpath('//div[@class="_2A8P4"]')

message_box.send_keys('Hey, I am your whatsapp bot')

message_box = driver.find_element_by_xpath('//button[@class="_1E0Oz"]')

message_box.click()

driver.quit()

At the end we put driver.quit() method to end the execution of the task.

You did a great job making this bot!!


Dictionaries in Python

Python Dictionary:

Dictionaries are Python’s implementation of a data structure that is more generally known as an associative array. A dictionary consists of a collection of key-value pairs. Each key-value pair maps the key to its associated value.Keys are unique within a dictionary while values may not be.

Creating a dictionary:

Each key is separated from its value by a colon (:), the items are separated by commas, and the whole thing is enclosed in curly braces. An empty dictionary without any items is written with just two curly braces, like this: {}.

The values of a dictionary can be of any type, but the keys must be of an immutable data type such as strings, numbers, or tuples.Dictionary keys are case sensitive, same name but different cases of Key will be treated distinctly.

Creating a dictionary

Output:

If we attempt to access a data item with a key, which is not part of the dictionary, we get an error as follows −

creating dictionary output
Dictionary can also be created by the built-in function dict(). An empty dictionary can be created by just placing to curly braces{}.

Using built-in function dict()

Output:

using built-in function dict() output

Nested Dictionary:

Using nested dictionary

Adding elements to a Dictionary:

In Python Dictionary, Addition of elements can be done in multiple ways. One value at a time can be added to a Dictionary by defining value along with the key e.g. Dict[Key] = ‘Value’. Updating an existing value in a Dictionary can be done by using the built-in update() method. Nested key values can also be added to an existing Dictionary.While adding a value, if the key value already exists, the value gets updated otherwise a new Key with the value is added to the Dictionary.

Adding elements to a Dictionary

Output:


Accessing elements from a Dictionary:

In order to access the items of a dictionary refer to its key name.Key can be used inside square brackets.

Accessing elements from a Dictionary

Accessing element of a nested dictionary:

In order to access the value of any key in nested dictionary, use indexing []

Accessing element of a nested dictionary

Delete Dictionary Elements:

ou can either remove individual dictionary elements or clear the entire contents of a dictionary. You can also delete entire dictionary in a single operation.

To explicitly remove an entire dictionary, just use the del statement. Following is a simple example −

Delete Dictionary Elements

Properties of Dictionary Keys:

Dictionary values have no restrictions. They can be any arbitrary Python object, either standard objects or user-defined objects. However, same is not true for the keys.

There are two important points to remember about dictionary keys −

(a) More than one entry per key not allowed. Which means no duplicate key is allowed. When duplicate keys encountered during assignment, the last assignment wins.

(b)Keys must be immutable. Which means you can use strings, numbers or tuples as dictionary keys but something like [‘key’] is not allowed.

Conclusion:

In this tutorial, you covered the basic properties of the Python dictionary and learned how to access and manipulate dictionary data.

Python IDEs and Code Editors (Guide)

Python code editors are designed for the developers to code and debug program easily. Using these Python IDEs(Integrated Development Environment), you can manage a large codebase and achieve quick deployment.

Developers can use these editors to create desktop or web application. The Python IDEs can also be used by DevOps engineers for continuous Integration.

What are IDEs and Code Editors?

Whether you are new to this game or you are a veteran player, you need an IDE (Integrated Development Environment) or a code editor to showcase your coding skills and talent. An IDE is a software that consists of common developer tools into a single user-friendly GUI (Graphical User interface). An IDE majorly consists of a source code editor for writing software code, local build automation for creating a local build of the software like compiling computer source code. Lastly, it has a debugger, a program for testing other programs. An IDE can have many more features apart from these & those vary for each IDE.

Code editors are also software; it is like a text editor with some added functionalities. It is not an IDE as an IDE has many developer tools. Depending upon the language one codes on the editor, it highlights special keywords and gives some suggestions. Sublime Text, Atom, Visual Studio Code are some of the popular code editors.

Requirements for a Good Python Coding Environment:

We have listed some major and standard features and requirements required by every project in its build phase and after. A project can have more requirements than mentioned below, but these are the basic ones, and IDE must possess.

  • Save and Reload Source Code

An IDE or editor must save your work and reopen everything later, in the same state it was in when you left, thus saving time for development.

  • Execution from Within the Environment

It should have a built-in compiler to execute your code. If you are not executing it in the same software, then probably it is a text editor.

  • Debugging Support

The debugger in most IDEs provides stepping through your code and applying breakpoints for the code’s partial execution.

  • Syntax Highlighting

Being able to spot keywords, variables quickly, and symbols in your code make reading and understanding code much easier.

  • Automatic Code Formatting

This is an interesting feature; the code indents itself as the developer uses loops, functions, or any other block code.

Top Python IDEs and Code Editors:

1.Pycharm:

PyCharm is an IDE for professional developers. It is created by JetBrains, a company known for creating great software development tools.

There are two versions of PyCharm:

  • Community – free open-source version, lightweight, good for Python and scientific development
  • Professional – paid version, full-featured IDE with support for Web development as well

PyCharm provides all major features that a good IDE should provide: code completion, code inspections, error-highlighting and fixes, debugging, version control system and code refactoring. All these features come out of the box.

Personally speaking, PyCharm is my favorite IDE for Python development.

The only major complaint I have heard about PyCharm is that it’s resource-intensive. If you have a computer with a small amount of RAM (usually less than 4 GB), your computer may lag.

Python IDEs and Code Editors_using Pycharm
2.IDLE:

When you install Python, IDLE is also installed by default. This makes it easy to get started in Python. Its major features include the Python shell window(interactive interpreter), auto-completion, syntax highlighting, smart indentation, and a basic integrated debugger.

IDLE is a decent IDE for learning as it’s lightweight and simple to use. However, it’s not for optimum for larger projects.

Python IDEs and Code Editors_using idle
3.Sublime Text 3:

Sublime Text is a popular code editor that supports many languages including Python. It’s fast, highly customizable and has a huge community.

It has basic built-in support for Python when you install it. However, you can install packages such as debugging, auto-completion, code linting, etc. There are also various packages for scientific development, Django, Flask and so on. Basically, you can customize Sublime text to create a full-fledged Python development environment as per your need.

You can download and use evaluate Sublime text for an indefinite period of time. However, you will occasionally get a pop-up stating “you need to purchase a license for continued use”.

Python IDEs and Code Editors_using sublime text
4.Atom:

Atom is an open-source code editor developed by Github that can be used for Python development (similar Sublime text).

Its features are also similar to Sublime Text. Atom is highly customizable. You can install packages as per your need. Some of the commonly used packages in Atom for Python development are autocomplete-python, linter-flake8, python-debugger, etc.

Personally speaking, I prefer Atom to Sublime Text for Python development.

Python IDEs and Code Editors_using atom

5.Visual Studio Code:

Visual Studio Code (VS Code) is a free and open-source IDE created by Microsoft that can be used for Python development.

You can add extensions to create a Python development environment as per your need in VS code. It provides features such as intelligent code completion, linting for potential errors, debugging, unit testing and so on.

VS Code is lightweight and packed with powerful features. This is the reason why it becoming popular among Python developers.

Python-IDEs-and-Code-Editors_using-vs-code
6.Spyder:

Spyder is an open-source IDE usually used for scientific development.

The easiest way to get up and running up with Spyder is by installing Anaconda distribution. If you don’t know, Anaconda is a popular distribution for data science and machine learning. The Anaconda distribution includes hundreds of packages including NumPy, Pandas, scikit-learn, matplotlib and so on.

Spyder has some great features such as autocompletion, debugging and iPython shell. However, it lacks in features compared to PyCharm.

Python-IDEs-and-Code-Editors_using-spyder
7.Thonny:

Thonny is an integrated development environment (IDE). Developed by the University of Tartu in Estonia, this software has been designed mainly to make life easier for beginners in Python by providing them with a simple, lightweight IDE. Still, with excellent features, it is a bit like the beginner’s kit. This software is therefore particularly suitable for beginners who wish to start programming and development in Python and is therefore not at all suitable for development experts.

The user interface is isolated from all features that may distract beginners. It is a well-thought-out pedagogical course for beginners who want to develop in Python quickly, easily, and simply.

Advantage:

  • IDE adapted for beginners’ learning
  • Basic and functional user interface
  • Does not require a large amount of memory to run

Disadvantage:

  • If you are an experienced developer, this software is certainly not for you.
  • Only basic functionalities

8.Eclipse + PyDev:

If you’ve spent any amount of time in the open-source community, you’ve heard about Eclipse. Available for Linux, Windows, and OS X at, Eclipse is the de-facto open-source IDE for Java development. It has a rich marketplace of extensions and add-ons, which makes Eclipse useful for a wide range of development activities.

One such extension is PyDev, which enables Python debugging, code completion, and an interactive Python console. Installing PyDev into Eclipse is easy: from Eclipse, select Help, Eclipse Marketplace, then search for PyDev. Click Install and restart Eclipse if necessary.

Python-IDEs-and-Code-Editors_using-eclipse.

Which Python IDE is Right for You?

Only you can decide that, but here are some basic recommendations:

  • New Python developers should try solutions with as few customizations as possible. The less gets in the way, the better.
  • If you use text editors for other tasks (like web pages or documentation), look for code editor solutions.
  • If you’re already developing other software, you may find it easier to add Python capabilities to your existing toolset.

Conclusion:

Python is one of the most well-known languages and perhaps even the most popular. As with most major languages, you have a multitude of useful, practical, and powerful IDEs, whether they are paid or free.

Introduction to Python – Python, Pythonic, History, Documentation

In this Page, We are Providing Introduction to Python – Python, Pythonic, History, Documentation. Students can visit for more Detail and Explanation of Python Handwritten Notes Pdf.

Introduction to Python – Python, Pythonic, History, Documentation

Python

Python is a high-level general-purpose programming language that is used in a wide variety of application domains. Python has the right combination of performance and features that demystify program writing. Some of the features of Python are listed below:

  • It is simple and easy to learn.
  • Python implementation is under an open-source license that makes it freely usable and distributable, even for commercial use.
  • It works on many platforms such as Windows, Linux, etc.
  • It is an interpreted language.
  • It is an object-oriented language.
  • Embeddable within applications as a scripting interface.
  • Python has a comprehensive set of packages to accomplish various tasks.

Python is an interpreted language, as opposed to a compiled one, though the distinction is blurry because of the presence of the bytecode compiler (beyond the scope of this book). Python source code is compiled into bytecode so that executing the same file is faster the second time (recompilation from source to bytecode can be avoided). Interpreted languages typically have a shorter development/debug cycle than compiled ones, and also their programs generally also run slowly. Please note that Python uses a 7-bit ASCII character set for program text.

The latest stable releases can always be found on Python’s website (http://www.python.org/). There are two recommended production-ready Python versions at this point in time because at the moment there are two branches of stable releases: 2.x and 3.x. Python 3.x may be less useful than 2.x since currently there is more third-party software available for Python 2 than for Python 3. Python 2 code will generally not run unchanged in Python 3. This book focuses on Python version 2.7.6.

Python follows a modular programming approach, which is a software design technique that emphasizes separating the functionality of a program into independent, interchangeable modules, such that each contains everything necessary to execute only one aspect of the desired functionality. Conceptually, modules represent a separation of concerns and improve maintainability by enforcing logical boundaries between components.

More information on the module is provided in chapter 5. Python versions are numbered in the format A.B.C or A.B, where A is the major version number, and it is only incremented for major changes in the language; B is the minor version number, and incremented for relatively lesser changes; C is the micro-level, and it is incremented for bug-fixed release.

Pythonic

“Pythonic” is a bit different idea/approach of the writing program, which is usually not followed in other programming languages. For example, to loop all elements of an iterable using for statement, usually, the following approach is followed:

food= [ 'pizza', 'burger',1 noodles']
for i in range(len(food)):
print(food[i])

A cleaner Pythonic approach is:

food=['pizza','burger','noodles']
for piece in food:
print(piece)

History

Python was created in the early 1990s by Guido van Rossum at Centrum Wiskunde & Informatica (CWI, refer http://www.cwi.nl/) in the Netherlands as a successor of a language called “ABC”. Guido remains Python’s principal author, although it includes many contributions from others. When he began implementing Python, Guido van Rossum was also reading the published scripts from “Monty Python’s Flying Circus”,.a BBC comedy series from the 1970s. Van Rossum thought he needed a name that was short, unique, and slightly mysterious, so he decided to call the language “Python”. In 1995, Guido continued his work on Python at the Corporation for National Research Initiatives (CNRI, visit http://www.cnri.reston.va.us/) in Reston, Virginia, where he released several versions of the software.

In May 2000, Guido and the Python core development team moved to “BeOpen.com” to form the BeOpen PythonLabs team. In October of the same year, the PythonLabs team moved to Digital Creations (now Zope Corporation, visit http://www.zope.com/). In 2001, the Python Software Foundation (PSF, refer http://www.python.org/psf/) was formed, a non-profit organization created specifically to own Python-related intellectual property. Zope Corporation is a sponsoring member of the PSF.

Documentation

Official Python 2.7.6 documentation can be accessed from the website link: http://docs.python.Org/2/. To download an archive containing all the documents for version 2.7.6 of Python in one of the various formats (plain text, PDF, HTML), follow the link: http://docs.python.Org/2/download.html.