We have compiled most frequently asked Python Interview Questions which will help you with different expertise levels.
Python Interview Questions on Searching and Sorting
Sequential Search
In the chapter based on Python operators, we have seen that we can make use of the membership operator ‘in’ to check if a value exists in a list or not.
    >>> list.1 = [1,2,3,4,5,6,71
    >>> 3 in list1
   True
    >>> 8 in list1
    False
    >>>
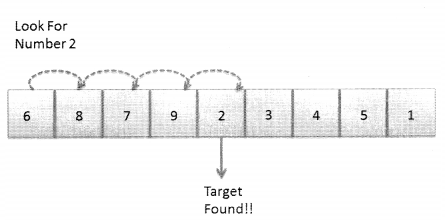
This is nothing but searching for an element in a list. We are going to look at how elements can be searched and how process efficiency can be improved. We start by learning about sequential search.
The simplest way of searching for an element in a sequence is to check every element one by one. If the element is found then the search ends and the element is returned or else the search continues till the end of the sequence. This method of searching is known as linear search or sequential search. It follows a simple approach but it is quite an inefficient way of searching for an element because we move from one element to the other right from the beginning to end and if the element is not present in the sequence we would not know about it till we reach the last element.
Time analysis for sequential search:
- Best scenario is that the element that we are looking for is the very first element in the list. In this case, the time complexity will be 0(1).
- The worst scenario would be if we traverse throughout the entire sequence and realize that the element that we are looking for, does not exist. In this case, the time complexity will be O(n).
Question 1.
Sequential search is also known as _______
Answer:
Linear Search
Question 2.
How are the elements reviewed in sequential search?
Answer:
The elements are reviewed one at a time in sequential terms.
Question 3.
When does the sequential search end?
Answer:
The sequential search ends when an element is found or when the end of the sequence is reached.
Question 4.
Write code to implement sequential search.
Answer:
The sequential search can be implemented as follows:
- The function takes two values: seq list which is the list and target_ num which is the number to search in the list.
- We set search_flag = 0 if the target number is found in the list we will set the search_flag to 1 else we let it be 0.
- We iterate through the list comparing each element in the list with the target_num.
- If a match is found we print a message and update the search_flag to 1.
- After the “for” loop if the search_flag is still 0 then it means that the number was not found.
Code
def sequential__search (seq_list, target_num) :
    search_flag = 0
    for i in range(len(seq_list)):
        if seq_list[i] == target_num:
           print("Found the target number ", target_num, " at index", i,".")
            search_flag = 1;
    if search_flag == 0:
       print("Target Number Does Not Exist.Search Unsuccessful.")
Execution
seq_list = [1,2,3,4,5,6,7,8,2,9,10,11,12,13,14,15, 16]
target__num = input ("Please enter the target number : ")
sequential_search(seq_list, int(target_num))
Output 1
Please enter the target number: 5
Found the target number 5 at index 4.
Output 2
Please enter the target number: 2
Found the target number 2 at index 1.
Found the target number 2 at index 8.
Output 3
Please enter the target number: 87
Target Number Does Not Exist. Search Unsuccessful.
Question 5.
How would you implement a sequential search for an ordered list?
Answer:
When elements in a list are sorted, then many times there may not be the need to scan the entire list. The moment we reach an element that has a value greater than the target number, we know that we need not go any further.
Step 1: We define a function sequential_search() that takes two arguments – a list (seq_list) and the number that we are looking for (target num).
def sequential_search(seq_list, target_num):
Step 2: The first thing we do is set define a flag (search_flag) and set it to “False’’ or “0” value. The flag is set to “True” or “1” if the element is found. So, after traversing through the list if the search_flag value is still “False” or “0”, we would know that the number that we are looking for does not exist in the list.
def sequential__search (seq_list, target_num) :
    search_flag = 0
Step 3: Now, it’s time to check the elements one by one so, we define the for loop:
def sequential_search(seq_list, target_num):
    search_flag = 0
    for i in range(len(seq_list)):
Step 4: We now define how the elements are compared. Since it is an ordered list for every “i” in seq_list we have to check if i > target_num. If yes, then it means that there is no point moving further as it is an ordered list and we have reached an element that is greater than the number that we are looking for. However, if seq_list[i] == target_num then, the search is successful and we can set the search_flag to 1.
def sequential_search(seq_list, target^num):
    search_flag = 0
    for i in range(len(seq_list)):
        if seq_list[i] > target_num:
           print("search no further.")
           break;
       elif seq_list[i] == target_num:
            print("Found the target number ", target_num, " at index", i,".")
            search_flag = 1;
Step 5: After the for loop has been executed if the value of search_flag is still 0 then a message stating that the target number was not found must be displayed.
Code
def sequential_search(seq_list, target_num):
      search_flag = 0
      for i in range(len(seq_list)):
          if seq_list[i] > target_num:
             print("search no further.")
             break;
         elif seq_list[i] == target_num:
              print("Found the target number ", target_num, " at index", i,".")
              search_flag = 1 ;

      if search_flag == 0 ;
      print ("Target Number Does Not Exist. search Unsuccessful.")
Execution
seq_list = [1,2,3,4,5,6,7,8,2,9,10,11,12,13,14,15, 16]
target_num = input ("Please enter the target number : ")
sequential_search(seq_list, int(target_num))
Output 1
Please enter the target number: 2
Found the target number 2 at index 1.
Found the target number 2 at index 2.
search no further.
>>>
Output 2
Please enter the target number: 8
Found the target number 8 at index 8.
Search no further.
>>>
Output 3
Please enter the target number: 89
Target Number Does Not Exist. Search Unsuccessful.
>>>
Binary Search
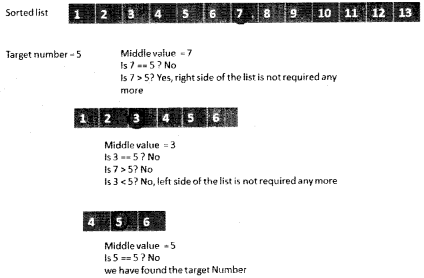
A binary search is used to locate a target value from a sorted list. The search begins from the center of the sequence. The element present at the center is not equal to the target number it is compared with the target number. If the target number is greater than the element at the center then it means that we need to search for the number in the right half of the list and the left half need not be touched. Similarly, if the target number is less than the element present in the center then we will have to direct our search efforts towards the left. This process is repeated till the search is completed. The beauty of binary search is that in every search operation the sequence is cut into half and focus is shifted to only that half that has chances of having the value.
Question 6.
Write a code to implement the binary search function.
Answer:
The binary search can be implemented in the following manner:
Step 1: Define the binary_search function. It takes 4 parameters:
- sorted list: the input list that is in sorted form
- target_num: the number that we are looking for
- starting_point: the place from where we want to start searching, default value = 0
- end_point: The endpoint for search, default value = None
Note that the list will be split in half in every step so the starting and ending point may change in every search operation.
def binary_search(sorted_list, target_num, start_ point=0, end_point=None):
Step 2: Do the following:
- Set the search_flag to “False”
- If the end_point is not provided, it would have the default value of “None”, set it to the length of the input list.
def binary_search(sorted_list, target_num,
start_point=0, end_point=None):
     search_flag = False
     if end_point == None:
        end_point = len(sorted_list)-1
Step 3: Check, the start_point should be less than the endpoint. If that is true, do the following:
- Get midpoint index value: mid_point = (end_point+start_point)//2
- Check the value of the element at mid_point. Is it equal to the target_ num?
- If sorted_lLst[midjioint] == target num1
- Set search flag to True
- If not check if the value at mid_point is greater than target_num :
- sorted_list[mid_point] > target num
- If yes, then we can discard the right side of the list now we can repeat the search from beginning to mid_point-1 value. Set
endpoint to mid_point – 1. The starting point can remain the same(0).
- The function should now call itself with:
- sorted_list: same as before
- target_num: same as before
- starting point: same as before
- endpoint: mid_point – 1
- If not check if the value at mid_point is lesser than target num :
- sorted_list[mid_point] < target_num
- If yes, then the left side of the list is not required. We can repeat the search from mid_point+1 to the end of the list. Set starting point to mid_point+1. The ending_point can remain the same.
- The function should now call itself with:
- sorted_list: same as before
- target_num: same as before
- starting point: mid_point+l
- end_point: same as before
- If at the end of this procedure the search_flag is still set to “False”, then it means that the value does not exist in the list.
Code
def binary_search(sorted_list, target_num, start_ point=0, end_point=None):
       search_flag = False
       if end_point == None:
          end_point = len(sorted_list)-1
       if start_point < end_point:
          mid_point = (end_point+start_point)//2
          if sorted_list[mid_point] == target_num:
             search_flag = True
             print(target_num," Exists in the list at ",sorted_list.index(target_num))
             elif sorted_list[mid_point] > target_num:
                  end_point = mid_point-l
                  binary_search(sorted_list, target_ num,start_point, end_point)
            elif sorted_list[mid_point] < target_num:
            start_point = mid_point+l
            binary_search(sorted_list, target_num, start_point, end_point)
       elif not search_flag:
             print(target_num," Value does not exist")
Execution
sorted_list=[ 1,2,3,4,5,6,7,8,9,10,11,12,13]
binary_search(sorted_list, 14)
binary_search(sorted_list,0)
binary_search(sorted_list,5)
Output
14 Value does not exist
0 Value does not exist
5 Exists in the list at 4
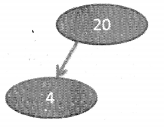
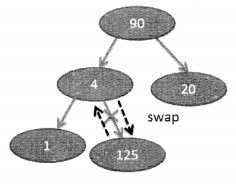
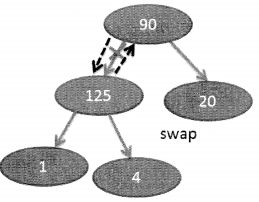
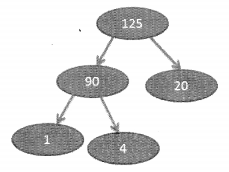
Hash Tables
Hash Tables are data structures where a hash function is used to generate the index or address value for a data element. It is used to implement an associative array that can map keys to values. The benefit of this is that it allows us to access data faster as the index value behaves as a key for data value. Hash tables store data in key-value pairs but the data is generated using the hash function. In Python, the Hash Tables are nothing but Dictionary data type. Keys in the dictionary are generated using a hash function and the order of data elements in Dictionary is not fixed. We have already learned about various functions that can be used to access a dictionary object but what we actually aim at learning here is how hash tables are actually implemented.
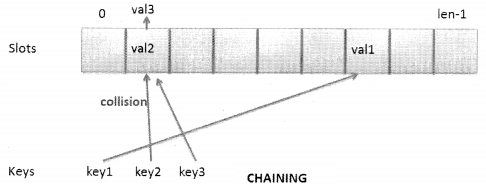
We know that by binary search trees we can achieve the time complexity of O(logn) for various operations. The question that arises here is that can search operations be made faster? Is it possible to reach a time complexity of 0(1)11 This is precisely why hash tables came into existence? Like in a list or an array if the index is known, the time complexity for search operation can become 0(1). Similarly, if data is stored in key-value pairs, the result can be retrieved faster. So, we have keys and we have slots available where the values can be placed. If we are able to establish a relationship between the slots and the key it would be easier to retrieve the value at a fast rate. Look at the following figure:
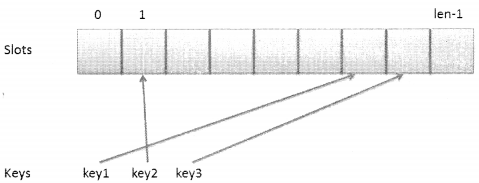
The key value is not always a nonnegative integer, it can be a string also, whereas the array has an index starting from 0 to length_of_array -1. So there is a need to do prewashing in order to match the string keys to indexes. So, for every key, there is a need to find an index in an array where the corresponding value can be placed. In order to do this, we will have to create a hash( ) function that can map a key of any type to a random array index.
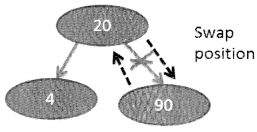
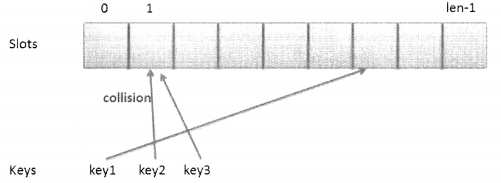
During this process, there are chances of collision. Collision is when we map two keys to the same index as shown in the following figure:
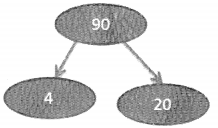
To resolve collision we can use chaining. Chaining is when values are stored -in the same slot with the help of a linked list as shown in the following figure:
However, there can be cases of more than one collision for the same spot, and considering the worst-case scenario where there is a need to insert all values as elements of a linked list, it can be a tough situation that will have a severe impact on the time complexity. Worst case scenario will be if we land up placing all values as linked list elements at the same index.
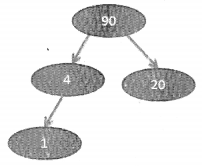
To avoid this scenario we can consider the process of open addressing. Open addressing is the process of creating a new address. Consider a case where if there is a collision we increment the index by 1 and place the value there as shown below, there is collision while placing val3, as val2 already exists at index 1. So, the index value is incremented by 1 (1+1 =2) and val3 is placed at the index
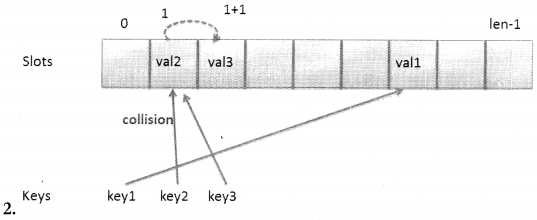
Had there been any other value at index 2 then the index would have incremented again and val3 could be placed at index 3. This means that this process of incrementing the index is continued till an empty slot is spotted. This is called Linear probing. Quadratic probing on the other hand increments by two times the index value. So, the search for the empty slots is done at a distance of 1,2,4,8, and so on. Rehashing is the process of hashing the result obtained again to find an empty slot.
The purpose of the hash function is to calculate an index from which the right value can be found therefore its job would be:
- To distribute the keys uniformly in the array.
- If n is the number of keys and m is the size of an array, the hash( ) = n%m(modulo operator) in case we use integers as keys.
- Prefer to use prime numbers both for array and the hash function for uniform distribution
- For string keys, you can calculate the ASCII value of each character and add them up and make a modulo operator on them
In many scenarios, hash tables prove to be more efficient than the search trees and are often used in caches, databases, and sets.
Important points:
- You can avoid clustering by using prime numbers.
- The number of entries divided by the size of the array is called the load factor.
- If the load factor increases the number of collisions will increase. This will reduce the performance of the hash table.
- Resize the table when the load factor exceeds the given threshold. However, this would be an expensive option as the hashes of the values entered will change whenever resizing is done and this can take O(n) to complete. Hence dynamic size array may be inappropriate for real-time scenarios.
Question 7.
What does the hash function do?
Answer:
The purpose of a hash function is to map the values or entries into the slots that are available in a hash table. So, for every entry, the hash function will compute an integer value that would be in the range of 0 to m-1 where m is the length of the array.
Question 8.
What is a remainder hash function? What are the drawbacks? Write the code to implement the remainder hash function.
Answer:
The remainder hash function calculates the index value by taking one item at a time from the collection. It is then divided by the size of the array and the remainder is returned.
h(item) = item% m, where m = size of the array Let’s consider the following array:
[18, 12,45,34, 89, 4]
The above array is of size 8.
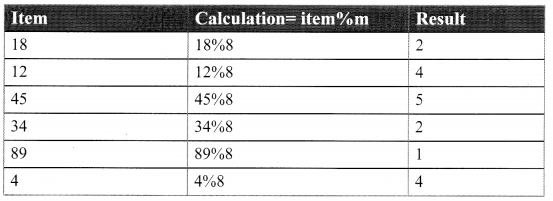
Drawback: You can see here that 18 and 34 have the same hash value of 2 and 12 and 4 have the same hash value of 4. This is a case of collision as a result when you execute the program, values 18 and 12 are replaced by 34 and 4 and you will not find these values in the hash table.
Let’s have a look at the implementation:
Step1: Define the hash function that takes a list and size of the array as input.
def hash(list_items, size):
def hash(list items, size) :
Step2: Do the following:
- Create an empty list.
- Now populate this key ‘from the numbers 0 to size mention. This
example takes a list of 8 elements so we are creating a list [0, 1, 2, 3, 4, 5,6, 7].
- Convert this list to diet using from keys( ). We should get a dictionary object of form {0: None, 1: None, 2: None, 3: None, 4: None, 5: None, 6: None, 7: None}. This value is assigned to hash_table.
def hash(list_items, size):
temp_list =[ ]
for i in range(size):
      temp_list.append(i)
'hash_table = diet.fromkeys(temp_list)
Step3:
- Now iterate through the list.
- Calculate the index for every item by calculating item%size.
- For the key value in the hash_table = index, insert the item.
Code
def hash(list_items, size):
     temp_list =[ ]
     for i in range(size):
          temp_list.append(i)
     hash_table = diet.fromkeys(temp_list)
     for item in list_items:
         i = item%size
         hash_table[i] = item
    print("value of hash table is : ",hash_table)
Execution
list_items = [18,12,45,34,89,4]
hash(list_items, 8)
Output
value of hash table is : {0: None, 1: 89, 2: 34,
3: None, 4: 4, 5: 45, 6: None, 7: None}
>>>
Question 9.
What is a folding hash function?
Answer:
The folding hash function is a technique used to avoid collisions while hashing. The items are divided into equal-size pieces, they are added together and then the slot value is calculated using the same hash function (item%size).
Suppose, we have a phone list as shown below:
phone_list= [4567774321, 4567775514, 9851742433, 4368884732]
We convert every number to a string, then each string is converted to a list, and then each list is appended to another list and we get the following result:
[[‘4’, ‘5’, ‘6’, ‘7’, ‘7’, ‘7\ ‘4’, ‘3’, ‘2’, ‘1’], [‘4’, ‘5’, ‘6’, ‘7’, ‘7’, ‘7’, ‘5’, ‘5’’, ‘1’, ‘4’], [‘9’, ‘8’, ‘5’, ‘1’, ‘7’, ‘4’, ‘2’, ‘4’, ‘3’, ‘3’], [‘4’, ‘3’, ‘6’, ‘8’, ‘8’, ‘8’, ‘4’, ‘7’, ‘3’, ‘2’]]
Now from this new list, we take one list item one by one, for every item we concatenate two characters convert them to integer, and then concatenate next to characters convert them to integer, and add the two values and continue this till we have added all elements. The calculation will be something like this:
[‘4’, ‘5’, ‘6’, ‘7’, ‘7’, ‘7’, ‘4’, ‘3’, ‘2’, ‘1’]
1. items =45
string val = 45
integer value = 45
hash value= 45
2. items =67
string val = 67
integer value = 67
hash value= 45+67 =112
3. items =77
string val = 77
integer value = 77
hash value= 112+77 =189
4. items =43
string val = 43
integer value = 43
hash value= 189+43 = 232
5. items =21
string val = 21 ,
integer value = 21
hash value= 232+21 = 253 Similarly,
[‘4’, ‘5’, ‘6’, ‘7’, ‘7’, ‘7’, ‘5’, ‘5’, ‘1’, ‘4’] will have a hash value of 511.
[‘9’, ‘8’, ‘5’, ‘1’, ‘7’, ‘4’, ‘2’, ‘4’, ‘3’, ‘3’] will have a hash value of 791.
[‘4’, ‘3’, ‘6\ ‘8’, ‘8’, ‘8’, ‘4’, ‘7’, ‘3’, ‘2’] will have a hash value of 1069.
We now call the hash function for [253, 531, 791, 1069] for size 11.
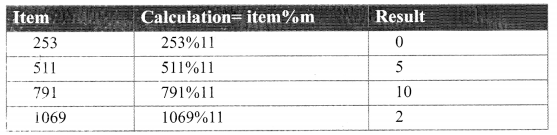
So, the result we get is:
{0: 253, 1: None, 2: 1069, 3: None, 4: None, 5: 511, 6: None, 7: None, 8: None, 9: None, 10: 791}
Question 10.
Write the code to implement the coding hash function.
Answer:
Let’s look at the execution statements for this program:
phone_list = [4567774321, 4567775514, 9851742433, 4368884732]
str_phone_values = convert_to_string(phone_list)
folded_value = foldingjiash(str_phone_values)
folding_hash_table = hash(folded_value,11)
print(folding_hash_table)
1. A list of phone numbers is defined: phonejist = [4567774321, 4567775514, 9851742433, 4368884732]
2. The next statement “str_phonepy allies = convert_to_string(phone_ list)” calls a function convert to_string( ) and passes the phone_list as argument. The function in turn returns a list of lists. The function takes one phone number at a time converts it to a list and adds to new list. So, we get the output as: [[‘4’, ‘5’, ‘6’, ‘7’, ‘7’, ‘7’, ‘4’, ‘3’, ‘2’, M’], [‘4’, ‘5’, ‘6’, ‘7’, ‘7’, ‘7’, ‘5’, ‘5’, ‘1’, ‘4’], [‘9’, ‘8’, ‘5’, ‘1’, ‘7’, ‘4’, ‘2’, ‘4’, ‘3’, ‘3’], [‘4’, ‘3’, ‘6’, ‘8’, ‘8’, ‘8’, ‘4’, ‘7’, ‘3’, ‘2’]]. The following steps are involved in this function:
a. Define two lists a phone_list[ ]
b. For elements in phone_list, take every element i.e. the phone number one by one and:
i. convert the phone number to string: temp_string = str(i)
ii. Convert each string to list: tempjist = list (temp_string)
iii. Append the list obtained to the phone_list defined in previous step.
iv. Return the phone_list and assign values to str_phone_ values
def convert_to_string(input_list):
phone_list=[ ]
for i in input_list:
temp_string = str(i)
temp_list = list(temp_string)
phone_list.append(temp_list)
return phone_list
3. The list str_phone_values is passed on to folding_hash( ). This method takes a list as input.
a. It will take each phone list element which is also a list.
b. Take one list item one by one.
c. For every item concatenate first two characters convert them to integer and then concatenate next to characters convert them to integer and add the two values.
d. Pop the first two elements from thr list.
e. Repeat c and d till we have added all elements.
f. The function returns a list of hash values.
def folding_hash(input_list):
    hash_final = [ ]
    while len(input_list) > 0:
         hash_val = 0
         for element in input_list:
             while len(element) > 1:
                 stringl = element[0]
                 string2 = element[1]
                 str_contbine = string1 + string2
                 int_combine = int(str_combine)
                 hash_val += int_combine
                 element.pop(0)
                 element.pop(0)
             if len(element) > 0:
                hash_val += element[0]
             else:
                pass
             hash_final. append (hash_val)
        return hash final
4. Call hash function for size 11. The code for the hash function is same.
def hash(list_items, size):
    temp_list =[ ]
    for i in range (size) :
        temp_list.append(i)
    hash_table = diet.fromkeys(temp_list)
    for item in list_items:
        i = item%size
        hash_table[i] = item
    return hash_table
Code
def hash(list_items, size):
    temp_list =[ ]
    for i in range(size):
        temp_list.append(i)
    hash_table = diet.fromkeys(temp_list)
    for item in list_items:
        i = item%size
        hash_table[i] = item
   return hash_table
def convert_to_string(input_list):
    phone_list=[ ]
    for i in input_list:
        temp_string = str(i)
        temp_list = list(temp_string)
        phone_list.append(temp_list)
   return phone_list
def folding_hash(input_list):
    hash_final = [ ]
    while len(input_list) > 0:
         hash_val = 0
         for element in input_list:
             while len(element) > 1:
                 string1 = element[0]
                 string2 = element[1]
                 str_combine = string1 + string2
                 int_combine = int(str_combine)
                 hash_val += int_combine
                 element.pop(0)
                 element.pop(0)
            if len(element) > 0:
                hash_val += element[0]
           else:
              pass
           hash_final. append (hash_val)
    return hash_final
Execution
phone_list = [4567774321, 4567775514, 9851742433, 4368884732]
str_phone_values = convert_to_string(phone_list)
folded_value = folding_hash (str_phone_valu.es)
folding_hash_table = hash(folded_value,11)
print(folding_hash_table)
Output
{0: 253, 1: None, 2: 1069, 3: None, 4: None, 5:
511, 6: None, 7: None, 8: None, 9: None, 10: 791}
In order to store phone numbers at the index, we slightly change the hash() function;
- The hash( ) function will take one more parameter : phone_list
- After calculating the index the corresponding element from the phone_list is saved instead of the folded_value.
def hash(list_items,phone_list, size):
    temp_list =[ ]
    for i in range(size):
        temp_list.append(i)
   hash_table = diet.fromkeys(temp_list)
   for i in range(len(list_items)):
       hash_index = list_items[i]%size
       hash_table[hash_index] = phone_list[i]
   return hash_table
Execution
phone_list = [4567774321, 4567775514, 9851742433, 4368884732]
str_phone_values = ‘convert_to_string(phone_list)
folded_value = folding_hash(str_phone_values)
folding_hash_table = hash (folded_value,phone_ list,11)
print(folding_hash_table)
Output
{0: 4567774321, 1: None, 2: 4368884732, 3: None,
4: None, 5: 4567775514, 6: None, 7: None, 8: None,
9: None, 10: 9851742433}
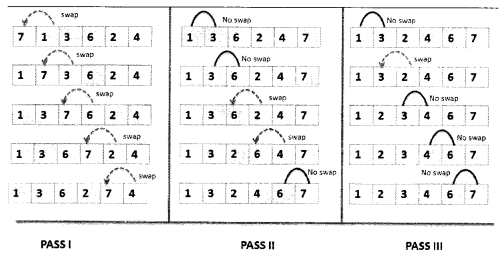
Bubble sort
Bubble sort is also known as sinking sort or comparison sort. In bubble sort, each element is compared with the adjacent element, and the elements are swapped if they are found in the wrong order. However, this is a time-consuming algorithm. It is simple but quite inefficient.
Question 10.
How will you implement bubble sort in Python?
Answer:
The code for a bubble sort algorithm is very simple.
Step 1: Define the function for bubble sort. It would take the list that needs
to be sorted as input.
def bubble_sort(input_list):
Step 2:
1. Set a loop for i in range len(input_list)
a. Inside this for loop set another loop for j in range len(input_ list)-i-1).
b. For every i, in the nested loop value at index j, is compared with the value at index j+1. If the value at index j+1 is smaller than the value at index j then the values are swapped.
c. After the for loop is overprint the sorted list.
Code
def bubble_sort(input_list):
    for i in range(len(input_list)):
        for j in range(len(input_list)-i-1):
            if input_list[j]>input_list[j+1]:
               temp = input_list[j]
               input_list[j]=input_list[j+1]
               input_list[j+1]= temp
    print(input_list)
Execution
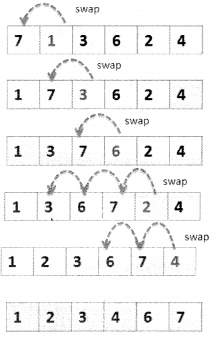
x = [7,1,3,6,2,4]
print("Executing Bubble sort for ",x)
bubble_sort(x)

y = [23,67,12,3,45,87,98,34]
print("Executing Bubble sort for ",y)
bubble_sort(y)
Output
Executing Bubble sort for [7, 1, 3, 6, 2, 4]
[1, 2, 3, 4, 6, 7]
Executing 98, 34] Bubble sort for [23, 67, 12, 3, 45, 87,
[3, 12, 23 , 34, 45, 67, 87, 98]
Question 11.
Write code to implement selection sort.
Answer:
Step 1: Define the function for selection_sort. It would take the list that
needs to be sorted as input.
def selection_sort(input_list):
Step 2:
1. Set a loop for i in range len(input_list)
a. Inside this for loop set another loop for j in range (i+1, len(input_ list)-i-l))
b. For every i, in the nested loop value at index j is compared with the value at index i. If the value at index j is smaller than the value at index i then the values are swapped.
c. After the for loop is overprint the sorted list.
Code
def selection_sort(input_list):
    for i in range(len(input list)-1) :
        for j in range(i+1,len(input list)):
            if input_list[j] < input_list[i]:
               temp = input_list[j]
               input_list[j] = input_list[i]
               input list[i] = temp
  print(input list)
Execution
selection_sort([15,10,3,19,80,85])
Output
[3, 10, 15, 19, 80, 85]
Insertion Sort
In insertion sort, each element at position x is compared with elements located at position x-1 to position 0. If the element is found to be less than any of the values that it is compared to then the values are swapped. This process is repeated till the last element has been compared.
Question 12.
Write code to implement insertion sort.
Answer:
It is very easy to implement insertion sort:
Consider a list [7,1,3,6,2,4]
Let indexi = i
indexj = indexi + 1
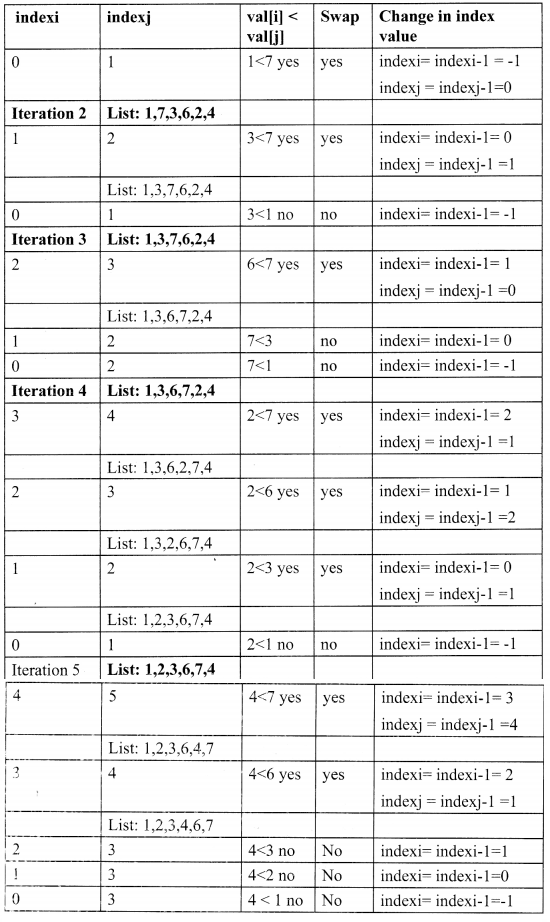
Step 1: Define the insert_sort( ) function. It will take input ist as input.
def insertion_sort(input_list):
Step 2: for i in range(input_list)-1), set indexi =1, indexj = i+1
for i in range(len(input_list)-1):
indexi = i
indexj = i+1
Step 3: set while loop, condition inaexi>=0
- if input_list[indexi]>input_list[indexj]
- swap values of input list [indexi] and input_list[indexj]
- set indexi = indexi -1
- set indexj = indexj -1
- else
- set indexi = indexi -1
while indexi >= 0:
            if input list[indexi]>input
list[indexj]:
               print("swapping")
               temp = input list indexi]
               input list[indexi] = input
list[indexj]
               input list[indexj] = temp
               indexi = indexi - 1
               indexj = indexj - 1
         else:
               indexi = indexi - 1
Step 4: Print updated list
Code
def insertion_sort(input_list):
    for i in range(len(input_list)-1):
        indexi = i
        indexj = i+1
        print("indexi = ", indexi)
        print("indexj = ", indexj)
        while indexi >= 0:
              if input_list[indexi]>input_ list[indexj]:
                            print("swapping")
                            temp = input_list[indexi]
                            input_list[indexi] = input
list[indexj]
                            input_list[indexj] = temp
                            indexi = indexi - 1
                            indexj = indexj - 1
                      else :
                            indexi = indexi - 1
                 print("list update:",input_list)
        print ("final list = ", input_list)
Execution
insertion_sort([9,5,4,6,7,8,2])
Output
[7, 1, 3, 6, 2, 4 ]
indexi = 0
indexj = 1
swapping
list update: [1, 7, 3, 6, 2, 4 ]
indexi = 1
indexj = 2
swapping
list update: [1, 3, 7, 6, 2, 4 ]
indexi = 2
indexj = 3
swapping
list update: [1, 3, 6, 7, 2, 4 ]
indexi = 3
indexj = 4
swapping
swapping
swapping
list update: [ 1, 2, 3,6,7,4]
indexi = 4
indexj = 5
swapping
swapping
list update: [1, 2, 3, 4, 6, 7]
final list = [1, 2, 3, 4, 6, 7]
>>>
Shell Sort
- Shell sort is a very efficient sorting algorithm.
- Based on insertion sort.
- Implements insertion sort on widely spread elements at first and then in each step space or interval is narrowed down.
- Great for medium size data set.
- Worst case time complexity: O(n)
- Worst-case space complexity : 0(n)
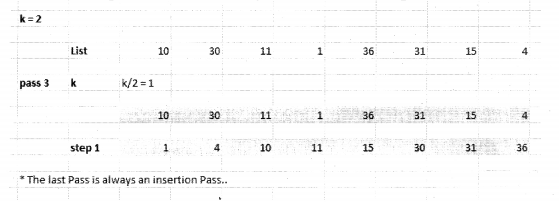
I Consider a list: [10,30,11,4,36,31,15,1]
Size of the list, n = 8
Divide n/2 = 4, let this value be named k
Consider every kth(in this case 4th) element and sort them in the right order.
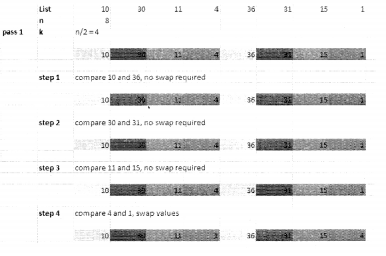
II. do the following:
k = k/2 = 4/2 = 2
consider every kth element and sort the order.

III. Do the following:
k = k/2 = 2/ 2 = 1
This is the last pass and will always be an insertion pass.
Question 13.
Write code to implement the shell sort algorithm.
Answer:
The following steps will be involved:
Step1: Define the shell_sort( ) function to sort the list. It will take the list(input_list) that needs to be sorted as the input value.
def shell_sort(input_list):
Step2:
Calculate size, n = len(inputjist)
Number of steps for the while loop, k = n/2
def shell_sort(input_list):
n = len(input_list)
k = n//2
Step 3:
- While k > 0:
- for j in range 0, size of input list
- for i in range (k, n)
- if the value of element at i is less than the element located at index i-k, then swap the two values
- set k = k//2
while k > 0:
     for j in range(n):
         for i in range(k,n):
             temp = input_list[i]
             if input_list[i] < input_list[i-k]:
                input_list[i] = input_list[i-k]
                input_list[i-k] = temp
    k = k//2
Step 4: Print the value of the sorted list.
Code
def shell_sort(input_list):
    n = len(input_list)
    k = n//2
    while k > 0:
         for j in range.(n) :
             for i in range(k,n):
                 temp = input_list[i]
                 if input_list[i] < input_list[i-k]:
                     input_list[i] = input_list[i-k]
                     input_list[i-k] = temp
        k = k//2
   print(input_list)
Execution
shell_sort ([10, 30, 11, 1,36, 31, 15, 4)]
Output
[1, 4, 10, 11, 15, 30, 31, 36]
Quick sort
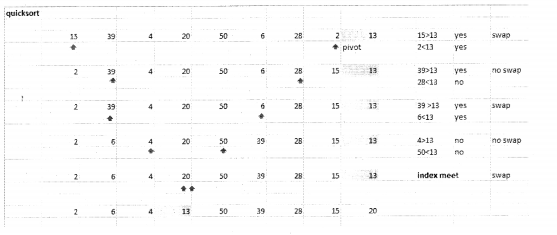
- In quicksort, we make use of a pivot to compare numbers.
- All items smaller than the pivot are moved to its left side and all items larger than the pivot are moved to the right side.
- This would provide a left partition that has all values less than the pivot and a right partition having all values greater than the pivot.
- Let’s take a list of 9 numbers: [15, 39, 4, 20, 50, 6, 28, 2, 13].
- The last element ‘ 13 ’ is taken as the pivot.
- We take the first element ‘15’ as the left mark and the second last element ‘2’ as the right mark.
- If left mark > pivot and Highmark <pivot then swap left a mark and right mark and increment left mark by 1 and decrement right make by 1.
- If leftmark> pivot and rightmark> pivot then only decrement the right mark.
- Same way if leftmark<pivot and rightmark< pivot then only increment the left mark.
- If left mark <pivot and rightmark>pivot, increment leftmark by 1 and decrement right mark by 1.
- When the left mark and right mark meet at one element, swap that element with the pivot.
I
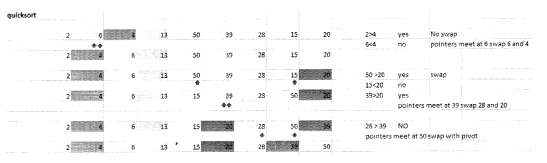
The updated list is now [2, 6, 4, 13, 50, 39, 28, 15, 20]:
- Take the elements to the left of 13, takin 4 as a pivot, and sort them in the same manner.
- Once the left partition is sorted take the elements on the right and sort them taking 20 as a pivot.
II.
Question 14.
Write the code to implement the quicksort algorithm.
Answer:
Step: Decide upon the Pivot
- This function takes three parameters, the list(input list), starting (fast) and ending (last) index for the list that has to be sorted.
- Take the input_list. pivot = input_list[last]. We set the pivot to the last value of the list.
- Set the left_pointer to first.
- Set right_pointer to last -1, because the last element is the pivot.
- Set pivot flag to True.
- While pivot_flag is true:
- If left mark > pivot and right mark <pivot then swap left mark and right mark and increment left mark by 1 and decrement right mark by 1.
- If leftmark> pivot and rightmark> pivot then only decrement the rightmark.
- Same way if leftmark<pivot and rightmark< pivot then only increment the leftmark.
- If leftmark <pivot and rightmark>pivot, increment leftmark by 1 and decrement right mark by 1.
- When left mark and rightmark meet at one element, swap that element with the pivot.
- When, leftmark >= rightmark, swap the value of the pivot with the element at left pointer, set the pivot_flag to false.
def find_pivot (input_list, first, last):
    pivot = input_list[last]
    print("pivot =", pivot)
    left_pointer = first
    print("left pointer = ", left_pointer, " ",input_list[left_pointer])
    right_pointer = last-1
    print("right pointer = ", right_pointer, " ",input_list[right_pointer])
    pivot_flag = True

   while pivot_flag:
         if input_list[left_pointer]>pivot:
            if input_list[right_pointer]<pivot:
                temp = input_list[right_pointer]
                input_list[right_pointer]=input_ list[left_pointer]

                input_list[left_pointer]= temp
                right_pointer = right_pointer-1
                left_pointer = left_pointer+1

       else:
                right_pointer = right_pointer-1
  else:
        left_pointer = left_pointer+1
        right_pointer = right_pointer-1
  if left_pointer >= right_pointer:
        temp = input_list[last]
  input_list[last] = input_list[left_pointer]
  input_list[left_pointer] = temp
  pivot_flag = False
print(left_pointer)
return left_pointer
Step 2:
Define quicksort(input list) function.
- This function will take a list as input.
- Decides the starting point(O) and end point(length_of_the_list-1) for sorting.
- Call the qsHelper( ) function.
def quicksort(input_list):
    first = 0
    last = len(input_list)-1
    qsHelper (input_list,first, last)
Step 3:
Define the qsHelper( ) function
This function checks the first index and last index value, it is a recursive function, it calls the find_pivot method where left mark is incremented by 1 and the right mark is decremented by 1. So, as long as the left mark(which is parameter first in this case) is less than the right mark(which is parameter last in this case) the while loop will be executed where qsHelper finds a new value of pivot, creates; eft and right partition and calls itself.
def qsHelper (input_list,first, last) :
    if first<last:
         partition = find_pivot (input_ list, first, last)
         qsHelper(input_list, first,partition-1)
         qsHelper(input_list,partition+l,last)
Code
def find_pivot (input_list, first, last):
    pivot = input_list[last]
    left_pointer = first
    right_pointer = last-1
    pivot_flag = True

    while pivot_flag:
          if input_list[left_pointer]>pivot:
             if input_list[right_pointer]<pivot:
                temp = input_list[right_pointer]
                input_list[right_pointer]=input_ list[left_pointer]
                input_list[left_pointer]= temp
                right_pointer = right_pointer-l left_pointer = left_pointer+l
        else:
                right_pointer = right_pointer-l
        else:
               if input_list[right_pointer]<pivot:
                 left_pointer = left_pointer+l
              else:
                 left_pointer = left_pointer+l
                 right_pointer = right_pointer-1
            if left_pointer >= right_pointer:
            temp = input_list[last]
            input_list[last] = input_list[left_pointer]

            input_list[left_pointer] = temp
            pivot_flag = False
            return left_pointer
def quicksort(input_list):
first = 0
last = len(input_list)-1
qsHelper (input_list, first, last)
def qsHelper (input_list,first, last) :
if firstclast:
partition = find_pivot (input_list,first, last)
qsHelper (input_list, first, partition-1)
qsHelper(input_list,partition+1,last)
Execution
input_list=[15,39,4,20, 50, 6,28,2, 13]
quicksort(input_list)
print(input list)
Output
[2,4, 6, 13, 15, 20, 28, 39, 50]