
Selenium Python – Installation and Setup
How to install selenium for python: In this chapter, we will learn how to prepare our system with the required software so that we are able to write our test automation scripts and execute them. We will note to have Python, Java Runtime Engine (JRE), Eclipse IDE, PyDev. After setting up this software for creating scripts, we will need to set up Selenium in the system and download the browser drivers for execution on the individual drivers.
Structure
- Installation and setting up
- Installing Selenium Python module
- Installing JRE
- Installing Eclipse IDE
- Setting up PyDev
- Installing different drivers for Chrome, Firefox, and IE browser
- Running the very first program on three browsers
Objective
How to install selenium for python: This chapter will help us to understand the steps to setup Selenium and Eclipse IDE on the Windows system
- Python Selenium Tutorial | Selenium Python Training for Beginners
- What is Python: Installation Guide | How to Install Python3 & Python2 on Windows, Linux, macOS?
- Selenium Python Tutorial | Introduction to Selenium
Installation and setting up
Install selenium python windows: Before we start to learn to write scripts to automate browsers using Selenium WebDriver, we have to prepare our system with a few software. We will require the following:
- Python setup: https://www.python.org/downloads/
[download the latest version] [3.7] - Java JRE: https://www.oracle.com/technetwork/Java/Javase/ downloads/jre8-downloads-2133155.html, and install it on the system.
- Eclipse IDE: https://www.eclipse.org/downloads/
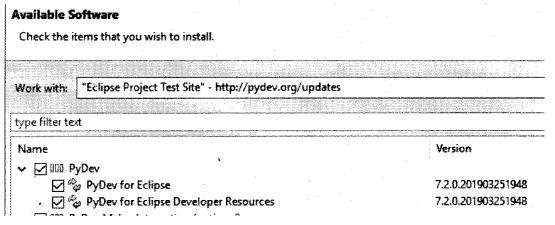
After we have installed and set up the above software in our system, we need to install PyDev in the Eclipse environment. To setup PyDev in the Eclipse environment, we have to perform the following actions:
- Open Eclipse.
- Click on Help | Install New Software. ;
- Provide in there, URL: http://pydev.org/updates
The following screenshot shows the same:
Now the Eclipse environment is ready to create Python projects and understand Python syntax as well. The next step is to install the Selenium Python module.
Installing Selenium Python module
The modules of Python are available on the website (http://www. pypi.org). From here, we will search the module for Selenium and use the pip install command.
1. Open the URL: https://pypi.org/project/selenium/
The above URL provides information about the Selenium module of Python, the command to install it, and the documentation available with it.
2. To install the module, open the Command Prompt and type pip install selenium, shown as follows:
SSI Command Prompt
Microsoft Windows [version 10.0.17134.706]
(c) 2018 Microsoft corporation. All rights reserved.

C:\users\write>pip install selenium
3. The preceding command will install the Selenium Python module, and the environment will now be ready to accept Selenium commands to automate the browser.
Creating Python project in Eclipse
We will now perform the steps to create a Python project in Eclipse and write down our first script to open the browser with the URL of our demo site application and close it. We will perform it for all three browsers: Internet Explorer, Firefox, and Chrome.
Let’s see in a step-by-step manner:
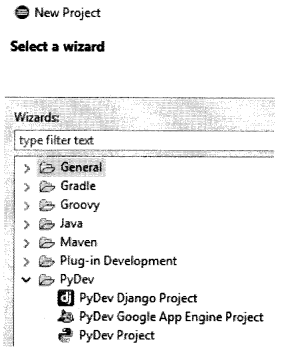
1. Go to File | Create New Project. In that window, select PyDev project. Refer to the following screenshot:
2. Provide a name to the project, select Python interpreter, it is advisable to choose Quick Auto Config. Refer to the following screenshot:
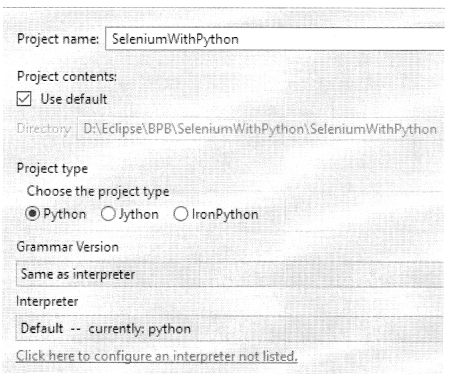
3. Click on Next, and then Finish. Eclipse may ask you to open the Python perspective, select Yes.
We are now ready to write down scripts in Python to automate the browsers.
Automating Chrome browser
To automate the Chrome browser, we first need to download the Chrome driver. Depending on the Chrome browser version we have on our system, and the operating system we are using, we need to download the suitable driver. It is advisable to ensure that you have the latest version of the browser.
1. To download Chrome driver, visit the link:
http://chromedriver.chromium.org/downloads
2. Drivers are available as per the operating system type for download:
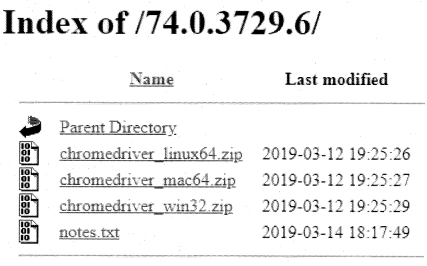
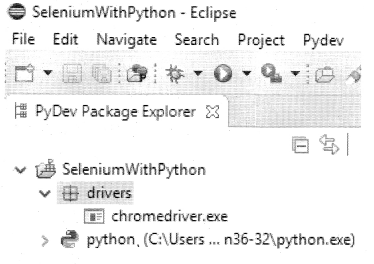
3. Here, we are taking an example of the Win32 system. So we download the Win32 ChromedriverZIP folder and extract the. exe file from it.
4. In Eclipse, where we create our project, we create a folder there, called drivers. We copy this chrome driver. exe file into that folder. So finally our project would look as follows:
I MG
Writing the first script
We will now write our very first script to automate the Chrome browser, where we will launch the browser, open the application, and then close the browser.
Let us understand the above script. The first statement from the Selenium import web driver will import Selenium classes in the file. This will allow usage of the Selenium commands in the script. So basically, we can create an object of WebDriver, and call different methods associated with it to handle the browser. It will fail if the Selenium module is not imported. The next statement initializes the browser object by creating an instance of the Chrome object and passing the path of the executable driver. With the Selenium WebDriver, every browser requires its own WebDriver to automate them.
The get method allows the browser to be launched with the URL that has been provided, and the quit method closes all the instances of the browser opened from this script.
Automating Firefox browser
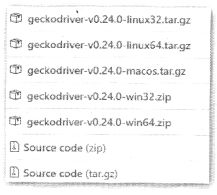
To automate the Firefox browser, we need to download the gecko driver. The geckodriver is the API which allows us to automate the Firefox browser. It acts as a bridge between Selenium and the browser. Flere as well, we need to select the driver version based on the operating system and the Firefox version. To download the driver, we need to visit the link: https://github.com/mozilla/ geckodriver/releases
Select the driver according to your system; here we select for win64 from the following list:
Refer to the following script:
from selenium import web-driver
browser =webdriver.Chrome (executable_path=r \Ectipse\BPB\seleniumpython\Selenim&thPython\drivers\chromedriver.exe}
browser.get{'http://practice. bpbonline,com/catolog/index.php'}
browser.quit()
Once we download the geckodriver for win64, we extract the geckodriver. exe file from the zip folder and put it in the driver’s folder in the Python project of Eclipse. Now we are ready to create the script which will open the application on the Firefox browser and close it:
Automating Internet Explorer
To automate the Internet Explorer browser, we have to download the IEdriverserver. exe file. This file is available on the https://www. seIeniumhq.org/download/ website.
Depending upon the operating system we are using, we will download that particular IE driver. Once the. exe file is downloaded, we will save it in the driver’s folder of our project, and write the following script to open the application in the IE browser:
The Internet Explorer Driver Server
This is required if you want to make use of the latest and greatest features of the WebDriver IntemetExplorerDriver, Please make sure that this is available on your $PATH (or %PATH% on Windows} in order for the IE Driver to work as expected.

Download version 3.14.0 for (recommended) 32 bit Windows IE or 64 bit Windows IE CHANGELOG
Conclusion
So, in this chapter, we have learned how to set up our system, create projects and automate the three browsers. The official documentation of Selenium Python bindings is available here: https://seleniumhq. github.io/selenium/docs/api/py/index.html
Now our system is ready for us to write down our Selenium tests for the multi-browser support available with Python programming languages, aiding the manual testers by automation and reducing the workload. In our next chapter, we will learn how to work with different types of WebElements, understand the concept of synchronization, and parameterization, which forms the basic building blocks for automation.
Related Articles:
- Chapter 1 Introduction to Selenium
- Chapter 2 Selenium IDE
- Chapter 3 Locators in Selenium
- Chapter 5 Understanding WebDriver, WebElement and By
- Chapter 6 Unittest in Python
- Chapter 7 Synchronizing Test
- Chapter 8 Concept of Parameterization
- Chapter 9 Working with Different Web Elements
- Chapter 10 Frames, Alerts, and Action Class
- Chapter 11 Page Object Model
- Chapter 12 Selenium-Grid