Python : How to copy files from one location to another using shutil.copy()

In this article, we will discuss how to copy files from one directory to another using shutil.copy().

shutil.copy()

We have a function named shutil.copy() provided by python shutil module.

shutil.copy(src, dst, *, follow_symlinks=True)

It copies the file pointed by src to the directory pointed by dst.

Parameters:

  • src is the file path.
  • dst can be a directory path or file path.
  • if src is a path of symlinks then,
    • if follow_symlinks is True, it will copy the path.
    • if follow_symlinks is False, then it will create a new dst directory in a symbolic link.

It returns the path string of a newly created file.

Now, we will see what module is required, the first step is to import the module.

import shutil

Now, we will use this function to copy the files.

Copy a file to another directory

newPath = shutil.copy('sample1.txt', '/home/bahija/test')

The file ‘sample1.txt’ will be copied to the home directory ‘/home/bahija/test’ and after being copied it will return the path of the newly created file that is,

/home/bahija/test/sample1.txt
  • If the file name already exists in the destination directory, then it will be overwritten.
  • If no directory exists with the name test inside the /home/bahija then the source file will be copied with the name test.
  • If there is no existence of the source file, then it will give an error that is, FileNotFoundError.

Copy a File to another directory with a new name

Copy a file with new name
newPath = shutil.copy('sample1.txt', '/home/bahijaj/test/sample2.txt')
The new name will be assigned to the ‘sample1.txt’ as ‘sample2.txt’ and the file will be saved to another directory.
Few points to note:
  • The file will be overwritten if the destination file exists.
  • If the file is not available, then it will give FileNotFoundError.

Copy symbolic links using shutil.copy()

Suppose we are using a symbolic link named link.csv which points towards sample.csv.

link.csv -> sample.csv

Now, we will copy the symbolic link using shutil.copy() function.

shutil.copy(src, dst, *, follow_symlinks=True)

We can see that the follow_symlinks is True by default. So it will copy the file to the destination directory.

newPath = shutil.copy('/home/bahijaj/test/link.csv', '/home/bahijaj/test/sample2.csv')

The new path will be:

/home/bahijaj/test/sample2.csv

Sample2.txt is the actual copy of sample1.txt.

If follow_symlinks will be False,

newPath = shutil.copy('/home/bahijaj/test/link.csv', '/home/bahijaj/test/newlink.csv', follow_symlinks=False)

It will copy the symbolic link i.e. newlink.csv will be a link pointing to the same target file sample1.csv i.e.
newlink.csv -> sample1.txt.

If the file does not exist, then it will give an error.

Complete Code:

import shutil
def main():
 # Copy file to another directory
 newPath = shutil.copy('sample1.txt', '/home/bahijaj/test')
print("Path of copied file : ", newPath)
 #Copy a file with new name
 newPath = shutil.copy('sample1.txt', '/home/bahijaj/test/sample2.txt')
print("Path of copied file : ", newPath)
 # Copy a symbolic link as a new link
 newPath = shutil.copy('/home/bahijaj/test/link.csv', '/home/bahijaj/test/sample2.csv')
print("Path of copied file : ", newPath)
 # Copy target file pointed by symbolic link
 newPath = shutil.copy('/home/bahijaj/test/link.csv', '/home/bahijaj/test/newlink.csv', follow_symlinks=False)
print("Path of copied file : ", newPath)
if __name__ == '__main__':
main()

Hope this article was useful for you. Enjoy Reading!


Python web crawler – Web crawling and scraping in Python

Python web crawler: In this article, we will be checking up few things:

  • Basic crawling setup In Python
  • Basic crawling with AsyncIO
  • Scraper Util service
  • Python scraping via Scrapy framework

Web Crawler

A web crawler is an automatic bot that extracts useful information by systematically browsing the world wide web.

The web crawler is also known as a spider or spider bot. Some websites use web crawling for updating their web content. Some websites do not allow crawling because of their security, so on that websites crawler works by either asking for permission or exiting out of the website.

Web Crawler

Web Scraping

Extracting the data from the websites is known as web scraping. Web scraping requires two parts crawler and scraper.

Crawler is known to be an artificial intelligence algorithm and it browses the web which leads to searching of the links we want to crawl across the internet.

Scraper is the tool that was specifically used for extracting information from the internet.

By web scraping, we can obtain a large amount of data which is in unstructured data in an HTML format and then it is converted into structured data.

Web Scraping

Crawler Demo

Mainly, we have been using two tools:

Task I

Scrap recurship website is used for extracting all the links and images present on the page.

Demo Code:

Import requests

from parsel import Selector

import time

start = time.time()

response = requests.get('http://recurship.com/')

selector  = Selector(response.text)

href_links = selector.xpath('//a/@href').getall()

image_links = selector.xpath('//img/@src').getall()

print("********************href_links****************")

print(href_links)

print("******************image_links****************")

print(image_links)

end = time.time()

print("Time taken in seconds:", (end_start)


Task II

Scrap recurship site and extract links, one of one navigate to each link and extract information of the images.

Demo code:

import requests
from parsel import Selector

import time
start = time.time()


all_images = {} 
response = requests.get('http://recurship.com/')
selector = Selector(response.text)
href_links = selector.xpath('//a/@href').getall()
image_links = selector.xpath('//img/@src').getall()

for link in href_links:
try:
response = requests.get(link)
if response.status_code == 200:
image_links = selector.xpath('//img/@src').getall()
all_images[link] = image_links
except Exception as exp:
print('Error navigating to link : ', link)

print(all_images)
end = time.time()
print("Time taken in seconds : ", (end-start))


Task II takes 22 seconds to complete. We are constantly using the python parsel” and request” package.

Let’s see some features these packages use.

Request package:

Parsel package


Crawler service using Request and Parsel

The code:

import requests
import time
import random
from urllib.parse import urlparse
import logging

logger = logging.getLogger(__name__)

LOG_PREFIX = 'RequestManager:'


class RequestManager:
def __init__(self):
self.set_user_agents(); # This is to keep user-agent same throught out one request

crawler_name = None
session = requests.session()
# This is for agent spoofing...
user_agents = [
'Mozilla/5.0 (Windows NT 10.0; Win64; x64) AppleWebKit/537.36 (KHTML, like Gecko) Chrome/42.0.2311.135 Safari/537.36 Edge/12.246',
'Mozilla/4.0 (X11; Linux x86_64) AppleWebKit/567.36 (KHTML, like Gecko) Chrome/62.0.3239.108 Safari/537.36',
'Mozilla/5.0 (Macintosh; Intel Mac OS X 10_11_2) AppleWebKit/601.3.9 (KHTML, like Gecko) Version/9.0.2 Safari/601.3.9',
'Mozilla/5.0 (Windows NT 6.1; WOW64) AppleWebKit/537.36 (KHTML, like Gecko'
]

headers = {}

cookie = None
debug = True

def file_name(self, context: RequestContext, response, request_type: str = 'GET'):
url = urlparse(response.url).path.replace("/", "|")
return f'{time.time()}_{context.get("key")}_{context.get("category")}_{request_type}_{response.status_code}_{url}'

# write a file, safely
def write(self, name, text):
if self.debug:
file = open(f'logs/{name}.html', 'w')
file.write(text)
file.close()

def set_user_agents(self):
self.headers.update({
'user-agent': random.choice(self.user_agents)
})

def set_headers(self, headers):
logger.info(f'{LOG_PREFIX}:SETHEADER set headers {self.headers}')
self.session.headers.update(headers)

def get(self, url: str, withCookie: bool = False, context):
logger.info(f'{LOG_PREFIX}-{self.crawler_name}:GET making get request {url} {context} {withCookie}')
cookies = self.cookie if withCookie else None
response = self.session.get(url=url, cookies=cookies, headers=self.headers)
self.write(self.file_name(context, response), response.text)
return response

def post(self, url: str, data, withCookie: bool = False, allow_redirects=True, context: RequestContext = {}):
logger.info(f'{LOG_PREFIX}:POST making post request {url} {data} {context} {withCookie}')
cookies = self.cookie if withCookie else None
response = self.session.post(url=url, data=data, cookies=cookies, allow_redirects=allow_redirects)
self.write(self.file_name(context, response, request_type='POST'), response.text)
return response

def set_cookie(self, cookie):
self.cookie = cookie
logger.info(f'{LOG_PREFIX}-{self.crawler_name}:SET_COOKIE set cookie {self.cookie}')

Request = RequestManager()

context = {
"key": "demo",
"category": "history"
}
START_URI = "DUMMY_URL" # URL OF SIGNUP PORTAL
LOGIN_API = "DUMMY_LOGIN_API"
response = Request.get(url=START_URI, context=context)

Request.set_cookie('SOME_DUMMY_COOKIE')
Request.set_headers('DUMMY_HEADERS')

response = Request.post(url=LOGIN_API, data = {'username': '', 'passphrase': ''}, context=context)


Class “RequestManager” offers few functionalities listed below:

Scraping with AsyncIO

All we have to do is scrap the Recurship site and extract all the links, later we navigate each link asynchronously and extract information from the images.

Demo code

import requests
import aiohttp
import asyncio
from parsel import Selector
import time

start = time.time()
all_images = {} # website links as "keys" and images link as "values"

async def fetch(session, url):
try:
async with session.get(url) as response:
return await response.text()
except Exception as exp:
return '<html> <html>' #empty html for invalid uri case

async def main(urls):
tasks = []
async with aiohttp.ClientSession() as session:
for url in urls:
tasks.append(fetch(session, url))
htmls = await asyncio.gather(*tasks)
for index, html in enumerate(htmls):
selector = Selector(html)
image_links = selector.xpath('//img/@src').getall()
all_images[urls[index]] = image_links
print('*** all images : ', all_images)


response = requests.get('http://recurship.com/')
selector = Selector(response.text)
href_links = selector.xpath('//a/@href').getall()
loop = asyncio.get_event_loop()
loop.run_until_complete(main(href_links))


print ("All done !")
end = time.time()
print("Time taken in seconds : ", (end-start))

By AsyncIO, scraping took almost 21 seconds. We can achieve more good performance with this task.

Open-Source Python Frameworks for spiders

Python has multiple frameworks which take care of the optimization

It gives us different patterns. There are three popular frameworks, namely:

  1. Scrapy
  2. PySpider
  3. Mechanical soup

Let’s use Scrapy for further demo.

Scrapy

Scrapy is a framework used for scraping and is supported by an active community. We can build our own scraping tools.

There are few features which scrapy provides:

Now we have to do is scrap the Recurship site and extract all the links, later we navigate each link asynchronously and extract information from the images.

Demo Code

import scrapy


class AuthorSpider(scrapy.Spider):
name = 'Links'

start_urls = ['http://recurship.com/']
images_data = {}
def parse(self, response):
# follow links to author pages
for img in response.css('a::attr(href)'):
yield response.follow(img, self.parse_images)

# Below commented portion is for following all pages
# follow pagination links
# for href in response.css('a::attr(href)'):
# yield response.follow(href, self.parse)

def parse_images(self, response):
#print "URL: " + response.request.url
def extract_with_css(query):
return response.css(query).extract()
yield {
'URL': response.request.url,
'image_link': extract_with_css('img::attr(src)')
}

Commands

scrapy run spider -o output.json spider.py

The JSON file got export in 1 second.

Conclusion

We can see that the scrapy performed an excellent job. If we have to perform simple crawling, scrapy will give the best results.

Enjoy scraping!!


Read csv without header – Python: Read a CSV file line by line with or without header

Read csv without header: In this article, we will be learning about how to read a CSV file line by line with or without a header. Along with that, we will be learning how to select a specified column while iterating over a file.

Let us take an example where we have a file named students.csv.

Id,Name,Course,City,Session
21,Mark,Python,London,Morning
22,John,Python,Tokyo,Evening
23,Sam,Python,Paris,Morning
32,Shaun,Java,Tokyo,Morning
What we want is to read all the rows of this file line by line.
Note that, we will not be reading this CSV file into lists of lists because that will be very space-consuming and time-consuming. It will also cause problems with the large data. We have to look for a solution that works as an interpreter where we can read a line one at a time so that less memory consumption will take place.
Let’s get started with it!
In python, we have two modules to read the CSV file, one is csv.reader and the second is csv.DictReader. We will use them one by one to read a CSV file line by line.

Read a CSV file line by line using csv.reader

Python read csv with header: By using the csv.reader module, a reader class object is made through which we can iterate over the lines of a CSV file as a list of values, where each value in the list is a cell value.

Read a CSV file line by line using csv.reader

Code:

from csv import reader
# open file in read mode
with open('students.csv', 'r') as read_obj:
 # pass the file object to reader() to get the reader object
csv_reader = reader(read_obj)
# Iterate over each row in the csv using reader object
for row in csv_reader:
# row variable is a list that represents a row in csv
print(row)
The above code iterated over each row of the CSV file. It fetched the content of each row as a list and printed that generated list.

How did it work?

Python read csv with headers: It performed a few steps:

  1. Opened the students.csv file and created a file object.
  2. In csv.reader() function, the reader object is created and passed.
  3. Now with the reader object, we iterated it by using the for loop so that it can read each row of the csv as a list of values.
  4. At last, we printed this list.

By using this module, only one line will consume memory at a time while iterating through a csv file.

Read csv file without header

Read csv without header: What if we want to skip a header and print the files without the header. In the previous example, we printed the values including the header but in this example, we will remove the header and print the values without the header.

Read csv file without header

Code:

from csv import reader
# skip first line i.e. read header first and then iterate over each row od csv as a list
with open('students.csv', 'r') as read_obj:
csv_reader = reader(read_obj)
header = next(csv_reader)
# Check file as empty
if header != None:
# Iterate over each row after the header in the csv
for row in csv_reader:
# row variable is a list that represents a row in csv
print(row)
We can see in the image above, that the header is not printed and the code is designed in such a way that it skipped the header and printed all the other values in a list.

Read csv file line by line using csv module DictReader object

Python read csv line by line: Now, we will see the example using csv.DictReader module. CSV’s module dictReader object class iterates over the lines of a CSV file as a dictionary, which means for each row it returns a dictionary containing the pair of column names and values for that row.

Read csv file line by line using csv module DictReader object

Code:

from csv import DictReader
# open file in read mode
with open('students.csv', 'r') as read_obj:
# pass the file object to DictReader() to get the DictReader object
csv_dict_reader = DictReader(read_obj)
# iterate over each line as a ordered dictionary
for row in csv_dict_reader:
# row variable is a dictionary that represents a row in csv
print(row)
The above code iterated over all the rows of the CSV file. It fetched the content of the row for each row and put it as a dictionary.

How did it work?

It performed a few steps:

  1. Opened the students.csv file and created a file object.
  2. In csv.DictReader() function, the reader object is created and passed.
  3. Now with the reader object, we iterated it by using the for loop so that it can read each row of the csv as a dictionary of values. Where each pair in this dictionary represents contains the column name & column value for that row.

It also saves the memory as only one row at a time is in the memory.

Get column names from the header in the CSV file

Pandas read_csv without header: We have a member function in the DictReader class that returns the column names of a csv file as a list.

Get column names from the header in the CSV fileCode:

from csv import DictReader
# open file in read mode
with open(‘students.csv’, ‘r’) as read_obj:
# pass the file object to DictReader() to get the DictReader object
csv_dict_reader = DictReader(read_obj)
# get column names from a csv file
column_names = csv_dict_reader.fieldname
print(column_names)

Read specific columns from a csv file while iterating line by line

Read specific columns (by column name) in a CSV file while iterating row by row

Read csv headers python: We will iterate over all the rows of the CSV file line by line but will print only two columns of each row.
Read specific columns (by column name) in a csv file while iterating row by row
Code:
from csv import DictReader
# iterate over each line as a ordered dictionary and print only few column by column name
withopen('students.csv', 'r')as read_obj:
csv_dict_reader = DictReader(read_obj)
for row in csv_dict_reader:
print(row['Id'], row['Name'])
DictReader returns a dictionary for each line during iteration. As in this dictionary, keys are column names and values are cell values for that column. So, for selecting specific columns in every row, we used column name with the dictionary object.

Read specific columns (by column Number) in a CSV file while iterating row by row

We will iterate over all the rows of the CSV file line by line but will print the contents of the 2nd and 3rd column.

Read specific columns (by column Number) in a csv file while iterating row by row

Code:

from csv import reader
# iterate over each line as a ordered dictionary and print only few column by column Number
with open('students.csv', 'r') as read_obj:
csv_reader = reader(read_obj)
for row in csv_reader:
print(row[1], row[2])
With the csv.reader each row of the csv file is fetched as a list of values, where each value represents a column value. So, selecting the 2nd & 3rd column for each row, select elements at index 1 and 2 from the list.
The complete code:
from csv import reader
from csv import DictReader
def main():
print('*** Read csv file line by line using csv module reader object ***')
print('*** Iterate over each row of a csv file as list using reader object ***')
# open file in read mode
with open('students.csv', 'r') as read_obj:
# pass the file object to reader() to get the reader object
csv_reader = reader(read_obj)
# Iterate over each row in the csv using reader object
for row in csv_reader:
# row variable is a list that represents a row in csv
print(row)
print('*** Read csv line by line without header ***')
# skip first line i.e. read header first and then iterate over each row od csv as a list
with open('students.csv', 'r') as read_obj:
csv_reader = reader(read_obj)
header = next(csv_reader)
# Check file as empty
if header != None:
# Iterate over each row after the header in the csv
for row in csv_reader:
# row variable is a list that represents a row in csv
print(row)
print('Header was: ')
print(header)
print('*** Read csv file line by line using csv module DictReader object ***')
# open file in read mode
with open('students.csv', 'r') as read_obj:
# pass the file object to DictReader() to get the DictReader object
csv_dict_reader = DictReader(read_obj)
# iterate over each line as a ordered dictionary
for row in csv_dict_reader:
# row variable is a dictionary that represents a row in csv
print(row)
print('*** select elements by column name while reading csv file line by line ***')
# open file in read mode
with open('students.csv', 'r') as read_obj:
# pass the file object to DictReader() to get the DictReader object
csv_dict_reader = DictReader(read_obj)
# iterate over each line as a ordered dictionary
for row in csv_dict_reader:
# row variable is a dictionary that represents a row in csv
print(row['Name'], ' is from ' , row['City'] , ' and he is studying ', row['Course'])
print('*** Get column names from header in csv file ***')
# open file in read mode
with open('students.csv', 'r') as read_obj:
# pass the file object to DictReader() to get the DictReader object
csv_dict_reader = DictReader(read_obj)
# get column names from a csv file
column_names = csv_dict_reader.fieldnames
print(column_names)
print('*** Read specific columns from a csv file while iterating line by line ***')
print('*** Read specific columns (by column name) in a csv file while iterating row by row ***')
# iterate over each line as a ordered dictionary and print only few column by column name
with open('students.csv', 'r') as read_obj:
csv_dict_reader = DictReader(read_obj)
for row in csv_dict_reader:
print(row['Id'], row['Name'])
print('*** Read specific columns (by column Number) in a csv file while iterating row by row ***')
# iterate over each line as a ordered dictionary and print only few column by column Number
with open('students.csv', 'r') as read_obj:
csv_reader = reader(read_obj)
for row in csv_reader:
print(row[1], row[2])
if __name__ == '__main__':
main()

I hope you understood this article as well as the code.

Happy reading!

Find index of element in dataframe python – Python: Find indexes of an element in pandas dataframe | Python Pandas Index.get_loc()

Python- Find indexes of an element in pandas dataframe

Find index of element in dataframe python: In this tutorial, we will learn how to find the indexes of a row and column numbers using pandas in a dataframe. By learning from this tutorial, you can easily get a good grip on how to get row names in Pandas dataframe. Also, there is a possibility to learn about the Python Pandas Index.get_loc() function along with syntax, parameters, and a sample example program.

Pandas Index.get_loc() Function in Python

Get_loc pandas: PandasIndex.get_loc()function results integer location, slice, or boolean mask for the requested label. The function acts with both sorted as well as unsorted Indexes. It gives various options if the passed value is not present in the Index.

Syntax:

Index.get_loc(key, method=None, tolerance=None)

Parameters:

  • key: label
  • method: {None, ‘pad’/’ffill’, ‘backfill’/’bfill’, ‘nearest’}, optional
  • default: exact matches only.
  • pad / ffill: If not having the exact match, find the PREVIOUS index value.
  • backfill / bfill: Utilize NEXT index value if no exact match
  • nearest: Make use of the NEAREST index value if no exact match. Tied distances are broken by preferring the larger index value.

Return Value:

Get index pandas: loc : int if unique index, slice if monotonic index, else mask

Example using Index.get_loc() function:

# importing pandas as pd
import pandas as pd
  
# Creating the Index
idx = pd.Index(['Labrador', 'Beagle', 'Labrador',
                     'Lhasa', 'Husky', 'Beagle'])
  
# Print the Index
idx

Also View:

Creating a Dataframe in Python

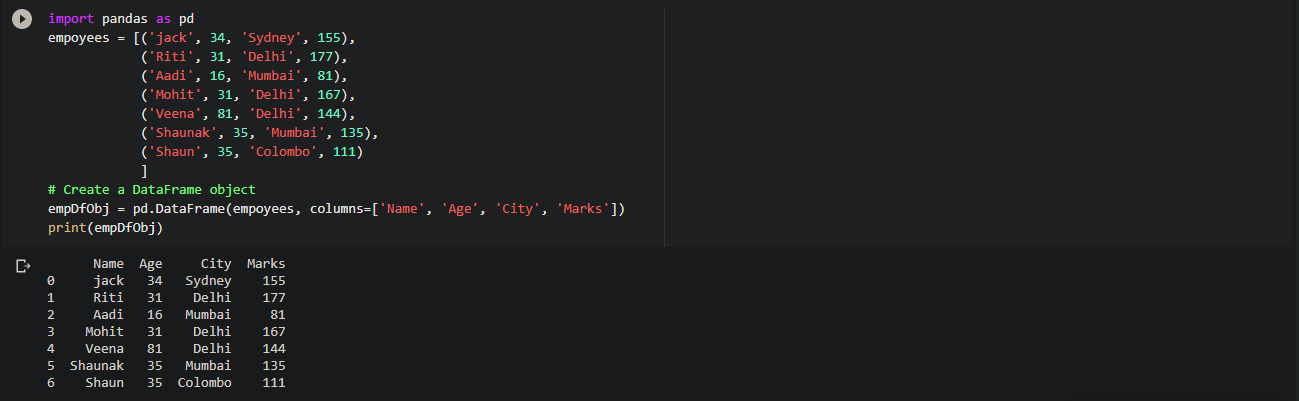
Pandas get index value: The initial step is creating a dataframe.

Code:

# List of Tuples
empoyees = [('jack', 34, 'Sydney', 155),
            ('Riti', 31, 'Delhi', 177),
            ('Aadi', 16, 'Mumbai', 81),
            ('Mohit', 31, 'Delhi', 167),
            ('Veena', 81, 'Delhi', 144),
            ('Shaunak', 35, 'Mumbai', 135),
            ('Shaun', 35, 'Colombo', 111)
            ]
# Create a DataFrame object
empDfObj = pd.DataFrame(empoyees, columns=['Name', 'Age', 'City', 'Marks'])
print(empDfObj)

Output:

Dataframe

Now, we want to find the location where the value ’81’ exists.

(4, 'Age')
(2, 'Marks')

We can see that value ’81’ exists at two different places in the data frame.

  1. At row index 4 & column “Age”
  2. At row index 2 & column “Marks”

Now, we will proceed to get the result of this.

Find all indexes of an item in pandas dataframe

Pandas get_loc: Dataframe object and the value as an argument is accepted by the function we have created.

It returns the list of index positions at all occurrences.

Code:

def getIndexes(dfObj, value):
    ''' Get index positions of value in dataframe i.e. dfObj.'''
    listOfPos = list()
    # Get bool dataframe with True at positions where the given value exists
    result = dfObj.isin([value])
    # Get list of columns that contains the value
    seriesObj = result.any()
    columnNames = list(seriesObj[seriesObj == True].index)
    # Iterate over list of columns and fetch the rows indexes where value exists
    for col in columnNames:
        rows = list(result[col][result[col] == True].index)
        for row in rows:
            listOfPos.append((row, col))
    # Return a list of tuples indicating the positions of value in the dataframe
    return listOfPos

Output:

Find all indexes of an item in pandas dataframe

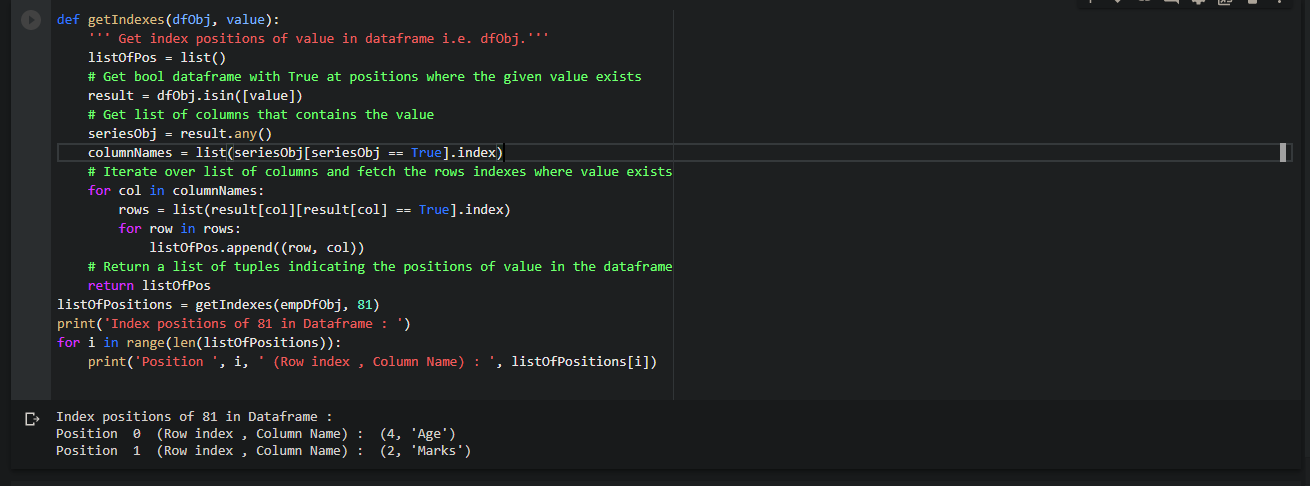
We got the exact row and column names of all the locations where the value ’81’ exists.

We will see what happened inside the getIndexes function.

How did it work?

Get index column pandas: Now, we will learn step by step process on what happened inside the getIndexes() function.

Step 1: Get bool dataframe with True at positions where the value is 81 in the dataframe using pandas.DataFrame.isin()

DataFrame.isin(self, values)

dataframe isin: This isin() function accepts a value and returns a bool dataframe. The original size and the bool data frame size is the same. When the given value exists, it contains True otherwise False.

We will see the bool dataframe where the value is ’81’.

# Get bool dataframe with True at positions where value is 81
result = empDfObj.isin([81])
print('Bool Dataframe representing existence of value 81 as True')
print(result)

Output:

bool dataframe where the value is '81'

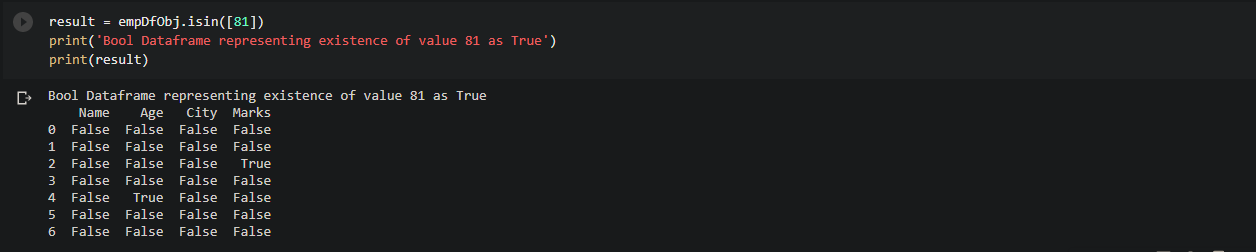
It is of the same size as empDfObj. As 81 exists at 2 places inside the dataframe, so this bool dataframe contains True at only those two places. In all other places, it contains False.

Step 2: Get the list of columns that contains the value

We will get the name of the columns that contain the value ’81’.We will achieve this by fetching names in a column in the bool dataframe which contains True value.

Code:

# Get list of columns that contains the value i.e. 81
seriesObj = result.any()
columnNames = list(seriesObj[seriesObj == True].index)

print('Names of columns which contains 81:', columnNames)

Output:

# Get list of columns that contains the value i.e. 81

Step 3: Iterate over selected columns and fetch the indexes of the rows which contains the value

We will iterate over each selected column and for each column, we will find the row which contains the True value.

Now these combinations of column names and row indexes where True exists are the index positions of 81 in the dataframe i.e.

Code:

# Iterate over each column and fetch the rows number where
for col in columnNames:
    rows = list(result[col][result[col] == True].index)
    for row in rows:
        print('Index : ', row, ' Col : ', col)

Output:

Iterate over selected columns and fetch the indexes of the rows which contains the value

Now it is clear that this is the way the getIndexes() function was working and finding the exact index positions of the given value & store each position as (row, column) tuple. In the end, it returns a list of tuples representing its index positions in the dataframe.

Find index positions of multiple elements in the DataFrame

Suppose we have multiple elements,

[81, 'Delhi', 'abc']

Now we want to find index positions of all these elements in our dataframe empDfObj, like this,

81  :  [(4, 'Age'), (2, 'Marks')]
Delhi  :  [(1, 'City'), (3, 'City'), (4, 'City')]
abc  :  []

Let’s use the getIndexes() and dictionary comprehension to find the indexes of all occurrences of multiple elements in the dataframe empDfObj.

listOfElems = [81, 'Delhi', 'abc']
# Use dict comprhension to club index positions of multiple elements in dataframe
dictOfPos = {elem: getIndexes(empDfObj, elem) for elem in listOfElems}
print('Position of given elements in Dataframe are : ')
for key, value in dictOfPos.items():
    print(key, ' : ', value)

Output:
getIndexes() and dictionary comprehension to find the indexes of all occurrences of multiple elements in the dataframe empDfObj.

dictOfPos is a dictionary of elements and their index positions in the dataframe. As ‘abc‘ doesn’t exist in the dataframe, therefore, its list is empty in dictionary dictOfPos.

Hope this article was understandable and easy for you!

Want to expert in the python programming language? Exploring Python Data Analysis using Pandas tutorial changes your knowledge from basic to advance level in python concepts.

Read more Articles on Python Data Analysis Using Padas – Find Elements in a Dataframe

Initialize empty numpy array – Create an empty NumPy Array of given length or shape and data type in Python

Initialize empty numpy array: In this article, we will be exploring different ways to create an empty 1D,2D, and 3D NumPy array of different data types like int, string, etc.

We have a Python module in NumPy that provides a function to create an empty() array.

numpy.empty(shape, dtype=float, order='C')
  • The arguments are shape and data type.
  • It returns the new array of the shape and data type we have given without initialising entries which means the array which is returned contain garbage values.
  • If the data type argument is not provided then the array will take float as a default argument.

Now, we will use this empty() function to create an empty array of different data types and shape.

You can also delete column using numpy delete column tutorial.

Create an empty 1D Numpy array of a given length

Numpy initialize empty array: To create a 1D NumPy array of a given length, we have to insert an integer in the shape argument.

For example, we will insert 5 in the shape argument to the empty() function.

Create an empty 1D Numpy array of given length

Code:

import numpy as np
# Create an empty 1D Numpy array of length 5
empty_array = np.empty(5)
print(empty_array)

Create an empty Numpy array of given shape using numpy.empty()

Numpy empty array with shape: In the above code, we saw how to create a 1D empty array. Now in this example, we will see how to create a 2D and 3D NumPy array numpy.empty() method.

Create an empty 2D Numpy array using numpy.empty()

Numpy.empty: To create the 2D NumPy array, we will pass the shape of the 2D array that is rows and columns as a tuple to the numpy.empty() function.

For instance, here we will create a 2D NumPy array with 5 rows and 3 columns.

Create an empty 2D Numpy array using numpy.empty()

Code:

empty_array = np.empty((5, 3))
print(empty_array)

It returned an empty numpy array of 3 rows and 5 columns. Since we did not provide any data type so the function has taken a default value as a float.

Create an empty 3D Numpy array using numpy.empty()

NP empty: As we have seen with the 2D array, we will be doing the same thing to create an empty 3D NumPy array. We will create a 3D NumPy array with 2 matrix of 3 rows and 3 columns.

Create an empty 3D Numpy array using numpy.empty()

Code:

empty_array = np.empty((2, 3, 3))
print(empty_array)

The above code creates a 3D NumPy array with 2 matrix of 3 rows and 3 columns without initialising values.

In all the above examples, we have not provided any data type argument. Therefore, by default, all the values which were returned were in the float data type.

Now in the next section, we customize the data type. Let’s see how to do that.

Create an empty Numpy array with custom data type

Numpy empty: To create an empty NumPy array with different data types, all we have to do is initialise the data type in type argument in the numpy.empty() function.

Let’s see different data types examples.

Create an empty Numpy array of 5 Integers

np.empty: To create a NumPy array of integer 5, we have to initialise int in the type argument in the numpy.empty() function.

Create an empty Numpy array of 5 Integers

Code:

# Create an empty Numpy array of 5 integers
empty_array = np.empty(5, dtype=int)
print(empty_array)

Create an empty Numpy array of 5 Complex Numbers

Now, to create the empty NumPy array of 5 complex numbers, all we have to do is write the data type complex in the dtype argument in numpy.empty() function.

Create an empty Numpy array of 5 Complex Numbers

Code:

empty_array = np.empty(5, dtype=complex)
print(empty_array)

Create an empty Numpy array of 5 strings

In this, we will write the dtype argument as a string in the numpy.empty() function.

Create an empty Numpy array of 5 strings

Code:

empty_array = np.empty(5, dtype='S3')
print(empty_array)

The complete code:

import numpy as np
def main():
print('*** Create an empty Numpy array of given length ***')
# Create an empty 1D Numpy array of length 5
empty_array = np.empty(5)
print(empty_array)
print('*** Create an empty Numpy array of given shape ***')
# Create an empty 2D Numpy array or matrix with 5 rows and 3 columns
empty_array = np.empty((5, 3))
print(empty_array)
# Create an empty 3D Numpy array
empty_array = np.empty((2, 3, 3))
print(empty_array)
print('*** Create an empty Numpy array with custom data type ***')
# Create an empty Numpy array of 5 integers
empty_array = np.empty(5, dtype=int)
print(empty_array)
# Create an empty Numpy array of 5 Complex Numbers
empty_array = np.empty(5, dtype=complex)
print(empty_array)
# Create an empty Numpy array of 5 strings of length 3, You also get an array with binary strings
empty_array = np.empty(5, dtype='S3')
print(empty_array)
if __name__ == '__main__':
main()

I hope this article was useful for you and you enjoyed reading it!

Happy learning guys!

Dataframe apply function – Pandas: Apply a function to single or selected columns or rows in Dataframe

Dataframe apply function: In this article, we will be applying given function to selected rows and column.

For example, we have a dataframe object,

matrix = [(22, 34, 23),
(33, 31, 11),
(44, 16, 21),
(55, 32, 22),
(66, 33, 27),
(77, 35, 11)
]
# Create a DataFrame object
dfObj = pd.DataFrame(matrix, columns=list('xyz'), index=list('abcdef'))
Contents of this dataframe object dgObj are,
Original Dataframe
    x    y   z
a 22 34 23
b 33 31 11
c 44 16 21
d 55 32 22
e 66 33 27
f 77 35 11

Now what if we want to apply different functions on all the elements of a single or multiple column or rows. Like,

  • Multiply all the values in column ‘x’ by 2
  • Multiply all the values in row ‘c’ by 10
  • Add 10 in all the values in column ‘y’ & ‘z’

We will use different techniques to see how we can do this.

Apply a function to a single column in Dataframe

What if we want to square all the values in any of the column for example x,y or z.

We can do such things by applying different methods. We will discuss few methods below:

Method 1: Using Dataframe.apply()

We will apply lambda function to all the columns using the above method. And then we will check if column name is whatever we want say x,y or z inside the lambda function. After this, we will square all the values. In this we will be taking z column.

dataframe.apply()

Code:

modDfObj = dfObj.apply(lambda x: np.square(x) if x.name == 'z' else x)
print("Modified Dataframe : Squared the values in column 'z'", modDfObj, sep='\n')
Output:
Modified Dataframe : Squared the values in column 'z'
 x y z
a 22 34 529
b 33 31 121
c 44 16 441
d 55 32 484
e 66 33 729
f 77 35 121

Method 2: Using [] operator

Using [] operator we will select the column from dataframe and apply numpy.square() method. Later, we will assign it back to the column.

dfObj['z'] = dfObj['z'].apply(np.square)

It will square all the values in column ‘z’.

Method 3: Using numpy.square()

dfObj['z'] = np.square(dfObj['z'])

This function will also square all the values in ‘z’.

Apply a function to a single row in Dataframe

Now, we saw what we have done with the columns. Same thing goes with rows. We will square all the values in row ‘b’. We can use different methods for that.

Method 1:Using Dataframe.apply()

We will apply lambda function to all the rows and will use the above function. We will check the label inside the lambda function and will square the row.

apply method on rows

Code:

modDfObj = dfObj.apply(lambda x: np.square(x) if x.name == 'b' else x, axis=1)
print("Modified Dataframe : Squared the values in row 'b'", modDfObj, sep='\n')

Output:

Modified Dataframe : Squared the values in row 'b'
 x y z
a 22 34 23
b 1089 961 121
c 44 16 21
d 55 32 22
e 66 33 27
f 77 35 11

Method 2 : Using [] Operator

We will do what we have done above. We will select the row from dataframe.loc[] operator and apply numpy.square() method on it. Later, we will assign it back to the row.

dfObj.loc['b'] = dfObj.loc['b'].apply(np.square)

It will square all the values in the row ‘b’.

Method 3 : Using numpy.square()

dfObj.loc['b'] = np.square(dfObj.loc['b'])

This will also square the values in row ‘b’.

Apply a function to a certain columns in Dataframe

We can apply the function in whichever column we want. For instance, squaring the values in ‘x’ and ‘y’.

function to a certain columns in Dataframe

Code:

modDfObj = dfObj.apply(lambda x: np.square(x) if x.name in ['x', 'y'] else x)
print("Modified Dataframe : Squared the values in column x & y :", modDfObj, sep='\n')
All we have to do is modify the if condition in lambda function and square the values with the name of the variables.

Apply a function to a certain rows in Dataframe

We can apply the function to specified row. For instance, row ‘b’ and ‘c’.

function to a certain rows in Dataframe

Code:

modDfObj = dfObj.apply(lambda x: np.square(x) if x.name in ['b', 'c'] else x, axis=1)
print("Modified Dataframe : Squared the values in row b & c :", modDfObj, sep='\n')

The complete code is:

import pandas as pd
import numpy as np
def main():
 # List of Tuples
 matrix = [(22, 34, 23),
(33, 31, 11),
(44, 16, 21),
(55, 32, 22),
(66, 33, 27),
(77, 35, 11)]
# Create a DataFrame object
 dfObj = pd.DataFrame(matrix, columns=list('xyz'), index=list('abcdef'))
print("Original Dataframe", dfObj, sep='\n')
print('********* Apply a function to a single row or column in DataFrame ********')
print('*** Apply a function to a single column *** ')
 # Method 1:
 # Apply function numpy.square() to square the value one column only i.e. with column name 'z'
 modDfObj = dfObj.apply(lambda x: np.square(x) if x.name == 'z' else x)
print("Modified Dataframe : Squared the values in column 'z'", modDfObj, sep='\n')
 # Method 2
 # Apply a function to one column and assign it back to the column in dataframe
dfObj['z'] = dfObj['z'].apply(np.square)
 # Method 3:
 # Apply a function to one column and assign it back to the column in dataframe
 dfObj['z'] = np.square(dfObj['z']
print('*** Apply a function to a single row *** ')
 dfObj = pd.DataFrame(matrix, columns=list('xyz'), index=list('abcdef'))
 # Method 1:
 # Apply function numpy.square() to square the values of one row only i.e. row with index name 'b'
 modDfObj = dfObj.apply(lambda x: np.square(x) if x.name == 'b' else x, axis=1)
print("Modified Dataframe : Squared the values in row 'b'", modDfObj, sep='\n')
 # Method 2:
 # Apply a function to one row and assign it back to the row in dataframe
 dfObj.loc['b'] = dfObj.loc['b'].apply(np.square)
 # Method 3:
 # Apply a function to one row and assign it back to the column in dataframe
dfObj.loc['b'] = np.square(dfObj.loc['b'])
print('********* Apply a function to certains row or column in DataFrame ********')
dfObj = pd.DataFrame(matrix, columns=list('xyz'), index=list('abcdef'))
print('Apply a function to certain columns only')
# Apply function numpy.square() to square the value 2 column only i.e. with column names 'x' and 'y' only
modDfObj = dfObj.apply(lambda x: np.square(x) if x.name in ['x', 'y'] else x)
print("Modified Dataframe : Squared the values in column x & y :", modDfObj, sep='\n')
print('Apply a function to certain rows only') # 
Apply function numpy.square() to square the values of 2 rows only i.e. with row index name 'b' and 'c' only
 modDfObj = dfObj.apply(lambda x: np.square(x) if x.name in ['b', 'c'] else x, axis=1)
print("Modified Dataframe : Squared the values in row b & c :", modDfObj, sep='\n')
if __name__ == '__main__':
main()
Output:
Original Dataframe
x y z
a 22 34 23
b 33 31 11
c 44 16 21
d 55 32 22
e 66 33 27
f 77 35 11
********* Apply a function to a single row or column in DataFrame ********
*** Apply a function to a single column *** 
Modified Dataframe : Squared the values in column 'z'
 x y z
a 22 34 529
b 33 31 121
c 44 16 441
d 55 32 484
e 66 33 729
f 77 35 121
*** Apply a function to a single row *** 
Modified Dataframe : Squared the values in row 'b'
 x y z
a 22 34 23
b 1089 961 121
c 44 16 21
d 55 32 22
e 66 33 27
f 77 35 11
********* Apply a function to certains row or column in DataFrame ********
Apply a function to certain columns only
Modified Dataframe : Squared the values in column x & y :
 x y z
a 484 1156 23
b 1089 961 11
c 1936 256 21
d 3025 1024 22
e 4356 1089 27
f 5929 1225 11
Apply a function to certain rows only
Modified Dataframe : Squared the values in row b & c :
 x y z
a 22 34 23
b 1089 961 121
c 1936 256 441
d 55 32 22
e 66 33 27
f 77 35 11

I hope you understood this article well.

Want to expert in the python programming language? Exploring Python Data Analysis using Pandas tutorial changes your knowledge from basic to advance level in python concepts.

Read more Articles on Python Data Analysis Using Padas – Modify a Dataframe

Print dimensions of numpy array – How to get Numpy Array Dimensions using numpy.ndarray.shape & numpy.ndarray.size() in Python

Print dimensions of numpy array: In this article, we will be discussing how to count several elements in 1D, 2D, and 3D Numpy array. Moreover, we will be discussing the counting of rows and columns in a 2D array and the number of elements per axis in a 3D Numpy array.

Let’s get started!

Get the Dimensions of a Numpy array using ndarray.shape()

NumPy.ndarray.shape

Get dimensions of numpy array: This module is used to get a current shape of an array, but it is also used to reshaping the array in place by assigning a tuple of arrays dimensions to it. The function is:

ndarray.shape

We will use this function for determining the dimensions of the 1D and 2D array.

Get Dimensions of a 2D NumPy array using ndarray.shape:

Let us start with a 2D Numpy array.

2D Numpy Array

Code:
arr2D = np.array([[11 ,12,13,11], [21, 22, 23, 24], [31,32,33,34]])
print(‘2D Numpy Array’)
print(arr2D)
Output:
2D Numpy Array 
[[11 12 13 11] 
[21 22 23 24] 
[31 32 33 34]]

Get the number of rows in this 2D NumPy array:

number of rows in this 2D numpy array

Code:

numOfRows = arr2D.shape[0]
print('Number of Rows : ', numOfRows)
Output:
Number of Rows : 3

Get a number of columns in this 2D NumPy array:

number of columns in this 2D numpy array

Code:

numOfColumns = arr2D.shape[1]
print('Number of Columns : ', numOfColumns)
Output:
Number of Columns: 4

Get the total number of elements in this 2D NumPy array:

total number of elements in this 2D numpy array

Code:

print('Total Number of elements in 2D Numpy array : ', arr2D.shape[0] * arr2D.shape[1])
Output:

Total Number of elements in 2D Numpy array: 12

Get Dimensions of a 1D NumPy array using ndarray.shape

Now, we will work on a 1D NumPy array.

number of elements of this 1D numpy array

Code:

arr = np.array([4, 5, 6, 7, 8, 9, 10, 11])
print(‘Shape of 1D numpy array : ‘, arr.shape)
print(‘length of 1D numpy array : ‘, arr.shape[0])
Output:
Shape of 1D numpy array : (8,)
length of 1D numpy array : 8

Get the Dimensions of a Numpy array using NumPy.shape()

Now, we will see the module which provides a function to get the number of elements in a Numpy array along the axis.

numpy.size(arr, axis=None)

We will use this module for getting the dimensions of a 2D and 1D Numpy array.

Get Dimensions of a 2D numpy array using numpy.size()

We will begin with a 2D Numpy array.

Dimensions of a 2D numpy array using numpy.size

Code:

arr2D = np.array([[11 ,12,13,11], [21, 22, 23, 24], [31,32,33,34]])
print('2D Numpy Array')
print(arr2D)

Output:

2D Numpy Array
[[11 12 13 11]
[21 22 23 24]
[31 32 33 34]]

Get a number of rows and columns of this 2D NumPy array:

number of rows and columns of this 2D numpy array

Code:

numOfRows = np.size(arr2D, 0)
# get number of columns in 2D numpy array
numOfColumns = np.size(arr2D, 1)
print('Number of Rows : ', numOfRows)
print('Number of Columns : ', numOfColumns)
Output:
Number of Rows : 3
Number of Columns: 4

Get a total number of elements in this 2D NumPy array:

 total number of elements in this 2D numpy array

Code:

print('Total Number of elements in 2D Numpy array : ', np.size(arr2D))

Output:

Total Number of elements in 2D Numpy array: 12

Get Dimensions of a 3D NumPy array using numpy.size()

Now, we will be working on the 3D Numpy array.

3D Numpy array

Code:

arr3D = np.array([ [[11, 12, 13, 11], [21, 22, 23, 24], [31, 32, 33, 34]],
[[1, 1, 1, 1], [2, 2, 2, 2], [3, 3, 3, 3]] ])
print(arr3D)
Output:
[[[11 12 13 11]
[21 22 23 24]
[31 32 33 34]]
[[ 1 1 1 1]
[ 2 2 2 2]
[ 3 3 3 3]]]

Get a number of elements per axis in 3D NumPy array:

number of elements per axis in 3D numpy array

Code:

print('Axis 0 size : ', np.size(arr3D, 0))
print('Axis 1 size : ', np.size(arr3D, 1))
print('Axis 2 size : ', np.size(arr3D, 2))

Output:

Axis 0 size : 2
Axis 1 size : 3
Axis 2 size : 4

Get the total number of elements in this 3D NumPy array:

total number of elements in this 3D numpy array

Code:

print(‘Total Number of elements in 3D Numpy array : ‘, np.size(arr3D))

Output:

Total Number of elements in 3D Numpy array : 24

Get Dimensions of a 1D NumPy array using numpy.size()

Let us create a 1D array.

Dimensions of a 1D numpy array using numpy.size()

Code:

arr = np.array([4, 5, 6, 7, 8, 9, 10, 11])
print('Length of 1D numpy array : ', np.size(arr))

Output:

Length of 1D numpy array : 8
A complete example is as follows:
import numpy as np
def main():
print('**** Get Dimensions of a 2D numpy array using ndarray.shape ****')
# Create a 2D Numpy array list of list
 arr2D = np.array([[11 ,12,13,11], [21, 22, 23, 24], [31,32,33,34]])
print('2D Numpy Array')
print(arr2D)
 # get number of rows in 2D numpy array
 numOfRows = arr2D.shape[0]
 # get number of columns in 2D numpy array
 numOfColumns = arr2D.shape[1]
print('Number of Rows : ', numOfRows)
print('Number of Columns : ', numOfColumns)
print('Total Number of elements in 2D Numpy array : ', arr2D.shape[0] * arr2D.shape[1])
print('**** Get Dimensions of a 1D numpy array using ndarray.shape ****')
 # Create a Numpy array from list of numbers
arr = np.array([4, 5, 6, 7, 8, 9, 10, 11])
print('Original Array : ', arr)
print('Shape of 1D numpy array : ', arr.shape)
print('length of 1D numpy array : ', arr.shape[0])
print('**** Get Dimensions of a 2D numpy array using np.size() ****')
 # Create a 2D Numpy array list of list
 arr2D = np.array([[11, 12, 13, 11], [21, 22, 23, 24], [31, 32, 33, 34]])
print('2D Numpy Array')
print(arr2D)
 # get number of rows in 2D numpy array
 numOfRows = np.size(arr2D, 0)
 # get number of columns in 2D numpy array
 numOfColumns = np.size(arr2D, 1)
print('Number of Rows : ', numOfRows)
print('Number of Columns : ', numOfColumns)
print('Total Number of elements in 2D Numpy array : ', np.size(arr2D))
print('**** Get Dimensions of a 3D numpy array using np.size() ****')
 # Create a 3D Numpy array list of list of list
 arr3D = np.array([ [[11, 12, 13, 11], [21, 22, 23, 24], [31, 32, 33, 34]],
[[1, 1, 1, 1], [2, 2, 2, 2], [3, 3, 3, 3]] ])
print('3D Numpy Array')
print(arr3D)
print('Axis 0 size : ', np.size(arr3D, 0))
print('Axis 1 size : ', np.size(arr3D, 1))
print('Axis 2 size : ', np.size(arr3D, 2))
print('Total Number of elements in 3D Numpy array : ', np.size(arr3D))
print('Dimension by axis : ', arr3D.shape)
print('**** Get Dimensions of a 1D numpy array using numpy.size() ****')
 # Create a Numpy array from list of numbers
arr = np.array([4, 5, 6, 7, 8, 9, 10, 11])
print('Original Array : ', arr)
print('Length of 1D numpy array : ', np.size(arr))
if __name__ == '__main__':
main()
Output:
**** Get Dimensions of a 2D numpy array using ndarray.shape ****
2D Numpy Array
[[11 12 13 11]
[21 22 23 24]
[31 32 33 34]]
Number of Rows : 3
Number of Columns : 4
Total Number of elements in 2D Numpy array : 12
**** Get Dimensions of a 1D numpy array using ndarray.shape ****
Original Array : [ 4 5 6 7 8 9 10 11]
Shape of 1D numpy array : (8,)
length of 1D numpy array : 8
**** Get Dimensions of a 2D numpy array using np.size() ****
2D Numpy Array
[[11 12 13 11]
[21 22 23 24]
[31 32 33 34]]
Number of Rows : 3
Number of Columns : 4
Total Number of elements in 2D Numpy array : 12
**** Get Dimensions of a 3D numpy array using np.size() ****
3D Numpy Array
[[[11 12 13 11]
[21 22 23 24]
[31 32 33 34]]
[[ 1 1 1 1]
[ 2 2 2 2]
[ 3 3 3 3]]]
Axis 0 size : 2
Axis 1 size : 3
Axis 2 size : 4
Total Number of elements in 3D Numpy array : 24
Dimension by axis : (2, 3, 4)
**** Get Dimensions of a 1D numpy array using numpy.size() ****
Original Array : [ 4 5 6 7 8 9 10 11]
Length of 1D numpy array : 8

I hope you understood this article well.

numpy.where() – Explained with examples

Numpy where example: In this article, we will see various examples of numpy.where() function and how it works in python. For instance, like,

  • Using numpy.where() with single condition.
  • Using numpy.where() with multiple condition
  • Use numpy.where() to select indexes of elements that satisfy multiple conditions
  • Using numpy.where() without condition expression

In Python’s NumPy module, we can select elements with two different sequences based on conditions on the different array.

Syntax of np.where()

numpy.where(condition[, x, y])

Explanation:

  • The condition returns a NumPy array of bool.
  • X and Y are the arrays that are optional, which means either both are passed or not passed.
    • If it is passed then it returns the elements from x and y based on the condition depending on values in the bool array.
    • If x & y arguments are not passed and only condition argument is passed then it returns the indices of the elements that are True in bool numpy array.

Let’s dig in to see some examples.

Using numpy.where() with single condition

NP.where with multiple conditions: Let’s say we have two lists of the same size and a NumPy array.

arr = np.array([11, 12, 13, 14])
high_values = ['High', 'High', 'High', 'High']
low_values = ['Low', 'Low', 'Low', 'Low']

Now, we want to convert this numpy array to the array of the same size, where the values will be included from the list high_values and low_values. For instance, if the value in an array is less than 12, then replace it with the ‘low‘ and if the value in array arr is greater than 12 then replace it with the value ‘high‘.

So ultimately, the array will look like this:

['Low' 'Low' 'High' 'High']

We can also do this with for loops, but this numpy module is designed to carry out tasks like this only.

We will use numpy.where() to see the results.

arr = np.array([11, 12, 13, 14])
high_values = ['High', 'High', 'High', 'High']
low_values = ['Low', 'Low', 'Low', 'Low']
# numpy where() with condition argument
result = np.where(arr > 12,['High', 'High', 'High', 'High'],['Low', 'Low', 'Low', 'Low'])
print(result)

Using numpy.where() with single condition

We have converted the two arrays in a single array by using the where function like evaluating based on conditions of less than 12 and greater than 12.

The first value came out low because the value in the array arr is smaller than 12. Similarly, the last values returned are high because the value in array arr is greater than 12.

Let’s see how it worked.

Numpy.where() contains three arguments.

The first argument is the numpy array which got converted to a bool array.

arr > 12 ==> [False False True True]

Numpy where: Then numpy.where() iterated over the bool array and for every True, it yields corresponding element from list 1 i.e. high_values and for every False, it yields corresponding element from 2nd list i.e. low_values i.e.

[False False True True] ==> [‘Low’, ‘Low’, ‘High’, ‘High’]

This is how we created a new array from the older arrays.

Using numpy.where() with multiple conditions

Numpy where multiple conditions: In the above example, we have used single conditions. Here we will see the example with multiple conditions.

arr = np.array([11, 12, 14, 15, 16, 17])
# pass condition expression only
result = np.where((arr > 12) & (arr < 16),['A', 'A', 'A', 'A', 'A', 'A'],['B', 'B', 'B', 'B', 'B', 'B'])
print(result)

Using numpy.where() with multiple conditions

We executed multiple conditions on the array arr and it returned a bool value. Then numpy.where() iterated over the bool array and for every True it yields corresponding element from the first list and for every False it yields the corresponding element from the 2nd list. Then constructs a new array by the values selected from both the lists based on the result of multiple conditions on numpy array arr i.e.

  • Conditional expression returns true for 14 and 15 values, so they are replaced by values in list1.
  • Conditional expression returns False for 11,12,16, and 17, so they are replaced by values in list2.

Now, we will pass the different values and see what the array returns.

arr = np.array([11, 12, 14, 15, 16, 17])
# pass condition expression only
result = np.where((arr > 12) & (arr < 16),['A', 'B', 'C', 'D', 'E', 'F'],[1, 2, 3, 4, 5, 6])

Different values

Use np.where() to select indexes of elements that satisfy multiple conditions

Numpy where two conditions: We will take a new NumPy array:

arr = np.array([11, 12, 13, 14, 15, 16, 17, 15, 11, 12, 14, 15, 16, 17])

Now, we will give a condition and find the indexes of elements that satisfy that condition that is an element should be greater than 12 and less than 16. For this, we will use numpy.where(),

arr = np.array([11, 12, 13, 14, 15, 16, 17, 15, 11, 12, 14, 15, 16, 17])
# pass condition expression only
result = np.where((arr > 12) & (arr < 16))
print(result)

Use np.where() to select indexes of elements that satisfy multiple conditions

A tuple containing an array of indexes is returned where the conditions met True in the original array.

How did it work?

NP.where two conditions: Here, the condition expression is evaluated to a bool numpy array, numpy.where() is passed to it. Then where() returned a tuple of arrays for each dimension. As our array was one dimension only, so it contained an element only i.e. a new array containing the indices of elements where the value was True in bool array i.e. indexes of items from original array arr where value is between 12 & 16.

Using np.where() without any condition expression

In this case, we will directly pass the bool array as a conditional expression.

result = np.where([True, False, False],[1, 2, 4],[7, 8, 9])
print(result)

Using np.where() without any condition expression

The True value is yielded from the first list and the False value is yielded from the second list when numpy.where()  iterates over the bool value.

So, basically, it returns an array of elements from the first list where the condition is True and elements from a second list elsewhere.

In the conclusion, we hope that you understood this article well.

Quandl intrinio – Best 5 stock markets APIs in 2020

Quandl intrinio: There are various stock markets that are available online but among all of them, it’s hard to figure out from which site you should visit or which site will be useful.

In this article, we will be discussing the 5 best stock market APIs.

What is Stock market data API?

Real-time or historical data on financial assets that are currently being traded in the markets are offered by stock market data APIs.

Prices of public stocks, ETFs, and ETNs are specially offered by them.

Data:

In the article, we will be more inclined towards the price information. We will be talking about the following APIs and how they are useful:

  1. Yahoo Finance
  2. Google Finance in Google sheets.
  3. IEX cloud
  4. AlphaVantage
  5. World trading data
  6. Other APIs( Polygon.io, intrinio, Quandl)

1. Yahoo Finance:

The API was shut down in 2017. However, it got back up after 2019. The amazing thing is we can still use Yahoo Finance to get free stock data. It is employed by both individual and enterprise-level users.

It is free and reliable and provides access to more than 5 years of daily OHLC price data.

yFinance is the new python module that wraps the new yahoo finance API.

>pip install yfinance

 The GitHub link is provided for the code but I will be attaching the code below for your reference.

GoogleFinance:

Google Finance got shut down in 2012 but some features were still on the go. There is a feature in this API that supports you to get the stock market data and It is known as GoogleFinance in google sheets.

All we have to do is type the below command and we will get the data.


GOOGLEFINANCE("GOOG", "price")

Furthermore, the syntax is:

GOOGLEFINANCE(ticker, [attribute], [start_date], [end_date|num_days], [interval])

The ticker is used for security consideration.

Attribute(should be “price” by default).

Start_date: when you want to fetch the historical data.

End_date: Till when you want the data.

Intervals: return data frequency which is either “DAILY” or “WEEKLY”.

2. IEX Cloud:

IEX Cloud is a new financial service just released this year. It’s an independent business separate from IEX Group’s flagship stock exchange, is a high-performance, financial data platform that connects developers and financial data creators.

It is very cheap compared to others and you can get all the data you want easily. It also provides free trial.

You can easily check it out at :


Iexfinance

3. AlphaVantage:

You can refer to the website:

https://www.alphavantage.co/

It is the best and the leading provider of various free APIs. It provides gain to access the data related to the stock, FX-data, and cryptocurrency.

AlphaVantage provides access to 5-API request per minute and 500-API requests per day.

4. World Trading Data:

You can refer to the website for World Trading data:

https://www.worldtradingdata.com/

In this trading application, you can access the full intraday API and currency API. The availability ranges from $8 to $32 per month.

There are different types of plans available. You can get 5-stocks per request for free access. You can get 250 total requests per day.

The response will be in JSON format and there will be no python module to wrap their APIs.

5. Other APIs:

Website: https://polygon.io

Polygon.io
Polygon.io

It is only for the US stock market and is available at $199 per month. This is not a good choice for beginners.

Website: https://intrino.com/

intrino
intrino

It is only available for real-time stock data at $75 per month. For EOD price data it is $40 but you can get free access to this on different platforms. So, I guess it might not be a good choice for independent traders.

Website: https://www.quandl.com/

Quandl
Quandl

It is a marketplace for financial, economic, and other related APIs. It aggregates API from thor party so that users can purchase whatever APIs they want to use.

Every other API will have different prices and some APIs will be free and others will be charged.

Quandl contains its analysis tool inside the website which will be more convenient.

It is a platform which will be most suitable if you can spend a lot of money.

Wrapping up:

I hope you find this tutorial useful and will refer to the websites given for stock market data.

Trading is a quite complex field and learning it is not so easy. You have to spend some time and practice understanding the stock market data and its uses.

Pandas fillna multiple columns – Pandas: Replace NaN with mean or average in Dataframe using fillna()

Pandas fillna multiple columns: In this article, we will discuss the replacement of NaN values with a mean of the values in rows and columns using two functions: fillna() and mean().

In data analytics, we have a large dataset in which values are missing and we have to fill those values to continue the analysis more accurately.

Python provides the built-in methods to rectify the NaN values or missing values for cleaner data set.

These functions are:

Dataframe.fillna():

Fillna with mean pandas: This method is used to replace the NaN in the data frame.

The mean() method:

mean(axis=None, skipna=None, level=None, numeric_only=None, **kwargs)

Parameters::

  • Axis is the parameter on which the function will be applied. It denotes a boolean value for rows and column.
  • Skipna excludes the null values when computing the results.
  • If the axis is a MultiIndex (hierarchical), count along with a particular level, collapsing into a Series.
  • Numeric_only will use the numeric values when None is there.
  • **kwargs: Additional keyword arguments to be passed to the function.

This function returns the mean of the values.

Let’s dig in deeper to get a thorough understanding!

Pandas: Replace NaN with column mean

Pandas fillna multiple columns: We can replace the NaN values in the whole dataset or just in a column by getting the mean values of the column.

For instance, we will take a dataset that has the information about 4 students S1 to S4 with marks in different subjects.

Pandas: Replace NaN with column mean

Code:

import numpy as np
import pandas as pd
# A dictionary with list as values
sample_dict = { ‘S1’: [10, 20, np.NaN, np.NaN],
‘S2’: [5, np.NaN, np.NaN, 29],
‘S3’: [15, np.NaN, np.NaN, 11],
‘S4’: [21, 22, 23, 25],
‘Subjects’: [‘Maths’, ‘Finance’, ‘History’, ‘Geography’]}
df = pd.DataFrame(sample_dict)
# Set column ‘Subjects’ as Index of DataFrame
df = df.set_index(‘Subjects’)
print(df)

Suppose we have to calculate the mean value of S2 columns, then we will see that a single value of float type is returned.

Mean values of S2 column

Code:

mean_value=df[‘S2’].mean()
print(‘Mean of values in column S2:’)
print(mean_value)

Replace NaN values in a column with mean of column values

C++ iterate over map: Let’s see how to replace the NaN values in column S2 with the mean of column values.

Replace NaN values in a column with mean of column values

Code:

df['S2'].fillna(value=df['S2'].mean(), inplace=True)
print('Updated Dataframe:')
print(df)

We can see that the mean() method is called by the S2 column, therefore the value argument had the mean of column values. So the NaN values are replaced with the mean values.

Replace all NaN values in a Dataframe with mean of column values

Replace nan pandas: Now, we will see how to replace all the NaN values in a data frame with the mean of S2 columns values.

We can simply apply the fillna() function with the entire data frame instead of a particular column.

Replace all NaN values in a Dataframe with mean of column values

Code:

df.fillna(value=df['S2'].mean(), inplace=True)
print('Updated Dataframe:')
print(df)

We can see that all the values got replaced with the mean value of the S2 column. The inplace = True has been assigned to make the permanent change.

Pandas: Replace NANs with mean of multiple columns

Replace nan pandas: We will reinitialize our data frame with NaN values.

Pandas: Replace NANs with mean of multiple columns

Code:

df = pd.DataFrame(sample_dict)
# Set column 'Subjects' as Index of DataFrame
df = df.set_index('Subjects')
# Dataframe with NaNs
print(df)

If we want to make changes to multiple columns then we will mention multiple columns while calling the mean() functions.

Mean of values in column S2 & S3

Code:

mean_values=df[['S2','S3']].mean()
print(mean_values)

It returned the calculated mean of two columns that are S2 and the S3.

Now, we will replace the NaN values in columns S2 and S3 with the mean values of these columns.

replace the NaN values in the columns ‘S2’ and ‘S3’ by the mean of values in ‘S2’ and ‘S3’

Code:

df[['S2','S3']] = df[['S2','S3']].fillna(value=df[['S2','S3']].mean())
print('Updated Dataframe:')
print(df)

Pandas: Replace NANs with row mean

Pandas fill nan: We can apply the same method as we have done above with the row. Previously, we replaced the NaN values with the mean of the columns but here we will replace the NaN values in the row by calculating the mean of the row.

For this, we need to use .loc(‘index name’) to access a row and then use fillna() and mean() methods.

Pandas: Replace NANs with row mean

Code:

df.loc['History'] = df.loc['History'].fillna(value=df.loc['History'].mean())
print('Updated Dataframe:')
print(df)

Conclusion

So, these were different ways to replace NaN values in a column, row or complete data frame with mean or average values.

Hope this article was useful for you!