
Selenium Python – Selenium-Grid
Parallel execution of tests is made possible through Seleniumthrough its Grid component. We come across scenarios like executing tests for cross-browser verification or executing a huge test suite by splitting it into smaller suites in parallel to save time. For all these, the Grid component is useful and effective as it allows parallel test execution.
Structure
- Selenium-Grid
- Creating hub
- Creating nodes
- Executing tests in parallel
Objective
In this chapter, we learn how to s tup Selenium-Grid in our local system. We understand what is a hub and a node, and how we set them up. In this chapter, we will set up a hub that will act as a central server and receive requests. We will have a Chrome node and a
Firefox node to complete the Grid for execution.
- Python Selenium Tutorial | Selenium Python Training for Beginners
- Selenium Python Tutorial | Introduction to Selenium
- Selenium IDE Tutorial For Beginners | What Is Selenium IDE
Selenium-Grid
An important component of Selenium is the Selenium-Grid. It allows us to run our tests in parallel, which helps in saving time and cost. To set up the Selenium-Grid, we need to first download the Selenium standalone server from: https://www.seleniumhq.org/download/
After we have downloaded the server JAR file, we will store it in a folder. This JAR file can now be invoked in two different modes to set up the Grid:
- The hub
- The node
A hub is a central server that receives the request to execute the test. It will send the test to the node in the Grid which matches the description in the test. While anode is a machine and browser combination where the actual execution of the test takes place.
Let us see a Grid setup, with the help of the following diagram:
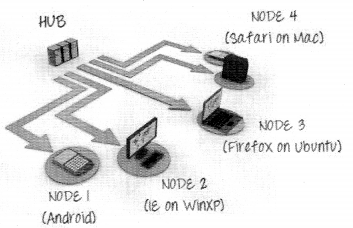
In the above diagram, we can see that the hub will receive the test execution request, which will get passed on to the matching node for actual execution. As the test is executed at the node, the result is passed back to the hub. The information, about the browser, and the operating system on which the test is to be executed, is present in the test script which the hub receives. Then the test commands are sent to the matched node for the actual execution.
We will now set up a Grid with one hub and two nodes—one for Chrome and another for Firefox. Let us see the commands for it.
Setting up the hub
To set up the hub, we need to open the Command Prompt window and go to the folder where our standalone JAR file is present. There we need to type the following command:
D:\work\jarfile>java . jan selenium.server-standalone-3.141.59.jan-role hub
In the above command, we are executing the standalone JAR file using the role flag that uses the value hub. So it will execute the server in the hub mode. By default, it will start the hub on port 4444.
If we want to change the port, we can use the – port flag and provide a value to it. For example:
D:\work\jarfile>java . jan selenium-server-standalone-3.141.59.jan-role hub-port 6666
If you are working with a different Selenium standalone server version, the version number will change for you in here.
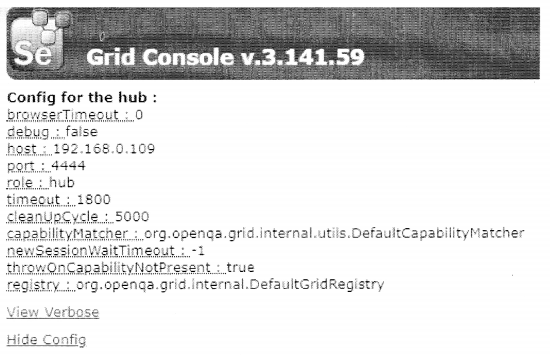
Once the hub has started, you can verify it using the following steps:
- Open a browser.
- Type this URL:
http://localhost:4444/grid/console - If all is working fine, you should be able to see the following:
At the Command Prompt, we will see the following:
D:\work\Jarfiles>java - jar selenium-server-standalone-3.141.59.jar - role hub
17:17:17.540 INFO [GridLaunchV3.parse] - selenium server version: 3.141.59, revision: e82
be7d358
17:17:17.540 INFO [GridLaunchV3.lambda$buildLaunchers$5] - Launching selenium Grid hub on port: 4444
2019-05-27 17:17:18.139: INFO: : main : Logging initialized @1218ms to org.seleniumhq.jetty9.util.log.stdErrLog
17:17:18.576 INFO [Hub.start] - selenium Grid hub is up and running
17:17:18.576 INFO [Hub.start] - Nodes should register to http://192.168.0.109:4444/grid/register/
17:17:18.576 INFO [Hub.start] - Clients should connect to http://192.168.0.109:4444/wb/hub
Setting a Chrome node on a Windows machine
To set a Chrome node on a Windows machine, we will have to download the Selenium standalone server on that machine and execute it in the node mode. To do this, we will have to execute this command:
D:\work\JarFiles>java - Dwebdriver.chrome.driver="D:\work\JarFiles\resource\chromedriver.exe" - jar selenium-server-standalone-3.141.59-Jar-role - hub http://localhost:4444/grid/register - browser "browsername-chrome" - post5556
In this command, we are providing a path to the Chrome driver as per the location in our system, that is, Dwebdriver. chrome. driver=”D: \ WORK\DarFiles\nesource\chromedriver.exe”. Then we set the role flag to be the node. Then we provide the hub flag, where we point to the hub location: http://localhost:4444/grid/register. We set the browser flag to chrome and the port flag to 5556.
At the script level, we will be making some changes in the setup method, which is as follows:
def setup(self):
    self.driver = webdriver.Remote(
         command_executor="http://Localhost:4444/wd/hub",
         desired_capabilities={
              "browserName":"chrome",
     })
   self.base_url = "http://practice.bpbonline.com/catalog/index.php"
Here, we create an instance of the remote WebDriver, pass the details of the hub and in desired capabilities variable, we pass information for the browser, on which we want to execute our test, in this case, Chrome. We will discuss more desired capabilities a little later in the chapter. So when we execute the script, the commands are sent to the hub. It fetches the information to find the node on which the actual test is to be executed and sends the commands to it. In this case, it will send the commands to a node that is registered with a Chrome browser.
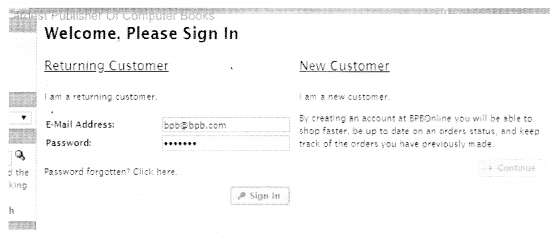
Please take a look at the following screenshot where we have entered all the details:
Setting a Firefox node on a Windows machine
To set a Firefox node on a Windows machine, we will have to download the Selenium standalone server on that machine and execute it in the node mode. To do this we will have to execute this command:
D:\work\JarFiles>java - Dwebdriver.chrome.driver="D:\work\JarFiles\resource\getkodriver.exe" - jar selenium-server-standalone-3.141.59-Jar-role - hub http://localhost:4444/grid/register - browser "browsername-firebox" - post5557
In this command, we are providing the path to the gecko driver as per the location in our system: Dwebdriver. gecko. driver=”D: \WORK\ DarFiles\resource\geckodriver. exe”. Then we set the role flag to be a node. Then we provide the hub flag, where we point to the hub location: http: //localhost:4444/grid/register. We set the browser flag to firefox and the port flag to 5557.
At the script level, we will be making some changes in the setup method:
def setup(self):
    self.driver = webdriver.Remote(
         command_executor="http://Localhost:4444/wd/hub",
         desired_capabilities={
               "browserName":"firebox",
})
self.base_url = "http://practice.bpbonline.com/catalog/index.php"
Here, we create an instance of the remote WebDriver, pass the details of the hub and in desired capabilities variable, we pass information for the browser, on which we want to execute our test, in this case, the Firefox browser. We will discuss more desired capabilities a little later in the chapter. So when we execute the script, the commands are sent to the hub. It fetches the information to find the node on which the actual test is to be executed and sends the commands to it. In this case, it will send the commands to a node that is registered with a Firefox browser:
Executing tests in parallel
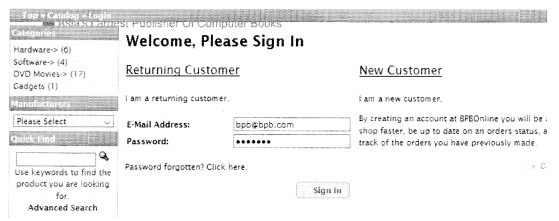
To execute the tests in parallel, on the Chrome and Firefox browser together, we will initiate them. So the test execution commands will reach the hub, and the hub will direct them to their respective nodes. In this case, the tests are directed to Chrome browser machine, and Firefox browser machine:

Desired capabilities
To set the test environment settings at the browser level, we have some properties associated with each browser that we can set. So at the time of execution, whenever the browser instance will be invoked it will be set with those browser properties. Internet Explorer, Chrome, and Firefox come with their own key-value pair.
In our above test scripts, we have used desired capabilities, to set the browser key-value to Firefox or Chrome, respectively:
desired_capabilities={
“browserName”: “firefox”.,}
desired_capabilities={
“browserName”: “chrome”,}
Conclusion
In this chapter, we understood the usage of an important component of Selenium which allows us to run tests in parallel. We understood how we establish the Selenium server in hub mode and node mode, and instantiate the remote Web’’)river at the script level to run our tests in the Grid.
Related Articles:
- Chapter 1 Introduction to Selenium
- Chapter 2 Selenium IDE
- Chapter 3 Locators in Selenium
- Chapter 4 Installation and setup
- Chapter 5 Understanding WebDriver, WebElement and By
- Chapter 6 Unittest in Python
- Chapter 7 Synchronizing Test
- Chapter 8 Concept of Parameterization
- Chapter 9 Working with Different Web Elements
- Chapter 10 Frames, Alerts, and Action Class
- Chapter 11 Page Object Model