Selenium Python – Working with Different WebElements
An HTML page is made up of various HTML elements. When we automate a web page using Selenium, we first have to identify the HTML element uniquely on the web page and then perform an action on it. An HTML page can have HTML elements like a form, frame, table, dropdown, link, image, alerts, divs, spans, and many more. In this chapter, we will learn how to automate these elements through Selenium.
Structure
- Working with form elements
- Working with HTML table
- Working with dropdown list
Objective
An HTML page is made up of different HTML elements, for example, we see a form element, which contains a lot of input elements. The input elements could be a textbox, radio button, or checkbox. We can then have a table element, a dropdown element. In this chapter, we will see how we can automate these HTML elements.
- Selenium Webdriver Tutorial with Examples | Understanding WebDriver, WebElement
- Python Selenium Tutorial | Selenium Python Training for Beginners
- Locators in Selenium- How To Locate Elements On Web-page?
Working with form elements
An HTML form generally contains text boxes, buttons, links, images, radio buttons, and checkboxes type of elements. The HTML of the input elements in the form is represented as follows:
<input type= “text/checkbox/radio/password property=value../>
The following table shows the different actions we generally perform on these elements using Selenium:
|
Web Element |
Selenium action |
Description |
| Text box | Clear | Clears the content of the text box. |
| Text box | Send_keys | Types content sent in the method in the text box. |
| Checkbox | Click | To select a given check box. |
| Radio button | Click | To select a given radio button. |
| Anchor | click | To click on the link element. |
| Button | click | To click on the button in the form. |
| Button | submit | If the button provided is a submit button, then we can perform the submit action on it. |
| Radio button | To verify if the radio button is selected, | |
| HTML element | This method will work for any HTML element, and it checks if the element is displayed on the page or not. | |
| HTML element | Is Enabled | This method will work for any HTML element, and it checks if the element is enabled on the page or not. |
TableExarapli
An example of working on the form elements described above can be seen on the registration page of the application: http://practice. bpbonline.com/catalog/create_account.php
On this page, we can see the checkbox, radio button, text boxes, buttons, links on which we can work. The following program displays the process of user registration by performing actions on the different web elements on this page:
def text_login(self):
browser=self.driver
browser.find_element_by_link_text("My Account").click()
browser.find_element_by_link_text("continue").click( )
browser.find_element_by_name("gender").click( )
browser.find_element_by_name("firstname").send_keys("BPB")
browser.find_element_by_name("lastname").send_keys("BPB")
browser.find_element_by_id("dob").send_keys("01/01/1987")
#change	email id with each iteration
browser.find_element_by_name("email_address").send_keys("bpb1@bpb.com")
browser.find_element_by_name("company").send_keys("5Elements learning")
browser.find_element_by_name("strret_address").send_keys("second Address")
browser.find_element_by_name("suburb").send_keys("second Address")
browser.find_element_by_name("postcode").send_keys("110001")
browser.find_element_by_name("city").send_keys("new delhi")
browser.find_element_by_name("state").send_keys("delhi")
sel=select(browser.find_element_by_name("country"))
sel.select_by_visible_text("India")
browser.find_element_by_name("country")
browser.find_element_by_name("telephone").send_keys("1234567890")
browser.find_element_by_name("fax").send_keys("0123456789")
browser.find_element_by_name("newsletter").click( )
browser.find_element_by_name("password").send_keys("123456")
browser.find_element_by_name("confirmation").send_keys("123456")
browser.find_element_by_xpath("//span[contains(text(),'continue')]").click( )
browser.find_element_by_xpath("//span[contains(text(),'continue')]").click( )
browser.find_element_by_link_text("log off").click( )
browser.find_element_by_link_text("continue").click( )
So in the preceding code, we are registering a new user in the application by handling actions on all the mandatory fields. So wherever there are textboxes, we have ensured they are cleared first, and then we type the text on them. For links, buttons, and radio buttons, we have used the click method for selecting them.
Working with HTML tables
The HTML tables are container elements, which mean they contain other HTML elements inside them. A general representation of HTML table is as follows:
<table>
<tbody>
<tr>
<td> text/HTML element</td>
<td> … </td>
</tr>
<tr>…</tr>
</tbody>
</table>
So we have the first node as a table, which contains a body, which contains table row[tr]. The tr node contains table data[td] which represents the table cell. The table cell can contain text or any HTML element within it. In our application, the home page displays the products listed in a web table:

Let us look at the backend HTML available:
<table border="0" width="100%" cellspacing="0" cellpadding=2">
  <tbody>
    <tr>
     <td width="33%" align="center" valign="top">
       <a href="http://practice.bpbonline.com/catalog/product info.php?
       products id=20">...</a>
        <br>
        <a href="http://practice.bpbonline.com/catalog/product info.php?
        products id=20">Beloved</a>
        <br>
       "$54.99"
      </td>
      <td width="33%" align="center" valign="top">...</td>
      <td width="33%" align="center" valign="top">...</td>
   </tr>
   <tr>...</tr>
   <tr>...</tr>
As we see in the preceding HTML snippet, the table has three tr tags, and each tr tag has three td tags. Each td tag has two anchor tags and a text, which we see on the page. One of the scenarios we pick for HTML web table automation is to find the rows and columns available in the table at run time. Here, we will be doing that, and printing the content available in every table cell as we iterate the table row by row and cell by cell.
from selenium import webdriver
import unittest

class TableExample(unittest.Testcase):
    def setup(self):
        self.driver = webdriver.chrome(executable_path='D:\Eclipse\BPB\seleniumpython\seleniumpython\drivers\chromedriver.exe')
        self.driver.implicitly_wait(30)
        self.base_url = "http://practice.bpbonline.com/catalog/index.php"
   def test_table(self):
       driver = self.driver
       driver.get(self.base_url)
       prodTable= driver.find_element_by_tag_name("table")
       #Fetch rows
       rows=prodTable.find_elements_by_xpath("//"/tbody/tr")
       i=1
       for r in rows:
           #Fetch colc for each row
           cols=r.find_elements_by_xpath("td")
           #print(for(path))
           j=1
           for cd in cols:
               print("row ", i, "col", j, ",", cd.text)
               j=j+1
          i=i+1
   def tearDown(self):
       self.driver.quit()
if_name_=="_main_";
unittest.main()
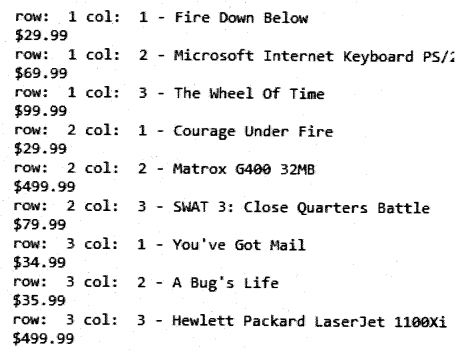
So in the preceding code, we first fetch the table object, then in that table object, we fetch all the table rows. Then we iterate each table row and fetch all table columns from each row. Then we iterate each table column, and fetch the text associated with each table cell, and print that information on the screen.
As we run the test, the output is as follows: col: 1 – Fire Down Below

Working with dropdown list
The dropdown list in HTML is known as the < select > element. It is also a container element. It contains <option> elements. The option element displays the different choices of the dropdown which can be selected from it. The HTML code of dropdown looks as follows:
<select>
(option value = data> Visible text </option>
. .
</select>
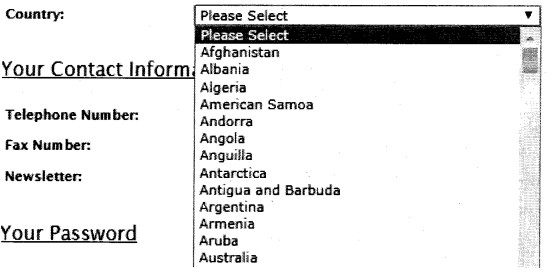
In our application, dropdowns are available on various pages. The dropdown element which we will see in the example is the country dropdown which we see on the registration page of the application:

If we look at the backend HTML of this dropdown, we will see the following:
<select name="country">
  <option value selected="selected">please select</option>
  <option value="1">Afghanistan</option>
  <option value="2">Albania</option>
  <option value="3">Algeria</option>
  <option value="4">American</option>
  <option value="5">Andorra</option>
  <option value="6">Angola</option>
  <option value="7">Anguilla</option>
  <option value="8">Antarctica</option>
  <option value="9">Antigua and Barbuda</option>
  <option value="10">Argentina</option>
  <option value="11">Armenia</option>
  <option value="12">Aruba</option>
The number of options in the list will be the same as we see on the screen.
To work with a dropdown element, Selenium provides a separate class called Select. More details on this class can be found on this link:
https://seleniumhq.github.io/selenium/docs/api/py/
webdriver_support/selenium.web driver.support.select.
HTML?highlight=select#selenium.web driver.support.select
The Select class allows us to select an element from the list using the following three methods:
• select_by_value: In this method, we select an option
bypassing the data associated with the value attribute. For example in the previous list, if we say select_by_ value(” 5″), Andorra as a country will get selected.
• select^Y-Visi-ble^ext: In this method, we select an
option bypassing the data which we see on the screen. For example, if we want to select the country Angola, we can say select_by_visible_text(“Angola”).
• select_by_index: In this method, we select an option from the list, bypassing an index value. The index value associated with the options in the list ranges from 0 to the total number of options -1. So if we say select_by_index(2), Albania will get selected.
Similar to the preceding set of methods, we have select by value, visible text, and index. In the following program:
def text_dropdown(self):
    browser=self.driver
    browser.get(self.base_url)
    browser.maximize_window()
    browser.find_element_by_link_text("My Account").click( )
    browser.find_element_by_link_text("Account").click( )
    sel=select(browser.find_element_by_name("country"))
    #select by visible text
    sel.select_by_visible_text("India")
    print(sel.first_selected_option.text)
    time.sleep(1)
    #select by index
    sel.select_by_index(1)
    print(sel.first_selected_option.text)
    time.sleep(1)
    #select by value
    sel.select_by_value("5")
    print(sel.first_selected_option.text)
    time.sleep(1)

#find an option in the list
for country in sel.options:
    if(country.text=="India"):
       print("country found")
In the preceding program, we try different methods to select options from the dropdown element. We use a method called first_ selected_option, which returns the option that was selected first and foremost in the list.
Conclusion
So in this chapter, we have seen how to handle different types of form elements, web table elements, and the dropdown element. We saw the different methods that are available with these entities. We also saw the different actions which can be performed on the HTML elements during test automation runs. In the next chapter, we will discuss the switch To method, and see how we can handle frames, alerts with it. We will also see the action class which allows us to handle various keyboard, mouse actions, and also automate composite actions.
Related Articles:
- Chapter 1 Introduction to Selenium
- Chapter 2 Selenium IDE
- Chapter 3 Locators in Selenium
- Chapter 4 Installation and setup
- Chapter 5 Understanding WebDriver, WebElement and By
- Chapter 6 Unittest in Python
- Chapter 7 Synchronizing Test
- Chapter 8 Concept of Parameterization
- Chapter 10 Frames, Alerts, and Action Class
- Chapter 11 Page Object Model
- Chapter 12 Selenium-Grid
