
Selenium Python – Locators in Selenium
Introduction
When we try to automate a web application, there are two important steps to consider. One is to identify the object uniquely on which we would want to perform the action. The second is to perform the action on the identified object. To identify the object uniquely on the web page, Selenium provides us with some locator strategies. In this chapter, we will discuss and explore them.
Structure
- What is a locator?
- Different types of locators
- Where are locators used?
Objective
When working with open source technology like Selenium, it is crucial for us to understand that as end-user what strategy Selenium uses to identify an object on a page. As we are going to write scripts to automate applications at hand, we will have to provide object information using one of the locator strategies which Selenium will use to identify the object on the page so that the required action can be performed on it.
- Python Selenium Tutorial | Selenium Python Training for Beginners
- Selenium Webdriver Tutorial with Examples | Understanding WebDriver, WebElement
- Synchronization in Selenium Python | Synchronizing Test
What is a locator?
Locator is a technique to identify the object on a page uniquely by using different identification methods. Once the object is identified, the action can be performed on it. Selenium provides us with the following locator techniques to identify the object on the page:
- ID
- NAME
- XPATH
- CSS
- DOM
- LINKTEXT
- PARTIALLINKTEXT
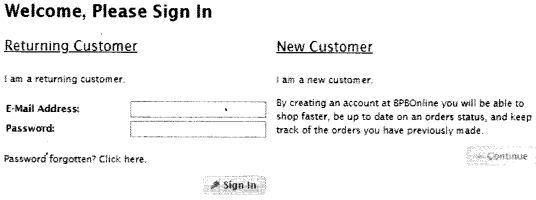
To understand the different strategies of the locators, which Selenium uses to identify the object on the page, we will take the example of an HTML code snippet from our web application: http://practice.bpbonline.com/catalog/index.php my account page, which we see,
when we click the My Account link of the home page. The idea is to explore the HTML code associated with the E-mail Address field,
Password field, and the Sign In button. So let us have a look at it:
If we right-click the HTML page and select View page source. Refer to the following screenshot:
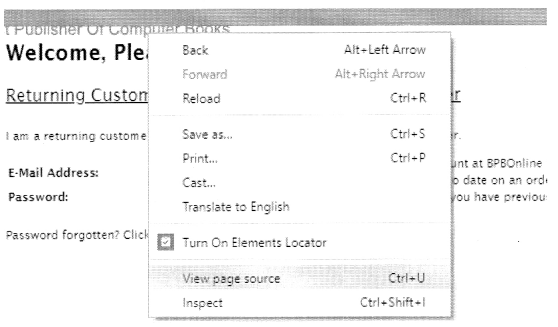
We can see the HTML content associated with the web page. It is displayed as follows:
    <form name"login" action="http://practice.bpbonline.com/catalog/login.php"action=process" method="post"><input type="hidden"
name="formid" value="46fedd827e8b83241e4cebff3c6046ae"/>
   <table border="0" cellspecing="e" cellpadding="2" width"100%">
   <tr>
    <td class="filedkey">E-mail Address:</td>
    <td class="filedvalue"><input type="text" name="email..address"/><td>
 </tr>
 <tr>
   <td class="filedkey"password:</td>
   <td class="filedvalue"><input type="password" name="password" maxlength="40"></td>
</tr>
</table>

<P><a href="http://practice.bpbonline.com/catalog/password_forgotten.php">password forgotten? click here.</a></p>

<p> align="right"><span class="tdblink"><button id="tdb1" type="submit">sign In</button></span><script type="text/javascript $("#tdb1").button({icons:{primary::ui.icon-key"}}).addclass("ui-priority-primary").parent( ).removeClass("tdblink"):
</script></p>

</form>
As we have seen, the above HTML content is associated with three objects – username and password fields, and sign-in button, let us try to understand the different locator strategies Selenium can use to identify them so that an action can be performed on them as our automation script executes. So, the following is explained below:
• ID: The ID locator is fetched from the ID attribute of an HTML element. If the HTML element of interest has an ID attribute, we use it to identify the object uniquely. The example of this is the Sign In button, which has the id = tdblxbutton id=”tdbl” type=”submit”>Sign In</button>
• NAME: This attribute is fetched from the NAME attribute of the HTML element. The data associated with this property of the HTML element is used to identify the object uniquely on the web page. Examples of this property username, and password fields:
<input type=”text” name=”email_address” />
<input type=”password” name=”password” maxlength=”40″ />
• XPATH: The path traversed to reach the node of interest in an XML document is known as XPATH. To create the XPATH locator for an element, we look at an HTML document as if it is an XML document, and then traverse the path to reach it. The XPATH can either be a relative or an absolute one:
- A relative XPATH will be in relation to a landmark node. A node that has a strong identifier like an ID or NAME. It uses / / in its path creation. Example: // input[@name=”email_addpess”]
- An absolute XPATH starts from the root node HTML. It uses a single slash /. It is more prone to changes if the document structure undergoes changes during the development of the application, so it is generally avoided.
Example:/HTML/body/div[2] / f orm[0] /table/ tbody/tr[2]/input
• CSS: It stands for Cascading Style Sheets. We can use this as well to identify the objects uniquely on the web page. The syntax is as follows:
- If the HTML of the object has an ID attribute then, css=#ID, for example, css=#tdbl
- Else, css=HTMLtag[prop=value], for example, css=input [namie^ email_address’ ]
• DOM: It stands for Document Object Model. It allows object identification by using the HTML tag name associated with the object.
• LINKTEXT: Generally, whenever we encounter a link in the application we can use it to identify the object on the page. For example, the My Account link can be identified using the same link text as seen on the web page
• PARTIAL LINK TEXT: We can also use a subpart of a complete text of the link to identify it on the web page and then perform actions on it.
It is important to use an appropriate locator to identify the object on the page, which is unique, helps in quick identification of the object, and is robust to application changes during the development process. Generally, if the object HTML has IDor NAME we use it to identify the object on the page. Then we use XPATH, followed by CSS and the last option is DOM. If it is a link, we always use LINKTEXT or PARTIAL LINK TEXT to identify the element on the page. So ideally, this should be the approach we need to take.
Conclusion
In this chapter we discussed the concept of locators; we understood its various types. We also saw where and how they would be needed. These locator strategies are standard in Selenium. They are not going to get modified in any version, and have been consistent with old versions as well. Lastly, we need to keep in mind that the locator strategy we are choosing to identify the object has to be robust and help to locate the object quickly on the page. In the next chapter, we will learn the steps to set up Selenium and Eclipse IDE on Windows OS.
Related Articles:
- Chapter 1 Introduction to Selenium
- Chapter 2 Selenium IDE
- Chapter 4 Installation and setup
- Chapter 5 Understanding WebDriver, WebElement and By
- Chapter 6 Unittest in Python
- Chapter 7 Synchronizing Test
- Chapter 8 Concept of Parameterization
- Chapter 9 Working with Different Web Elements
- Chapter 10 Frames, Alerts, and Action Class
- Chapter 11 Page Object Model
- Chapter 12 Selenium-Grid