Selenium Python – Frames, Alerts, and Action Class

Selenium Python – Frames, Alerts, and Action Class

In this chapter, we will learn about the concept of the switch to( ) command associated with the driver object. Many times we come across applications that have a frame in them, if we have to handle the objects in a frame we need to first switch to the frame, and only then can we work on the objects of the page in the frame. Another usage of the switch is seen in handling alerts, JavaScript pop windows, which come up to ask for yes or no / ok and cancel decisions, to proceed. And lastly, we are going to talk about the action class, which allows us to automate various mouse and keyboard movements. It also allows us to automate composite action class.

Structure

  • Working with frame
  • Working with alerts
  • Action class

Objective

The WebDriver element has a method called switch to( ). This method allows switching the focus to a frame, an alert, or a new window. In this chapter, we will see its usage. Another entity we will see is the Action class. This is used to automate keyboard and mouse actions. Sometimes, we may come across composite actions, and in those situations, actions class is helpful.

Working with frame

A frame HTML element allows us to break an HTML window into multiple sections, where each section can contain its own HTML page. A frame tag is represented inside a frameset tag and looks like the following:

<frameset>
<frame name=”topframe” src=”topframe.htm”>
<frame name^’hot-frame” src=”botframe.htm”>
</frameset>

If we have to work with the HTML element which is available in the web page that lies inside a frame, we need to switch to the frame first, and only then we can interact with the HTML elements of the page inside the frame. To perform this task we need to use the switch_ to() command, using some attribute to identify the frame which contains the element. Let us take the following example of a page that contains nested frames: http://the-internet.herokuapp.com/ nested_frames.

If we look at the backend HTML of the page, we will find that the page contains a top frame and a bottom frame. The top frame further contains three frames: left, middle, and right. The following screenshot shows the frames HTML:

<frameset frameborder="1" rows="50%,50%">
  <frame src="/frame top" scrolling="no" name="frame-top">
   #document
    <html>
       <script src="chrome-extention://cdmedbnojkdahhdbjnemegb1hbaa1kbc/page/prompt.is">
       </script>
       <script src="chrome-extention://cdmedbnojkdahhdbjnemegb1hbaa1kbc/page/prompt.is"
       </script>
       <head>...</head>
       <frameset frameborder="1" name="frameset.middle" cols=*33%,33%,33%">
         <frame src="/frame left" scrolling="no" name = "frame=left">...</frame>
         <frame src="/frame middle" scrolling="no" name = "frame=middle">...</frame>==$o
         <frame src="/frame right" scrolling="no" name = "frame=right">...</frame>
    </frameset>
   </html>
  </frame>
<frame src="/frame bottom" scrolling="n0" name="frame-bottom">...</frame>

Now, let us suppose that in the preceding example we need to fetch the text associated with the page inside the middle frame, so how will we do that? To achieve this we will first need to switch to the top frame, and then from it, switch to the middle frame. Once we have switched to the middle frame we can fetch the text associated with it. The following program shows the working of the same.

from selenium import webdriver
import unittest

class FrameExample(unittest.TestCase):
     def setup(self):
         self.driver=webdriver.chrome(executable_path="D:\Eclipse\workspace\seleniumpython\seleniumpython\drivers\chromedriver.exe")
         self.driver.implicity_wait(30)
        self.base_url="http.ss//the.internet.herocomp.com/test_frame(self):

def test_frame(self):
    driver = self.driver
    driver.get(self.base_url)
    driver.switch_to_frame(driver.find_element_by_name("frame.top"))
    driver.switch_to_frame(driver.find_element_by_name("frame.middle"))
    print(driver.page_source)

def tearDown(self):
    self.driver.quit( )

if_name_ =="_main_":
   unittest.main( )

In the preceding program, we switch our focus to the first frame which is recognized by the name property frame-top, and then we switch our focus to another frame inside it which is recognized by the name property frame-middle. Once we have switched focus to the inner frame, we print the page source of it.

The output which we get when we run the program is as follows:

<html xmlns="http://www.w3.org/1999/xhtml"><head>
     </head>
     <body>
        <div id="content">MIDDLE</div>


</body></html>

Working with alerts

Alerts are JavaScript popup windows that prompt the user for an action or decision based on which an event is performed, or it displays some information to the user. For example, in our web i application http://practice.bpbonline.com/catalog/index.php, when we try to register the user, and while filling in the registration form, if we forget to fill in some mandatory field and we try to proceed with the process, we will see an alert prompting us to correct our entries.
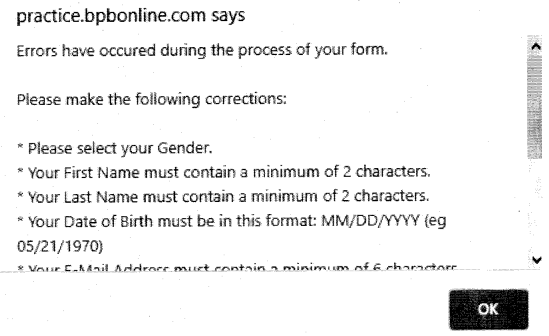
Selenium Python - Frames, Alerts, and Action Class chapter 10 img 4

Now to handle the preceding alert we have to click on the OK button. To perform the action we have a class available in Selenium called the Alert class. The details of it are available here: https://seleniumhq. github.io/selenium/docs/api/py/webdriver/selenium.webdriver. common.alert.html. This Alert class has four methods:

  • accept (): It accepts the alert by clicking on the OK button.
  • dismiss( ): It cancels the alert by clicking on the cancel button.
  • Send_keys: It sends keys to the alert.
  • Text: It fetches the text associated with the alert.

In the scenario from our application which we try to automate the user registration process. Here, we will first pass a bad combination of passwords and confirm passwords. This will cause the alert to popup:
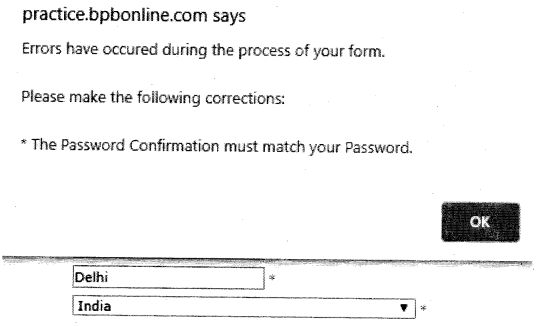
Selenium Python - Frames, Alerts, and Action Class chapter 10 img 5

So, we use the Alert class here, and its method accepts to handle it, as can be seen in the following code snippet:

#bad password and confirm password
browser.find_element_by_name("password").send_keys("123456")
browser.find_element_by_name("confirmation").send_keys("1234")
browser.find_element_by_xpath("//span[@class='ul-button-text'][contains(	text(), 'continue')]").click( )
time.sleep(3)
alert=browser.switch_to_alert( )
print(alert.text)
alert.accept( )#press ok button
time.sleep (3)
#provide correct owd and confirm owd
browser.find_element_by_name("password").clear( )
browser.find_element_by_name("password").send_keys("123456")
browser.find_element_by_name("confirmation").clear( )

The complete code of the preceding snippet is available in the codebase.

Action class

Selenium provides us with an action class, inits Python implementation is known as action chains. This class helps us to handle low-level keyboard and mouse actions as well as complex actions like drag and drop, mouse hover, and more. Using the Action class, you can either call one action at a time, or you can queue up the actions one after another and then use a method called as perform() to call them in order. We will take an example here for a website to perform drag and drop action. This example will also showcase the usage of frames.

So the website we will be using here is: http://jqueiyui.com/ droppable/
There are two objects, where the left one has to be dropped on right. Refer to the following diagram:

Selenium Python - Frames, Alerts, and Action Class chapter 10 img 7

As we inspect the element, we will find that these elements are inside the iframe tag. Let us have a look:

<iframe src="/resource/demos/droppable/default.html" class="demo-frame">
  #document
    <!doctype html>
    <html lang="en">
      <head>...</head>
      <body>
       <div id="draggable" class="ui-widget-content ui-draggable ui-draggable-handle" style="position: relative;">...</div>
       <div id="droppable" class="ui-widget-header ui-droppable">...</div>
     </body>
   </html>
 </iframe>

We want to drag the left object and drop it on the right object. The following code shows how we can do that:

driver=self.driver
driver.get(self.base_url)
actions = ActionChains(driver)
driver . switch_to_frame(driver.find_element_by_class_name("demo-frame"))
draggable=driver.find_element_by_id("draggable");
actions.drag_and_drop(draggable, droppable).perform( ):
time.sleep(3)

In the preceding program, we first switch to the iframe which contains the draggable and droppable objects. We then recognize the objects using their ID properties. Once the objects are created, we use the method available with the Action class, drag_and_drop(), which performs the required action and solves the scenario.

So to use the ActionChains class, we have to import it as well, so the following would be our import modules:

from selenium.web driver. common.action_chains import ActionChains

Conclusion

In this chapter, we saw how we will handle the frame HTML element, by using the switch command. Also, if we come across the JavaScript popups, how do we handle them using the alert interface available in Selenium. If we come across scenarios in applications that require composite actions like click and hold, drag and drop, double click, context-click, we have with us Action class, which we can use to handle mouse actions, keyboard actions, and composite actions as well.

In our next chapter, we will learn about the concept of Page Object Model (POM), where we will learn how we handle object information. The management of object information is important and is required for our test automation scripts.

Related Articles:

Python Interview Questions on Recursion

We have compiled most frequently asked Python Interview Questions which will help you with different expertise levels.

Python Interview Questions on Recursion

When a function makes a call to itself it is called recursion. The same sets of instructions are repeated again and again for new values and it is important to decide when the recursive call must end. For Example: Let’s look at the code to find the factorial of a number.
If we use a loop then a factorial function would look something like this:

Code

def factorial(number):
     j = 1
     if number==0|number==1:
        print(j)
     else:
           for i in range (1, number+1):
              print(j," * ",i," = ",j*i)
           j = j*i
    print(j)

Execution

factorial(5)

Output

1 * 1 = 1
1 * 2 = 2
2 * 3 = 6 
6 * 4 = 24
24 * 5 = 120
120 
>>>

Now, let’s have a look at how we can solve the same problem using a recursive algorithm.

Code

def factorial(number):
    j = 1
    if number==0 | number==1:
        return j
    else:
     return number*factorial(number-1)

Execution

print(factorial(4))

Output
24

Pros and Cons

Recursive functions make the code look neat, it helps in breaking a complex task into simpler sub-problems. It can be easier than implementing iterations. However, it can be a little difficult to understand the logic behind recursion. Recursion can consume more memory and time and can be hard to debug.

Question 1.
Write code to find the sum of natural numbers from 0 to the given number using recursion.
Answer:

I Result
0 0
1 1+0=i(1)+i(0)=1
2 2+1=i+i(1)=3
3 3+3=i+i(2)=6
4 4+6=i+i(3)=10
5 5+10=i+i(4)=15

Observe for i = 0, the result is 0, thereafter result = i(n)+i(n-l)

Code

def natural sum(num):
     if num == 0
          return 0
     else:
         return (num + natural sum(num-1) )

Execution

print (natural_sum(10))

Output

55

Question 2.
What would be the output for the following code?

def funny (x,y):
       if y == 1:
          return x [0]
      else:
           a = funny (x, y-1)
           if a>x [y-1]
            return a
     else:
         return x[y-1]
x = [1,5,3,6,7]
y = 3
print (funny (x,y) )

Answer:
If we insert a print statement in the code and execute the code again we can see the actual sequence in which it executes:

def funny(x,y):
   print("calling funny , y = ",y)
   if y == 1:
      return x[0]
else:

   print("inside else loop because y = ", y)
   a = funny(x, y-1)
   print("a = ", a)
   if a > x[y-1]:
       print("a = ",a, " Therefore a > ",x[y-1])
       return a
   else:
       print("a = ",a, " Therefore a < ",x[y-1])
return x[y-1]
x = [1,5,3,6,7]
y = 3
print(funny(x,y))

Output

calling funny , y = 3
inside else loop because y = 3
calling funny , y = 2
inside else loop because y = 2
calling funny , y = 1
a = 1
a = 1 Therefore a < 5
a = 5
a = 5 Therefore a > 3
5
The answer is 5

Question 3.
What would be the output of the following code?

def funny(x):
      if (x%2 == 1) :
         return x+1
     else:
        return funny(x-1)
print(funny(7))
print(funny(6))

Answer:
For x =7
1. x = 7
2. x % 2 is 1
return 7 + 1
For x = 6
1. x =6
2. x%2 = 0
3. Return funny(5)
4. x = 5 .
5. x%2 =1
6. Return x+1 = 6

Question 4.
Write Fibonacci sequence using recursion. Answer:
The Fibonacci sequence = 0, 1, 2, 3, 5, 8, 13 ……….

I Result
0 0
1 1
2 1+0=i(0)+i(1)=1
3 1+1=i(2)+i(1)=2
4 2+1=i(3)+i(2)=3
5 3+2=i(4)+i(3)=5

Observe for i = 0, the result is 0 and for i = 1, the result is 1. Thereafter, the value of i(n) = i(n-1) + i(n-2). We implement the same, when we try to find Fibonacci code using recursion.

  • The fibonacci_seq(num), takes a number as argument.
  • If num = 0, result is 0
  • If num = 1, result is 1
  • Else result is fibonacci_seq(num-l) + Fibonacci_seq(num-2)
  • If you want to find Fibonacci Sequence for 10 then:
  • For elements 0 to 10 o Call the fibonacci_seq( ) function
  • fibonacci_seq(0) = 0
  • fibonacciseq(l) = 1
  • fibonacci_seq(2) = fibonacci_seq(l)+ fibonacci_seq(0)
  • fibonacci_seq(3) = fibonacci_seq(2)+ fibonacci_seq(3)

Code

def fibonacci_seq (num) :
     if num <0:
          print("Please provide a positive integer value")
    if num == 0:
           return 0
    elif num == 1:
          return 1
   else:
        return (fibonacci_seq (num-1) +fibonacci_ seq(num-2))

Execution

for i in range(10):
     print (fibonacci_seq(i))

Output

0
1
1
2
3
5
8
13
21
34

Question 5.
What is memoization?
Answer:
Basically, in memoization, we maintain a look-up table where solutions are stored so that we don’t have to solve the same sub-problem again and again. Instead, we solve it once and store the values so that they can be reused.

We know that Fibonacci sequence is:
F(n) = F(n-1)+F(n-2) if n>1 = n if n =0,1
So,
F(n):
if n<1:
return n
else :
return F(n-1)+F(n-2)
Here, we are making two recursive calls and adding them up and the value is returned.
Look at the following diagram:

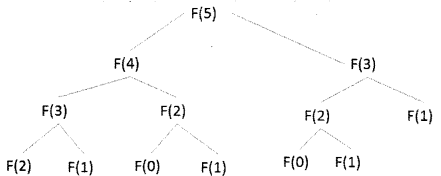
Python Interview Questions on Recursion chapter 12 img 1

Just to find Fibonacci(5), Fibonacci(2) is computed three times and Fibonacci (3) is computed two times. So, as n increases Fibonacci function’s performance will go down. The consumption of time and space would increase exponentially with an increase in n. In order to save time what we can do is save a value when it is computed for the first time. So, we can save F(2) when it is computed for the first time, the same way with F(3), F(4)… so on. So, we can say that:

F(n):
if n=<1:
return n
elif f(n) exist:
return F(n-1)
else:
F(n) = F(n-1) + F(n-2)
save F(n).
Return F(n).

In the code below:

  1. The function Fibonacci( ) takes a number and creates a list, fib_num of size num+1. This is because the Fibonacci series starts from 0.
  2. It calls the function fib_calculate( )which takes the number num and lists fib_num as a parameter.
  3. We have saved-I at all index in the list:

a. If fib_num[num] is>0, that means Fibonacci for this number already exists and we need not compute it again and the number can be returned.
b. If num <= 1 then return num.
c. Else if num >=2, calculate fib_calculate(num – 1, fib num) + fib_calculate(num – 2, fib_num). The value calculated must be stored in list fib_num at index num so that there is no need to calculate it again.

Code

def fibonacci (num) :

   fib_num = [-1] * (num + 1)
   return fib_calculate (num, fib_num)
def fib_calculate (num, fib_num) :
   if fib_num [num] >= 0:
        return fib_num[num]

if (num <= 1):
    fnum = num
else:
     fnum = fib_calculate (num - 1, fib_num) + fib_ calculate (num - 2, fib_num)
fib_num [num] = fnum

return fnum

Execution

num = int(input('Enter the number: '))
print ("Answer = ", fibonacci (num) )

Output

Enter the number: 15 
Answer = 610
>>>

Question 6.
What would be the output of the following program?

def test_function(i, j) :
      if i == 0:
          return j;
      else:
           return test_function(i-1, j+1)
    print (test_function(6,7) )

Answer:

I J I==0? Return
6 7 No Test_function(5,8)
5 8 No Test_function(4,9)
4 9 No Test_function(3,10)
3 10 No Test_function(2,11)
2 11 No Test_function(1,12)
1 12 No Test_function(0,13)
0 13 Yes 13

The output will be 13.

Question 7.
What will be the output for the following code:

def even(k):
    if k <= 0:
        print("please enter a positive value")
    elif k == 1:
           return 0
   else:
       return even(k-1) + 2
print(even(6))

Answer:

K K<=0 K ==1 Result
6 no No Even(5)+2
5 No No Even(4)+2+2
4 No No Even(3)+2+2+2
3 No No Even(2)+2+2+2+2
2 No No Even(1)+2+2+2+2+2
1 No yes 0)+2+2+2+2+2

Question 8.
Write a code to find the n_power(n), of 3 using recursion. Answer:
1. Define function n_power(n), it takes the value of power and parameter(n).
2. If n = 0 then return 1 because any number raised to power 0 is 1.
3. Else return (n_power(n-1)).

N N<0 N ==0 Result
4 No No n_power(3)*3
3 No No n_power(2)*3*3
2 No No n_power(1)*3*3*3
1 No No n_power(0)*3*3*3*3
0 No Yes 1*3*3*3*3

Code

def n_power(n):
    if n < 0:
       print ("please enter a positive value")
   elif n == 0:
        return 1
   else:
       return n_power(n-1)*3

Execution

print(n_power(4))

Output

81

Python Data Persistence object-oriented programming

Python Data Persistence – OOP

The object-oriented programming paradigm has emerged as a cornerstone of modern software development. Python too is a predominantly object-oriented language, although it supports classical procedural approach also. Python’s implementation of OOP is a little different from that of C++ and Java, and is in keeping with ‘Simple is better than Complex’ – one of the design principles of Python. Let us not go into much of the theory of object-oriented programming methodology and its advantages. Instead, let us dive straight into Python’s brand of OOP!

Everything in Python is an object. This statement has appeared more than once in previous chapters. What is an object though? Simply put, object is a piece of data that has a tangible representation in computer’s memory. Each object is characterized by attributes and behaviour as stipulated in a template definition called class. In Python, each instance of any data type is an object representing a certain class. Python’s built-in type ( ) function tells you to which class an object belongs to. (figure 4.1)

>>> num=1234
>>> type(num)
<class 'int'>
>>> complexnum=2+3j
>>> type(complexnum)
<class 'complex'>
>>> prices={ 'pen' :50, 'book' :200}
>>> type(prices)
<class 'diet'>
>>>

Each Python object also possesses an attribute__class__that returns class. (figure 4.2)

>>> num.__class__
<class 'int'>
>>> complexnum.__class__
<class 'complex'>
>>> prices.__class__
<class 'diet'>
>>>

Hence, it is clear that num is an object of int class, a complexion is an object of the complex class, and so on. As mentioned above, an object possesses attributes (also called data descriptors) and methods as defined in its respective class. For example, the complex class defines real and image attributes that return the real and imaginary parts of a complex number object. It also has conjugate () method returning a complex number with the imaginary part of the opposite sign, (figure 4.3)

>>> complexnum=2+3j
>>> #attr.ibutes
. . .
>>> complexnum.real
2.0
>>> complexnum.imag
3.0
>>> #method
. . .
>>> complexnum.conjugate()
(2-3j )

In the above example, real and imag are the instance attributes as their values will be different for each object of the complex class. Also, the conjugate 0 method is an instance method. A class can also have class-level attributes and methods which are shared by all objects. We shall soon come across their examples in this chapter.

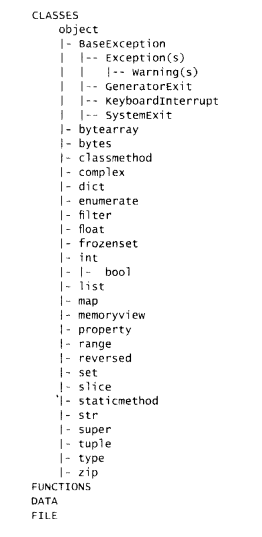
Built-in data types in Python represent classes defined in the builtins module. This module gets loaded automatically every time when the interpreter starts. The class hierarchy starts with object class. The builtins module also defines Exception and built-in functions (many of which we have come across in previous chapters).

The following diagram rightly suggests that built-in classes (int, float, complex, bool, list, tuple, and diet) are inherited from the object class. Inheritance incidentally is one of the characteristic features of Object-Oriented Programming Methodology. The base attribute of each of these classes will confirm this.

Python’s built-in function library also has issubclass ( ) function to test if a certain class is inherited from another. We can use this function and confirm that all built-in classes are sub-classes of the object classes. Interestingly, class is also an object in Python. Another built-in function is±nstance() returns True if the first argument is an object of the second argument which has to be a class. By the way, type ( ) of any built-in class returns type which happens to be a metaclass of which all classes are objects, is itself a subclass of the object as its base class, (figure 4.4)

Python Data Presistence - OOP chapter 4 img 1

Following interpreter, activity shows that bool class is derived from int class, which is a subclass of object class and also an object of object class!

Example

>>> isinstance(int, object)
True
>>> issubclass(bool, int)
True
>>> int. bases
(<class 'object'>,)
>>> isinstance(int, object)
True

Each class also has access to another attribute__mro__(method resolution order) which can show the class hierarchy of inheritance. The bool class is inherited from int and int from the object.

Example

>>> bool.__mro__
(<class 'boo'>, <class 'int'>, <class 'object'>)

As mentioned above, type () on any built-in class returns type class which in turn is both a subclass and instance of the object class.

Example

>>> type(bool)
<class 'type'>
>>> type.__bases__
(<class 'object'>,)
>>> isinstance(type, object)
True
>>> issubclass(type, object)
True

Other important constituents of Python program such as functions or modules are also objects, as the following interpreter activity demonstrates:

Example

>>> #function from a module
. . .
>>> import math
>>> type(math.sqrt)
<class 'builtin_function_or_method'>
>>> #built-in function
. . .
>>> type(id)
cclass 'builtin_function_or_method'>
>>> #user defined function
. . .
>>> def hello( ):
... print ('Hello World')
. . .
>>> type(hello)
<class 'function'>
>>> #module is also an object
. . .
>>> type(math)
<class 'module'>

We have used the range ( ) function in connection with for loop. It actually returns a range object which belongs to the range class.

Example

>>> #range is also an object
. . .
>>> obj=range(10)
>>>type(obj)
<class 'range'>
>>> >>> range._bases__
(<class 'object'>,)

Python Data Persistence – Exceptions

Python Data Persistence – Exceptions

Even an experienced programmer’s code does contain errors. If errors pertain to violation of language syntax, more often than not, they are detected by the interpreter (compiler in case of C++/Java) and code doesn’t execute till they are corrected.

There are times though when the code doesn’t show syntax-related errors but errors creep up after running it. What is more, sometimes code might execute without errors and some other times, its execution abruptly terminates. Clearly, some situation that arises in a running code is not tolerable to the interpreter. Such a runtime situation causing the error is called an exception.
Take a simple example of displaying the result of two numbers input by the user. The following snippet appears error-free as far as syntax error is concerned.

Example

num1=int(input('enter a number..')) 
num2 = int(input(1 enter another number..')) 
result=num1/num2 
print ('result: ' , result)

When executed, above code gives satisfactory output on most occasions, but when num2 happens to be 0, it breaks, (figure 5.3)

enter a number . . 12
enter another number . . 3
result: 4.0
enter a number . . 12
enter another number . . 0
Traceback (most recent call last) :
File "E:\python37\tmp.py", line 3, in <module> 
result =num1/num2
ZeroDivisionError: division by zero

You can see that the program terminates as soon as it encounters the error without completing the rest of the statements. Such abnormal termination may prove to be harmful in some cases.
Imagine a situation involving a file object. If such runtime error occurs after the file is opened, the abrupt end of the program will not give a chance for the file object to close properly and it may result in corruption of data in the file. Hence exceptions need to be properly handled so that program ends safely.

If we look at the class structure of builtins in Python, there is an Exception class from which a number of built-in exceptions are defined. Depending upon the cause of exception in a running program, the object representing the corresponding exception class is created. In this section, we restrict ourselves to consider file operations-related exceptions.

Python’s exception handling mechanism is implemented by the use of two keywords – try and except. Both keywords are followed by a block of statements. The try: block contains a piece of code that is likely to encounter an exception. The except block follows the try: block containing statements meant to handle the exception. The above code snippet of the division of two numbers is rewritten to use the try-catch mechanism.

Example

try:
num1=int(input('enter a number..'))
num2=int(input('enter another number..'))
result=num1/num2
print (' result: ' , result)
except:
print ("error in division")
print ("end of program")

Now there are two possibilities. As said earlier, the exception is a runtime situation largely depending upon reasons outside the program. In the code involving the division of two numbers, there is no exception if the denominator is non-zero. In such a case, try: block is executed completely, except block is bypassed and the program proceeds to subsequent statements.

If however, the denominator happens to be zero, a statement involving division produces an exception. Python interpreter abandons rest of statements in try: block and sends the program flow to except: block where exception handling statements are given. After except: block rest of unconditional statements keep on executing, (figure 5.4)

enter a number..15 
enter another number..5 
result: 3.0
end of program 
enter a number..15 
enter another number..0 
error in division 
end of program

Here, except block without any expression acts as a generic exception handler. To catch objects of a specific type of exception, the corresponding Exception class is mentioned in front of except keyword. In this case, ZeroDivisionError is raised, so it is mentioned in except statement. Also, you can use the ‘as’ keyword to receive the exception object in an argument and fetch more information about the exception.

Example

try:
num1=int(input('enter a number..')) 
num2=int(input('enter another number..')) 
result =num1/num2 
print ('result: ', result) 
except ZeroDivisionError as e: 
print ("error message",e) 
print ("end of program")

File operations are always prone to raising exceptions. What if the file you are trying to open doesn’t exist at all? What if you opened a file in ‘r’ mode but trying to write data to it? These situations will raise runtime errors (exceptions) which must be handled using the try-except mechanism to avoid damage to data in files.
FileNotFoundError is a common exception encountered. It appears when an attempt to read a non-existing file. The following code handles the error.

Example

E:\python37>python tmp.py
enter a filename, .testfile.txt
H e l l o P y t h o n
end of program
E:\python37>python tmp.py
enter filename, .nofile.txt
error message [Errno 2] No such file or directory:
' nofile . txt '
end of program

Another exception occurs frequently when you try to write data in a file opened with ‘r’ mode. Type of exception is UnsupportedOperation defined in the io module.

Example

import io
try:
f=open ( ' testfile . txt1 , ' r ')
f.write('Hello')
print (data)
except io.UnsupportedOperation as e:
print ("error message",e)
print ("end of program")

Output

E:\python37 >python tmp.py 
error message not writable 
end of program

As we know, the write ( ) method of file objects needs a string argument. Hence the argument of any other type will result in typeError.

Example

try:
f=open (' testfile . txt' , ' w')
f.write(1234)
except TypeError as e:
print ("error message",e)
print ("end of program")


Output

E:\python37>python tmp.py
error message write() argument must be str, not int end of program

Conversely, for file in binary mode, the write () method needs bytes object as argument. If not, same TypeError is raised with different error message.

Example

try:
f =open ( ' testfile . txt' , ' wb' )
f.write('Hello1)
except TypeError as e:
print ("error message",e)
print ("end of program")

Output

E:\python37>python tmp.py
error message a bytes-like object is required, not 'str'
end of program

All file-related functions in the os module raise OSError in the case of invalid or inaccessible file names and paths, or other arguments that have the correct type but are not accepted by the operating system.

Example

import os
try:
fd=os . open ( ' testfile . txt' , os . 0_RD0NLY | os . 0_CREAT) os.write(fd,'Hello'.encode())
except OSError as e:
print ("error message",e)
print ("end of program")

Output

E:\python37>python tmp.py
error message [Errno 9] Bad file descriptor 
end of program

In this chapter, we learned the basic file handling techniques. In the next chapter, we deal with advanced data serialization techniques and special-purpose file storage formats using Python’s built-in modules.

Python Data Persistence – File/Directory Management Functions

Python Data Persistence – File/Directory Management Functions

We normally use operating system’s GUI utilities or DOS commands to manage directories, copy, and move files etc. The os module provides useful functions to perform these tasks programmatically. os .mkdir ( ) function creates a new directory at given path. The path argument may be absolute or relative to the current directory. Use chdir ( ) function to set current working directory at the desired path. The getcwd ( ) function returns the current working directory path.

Example

>>> os.mkdir('mydir')
>>> os.path.abspath('mydir')
'E:\\python37\\mydir'
>>> os.chdir('mydir')
>>> os.getcwd()
'E:\\python37\\mydir'

You can remove a directory only if the given path to rmdir ( ) function is not the current working directory path, and it is empty.

Example

>>> os.chdir( ' . . ' ) #parent directory becomes current working directory
>>> os.getcwd ( )
'E:\\python37'
>>> os.rmdir('mydir')

The rename ( ) and remove ( ) functions respectively change the name of a file and delete a file. Another utility function is listdir () which returns a list object comprising of file and subdirectory names in a given path.

Python Data Persistence – File Handling using os Module

Python Data Persistence – File Handling using os Module

Python’s built-in library has an os module that provides useful operating system-dependent functions. It also provides functions for performing low-level read/write operations on the file. Let us briefly get acquainted with them.

The open () function from the os module (obviously it needs to be referred to as os. open ( )) is similar to the built-in open ( ) function in the sense it also opens a file for reading/write operations. However, it doesn’t return a file or file-like object but a file descriptor, an integer corresponding to the file opened. File descriptor’s values 0, 1, and 2 are reserved for stdin, stout, and stder r streams. Other files will be given an incremental file descriptor. Also, the write ( ) and read( ) functions of the os module needs bytes to object as the argument. The os .open () function needs to be provided one or combinations of the following constants: (Table 5.2)

os.OWRONLY open for writing only
os.ORDWR open for reading and writing
os.OAPPEND append on each write
os.OCREAT create file if it does not exist
os.OTRUNC truncate size to 0
os.OEXCL error if create and file exists

As in the case of a file object, the os module defines a sleek () function to set file r/w position at the desired place from the beginning, current position, or end indicated by integers 0,1, and 2 respectively.

Example

>>> fd=os . open ("testfile. txt", os .0_RDWR | os .0_CREAT)
>>> text="Hello Python"
>>> encoded=text.encode(encoding='utf-16')
>>> os.write(fd, encoded)
>>> os.lseek(fd,0,0)
>>> encoded=os.read(fd)
>>> os.path.getsizeCtestfile.txt") #calculate file size
>>> encoded=os.read(fd, 26)
>>> text=encoded.decode('utf-16 ')
>>> text
'Hello Python'


Python Data Persistence – Simultaneous Read/Write

Python Data Persistence – Simultaneous Read/Write

Modes ‘w’ or ‘a’ allow a file to be written to, but not to be read from. Similarly, ‘r’ mode facilitates reading a file but prohibits writing data to it. To be able to perform both read/write operations on a file without closing it, add the ‘+’ sign to these mode characters. As a result ‘w+’, ‘r+’ or ‘a+’ mode will open the file for simultaneous read/write. Similarly, binary read/ write simultaneous operations are enabled on file if opened with ‘wb+’, ‘rb+’ or ‘ab+’ modes.

It is also possible to perform read or write operations at any byte position of the file. As you go on writing data in a file, the end of file (EOF) position keeps on moving away from its beginning. By default, new data is written at the current EOF position. When opened in ‘r’ mode, reading starts from the 0th byte i.e. from the beginning of the file.
The seek ( ) method of file object lets you set current reading or writing position to a desired byte position in the file. It locates the desired position by counting the offset distance from beginning (0), current position (1), or EOF (2). Following example illustrates this point:

Example

>>> file=open ("testfile . txt", "w+")
>>> file .write ("This is a rat race")
>>> file.seek(10,0) #seek 10th byte from beginning
>>> txt=file . read (3) #read next 3 bytes
>>> txt
' rat'
>>> file . seek (10,0) #seek 10th byte position
>>> file . write ('cat' ) #overwrite next 3 bytes
>>> file.seek(0)
>>> text=file . read () #read entire file
>>> text
'This is a cat race'
>>> file . close ( )

Of course, this may not work correctly if you try to insert new data as it may overwrite part of existing data. One solution could be to read the entire content in a memory variable, modify it, and rewrite it after truncating the existing file. Other built-in modules like file input and map allow modifying files in place. However, later in this book, we are going to discuss a more sophisticated tool for manipulating databases and update data on a random basis.

Python Data Persistence – Reading a File

Python Data Persistence – Reading a File

Let us now read ‘top-quotes.txt programmatically by opening it with r mode. When in R mode, the file object can call read (), readline ( ) , and readlines () methods.

Out of these, the read ( ) method can read a specified number of bytes from the file, the size defaults to file size. However, if the file is very big, the available memory restrictions may not allow the entire file to be read, so you may have to provide size parameters to read bytes at once.

Example

>>> file=open ( ' top-quotes . txt' , ' r')
>>> text=file . read ()
>>> text
"'The best way to predict the future is to invent it.' - Alan Kay'\nThere are only two kinds of programming languages: 
those people always bitch about and those nobody uses.' - 
Bjarne Stroustrup\ n'The only way to learn a new programming language is by writing programs in it.' 
-Dennis Ritchie\n'A computer would deserve to be called intelligent if it could deceive a human into believing that 
it was human.' - Alan Turing\nprogramming languages have a devious influence. They shape our thinking habits 
- Edsger W. Dijkstra\nprogrammers do programming not because they expect to get paid or get adulation by the public, 
but because it is fun to program - Linus Torvalds\nA computer would deserve to be called intelligent if it could deceive 
a human into believing that it was human - Alan Turing"
>>>file . close ( )

To read specified number of bytes from the beginning of file

Example

>>> file=open (' top-quotes . txt' , ' r' )
>>> text =file . read (65)
>>> text
" ' The best way to predict the future is to invent it.' - Alan Kay\n"
>>> file . close ()

Reading a File Line-by-Line

The readline () method reads all bytes till a newline character ‘\n’ is encountered. It returns an empty string when no more lines are left to be read. Hence, we can call readline ( ) method in a loop till empty string is returned, (figure 5.2)

>>> file=open ( ' top-quotes . txt1 , ' r ' )
>>> while True:
line=file . readline () 
if line=='':break 
print (line, end='')

'The best way to predict the future is to invent it.1 - Alan Kay 1 There are only two kinds of programming languages: 
those people always bitch about and those nobody uses.' - Bjarne Stroustrup 'The only way to learn a new programming 
language is by writing programs in it.1 -Dennis Ritchie
'A computer would deserve to be called intelligent if it could deceive a human into believing that it was human.' 
- Alan Turing programming languages haile a devious influence. They shape our thinking habits - Edsger W. Dijkstra
programmers do programming not because they expect to get paid or get adulation by the public, but because 
it is fun to program - Linus Torvalds
A computer would deserve to be called intelligent if it could deceive a human into believing that it was human - Alan Turing

The file object is a data stream that acts as an iterator. An iterator serves subsequent object every time next() function 
is called till stream is exhausted and Stoplteration exception is encountered. 
We can use the next () method on the file object to read a file line by line.

Example

f=open("top-quotes.txt", "r")
while True:
           try:
               line=next(f)
               print (line, end=" ")
      except StopIteration:
                  break
f . close ( )

Or simply use a for loop over each line in the file iterator:

Example

file=open ("top-quotes . txt", " r") 
for line in file:
print (line, end="") 
file. close ( )

The readlines ( ) method returns list of lines in the file.

>>> file=open( top-quotes.txt ' 'r')
>>> lines=file.readlines( )

Python Data Persistence – Backup and Restore Database

Python Data Persistence – Backup and Restore Database

It is extremely important to secure an organization’s data with periodic backup so that the same can be used to fall back in case of any damage. The sqlite3 module provides iterdump ( ) function that returns an iterator of the entire data of a database in the form of SQL statements. This includes CREATE TABLE statements corresponding to each table in the database and INSERT statements corresponding to rows in each table.

Let us demonstrate the effect of iterdump ( ) with the following example. First, we create a database with one table and insert a record in it. After that, we create a dump of the database. Run the following script and open the resultant backup.sql file with an editor.

Example

import sqlite3
conn=sqlite3.connect('sample.db')
qry='create table names (name text (20), address
text(20));'
conn.execute(qry)
qry="insert into names values('Anurag', 'Mumbai');"
cur=conn.cursor()
try:
cur.execute(qry) print ('record added') conn.commit()
except:
print ('error in insert operation')
conn.rollback()
conn.close()
#creating dump
conn=sqlite3.connect('sample.db')
f=open('dump.sql','w')
for line in conn.iterdump():
f.write('{}\n'.format(line))
f.close()
conn.close ()

The dump file, created, will look like the following:

Example

BEGIN TRANSACTION; 
CREATE TABLE names (name text (20), address 
text(20)); 
INSERT INTO "names" VALUES('Anurag' ,'Mumbai'); 
COMMIT;

To restore the database from the dumped version in ‘newsample.db’, we have to read its contents and execute SQL statements in it with the help of executescript ( ) method of the cursor object.

>>> conn=sqlite3.connect('newsample.db')
>>> f=open('dump.sql1,1r')
>>> qry=f.read( )
>>> f.close ( )
>>> cur=conn.cursor ( )
>>> cur.executescript(qry)
>>> conn, close ( )

The new database gets constructed from the backup. To verify, run a select query on its names table and display the result.

>>> conn=sqlite3.connect('newsample.db')
>>> cur=conn.cursor()
>>> cur.execute('select * from names;')
>>> row=cur.fetchone( )
> > > row
('Anurag', 'Mumbai')

As you can see the result is the same data inserted in the original database. As mentioned earlier, SQLite recognizes NULL, INTEGER, REAL, TEXT, BLOB as native data types. They are mapped to respective Python data types as per the following table:(table 8.1)

Python Type SQLite type
None NULL
Int INTEGER
Float REAL
Str TEXT
Bytes BLOB

The type system of the sqliteT module can be extended to store additional Python types in the SQLite database via object adaptation. You can let the sqlite3 module convert SQLite types to different Python types via converters. Discussion on adapters and converters is kept outside the scope of this book.

Before we discuss other DB-API compatible modules, one more thing is worth mentioning here. We have used The execute () method – and its other variants execute any( ) and execute scripts) – as defined in the cursor class of the sqlite3 module. These methods are also available for use with the connection object. However, as mentioned in the official documentation of the sqlite3 module, they are non-standard methods. It simply means that DB API recommends these methods be defined in cursor class and the connection object as defined in other modules (pymysql or pyodbc module for example) may not be able to call these execute() methods.

Python Data Persistence – Using pymysql Module

Python Data Persistence – Using pymysql Module

To make a Python program interact with a MySQL database, we need to install a DB-API compliant module. As mentioned earlier in this chapter, there are many alternatives available for this purpose. In this section, we shall discuss the use of pymysql module. In any case, the functionality of any DB-API compatible module is more or less similar, with a few differences.

The pymysql module is not a part of Python’s standard library. Hence, we have to install it using pip utility.

E:\python37>pip3 install pymysql

As per the DB-API standards, the first step is to establish a connection with the database to be used. Usage of connecting () function in pymysql module is a little different. Remember that MySQL databases are hosted on a server. Hence, the server’s URL and login credentials (user ID and password) must be passed to connect () function. Additionally, if you are trying to connect to an existing database, its name should also be provided. If you are going to create a new database (or use an existing database later), you needn’t provide its name in the connect ( ) function’s parameter list and just connect to the server.

Example

>>> import pymysql
>>> con=pymysql . connect ( ' localhost ' , 'root' , '***' )

MySQL provides the ‘CREATE DATABASE’ statement to start a new database. Execute this statement through the cursor object obtained from the connection object.

Example

>>> cur=con.cursor ( )
>>> cur.execute('create database mynewdb')

You can now start using this (or any other existing database) either by select_db () method or executing the ‘USE DATABASE’ statement.

Example

>>> con.select_db('mynewdb')
>>> #or
>>> cur.execute('use mynewdb')

Now that the new database has been created and is in use, you are now in a position to create a table and perform insert, update, delete and select operations on it exactly as we did on an SQLite database. The only thing you need to take into account is MySQL data types which are different from SQLite data types. (Table 8,2)

Integer types TINYINT, SMALLINT, MEDIUMINT, INTEGER, BIGINT
Float types FLOAT, DOUBLE , DECIMAL, NUMERIC
String types VARCHAR, TEXT, BLOB, CHAR, NCHAR
Date/time types DATE , TIME, DATETIME
Binary types BLOB, LONGBLOB

Example

>>> qry=' ' '
CREATE TABLE Products (
ProductID INTEGER PRIMARY KEY AUTO_INCREMENT,
Name VARCHAR (20),
Price INTEGER
)
' ' '
>>> cur.execute(qry)

You can follow the process, as detailed in previous sections of this chapter, for insert, delete, and select operations.