Python Data Persistence – UPDATE Statement

Python Data Persistence – UPDATE Statement

It is possible to modify data of a certain field in a given table using the UPDATE statement. The usage syntax of the UPDATE query is as follows:

Example

UPDATE table_name SET coll=vall, col2=val2,.., colN=valN WHERE [expression] ;

Note that the WHERE clause is not mandatory when executing the UPDATE statement. However, you would normally want to modify only those records that satisfy ing a certain condition. If the WHERE clause is not specified, all records will be modified.

For example, the following statement changes the price of ‘Printer’ to 1000Q.

sqlite> update products set price=10000 where name='Printer';
sqlite> select * from products;
Product ID                Name                 Price
  ----------                 -----------          ------  
      1                         Laptop              25000
      2                          TV                    40000
      3                         Router               2000
      4                         Scanner             5000
      5                         Printer              10000
      6                         Mobile             15000

However, if you want to increase the price of each product by 10 percent, you don’t have to specify the WHERE clause.

sqlite> update products set price=price+price*10/100;
sqlite> select * from products;
ProductID             Name                Price
 ----------             ----------          -------  
      1                      Laptop              27500
      2                      TV                     44000
      3                      Router                2200
      4                     Scanner               5500
      5                     Printer                11000
     6                      Mobile                16500

Python Data Persistence – Transaction Control

Python Data Persistence – Transaction Control

As mentioned above, SQLite is a transactional database and all transactions are ACID compliant. ACID stands for Atomic, Consistent, Isolated, and Durable. As a result, it ensures that the SQLite database doesn’t lose integrity, even if transaction such as INSERT, DELETE, or UPDATE, is interrupted because of any reason whatsoever.

A transaction is the propagation of changes to the database. The operation performed by INSERT, UPDATE, or DELETE statement results in a transaction.

Atomicity: When we say that a transaction should be atomic, it means that a change cannot be affected in parts. Either the entire transaction is applied or not applied.

Consistency: After any transaction is completed, the database should hold on to the changes in its state.
Isolation: It must be ensured that the transaction such as INSERT, UPDATE, or DELETE, performed by a client should only be visible to other clients after successful completion.

Durability: The result of successfully committed transactions must be permanent in the database regardless of the condition such as power failure or program crash.

SQLite provides two statements for transaction control. They are COMMIT and ROLLBACK. All CRUD (CREATE. RETRIEVE, UPDATE] and DELETE) operations first take effect in memory, and then they are permanently saved (committed) to the disk file. SQLite transactions are automatically committed without giving any chance to undo (roll back) the changes.
To control the commitment and rolling back manually, start transactions after issuing the directive BEGIN TRANSACTION. Whatever operations are done thereafter will not be confirmed, until COMMIT is issued and will be annulled if ROLLBACK is issued.

sqlite> select * from products;
productID      Name         price
----------     --------        -------
      1            Laptop       27500
      3           Router         2200
      4          Scanner        5500
      5          printer        11000
      6          Mobile        16500
sqlite> begin transaction;
sqlite> update products set price=2000 where name = 'Router';
sqlite> select * from products;
productID         Name         price
----------        --------        -------
      1               Laptop        27500
      3               Router        2200
      4              Scanner       5500
      5              printer         11000
     6               Mobile        16500
sqlite> rollback;
productID      Name        price
----------       --------     -------
      1             Laptop      27500
      3             Router       2200
      4             Scanner      5500
      5             printer        11000
      6             Mobile       16500

In the above example, the price of ‘ Router ‘ is initially 2200. It was changed to 2000 but rolled back. Hence its earlier value is restored. The following example shows the effect of the commit statement where the effect of the UPDATE statement is confirmed.

sqlite> begin transaction;
sqlite> update products set price=3000 where name='Router'; 
sqlite> commit;
sqlite> select * from products; 
productID        Name           price
----------          --------        -------
     1                 Laptop         27500
     3                 Router          2200
     4                 Scanner        5500
     5                 printer         11000
     6                Mobile          16500

Python Data Persistence – MySQL

Python Data Persistence – MySQL

So far we have learned how some basic SQL operations are performed over a relational database using SQLite console. Similar console-driven interaction is possible with other RDBMS products. MySQL console works more or less similar (barring certain syntactical differences) to the SQLite console we’ve used in this chapter. Following piece of code shows a sample MySQL console session:

Welcome to the MySQL monitor. Commands end with; or \g. 
Your MySQL connection id is 17
Server version: 5.7.23 MySQL Community Server (GPL) Copyright (c) 2000, 2018, 
Oracle and/or its affiliates. All rights reserved.
Oracle is a registered trademark of Oracle Corporation and/or its
affiliates. Other names may be trademarks of their respective owners.
Type 'help;1 or '\h' for help. Type '\c' to clear
the current input statement. 
mysql> show databases;
+------------------------+
 | Database                     |
+------------------------+
 | information_schema   |
 |mydb                            | 
 |mysql                            |
 | performance_schema  |
 |I sys                              |
+------------------------+
5 rows in set (0.03 sec) 
mysql> use mydb;
Database changed 
mysql > CREATE TABLE products 
         -> ( productID varchar(5),
         -> productName varchar(20),
         -> price Numeric(7,2));
Query OK, 0 rows affected (0.17 sec)
mysql> insert into products values (1, 'TV', 40000);
Query OK, 1 row affected (0.06 sec) 
mysql> select * from products;
+-------------+---------------+---------+
 | productID    | productName | price    |
+-------------+---------------+---------+
|       1            |          TV         | 40000.00 |
+-------------+---------------+---------+
1 row in set (0.05 sec)

MS SQL Server also has a console-based frontend called SQLCMD which also works similarly. The command-line interface of Oracle is called SQL*Plus. As far as PostgreSQL is concerned, its primary command-line interface is psql program.

All the RDBMS products also provide GUI-based environments to perform various SQL-related operations instead of command-line actions. Oracle’s SQL Developer, Microsoft’s SQL Server management studio, pgAdmin for PostgreSQL, and Workbench for MySQL are respective examples. SQL Server client is integrated with Visual Studio which helps the user to perform database operations graphically. MySQL module is shipped with various web server software bundles (for example, LAMP, XAMPP, etc.), providing a web-based interface called PhpMyAdmin. (figure 7.2)

Python Data Presistence - MySQL chapter 7 img 1

Although SQLite doesn’t provide its own GUI tool for database management, many third-party tools are available. One such utility is SQLiteStudio that is very popularly used.


Python Data Presistence – Variables

Python Data Presistence – Variables

When you use an object of any of the above types – of any type for that matter – (as a matter of fact everything in Python is an object!) it is stored in the computer’s memory. Any random location is allotted to it. Its location can be obtained by the built-in id ( ) function.

Example

>>> id(10)
1812229424
>>> id(‘Hello’)
2097577807520
>>> id([10,20,30])
2097577803464

However, order to refer to the same object repetitively with its id() is difficult. If a suitable name (by following rules of forming identifier) is given to an object, it becomes convenient while referring to it as and when needed. To bind the object with a name, the ‘=’ symbol is used. It is called the assignment operator.

Here, an int object 5 is assigned a name ‘radius’. The id( ) of both is same.

Example

>>> id(5)
1812229264
>>> radius=5
>>> id(radius)
1812229264

The name ‘radius’ can now be used in different expressions instead of its id ( ) value.

Example

>>> diameter=radius*2
>>> diameter
10
>>> area=3. 142*radius*radius
>>> area
78.55
>>> circumference=2*3.142*radius
>>> circumference
31.419999999999998

Dynamic Typing

Python is a dynamically typed language. This feature distinguishes it from C Family languages like C, C++, Java, and so on. These languages are statically typed. What is the difference?

The difference is the manner in which a variable behaves. In statically typed languages, the variable is in fact a named location in the memory. Moreover, it is configured to store data of a certain type before assigning it any value. Data of any other type is not acceptable to the respective language compiler. Type of Variable is announced first, and data of only that type is acceptable. This makes these languages statically typed.

Look at the following statements in a Java program. A string variable is declared and assigned a string value. However, if we try storing the value of any other type then the Java compiler reports an error.

Example

String somevar;
somevar=”some string value”;
somevar=999;

Java Compiler error

Error: incompatible types: int cannot be converted to java. lang.String

On the other hand, a variable in Python is not bound permanently to a specific data type. In fact, it is only a label to an object in memory. Hence, Java-like prior declaration of variable’s data type is not possible, nor is it required. In Python, the data assigned to a variable decides its data type and not the other way round.

Let us define a variable and check its id ( ) as well as type ( ).

Example

>>> somevar=’some string value’
>>> id(somevar)
2166930029568
> > > type(somevar)
<class ‘str’>

‘somevar’ is a string variable here. But it’s just a label. So you can put the same label on some other object.

Let us assign an integer to Somevar’ and check id () as well as type () again.

Example

>>> somevar=999
>>> id(somevar)
2166929456976
>>> type(somevar)
<class 1int’>

Two things to note here:

  1. You didn’t need a prior declaration of variable and its type.
  2. Variable’s type changed according to data assigned to it. That’s why Python is called a dynamically typed language.

Sequence Operators

As described earlier, string, list, and tuple objects are sequence types. Obviously, arithmetic operators won’t work with them. However, the symbols ‘+’ and can. In this context, they are defined as concatenation and repetition operators respectively.
The concatenation operator (‘+’) appends the contents of the second operand to the first. Of course, both operands must be of the same type.

Example

>>> #concatenation of strings
>>> str1=’Hello World.’
>>> str2=’Hello Python.’
> > > str1+str2
‘Hello World.Hello Python.’
> > > #concatenation of lists
. . .
>>> list1= [1,2,3,4]
> > > list2= [‘one’, ‘two’, ‘three’ ,’four’ ]
> > > listl+list2
[1, 2 , 3 , 4 , ‘ one ‘ , ” two ‘ , ‘ three ‘ , ‘ four’]
>>> ttconcatenation of tuples
. . .
>>> tup1=(1,2,3,4)
>>> tup2=(‘one’,’two’,’three’, ‘four’)
>>> tupl+tup2
(1, 2 , 3, 4, ‘one’, ‘two’, ‘three’, ‘ four’)

Repetition operator(‘*’) concatenates multiple copies of a sequence. The sequence to be replicated is the first operand, the second operand is an integer that specifies the number of copies.

Example

>>> #repetition operator with string
. . .
>>> strl=’Hello.’
>>> str1*3
‘Hello.Hello.Hello.’
>>> #repetition operator with list
. . .
>>> list1= [1,2,3,4]
>>> list1*3
[1, 2, 3, 4, 1, 2, 3, 4, 1, 2, 3, 4]
>>> #repetition operator with tuple
tup1=(1,2,3,4)
>>> tup1*3
(1, 2, 3, 4, 1, 2, 3, 4, 1, 2, 3, 4)

Index operator (‘[]!) extracts an item at a given position in a sequence. As you know, the sequence is an ordered collection of items and each item has a positional index starting from 0. The expression seq[i] fetches ill item from a given sequence.

Example

>>> #indexing of string
. . .
>>> str1=’Monty Python and the Holy Grail ‘
>>> str1 [21]
‘ H ‘
>>> #indexing of list
. . .
>>> list1=[l,2,3,4,5,6,7,8,9,10]
>>> list1 [6]
7
>>> list1= [‘Python ‘ , ‘‘Java’, ‘C++’, ‘Ruby’, ‘Kotlin’]
>>> .list1 [3]
‘Ruby’
>>> #indexing of tuple
. . .
>>> tup1=(-50, 3.142, 2+3j, True, 50
>>> tup1[2]
(2+3j) )

Slice operator (‘[:]’) fetches a part of the sequence object. The expression has two integers on either side of the symbol inside square brackets. The first integer is an index of the first item in the sequence and the second integer is an index of the next item up to which slice is desired. For example seqflj] returns items from i* position to (j-l)the position. The first integer is 0 by default. Second integer defaults to the last index of the sequence. Remember index starts from 0.

Example

>>> #slicing of string
… strl=’Monty Python and the Holy Grail’
>>> strl [13:16]
‘and’
>>> listl=[‘Python’, ‘Java’, ‘C++’, ‘Ruby’, ‘Kotlin’]
>>> listl [1:3]
[‘Java’, ‘C++’]
>>> tupl=(-50, 3.142, 2 + 3j, True, 50)
>>> tupl[2:4]
( (2 + 3j), True)

There are two ‘Membership’ operators in Python. The in operator checks if an operand exists as one of the items in a given sequence and returns True if so, otherwise, it returns False. The not-in operator does the opposite. It returns False if the operand doesn’t belong to a given sequence, otherwise it returns True.

Example

>>> #membership operator with string
. . .
>>> str1=’Monty Python and the Holy Grail’
>>> ‘Holy’ in str1
True
>>> ‘Grill’ not in str1
True
>>> #membership operator with list
. . .
>>> list1=[‘Python’, ‘Java’, ‘C++’, ‘Ruby’, ‘Kotlin’]
>>> ‘C#’ in list1
False
>>> ‘Ruby’ not in list1
False
>>> #membership operator with tuple
. . .
>>> tup1=(-50, 3.142, 2+3j, True, 50)
>>> 3.142 in tup1
True
>>> 3.142 not in tup1
False

Mutability

As already mentioned, everything in Python is an object. A Python object is either mutable or immutable. What is the difference?
To put it simply, the object whose contents can be changed in place is mutable. As a result, changes are not possible in the contents of immutable objects. Of the built-in objects numbers, string, and tuple objects are immutable. On the other hand, list and dictionary objects are mutable.

Let us try to understand the concept of mutability with the help of the id() function that we have earlier used. First, define a variable and assign an integer to it.

Example

>>> x=100
>>> id(x)
1780447344

Remember that a variable is just a label of the object in memory. The object is stored in a location whose id() is given as shown in example 1.31 above. (The location is allotted randomly. So, when you try it on your machine, it may be different.) To understand what goes on inside the memory, have a look at the diagram (figure 1.4) below. Figure 1.4 (a) shows a label assigned to an integer object 100.
Next, assign x to another variable y.

Python Data Presistence - Variables chapter 1 img 1

Example

>>> y=x
>>> id(y)
1780447344
>>> y
100

Figure 1.4 (b) shows that id() of y is the same as id ( ) of x. It means both x and y are labels of the same object in memory, in this case, the number 100.
Now, increment x by 1 (x=x+l). A new integer object 101 is located at a different location and it is bound to name x. Now x label is detached from 100 but y still remains on 100. (refer figure 1.4 (c))

Example

>>> x=x+1
>>> X
101
>>> id(x)
1780447376
>>> id(y)
1780447344

id (x) has changed but id (y) remains as earlier.

It is clear that the location containing object 100 doesn’t get replaced by 101, instead, it is stored in a new location. Hence, we say that a Number object is immutable. String and tuple objects are also immutable. If we try to change the sequence of characters in a string or any of the items in a tuple, the TypeError message appears effectively meaning that items in a string/tuple sequence can’t be altered because they are immutable.

Example

>>> str1=’Hello World’
>>> str1[6]
‘ W’
>>> str1 [6] = ‘ z ‘
Traceback (most recent call last):
File “<stdin>”, line 1, in <module>
TypeError: ‘str’ object does not support item
assignment
>>> tup1=(-50, 3.142, 2+3j, True, 50)
>>> tup1[1]
3.142
>>> tup1[1]=2.303
Traceback (most recent call last):
File “<stdin>”, line 1, in <module>
TypeError: ‘tuple’ object does not support item assignment

This restriction doesn’t apply to list or dictionary objects. You can add, remove, or modify a list or dictionary. Hence, they are mutable.
Following code demonstrates how an item in list/dictionary is modified.

Example

>>> list1=[‘python’, ‘java’,’C++’ , ‘Ruby’, ‘kotlin’]
>>> list[2] = ‘c#’
>>> list1
[‘Python’ , ‘Java’ , ‘C#’ , ‘Ruby’ , ‘ Kotlin’ ]
>>> dict1= {“Mumbai’ , : ‘Maharastra’ , ‘Hyderebad’ : ‘Telangana’ , ‘patna’ , : ‘Bihar’}
>>>dict1 [‘Hyderabad’ ] = ‘Andhra pradesh’
>>>dict1
{‘Mumbai’ : ‘ Maharastra’ , ‘Hyderabad’ : ‘Andhra pradesh’ ‘patna’ : ‘Bihar’ }

Addition/removal of items in list and dictionary is being explained later in this chapter. That brings us to one of the questions left unanswered earlier. What is the difference between list and tuple? Now the answer is clear. Tuple is immutable. List is mutable.

Python Data Presistence – Methods of Built-in Data Type Classes

Python Data Persistence – Methods of Built-in Data Type Classes

Python built-in object of a certain type is characterized by attributes and methods, and as defined in the built-in class of the corresponding name. Methods defined in s tr class for example are available for use to each string object. So is the case of list, tuple, and dictionary objects.

In this section, some commonly used methods of built-in type classes are described. (Two new terms pop up here – class and methods. You’ll come to know about them in the chapter on Object-oriented programming. For the time being treat a method as a function only.)

String Methods

Various methods in str class fall into the following categories:

Related to Case of Alphabets

1. capitalize ( ): Method changes the first letter of the given string to uppercase and returns another string object.

Example

>>> str1=1 python string’
>>> str2=str1.capitalize( )
>>> str2
‘Python string’

2. lower ( ): Method returns a string object by replacing all alphabets in given string with respective lowercase equivalents.

Example

>>> str1=’Python String’
>>> str2=strl.lower( )
>>> str2
‘python string’

3. upper ( ): Method ensures that the resulting string consists of all uppercase alphabets.

Example

>>> str1=’Python String’
>>> str2=str1.upper()
>>> str2
‘PYTHON STRING’

4. title ( ): Method titlecases the string having first alphabet of each word in uppercase.

Example

>>> str1=’python string’
>>> str2=strl.title()
>>> str2
‘Python String’

5. swapcase ( ): Method replaces uppercase alphabets by lowercase and vice versa.

Example

>>> str1=’Simple is Better than Complex.’
>>> str2=str1.swapcase()
>>> str2
‘SIMPLE IS bETTER THAN COMPLEX.’
>>> str1=str2.swapcase()
>>> str1
‘Simple is Better than Complex.’

Find/Replace Methods

1. find( ): Method returns index of first occurrence of a substring in given string. If not found, the method returns -1

Example

>>> str1=’Simple is Better than Complex.’
>>> str1 .find (‘p1’ )
3
>>> strl .find (‘bet’ )
-1

2. index( ): Method is similar to find() except this one raises ValueError if the substring is not found.

Example

>>> str1=’Simple is Better than Complex.’
>>> str1. index (‘p1’ )
3
>>> strl.index(‘bet’)
Traceback (most recent call last):
File “<stdin>”, line 1, in <module>
ValueError: substring not found

3. replace ( ): Method requires two string parameters. All occurrences of first parameter get replaced by second parameter.

Example

>>> str1=’all animals are equal. Some are more equal
>>> str1.replace(‘are’, ‘were’)
‘all animals were equal. Some were more equal’

4. count( ): Method returns an integer corresponding to the number of times a substring occurs in a given string.

Example

>>> str1=’Simple is Better than Complex.’
>>> str1.count(‘pi1)
2

Methods Returning Boolean Result

1. isalpha ( ): Method returns True if all characters in given string are alphabetic i.e a-z or A-Z.

Example 

>>> str1=’BpbOnline’
>>> str1.isalpha()
True
>>> str2=’BPB Publications’
>>> str2.isalpha()
False

2. isdigit ( ): Method returns True if the string is made of all digits. If not, it returns False.

Example

>>> str1= ‘8860322236’
>>> str1.isdigit ( )
True
>>> str1= ‘ (+91) 8860322236’
>>> str1 . isdigit ( )
False

3. islower( ) : If all alphabets in given string are in lowercase,this method returns True otherwise returns False.

Example

>>> str1=’pythonrocks’
>>> str1.is lower( )
True

4. isupper ( ): Method returns True if all alphabets in given string are in uppercase not considering other characters.

Example

>>> str1=’IIT JEE’
>>> str1.isupper( )
True

5. startswith( ): method returns True if the given string has substring parameter or any of string items is in a tuple parameter. If it doesn’t, then False is returned.

Example

>>> name=1 Mr. John’
>>> name.startswith(‘Mr’)
True
>>> name=’Dr. Watson’
>>> name.startswith((‘Mr’ , True ‘Dr’))
True

6. endswith ( ): Method checks whether the substring parameter is at the end of a given string and returns True if so, otherwise returns False. The substring to be checked can also be in the tuple parameter.

Example

>>> name=’Mr. John’
>>> name.endswith(‘on’)
False
>>> name=’Dr. Watson’
>>> name.endswith((‘on’, True 1 ‘hn’))
True

Join/split

1. join( ): Method concatenates all string objects in a list or tuple. Items in list/tuple are separated by given string object.

>>> list1= [‘Python’, 1 C++’, ‘Ruby’, 1Kotlin’]
>>> sep=’ and ‘
>>> sep.join(list1)
‘Python and C++ and Ruby and Kotlin’
>>> listl= [‘192’, ‘168’, ‘0’ , ‘1’ ]
>>> sep=’.’
>>> sep.join(listl)
‘192.168.0.1’

2. split ( ): Method separates splits given string into parts wherever the substring parameter is found. The parts are returned in the form of a list object.

Example

>>> str1=’all animals are equal. Some are more equal’
>>> strl.split(‘ ‘)
[‘all’, ‘animals’, ‘are’, ‘equal.’, ‘Some’, ‘are’, ‘more’, ‘equal’]
>>> strl=’192.168.0.1′
>>> strl.split(‘.’)
[ ‘ 192’, ‘ 168’, ‘O’, ‘1’ ]

3. strip ( ): If no parameter is present in the parentheses of this method, then leading and trailing spaces are removed. The parameter can be a string of one or more characters. It acts as a set of characters to be removed.

Example

>>> str1=’ Hello Python ‘
>>> strl.strip( )
‘Hello Python’
>>> str1=’all animals ‘are equal’
>>> str1.strip(‘alu’)
‘ animals are eq’

4. format( ): Method returns a formatted string by interpolating placeholders in the given string by values of objects. Values of parameters in the method’s parentheses fillup the place holders marked by {}.

Example

>>> name=’Virat Kohli’
>>> runs=10385
>>> print (‘{ } is Captain of India. He has scored {} runs in ODI.’.format(name,runs))
Virat Kohli is Captain of India. He has scored 10385 runs in ODI.

The curly bracket placeholders in the string are filled in the same order in which parameters appear in parentheses. You can also refer to the parameter by name and use them in any order.

Example

>>> name=’Virat Kohli’
>>> runs=10385
>>> print (‘{nm} is Captain of India. He has scored {r} runs in ODI.1.format(r=runs,nm=name))
Virat Kohli is Captain of India. He has scored 10385 runs in ODI.

Python also supports C-style string formatting using the ‘ %’ sign as a substitution character. The format specification symbols (like %d, %f, %c, and so on; famously used in print( ) statement of C program) are available for use in Python too.

Example

>>> name=1Virat Kohli’
>>> runs=10385
>>> print (“%s is Captain of India. He has scored %d runs in ODI.” % (name,runs))
Virat Kohli is Captain of India. He has scored 10385 runs in ODI.

List Methods

As described earlier, the list is a mutable data type. It means, it is possible to change the contents of a list object after it has been defined. In this section, you will learn to handle methods in list class that can add/modify/rein o ve items in a list object.

1. append ( ): Method adds a new item at the end of the given list.

Example

>>> list1=[‘Python’,’C++’ ’Ruby’, Kotlin’]
>>> list1.append(‘JS’)
>>> list1
[‘Python’, ‘C++’, ‘Ruby’, ‘Kotlin , ‘JS’]
>>>

2. insert ( ): Method needs two parameters. the Second parameter is the new object to be added. The first parameter is the index at which it will be inserted. Again, the sequence index starts from 0.

Example

>>> list1=[‘Python’,’C++’ ‘Ruby’ ‘Kotlin’]
>>> list1.insert(2,’Java’)
>>> list1
[‘Python’, ‘C++’, ‘Java’, ‘Ruby’ ‘Kotlin’]
>>>

3 . count ( ): Method returns an integer corresponding to number of times a certain item appears in given list.

Example

>>> list1= [3,5,9,3,6]
>>> list1.count(3)
2
>>> str1=’all animals are equal. Some are more equal’
>>> list1=strl.split(‘ ‘)
>>> list1
[‘all’, ‘animals’, ‘are’, ‘equal.’, ‘Some’, ‘are’, ‘more’, ‘equal’]
>>> list1.count(‘are’)
2
> > >

4. index ( ): method returns the index of the first occurrence of a certain value if found in a given list. If it is not found, then the method raises ValueError.

Example

>>> list1= [‘ all’ , ‘animals’, ‘are’, ‘equal.’, ‘Some’, ‘are’, ‘more’, ‘equal’]
>>> list1.index(‘are’)
2
>>> listl.index(‘were’)
Traceback (most recent call last):
File “<stdin>”, line 1, in <module>
ValueError: ‘were’ is not in list
>>>

5 . reverse ( ): Order of items in given list is reversed by using this

>>> list1=[‘Python’, ‘C++ , ‘Ruby’, ‘ Kotlin’, 1 JS’ ]
> > > listl.reverse( )
> > > list1
[ ‘ JS ‘, ‘Kotlin’, ‘Ruby’, C++’, ‘Python’]
> > >

6 . sort ( ): Items in the given list object are rearranged in ascending order unless the method’s ‘reverse’ parameter set to True.

Example

>>> list1= [‘Python’, ‘C++’, ‘Ruby’, ‘Kotlin’, ‘JS’]
>>> list1.sort()
>>> list1
[‘C++’, ‘JS’, ‘Kotlin’, ‘Python’, ‘Ruby’]
>>> list2= [‘all’, ‘animals’, ‘are’, ‘equal.’,
‘Some’, ‘are’, ‘more’, ‘equal’]
>>> list2.sort(reverse=True)
>>> list2
[‘more’, ‘equal.’, ‘equal’, ‘are’, ‘are’, ‘animals’, ‘all’, ‘Some’]
> > >

7. remove ( ): Method causes removal of an item’s first occurrence from the given list. If the item to be removed is not found in the list, then ValueError is raised.

Example

8 . pop ( ): Method is similar to remove() method. However, this method returns the removed item. The pop( ) method by default removes the last item in the list. If it contains an index parameter, the item at the specified index is removed and returned.

Example

>>> list1= [‘Python’, ‘C++’, ‘Ruby’, ‘Kotlin’, ‘JS’]
>>>lang=list1.pop( )
>>>>>> list1.sort( )
>>> list1
[‘C++’, ‘JS’, ‘Kotlin’, ‘Python’, ‘Ruby’]
>>> list2= [‘all’, ‘animals’, ‘are’, ‘equal.’,
‘Some’, ‘are’, ‘more’, ‘equal’]
>>> list2.sort(reverse=True)
>>> list2
[‘more’, ‘equal.’, ‘equal’, ‘are’, ‘are’, ‘animals’,
‘all’, ‘Some’] ‘
> > >

If you remember, a tuple is an immutable object. As a result, the above methods performing addition, removal, sorting, and so on; can’t be used with tuple. Only count ( ) and index ( ) methods are available for a tuple object. Their behavior is similar to list methods of the same name.

Dictionary Methods

Like List, a dictionary object is also mutable. However, the dictionary is not a sequence. Its items do not have an index. So, index-based insertion or removal is not supported. Following methods are defined in the built-in dictionary class:

1. get ( ): Method retrieves value component corresponding to key parameter.

Example

>>> dict1 = {‘Mumbai 1 :’Maharashtra’, ‘Hyderabad’:’Telangana’, ‘Patna1:’Bihar’}
>>> dict1.get(‘Patna’)
‘Bihar’
>>>

2. pop ( ): Method removes k-v pair item from given dictionary object corresponding to key parameter, an returns its value component.

Example

>>> dict1 = {1 Mumbai’: Maharashtra’ , ‘Hyderabad’:’Telangana’, ‘Patna’:’Bihar’}
>>> state=dictl.pop( ‘Mumbai’)
>>> state
‘Maharashtra’
>>>

3 . popitem ( ): Method returns a k-v pair in the form of a tuple.

Example

>>> dictl={‘Mumbai’:’Maharashtra’,
‘Hyderabad’:1Telangana’, ‘Patna’:’Bihar’}
>>> t=dictl.popitem()
>>> t
(‘Patna’, ‘Bihar’)
>>>

4. update ( ): Method is used to add a new k-v pair item as well as modify the value of the existing key. The update() method takes another • dictionary object as a parameter. There may be one or more items in it. If its key is not used in a given dictionary, a new k-v pair is added. If the key is already present, its value is replaced by the new value. This process takes place for all items in the diet parameter.
In following code snippet, dictl is updated by adding a new state- capital pair.

Example

>>> dict1={‘MaharashtraBombay’Andhra Pradesh1:1 Hyderabad’, ‘UP’ :’Lucknow’}
>>> dict1.update({‘MP’ :’Bhopal1})
>>> dict1
{‘Maharashtra’: ‘Bombay’, ‘Andhra Pradesh’: ‘Hyderabad’, ‘UP’: ‘Lucknow’, ‘MP’: ‘Bhopal’}
>>>

The initial dictionary object gets updated by another diet parameter. Capitals of two states are modified and one pair is added.

Example

>>> dict1={‘Maharashtra’: ‘Bombay’, ‘Andhra Pradesh’: ‘Hyderabad’, ‘UP’: ‘Lucknow’, ‘MP’: ‘Bhopal’}
>>> dict2={‘AndhraPradesh’:’Amaravati’,’Telangana’:’Hyderabad’, ‘Maharashtra’:’Mumbai’}
>>> dictl.update(dict2)
>>> dict1
{‘Maharashtra’: ‘Mumbai’, ‘Andhra Pradesh’: ‘Amaravati’, ‘UP’: ‘Lucknow’, ‘MP’: ‘Bhopal’, ‘Telangana’: ‘Hyderabad’}
>>>

You can also add a new k-v pair simply by assigning value to the unused key by the following syntax:

dict1[newkey]=value

Here is an example:

Example

>>> dict1 ={‘Maharashtra’: ‘Bombay’ , ‘Andhra Pradesh ‘ : ‘ Hyderabad ‘ , ‘ UP’ : ‘Lucknow’ , ‘MP’ , ‘Bhopal’}
>>> dict1 [‘Maharastra’] = ‘Mumbai’
>>> dict1
{‘Maharashtra’: ‘Bombay’ , ‘Andhra Pradesh ‘ : ‘ Hyderabad ‘ , ‘ UP’ : ‘Lucknow’ , ‘MP’ , ‘Bhopal’}
>>>

Dictionary View Methods

1. items ( ): Method returns a view object consisting of two-item tuples, one for each k-v pair. This view object can be converted to a list of k-v tuples.

Example

>>> dict1 = {‘Maharastra’: ‘Mumbai’ , “Andhra pradesh’ :’Amaravati’ , ‘UP’: ‘Lucknow’ , ‘MP’: ‘Bhopal’, ‘Telangana’ : ‘Hyderabad’}

>>> items=dict1.items( )

>>> items

dict_items([{‘Maharastra’ , ‘Mumbai’), (‘Andhra pradesh’ , ‘Amaravati’), (‘UP’, ‘Lucknow’), (‘MP’, ‘Bhopal’), (‘Telangana’ , ‘Hyderabad’}])

>>> list(items)

[(‘Maharastra’ , ‘Mumbai’), (‘Andhra pradesh’, ‘Amaravati’), (‘UP’, ‘Lucknow’), (‘MP’, ‘Bhopal’), (‘Telangana’ , ‘Hyderabad’}])

>>>

2.keys ( ):

The method returns a view object consisting of all keys in a given dictionary. This view object can be converted to a list of keys.

Example

>>> dict1 = {‘Maharastra’: ‘Mumbai’ , ‘Andhra pradesh’ :’Amaravati’ , ‘UP’: ‘Lucknow’ , ‘MP’: ‘Bhopal’, ‘Telangana’ : ‘Hyderabad’}

>>> keys=dict1.keys( )

>>> keys

dict_keys([‘Maharastra’ , ‘Andhra pradesh’ , ‘UP’ , ‘MP’ , ‘Telangana’])

>>> list (keys)

[‘Maharastra’ , ‘Andhra pradesh’ , ‘UP’ , ‘MP’ , ‘Telangana’]

>>>

3 . values ( ): Method returns a view object consisting of all values in a given dictionary. This view object can be converted to a list of values.

Example 

>>> dictl={1 Maharashtra’: ‘Mumbai’, ‘Andhra Pradesh’: ‘Amaravati’, ‘UP’: ‘Lucknow’, ‘MP’:
‘Bhopal’, ‘Telangana’: ‘Hyderabad’}
>>> values=dictl.values()
>>> values
dict_values([‘Mumbai’, ‘Amaravati’, ‘Lucknow’,
‘Bhopal’, ‘Hyderabad’])
>>> list(values)
[‘Mumbai’, ‘Amaravati’, ‘Lucknow’, ‘Bhopal’,
‘Hyderabad’3
>>>

All view objects returned by items(), keys(), and values() methods get automatically refreshed whenever the underlying dictionary object gets updated.

Example

>>> dictl={‘Maharashtra’:’Bombay’,’Andhra Pradesh’:
‘Hyderabad’, ‘UP’:’Lucknow’}
>>> items=dictl.items()
>>> keys=dictl.keys >>> values=dictl.values >>> items
dict_items([(‘Maharashtra’ , ‘Bombay’), (‘Andhra Pradesh’, ‘Hyderabad’), (‘UP’, ‘Lucknow’)])
>>> dict2={‘Andhra
Pradesh’:’Amaravati’,’Telangana’:’Hyderabad’,
‘Maharashtra’:’Mumbai’}
>>> dictl.update(dict2)
>>> items
dict_items([(‘Maharashtra’, ‘Mumbai’), (‘Andhra
Pradesh’, ‘Amaravati’), (‘UP’, ‘Lucknow’),
(1Telangana’, ‘Hyderabad’)])
>>>

We have thus reached the end of a fairly lengthy introductory chapter of this book. As mentioned in the preface, this (and next) chapter is intended to be a quick-start tutorial for Python. So try and explore Python as much as you can with Python’s interactive shell. The next chapter explains how Python’s scripting mode works. Python’s conditional and looping techniques are also discussed there.

Python Data Presistence – Data Types

Python Data Presistence – Data Types

Data and information, these two words are so common nowadays – they are on the lips of everybody around us. But many seem to be confused about the exact meaning of these words. So much so, people use them almost as if they are synonymous. But they are not.
The computer is a data processing device. Hence, data is a raw and factual representation of objects, which when processed by the computer program, generates meaningful information.

Various pieces of data items are classified into data types. Python’s data model recognizes the following data types (figure 1.3):

Python Data Presistence - Data Types chapter 1 img 1

Number Types

Any data object having a numerical value (as in a mathematical context) is a Number. Python identifies integer, real, complex, and Boolean number types by the built-in type names int, float, complex, and bool respectively. Any number (positive or negative) without a fractional component is an integer, and the fractional component is afloat. The boolean object represents truth values True and False, corresponding to 1 and 0 respectively.

A number object is created with a literal representation using digit characters. Python has a built-in type ( ) function to identify the type of any object.

Example

>>> #this is an integer
. . . 100
100
>>> type ( 100 )
<class ‘ int ‘ >
>>> #this is a float
. . . 5.65
5.65
>>> type ( 5 . 65 )
<class ‘float’>
>>> #this is bool object
. . . True
True
>>> type ( True )
<class ‘ bool ‘ >

Any number with a fractional component (sometimes called the mantissa) is identified as a floating object. The fractional component is the digits after the decimal point symbol. To shorten the representation of a float literal with more digits after the decimal point, symbols ‘e’ or ‘E’ are used.

Example

>>> #this is float with scientific notation
. . . 1 . 5e – 3
0 . 0015
>>> type ( 1 . 5e – 3 )
<class ‘ float ‘ >

A complex number consists of two parts – real and imaginary – separated by ‘+’ or sign. The imaginary part is suffixed by ‘j’ which is defined as an imaginary number which is the square root of \(\sqrt{-1}\) (• A complex number is represented as x+yj.

Example

>>> 2 + 3j
( 2+3j )
>>> type ( 2+3j )
<class ‘ complex ‘ >

Arithmetic Operators

All number types can undergo arithmetic operations. Addition (‘+’), subtraction multiplication (‘*’) and division (7’) operators work as per their traditional meaning. In addition, few more arithmetic operators are defined in Python, which are:

  • Modulus or remainder operator (‘%’), returns the remainder of the division of the first operand by the second. For example, 10%3 returns 1.
  • Exponent operator (‘**’), computes the first operand raised to second. For example, 10**2 returns 100.
  • The floor division operator (7/’) returns an integer not greater than the division of the first operand by the second. For example, 9//2 returns 4.

Example

>>> #addition operator
. . . 10+3
13
>>> #subtraction operator
. . . 10-3
7
>>> #multiplication operator
. . . 10*3
30
>>> #division operator
. . . 10/3
3.3333333333333335
>>> #modulus operator
. . . 10%3
1
>>> #exponent operator
. . . 10**3
1000
>>> #floor division operator
. . . 10//3
3

Sequence Types

An ordered collection of items is called a sequence. Items in the sequence have a positional index starting with 0. There are three sequence types defined in Python.
1. String: Ordered sequence of any characters enclosed in single, double, or triple quotation marks forms a string object. Each character in the string object is accessible by index.

Example

>>> #string using single quotes
. . . ‘Hello. How are you?’
‘Hello. How are you?’
>>> #string using double quotes
. . .  “Hello. How are you?”
‘Hello. How are you?’
>>> #string using triple quotes
. . . ”’Hello. How are you?”’
‘Hello. How are you?’

2. List: An ordered collection of data items, not necessarily of the same type, separated by a comma and enclosed in square brackets [ ] constitutes a List object. The list is a sequence type because its items have a positional index starting from 0.

3. Tuple: A tuple is also an ordered collection of items, which may be of dissimilar types, each separated by a comma and enclosed in parentheses ( ). Again each item in tuple has a unique index.

Example

>>> [ ‘ pen ‘ , 15 , 25 . 50 , True ]
[ ‘pen ‘ , 15 , 25 . 5 , True ]
>>> type ( [ ‘ pen ‘ , 15 , 25 . 50 , True ] )
<class ‘ list’ >
>>> ( ‘ Python ‘ , 3 . 72 , ‘ Windows ‘ , 10 , 2 . 5E04 )
( ‘ Python ‘ ,  3 . 72 ,  ‘ Windows ‘ , 10 , 25000 . 0 )
>>> type ( ( ‘ Python ‘ ,  3 . 72 , ‘ Windows ‘ , 10 , 2 . 5E04 ) )
<class ‘ tuple ‘ >

Apart from the type of brackets – [ ] or ( ) – List and Tuple appear similar. However, there is a crucial difference between them – that of mutability. This will come up for explanation just a few topics afterward.

Mappings Type

A mapping object ‘maps’ the value of one object with that of other. Python’s dictionary object is an example of mapping. A language dictionary is a collection of pairs of words and corresponding meanings. Two parts of the pair are key (word) and value (meaning). Similarly, a Python dictionary is also a collection of key-value pairs, separated by a comma and is put inside curly brackets {}. The Association of the key with its value is represented by putting V between the two.

Each key in a dictionary object must be unique. The key should be a number, string, or tuple. (All are immutable objects). Any type of object can be used as the value in the pair. The same object can appear as the value of multiple keys.

Example

>>> {1:’one’, 2:’two’, 3 :’three’}
{1: ‘one’ , 2: ‘two’ , 3 : ‘three’}
>>> type({1:’one’, 2:’two’, 3:’three’})
<class ‘diet’>
>>> {‘Mumbai’:’Maharashtra’ ,
‘Hyderabad’:’Telangana’, ‘Patna’: Bihar ‘}
{‘Mumbai’: ‘Maharashtra’ , ‘Hyderabad’: ‘Telangana’,
‘Patna’: ‘Bihar’}
>>> type({‘Mumbai’:’Maharashtra’ ,
‘Hyderabad’:’Telangana’ , eclass 1 diet’> ‘Patna’: Bihar ‘})
>>> {‘Windows’: t’Windows XP’, ‘Windows 10 ‘ ] ,
‘Languages’: [‘Python’, ‘ Java’] }
{‘Windows’: [‘Windows XP ‘Windows 10’ 1 ,
‘Languages’: [‘Python’, ‘Java’]}
>>> type({‘Windows’:[‘Windows XP’ ‘Windows 10’],
‘Languages’ : [‘Python’, ‘Java’]})
<class ‘diet’>


Python Data Presistence – Indents

Python Data Presistence – Indents

The use of indents is one of the most unique features of Python syntax. As mentioned above, each statement starts at the first character position of the next available line on the online shell. In the case of the script, blank lines are ignored. In many situations, statements need to be grouped together to form a block of certain significance. Such circumstances are the definitions of function or class, a repetitive block of statements in the loop, and so on. Languages such as C/C++ or Java put series of statements in a pair of opening and closing curly brackets. Python uses the indentation technique to mark the blocks. This makes the code visually cleaner than clumsy curly brackets.

Whenever you need to start a block, use: symbol as the last character in the current line, after that press Enter, and then press Tab key once to leave fixed whitespace before writing the first statement in the new block. Subsequent statements in the block should follow the same indent space. If there is a block within the block you may need to press the Tab key for each level of block. Look at the following examples:

Indented Block in Function

Example

>>> def calculate_tax (sal) :
. . .            tax=sal*10/100
. . .           if tax>5000:
. . .                     tax=5000
. . .          netsal=sal-tax
. . .          return netsal
. . .
>>>

Indents in Class

Example 

>>> class Example:
. . .              def init_(self, x) :
. . .              self.x=x
. . .             if x>100:
. . .                      self.x=100
. . .
> > >

Indents in Loop

Example

>>> for i in range (4) :
. . .         for j in range(4) :
. . .                       print ( i , j )
. . .


Python Data Presistence – Statements

Python Data Presistence – Statements

Python interpreter treats any text (either in interactive mode or in a script) that ends with the Entering key (translated as ‘\n’ and called newline character) as a statement. If it is valid as per syntax rules of Python, it will be executed otherwise a relevant error message is displayed.

Example

>>> “Hello World”
‘Hello World’
>>> Hello world
File “<stdin>”, line 1
Hello world

SyntaxError: invalid syntax

In the first case, the sequence of characters enclosed within quotes is a valid Python string object. However, the second statement is invalid because it doesn’t qualify as a representation of any Python object or identifier or statement, hence the message as SyntaxError is displayed.

Normally one physical line corresponds to one statement. Each statement starts at the first character position in the line, although it may leave certain leading whitespace in some cases (See Indents – next topic). Occasionally you may want to show a long statement spanning multiple lines. The ‘V character works as a continuation symbol in such a case.

Example

>>> zen=”Beautiful is better than ugly. \
… Explicit is better than implicit. \
… Simple is better than complex.”
>>> zen
‘Beautiful is better than ugly. Explicit is better than implicit. Simple is better than complex.’

This is applicable for script also. In order to write an expression you would like to use two separate lines for numerator and denominator instead of a single line as shown below:

Example

>>> a=10
>>> b=5
>>> ratio=( pow ( a , 2 ) + ( pow ( b , 2 ) ) ) /  \
. . . ( pow ( a , 2 ) – ( pow ( b , 2 ) ) )
>>>

Here pow ( ) is a built-in function that computes the square of a number. You will learn more built-in functions later in this book.
The use of a backslash symbol (\) is not necessary if items in a list, tuple, or dictionary object spill over multiple lines. (Plenty of new terms, isn’t it? Never mind. Have patience!)

Example

>>> marks=[34,65,92,55,71,
. . . 21,82,39,60,41]
>>> marks
[34, 65, 92, 55, 71, 21, 82, 39, 60, 41]


Python Data Presistence – Identifiers

Python Data Presistence – Identifiers

Python identifiers are the various programming elements such as keywords, variables, functions/methods, modules, packages, and classes by suitable name. Keywords are reserved words with predefined meanings in Python interpreter. Obviously, keywords can’t be used as the name of other elements as functions etc. Python language currently has 33 keywords. Enter the following statement in Python’s interactive console. The list of keywords gets displayed!

Example

>>> import keyword
>>> print (keyword.kwlist)
[‘False ‘, ‘None’, ‘True’, ‘ and’, ‘as’, ‘assert’, ‘break’ , ‘class’, ‘continue ‘, ‘def’, ‘del’, ‘elif’, ‘ else’ , ‘except’, ‘finally’, ‘for’, ‘from’, ‘global’, ‘ if’, 1 import’, ‘in’, ‘is’ , ‘lambda’, ‘nonlocal’, ‘ not’ , ‘while’ ‘or’, ‘pass’, ‘raise ‘return’, ‘try’, ‘with’, ‘yield’]

Apart from keywords, you can choose any name (preferably cryptic but indicative of its purpose) to identify other elements in your program. However, only alphabets (upper or lowercase), digits, and underscore symbols (‘_’) may be used. As a convention, the name of the class starts with an uppercase alphabet, whereas the name of the function/method starts with the lowercase alphabet. The name of a variable normally starts with an alphabet, but in special cases, an underscore symbol (sometimes double underscore ) is seen to be the first character of the variable’s name.

Some examples of valid and invalid identifiers:

Valid identifiers

Invalid identifiers

name, FileName, yrlseml, EMP, roll_no, sum_of_dig,

_price, _salary, _ function_

123, sub-1, yr1.sem1, roll no, ‘price’, *marks*


How To Locate Different Web Elements in Selenium Using Python?

Selenium Python – Working with Different WebElements

An HTML page is made up of various HTML elements. When we automate a web page using Selenium, we first have to identify the HTML element uniquely on the web page and then perform an action on it. An HTML page can have HTML elements like a form, frame, table, dropdown, link, image, alerts, divs, spans, and many more. In this chapter, we will learn how to automate these elements through Selenium.

Structure

  • Working with form elements
  • Working with HTML table
  • Working with dropdown list

Objective

An HTML page is made up of different HTML elements, for example, we see a form element, which contains a lot of input elements. The input elements could be a textbox, radio button, or checkbox. We can then have a table element, a dropdown element. In this chapter, we will see how we can automate these HTML elements.

Working with form elements

An HTML form generally contains text boxes, buttons, links, images, radio buttons, and checkboxes type of elements. The HTML of the input elements in the form is represented as follows:
<input type= “text/checkbox/radio/password property=value../>

The following table shows the different actions we generally perform on these elements using Selenium:

Web Element

Selenium action

Description

Text box Clear Clears the content of the text box.
Text box Send_keys Types content sent in the method in the text box.
Checkbox Click To select a given check box.
Radio button Click To select a given radio button.
Anchor click To click on the link element.
Button click To click on the button in the form.
Button submit If the button provided is a submit button, then we can perform the submit action on it.
Radio button To verify if the radio button is selected,
HTML element This method will work for any HTML element, and it checks if the element is displayed on the page or not.
HTML element Is Enabled This method will work for any HTML element, and it checks if the element is enabled on the page or not.

TableExarapli

An example of working on the form elements described above can be seen on the registration page of the application: http://practice. bpbonline.com/catalog/create_account.php

On this page, we can see the checkbox, radio button, text boxes, buttons, links on which we can work. The following program displays the process of user registration by performing actions on the different web elements on this page:

def text_login(self):
browser=self.driver
browser.find_element_by_link_text("My Account").click()
browser.find_element_by_link_text("continue").click( )
browser.find_element_by_name("gender").click( )
browser.find_element_by_name("firstname").send_keys("BPB")
browser.find_element_by_name("lastname").send_keys("BPB")
browser.find_element_by_id("dob").send_keys("01/01/1987")
#change	email id with each iteration
browser.find_element_by_name("email_address").send_keys("bpb1@bpb.com")
browser.find_element_by_name("company").send_keys("5Elements learning")
browser.find_element_by_name("strret_address").send_keys("second Address")
browser.find_element_by_name("suburb").send_keys("second Address")
browser.find_element_by_name("postcode").send_keys("110001")
browser.find_element_by_name("city").send_keys("new delhi")
browser.find_element_by_name("state").send_keys("delhi")
sel=select(browser.find_element_by_name("country"))
sel.select_by_visible_text("India")
browser.find_element_by_name("country")
browser.find_element_by_name("telephone").send_keys("1234567890")
browser.find_element_by_name("fax").send_keys("0123456789")
browser.find_element_by_name("newsletter").click( )
browser.find_element_by_name("password").send_keys("123456")
browser.find_element_by_name("confirmation").send_keys("123456")
browser.find_element_by_xpath("//span[contains(text(),'continue')]").click( )
browser.find_element_by_link_text("log off").click( )
browser.find_element_by_link_text("continue").click( )

So in the preceding code, we are registering a new user in the application by handling actions on all the mandatory fields. So wherever there are textboxes, we have ensured they are cleared first, and then we type the text on them. For links, buttons, and radio buttons, we have used the click method for selecting them.

Working with HTML tables

The HTML tables are container elements, which mean they contain other HTML elements inside them. A general representation of HTML table is as follows:

<table>
<tbody>
<tr>
<td> text/HTML element</td>
<td> … </td>
</tr>
<tr>…</tr>
</tbody>
</table>

So we have the first node as a table, which contains a body, which contains table row[tr]. The tr node contains table data[td] which represents the table cell. The table cell can contain text or any HTML element within it. In our application, the home page displays the products listed in a web table:


Selenium Python - Working with Different WebElements chapter 9 img 2

Let us look at the backend HTML available:

<table border="0" width="100%" cellspacing="0" cellpadding=2">
  <tbody>
    <tr>
     <td width="33%" align="center" valign="top">
       <a href="http://practice.bpbonline.com/catalog/product info.php?
       products id=20">...</a>
        <br>
        <a href="http://practice.bpbonline.com/catalog/product info.php?
        products id=20">Beloved</a>
        <br>
       "$54.99"
      </td>
      <td width="33%" align="center" valign="top">...</td>
      <td width="33%" align="center" valign="top">...</td>
   </tr>
   <tr>...</tr>
   <tr>...</tr>


As we see in the preceding HTML snippet, the table has three tr tags, and each tr tag has three td tags. Each td tag has two anchor tags and a text, which we see on the page. One of the scenarios we pick for HTML web table automation is to find the rows and columns available in the table at run time. Here, we will be doing that, and printing the content available in every table cell as we iterate the table row by row and cell by cell.

from selenium import webdriver
import unittest

class TableExample(unittest.Testcase):
    def setup(self):
        self.driver = webdriver.chrome(executable_path='D:\Eclipse\BPB\seleniumpython\seleniumpython\drivers\chromedriver.exe')
        self.driver.implicitly_wait(30)
        self.base_url = "http://practice.bpbonline.com/catalog/index.php"
   def test_table(self):
       driver = self.driver
       driver.get(self.base_url)
       prodTable= driver.find_element_by_tag_name("table")
       #Fetch rows
       rows=prodTable.find_elements_by_xpath("//"/tbody/tr")
       i=1
       for r in rows:
           #Fetch colc for each row
           cols=r.find_elements_by_xpath("td")
           #print(for(path))
           j=1
           for cd in cols:
               print("row ", i, "col", j, ",", cd.text)
               j=j+1
          i=i+1
   def tearDown(self):
       self.driver.quit()        
if_name_=="_main_";
unittest.main()


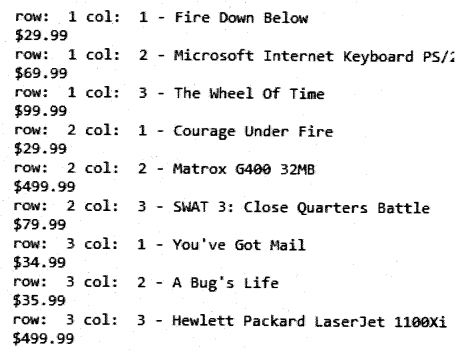
So in the preceding code, we first fetch the table object, then in that table object, we fetch all the table rows. Then we iterate each table row and fetch all table columns from each row. Then we iterate each table column, and fetch the text associated with each table cell, and print that information on the screen.

As we run the test, the output is as follows: col: 1 – Fire Down Below


Selenium Python - Working with Different WebElements chapter 9 img 5

Working with dropdown list

The dropdown list in HTML is known as the < select > element. It is also a container element. It contains <option> elements. The option element displays the different choices of the dropdown which can be selected from it. The HTML code of dropdown looks as follows:

<select>
(option value = data> Visible text </option>
. .
</select>

In our application, dropdowns are available on various pages. The dropdown element which we will see in the example is the country dropdown which we see on the registration page of the application:


Selenium Python - Working with Different WebElements chapter 9 img 6

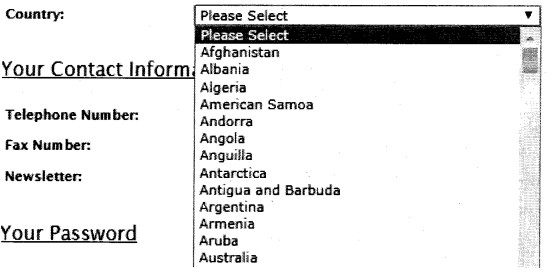
If we look at the backend HTML of this dropdown, we will see the following:

<select name="country">
  <option value selected="selected">please select</option>
  <option value="1">Afghanistan</option>
  <option value="2">Albania</option>
  <option value="3">Algeria</option>
  <option value="4">American</option>
  <option value="5">Andorra</option>
  <option value="6">Angola</option>
  <option value="7">Anguilla</option>
  <option value="8">Antarctica</option>
  <option value="9">Antigua and Barbuda</option>
  <option value="10">Argentina</option>
  <option value="11">Armenia</option>
  <option value="12">Aruba</option>


The number of options in the list will be the same as we see on the screen.

To work with a dropdown element, Selenium provides a separate class called Select. More details on this class can be found on this link:

https://seleniumhq.github.io/selenium/docs/api/py/
webdriver_support/selenium.web driver.support.select.
HTML?highlight=select#selenium.web driver.support.select

The Select class allows us to select an element from the list using the following three methods:

• select_by_value: In this method, we select an option
bypassing the data associated with the value attribute. For example in the previous list, if we say select_by_ value(” 5″), Andorra as a country will get selected.

• select^Y-Visi-ble^ext: In this method, we select an
option bypassing the data which we see on the screen. For example, if we want to select the country Angola, we can say select_by_visible_text(“Angola”).

• select_by_index: In this method, we select an option from the list, bypassing an index value. The index value associated with the options in the list ranges from 0 to the total number of options -1. So if we say select_by_index(2), Albania will get selected.

Similar to the preceding set of methods, we have select by value, visible text, and index. In the following program:

def text_dropdown(self):
    browser=self.driver
    browser.get(self.base_url)
    browser.maximize_window()
    browser.find_element_by_link_text("My Account").click( )
    browser.find_element_by_link_text("Account").click( )
    sel=select(browser.find_element_by_name("country"))
    #select by visible text
    sel.select_by_visible_text("India")
    print(sel.first_selected_option.text)
    time.sleep(1)
    #select by index
    sel.select_by_index(1)
    print(sel.first_selected_option.text)
    time.sleep(1)
    #select by value
    sel.select_by_value("5")
    print(sel.first_selected_option.text)
    time.sleep(1)

#find an option in the list
for country in sel.options:
    if(country.text=="India"):
       print("country found")


In the preceding program, we try different methods to select options from the dropdown element. We use a method called first_ selected_option, which returns the option that was selected first and foremost in the list.

Conclusion

So in this chapter, we have seen how to handle different types of form elements, web table elements, and the dropdown element. We saw the different methods that are available with these entities. We also saw the different actions which can be performed on the HTML elements during test automation runs. In the next chapter, we will discuss the switch To method, and see how we can handle frames, alerts with it. We will also see the action class which allows us to handle various keyboard, mouse actions, and also automate composite actions.

Related Articles: