Data Persistence – Python – PyMongo

Python Data Persistence – Python – PyMongo

is NOSQL?

In today’s era of real-time web applications, NoSQL databases are becoming increasingly popular. The term NoSQL originally referred to “non SQL” or “non-relational”, but its supporters prefer to call it “Not only SQL” to indicate that SQL-like query language may be supported alongside.

NoSQL is touted as open-source, distributed, and horizontally scalable schema-free database architecture. NoSQL databases are more scalable and provide superior performance as compared to RDBMS. This primarily because it requires that schemas (table structure, relationships, etc.) be defined before you can add data. Some of the popular NoSQL databases extensively in use today include MongoDB, CouchDB, Cassandra, HBase, etc.

Several NoSQL products are available in the market. They are classified into four categories based on the data model used by them.

Key-Value store: Uses a hash table (also called a dictionary). Each item in the database is stored as a unique attribute name (or ‘key’), associated with its value. The key-value model is the simplest type of NoSQL database. Examples of key-value databases are Amazon SimpleDB, Oracle BDB, Riak, and Berkeley DB.

Column Oriented: This type of databases store and process very large amount of data distributed over multiple machines. Keys point to multiple columns. The columns are arranged by column family. Examples of column-oriented databases are Cassandra and HBase.

Document oriented: Database of this category is an advanced key-value store database. The semi-structured documents are stored in formats like JSON. Documents can contain many different key-value pairs, or key- array pairs, or even nested documents.

Graph Based: Databases of this type are used to store information about networks of data, such as social connections. A flexible graph model can scale across multiple machines. Graph stores include Neo4J and Giraph.
In this chapter, we shall get acquainted with a hugely popular document-oriented database, MongoDB, and how it can be interfaced with Python through the PyMongo module.

MongoDB

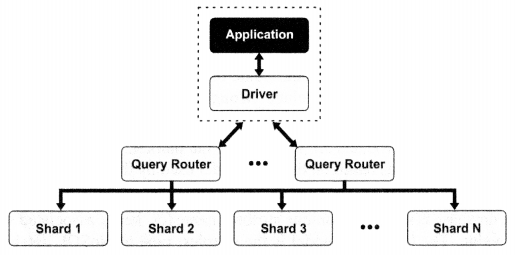
NoSQL databases typically have a huge amount of data. Hence, more often than not, the power of a single CPU is not enough when it comes to fetching data corresponding to a query. MongoDB uses a sharding technique that splits data sets across multiple instances. A large collection of data is split across multiple physical servers called ‘shards’, even though they behave as one collection. Query request from the application is routed to the appropriate shard and the result is served. Thus, MongoDB achieves horizontal scalability, (figure 11.1)

Python Data Presistence - Python - PyMongo chapter 11 img 1

The Document is the heart of a MongoDB database. It is a collection of key-value pairs – similar to Python’s dictionary object. We can also think of it being similar to a single row in a table of SQL-based relational databases.

Collection in MongoDB is analogous to a table in the relational database. However, it doesn’t have a predefined schema. The Collection has a dynamic schema in the sense each document may of a variable number of k-v pairs not necessarily with the same keys in each document.

Each document is characterized by a special key called “_id” having a unique value, again similar to a primary key in the entity table of a relational database.

MongoDB server has a command-line interface from inside which different database operations can be performed.

MongoDB – Create Database

To display the current database in use, there’s a DB command. The default database in-use tests.

> db 
Test

With the ‘use’ command any other database is set as current. If the named database doesn’t exist, a new one is created.

> use mydb 
switched to db mydb

However, until you store data(such as collection or document) in it, is the database is not created. The following command inserts a document in the ‘products’ collection under the current database.

MongoDB – Insert Document

Appropriately, insertone ( ) method is available to a collection object in a database. A document is provided to it as a parameter.

> db.products.insertone({"ProductID":1, 
"Name":"Laptop", "Price":25000}) 
WriteResult({ "nlnserted" : 1 })

Result of above (for that matter any insert/update/delete operation) command returns WriteResult object. The insert () method inserts multiple documents if the argument is an array of documents. In that case, the result is BulkWriteResult object.

> var pricelist=[{'productID' :1, 'Name': 'Laptop' , 'price':25000}, 
. . . { 'productID' : 2, 'Name":'TV' , 'price':2000}, 
. . . { 'productID' : 3, 'Name":'Router' , 'price':2000}, 
. . . { 'productID' : 4, 'Name":'Scanner' , 'price':5000}, 
. . . { 'productID' : 5, 'Name":'Printer' , 'price':9000}, 
> db.products.insert(pricelist); 
BulkWriteResult ({
 "writeErrors" : [ ] , 
 "writeConcernErrors" : [ ] , 
 "nInserted" : 5 , 
 "nUpserted" : 0 , 
 "nMatched" : 0 , 
 "nModified" : 0 , 
 "nRemoved" : 0 , 
 "upserted" : [ ] 
 })

The insert () function inserts a single document or array whereas a single document is inserted with inserOne ( ) method and array whereas the insert_many () method is used with an array.

MongoDB – Delete Document

The remove () method deletes one or more documents from the collection based on the provided criteria. The following statement will result in the removal of a document pertaining to price>40000 (in our data it happens to be with name=’TV’).

> db.products.remove({"price":{$gt:40000}}) 
WriteResult({ "nRemoved" : 1 })

Run the find ( ) method in the shell to verify the removal.

Now that, we have attained some level of familiarity with MongoDB with the help of shell commands. Let us concentrate on our main objective – use MongoDB in Python.

PyMongo – Update Document

PyMongo offers two collection methods for the modification of data in one or more documents. They are update_one () and update_many () . Both require filter criteria and a new value of one or more keys. The update_one () updates only the first document that satisfies filter criteria. On the other hand, update__many () performs updates on all documents that satisfy the filter criteria.

collection.update_one (filter, newval)

Following Python script accepts the name of the product from the user and displays the current price. It is updated to the new price input by the user.

Example

> var pricelist=[{'productID' :1, 'Name': 'Laptop' , 'price':25000}, 
. . . { 'productID' : 2, 'Name":'TV' , 'price':2000}, 
. . . { 'productID' : 3, 'Name":'Router' , 'price':2000}, 
. . . { 'productID' : 4, 'Name":'Scanner' , 'price':5000}, 
. . . { 'productID' : 5, 'Name":'Printer' , 'price':9000}, 
> db.products.insert(pricelist); 
BulkWriteResult ({
 "writeErrors" : [ ] , 
 "writeConcernErrors" : [ ] , 
 "nInserted" : 5 , 
 "nUpserted" : 0 , 
 "nMatched" : 0 , 
 "nModified" : 0 , 
 "nRemoved" : 0 , 
 "upserted" : [ ] 
 })

Python Data Persistence – pyMongo – Querying Collection

PyMongo module defines find( ) method to be used with a collection object. It returns a cursor object which provides a list of all documents in the collection.

>>> products=db['products']
>>> docs=products .find ()
>>> list(docs)
[{'_id' : Objectld('5c8dec275405cl2e3402423c'),
'ProductID': 1, 'Name': 'Laptop', 'price': 25000},
{'_id': ObjectId('5c8dec275405cl2e3402423d'),
'ProductID': 2, 'Name': 'TV', 'price': 50000},
{'_id': Objectld('5c8dec275405cl2e3402423e'),
'ProductID': 3, 'Name': 'Router', 'price': 2000},
{'_id': Objectld('5c8dec275405cl2e3402423f'),
'ProductID': 4, 'Name': 'Scanner', 'price': 5000},
{'_id': Objectld('5c8dec275405cl2e34024240'),
'ProductID': 5, 'Name': 'Printer', 'price': 9000}]

This cursor object is an iterator that serves one document for every call of the next () method. Each document is a dictionary object of k-v pairs. The following code displays the name and GSTIN of all customers.

Example

#mongofind. py 
from pymongo import MongoClient 
client=MongoClient( ) 
db=client.newdb 
cust=db['customers'] 
docs=cust. find ( ) 
while True:               
 try:                          
         doc=docs.next()                          
         print (doc['Name'], doc['GSTIN'])              
         except Stoplteration:                           
         break 
 client.close ( )

Run the above script from the command prompt.

E : \python3 7 >python mongofind. py
Ravikumar 27AAJPL7103N1ZF
Patel 24ASDFG1234N1ZN
Nitin 27AABBC7895N1ZT
Nair 32MMAF8963N1ZK
Shah 24BADEF2002N1ZB
Khurana 07KABCS1002N1ZV
Irfan 05IIAAV5103N1ZA
Kiran 12PPSDF22431ZC
Divya 15ABCDE1101N1ZA
John 29AAEEC4258E1ZK

You can, of course, employ a regular ‘for’ loop to traverse the cursor object to obtain one document at a time.

Example

for doc in docs: 
      print (doc['Name'] , doc[1GSTIN'])

The logical operators of MongoDB (described earlier in this chapter) are used to apply filter criteria for the find ( ) method. As an example, products with price>10000 are fetched with the following statement:

Example

>>> products=db['products'] 
>>> docs=products .find 
({'price :{ 1$gt ' :10000} } ) 
>>> for 
doc in docs: print (doc.get('Name'), 
doc.get('price')) Laptop 25000 TV 50000


Data Persistence – Python and Excel

Python Data Persistence – Python and Excel

Interactive spreadsheet applications have been in use for quite a along. Over the years, Microsoft Excel has emerged as the market leader in this software category. Early versions of MS Excel used a proprietary data representation format. After 2003, Microsoft has adopted Office Open XML (OOXML) file format for its later versions of MS Excel.

OOXML is an ECMA standard file format. This has led to the development of programming interfaces for Excel in many programming environments including Python. Out of many Python packages, openpyxl is the most popular and can read/write Excel files with the .xlsx extension. Pandas is a very popular Python library. It has various tools for performing the analysis of data stored in different file formats. Data from Excel sheet, CSV file, or SQL table can be imported into Pandas data frame object for processing.

In this chapter, first, we shall learn to use openpyxl to programmatically perform various operations on an Excel file such as copying a range, define, and copy formulas, insert images, create charts, and so on.

In the second part of this chapter, we get acquainted with Pandas library – specifically, how to read/write data from/to an Excel worksheet.
Before proceeding further, here is a brief recap of important terms used in the Excel spreadsheet. An Excel document is called a workbook and is saved as a .xlsx file. A workbook may have multiple worksheets. Each worksheet is a grid of a large number of cells, each of which can store one piece of data – either value or formula. Each cell in the grid is identified by its row and column number. Columns are identified by alphabets, A, B, C,…., Z, AA, AB, and so on. Rows are numbered starting from 1. (figure 10.1)

Python Data Presistence - Python and Excel chapter 10 img 1

Excel With openpyxml

The openpyxl is an open-source package. Its installation is straightforward by using pip utility. It is recommended that you set a virtual environment first and then install openpyxl in it using the following command:

Example

E:\>cd excelenv 
E:\excelenv>scripts\activate
(excelenv) E:\excelenv>scripts\pip3 install openpyxl Collecting openpyxl
Using cached https://files.pythonhosted.org/packag- es/Sf/f8/a5d3a4ab669f99154f87ab531192dd84ac79aae62e- 
fab6G2bd2d82a72194/openpyxl-2.6.1.tar.gz Collecting jdcal (from openpyxl)
Using cached https://files.pythonhosted.org/packag- es/aO/38/dcf8353248Of25284f3ef13f8ed63e03c58a65c9d- 
3ba2a6a894ed94972 07/j deal-1.4-py2.py3-none-any.whl Collecting et_xmlfile (from openpyxl)
Using cached https://files.pythonhosted.org/ packages/22/28/a99c42aea746el8382ad9fb36f64c- 
lclf04216f41797f2fOf a567dall3 8 8/et_xmlfile -1.0.1.tar. gz
Installing collected packages: jdcal, et-xmlfile, openpyxl
Running setup.py install for et-xmlfile ... done Running setup.py install for openpyxl ... done 
Successfully installed et-xmlfile-1.0.1 jdcal-1.4 openpyxl-2.6.1

Read Cell Range to List

First of all, let us read back the data from A2:C7 in a Python list object by traversing the range with two nested loops. Each row is collected in a tuple and appended to a list.

Example

sheet1 = wb['PriceList'] 
pricelist= [ ] 
for row in range(1,7): prod= [ ]
for col in range(1,4):
val=sheetl.cell(column=col,
row=2+row).value
prod.append(val) 
pricelist.append(tuple(prod)) 
print (pricelist)

The result will be as shown below:

[(1, 'Laptop', 25000) , (2, 'TV' , 40000) , (3, 'Router', 2000) , (4, 'Printer', 9000)] 'Scanner', 5000) , (5, 'printer' , 9000)]

Merge and Center

To merge Al-Cl cells use the merge_cells ( ) method.

sheet1.merge_cells('A1:C1')

The openpyx1. styles module defines Alignment and Font classes. Apply ‘Center’ alignment to text in ‘AT

cell=sheetl[1A1']
cell.alignment=Alignment('horizontal center')

The Font object can be configured by defining attributes like name, size, color, and so on. Font constructor also accepts bold, italic, underline, and strike, as Boolean attributes (True/False).

cell.font=Font(name='Calibri',size=20,bold=True)

Insert Image

First, install the pillow library in your current Python environment. It is an open-source Python image library that provides support for opening, saving, and manipulating image files.

pip3 install pillow

Let us create a new worksheet in ‘example.xlsx’ in which we shall insert an image.

wb = load_workbook('example.xlsx') 
sheet2=wb.create_sheet(title="image")

Now import Image class from openpyxl. drawing. image module. Obtain the Image object from the image file to be inserted. Finally call add_image () method of the worksheet. This method needs image object and location, (figure 10.9)

Example

from openpyxl.drawing.image import Image
img = Image('openpyxl.jpg')
sheet2.add_image(img,'Al')
wb . save (filename= ' example . xlsx ' )

Define Formula

It is very easy to define a formula in a cell. Just assign string representation of cell formula as would appear in the formula bar of Excel. For example, if you want to set cell 8 to sum of cells between C3 to 7, assign it to ‘=SUM(C3:C7)’

Example

sheet1 ['B8'] ='SUM'
sheet1['C8']='SUM(C3:C7)'
sheet1['C9'] ='=AVERAGE(C3:C7)'

All above actions are collected in the following script. Run it from the command prompt and then open the workbook, (figure 10.4)

Example

#readworkbook.py
from openpyxl import load_workbook 
wb = load_workbook('test.xlsx') 
sheet1 = wb['PriceList']
#copy range to list 
pricelist= [ ] 
for row in range(1,7): 
prod= [ ]
for col in range(1,4):
val=sheetl.cell(column=col,
row=2+row).value
prod.append(val) 
pricelist.append(tuple(prod)) 
print (pricelist)
#merge and center
sheetl.merge_cells('A1:C1')#merge
cell=sheetl['A1']
cell.alignment=Alignment(horizontal'center1) #apply font
cell.font=Font(name='Calibri',size=20,bold=True)
#define formula
sheetl['b8']='SUM'
sheetl['C8']='=SUM(C3:C7)'
sheetl['C9']='=AVERAGE(C3:C7)'

Python Data Presistence - Define Formula chapter 10 img 1

Copy Formula

One of the important features of Excel software is the ability to copy a cell formula either with the relative or absolute address to other cells or ranges. In the above worksheet, we calculate the difference of each price and average and store it in Column D. Accordingly formula for D4 should be C4-C9. It is to be copied for range D5:D9

The openpyxml. formula module defines Translator class having translate_formula ( ) function that copies formula at original cell (D4) to the required range.

Example

from openpyxl.formula.translate import 
Translator#copy formula 
sheet1['D2']='DIFF' 
sheet1['D3']= ' =C$9-C3' 
sheet1['D4'] = Translator("=C$9-C3", origin="D3") . translate_formula("D4") 
for row in range(4,8): 
coor=sheetl.cell(column=4, row=row). 
coordinate#copy formula to range 
sheet1.cell(column=4, row=row). 
value=Translator("=C$9-C3", origin="D3"). \ 

translate formula(coor)

Using the translate_formula, we can also copy a range of cells to other location. Following snippet copies range A2:D2 which is the table’s heading row to A10:D10 cell range.

Example

sheet1['A10'] = '=A2' 
for col in range(1,4): 
coor=sheet1.cell(column=col,row=3).coordinate 
coor1=sheet1.cell(column=col, row=10).coordinate 
print (coor,coor1) 
sheet1.cell(column=col, row=10). 
value=Translator("=A2", origin="A10"). \ 

translate formula(coor1)

After copying the formula and range, (figure 10.5) the worksheet appears as follows:

Python Data Presistence - Copy Formula chapter 10 img 1

Python Data Persistence – class Keyword

Python Data Persistence – class Keyword

Apart from various built-in classes, the user can define a new class with customized attributes and methods. Just as a built-in class, each user-defined class is also a subclass of the Object class. The keyword ‘class’ starts the definition of a new class.

Example

>>> #user defined class
. . .
>>> class MyClass:
. . . pass
. . .
>>> type(MyClass)
<class 'type'>
>>> MyClass.__bases__
(<class 'object'>,)
>>> issubclass(MyClass, object)
True

A user-defined name is mentioned just beside the class keyword and is followed by a symbol to initiate an indented block containing its attributes and methods. In this case, the class body contains just one statement pass which is a no-operation keyword.
Above code clearly indicates that the user-defined class is subclassed from the object class. It means that any Python class, built-in or user-defined is either directly or indirectly inherited from the parent object class. To underline this relationship explicitly, the MyClass can very well be defined as follows:

Example

>>> class MyClass(object):
. . . pass
. . .
>>> MyClass.__bases__
(<class 'object'>,)

Now we can have objects of this class. The library function dict() returns an empty dictionary object. Similarly, MyClass( ) would return an empty object because our new class doesn’t have any attributes defined in it.

Example

>>> obj1=MyClass( )
>>> obj2=MyClass( )

It is veiy easy to add attributes to this newly declared object. To add ‘myname’ attribute to obj 1, give the following statement:

>>> obj1.myname='Ashok'

There is also a built-in setattr ( ) function for this purpose.

>>> setattr(obj1, 'myage',21)

The second argument for this function may be an existing attribute or a new one. The third argument is the value to be assigned. You can even assign a function to an attribute as shown below:

Example

>>> def about me(obj):
. . . print ( ' My name is { } and I am { } years old ' . format ( obj,myname,obj.myage ) )
. . .
>>> setattr(MyClass, 'about', aboutme)
>>> obj1.about( )
My name is Ashok and I am 21 years old

So you have been able to add new attributes to an individual instance or class. Even from outside the class! If you have honed your object-oriented programming skills by learning Java or C++, this might send shivers down your spine! On the face of it, this seems to be a violation of the very idea of class which is a template definition of an object’s attributes. Don’t worry; we will soon make a Python class work as per OOP guidelines.

Python Data Persistence – ORM – Relationships

Python Data Persistence – ORM – Relationships

In the case of raw SQL, we establish relationships among tables using the FOREIGN KEY constraint. This section describes how relationships are built between tables and mapped classes.

In the previous chapter, our mydb.SQLite database contained an Invoices table that had a relationship with the ‘Products’ and ‘Customers’ table. These relationships were established with foreign keys. We shall now declare Invoice class (that maps Invoices table) and relate it to Product class and Customer class with the help of ForeignKey ( ) function imposed on ProductID and CustID columns in it. This is very similar to the definition of a table in raw SQL.

Example

from sqlalchemy import ForeignKey 
class Invoice(base): 
__tablename__='Invoices' 
‘InvID=Column(Integer, primary_key=True) 
CustID=Column(Integer, ForeignKey(1 Customers. CustID')) 
ProductID=Column(Integer, ForeignKey('Products. ProductID')) 
quantity=Column(Integer)

However, this will not establish a relationship amongst classes. SQLAlchemy’s ORM provides a relationship ( ) function for this purpose. In the Invoice class, ‘prod’ is a relationship property that sets uplink with the Product class, and ‘ c s t ’ attribute is a relationship that establishes a relation between Invoice and Customer class.

prod=relationship("Customer", back_ populates="Invoices") 
cst=relationship("Product", back_ populates="Invoices")

The ‘ back_populates ‘ parameter indicates that ‘prod’ and ‘c.s/’ properties have to be placed on the related mapped classes (Product and Customer respectively) that will handle this relationship in the other direction. The backward relationship is established by the following directives:

Example

Product.Invoices=relationship('Invoice', order_ by=Invoice.InvID, back_populates='cst') 
Customer.Invoices=relationship('Invoice 1, order_ by=Invoice.InvID, back_populates='prod1)

The complete code of the Invoice class is given below. Add it to my classes. py script and recreate the metadata schema by executing create_ all (engine) function.

Example

from sqlalchemy import ForeignKey 
from sqlalchemy.orm import relationship 
class Invoice(base): 
__tablename__='Invoices' 
InvID=Column(Integer, primary_key=True) 
CustID=Column(Integer, ForeignKey('Customers. CustID1)) 
ProductID=Column(Integer, ForeignKey('Products. ProductID')) 
prod=relationship("Customer", back_ populates="Invoices") 
cst=relationship("Product", back_ populates="Invoices") 
quantity=Column(Integer) 
Product.Invoices=relationship('Invoice' , order_ by=Invoice.InvID, back_populates='cst') 
Customer.Invoices=relationship('Invoice' , order_ by=Invoice.InvID, backj?opulates='prod')

The structure of the newly created Invoices table will be echoed on the command terminal:

Example

PRAGMA table_info("Invoices") 
( ) 
CREATE TABLE "Invoices" ( 
"InvID" INTEGER NOT NULL, 
"CustID" INTEGER, 
"ProductID" INTEGER, quantity INTEGER, 
PRIMARY KEY ("InvID"), 
FOREIGN KEY("CustID") REFERENCES "Customers" ("CustID"), 
FOREIGN KEY("ProductID") REFERENCES "Products" ("ProductID") 
)
 ( ) 
COMMIT

Using the Session object, we can now add data in this table as follows:

Example

from sqlalchemy.orm import sessionmaker 
Session = sessionmaker(bind=engine) 
sessionobj = Session() 
il=Invoice(InvID=l, CustID=l, ProductID=l, quantity=2) 
sessionobj.add(il) 
sessionobj.commit()

Likewise, you can add the rest of the records as given in sample data in the previous chapter.

Python Data Persistence – Querying related tables (ORM)

Python Data Persistence – Querying related tables (ORM)

The query object we used earlier in this chapter can act on more than one mapped class. By equating relating columns in two tables using filter ( ) function we can simulate implicit join affected by WHERE clause in SQL syntax.

The snippet gives the blow, we display the name of the product and its price of ProductID in the Invoices table. The filter ( ) establishes join on the basis of equal values of ProductID in Invoices and Products tables.

Example

from sqlalchemy import Column, Integer, String 
from sqlalchemy import create_engine, and_, or_ 
from myclasses import Product,base, Customer, 
Invoice 
engine = create_engine('sqlite:///mydb.sqlite1, echo=True) 
base.metadata.create_all(engine) 
from sqlalchemy.orm import sessionmaker 
Session = sessionmaker(bind=engine) 
sessionobj = Session() 
q=sessionobj.query(Invoice,Product) 
for i,p in q.filter(Product.ProductID==Invoice. 
ProductID).all():
print (i.InvID, p.name, p.price, i.quantity)

The equivalent SQL expression emitted by SQLAlchemy will be echoed as follows:

Example

SELECT "Invoices"."InvID" AS "Invoices_InvID", "Invoices"."CustID" AS "Invoices_CustID",
"Invoices"."ProductID" AS "Invoices_ProductID",
"Invoices".quantity AS "Invoices_quantity",
"Products"."ProductID" AS "Products_ProductID", "Products".name AS 
"Products_name", "Products".price AS "Products_price"
FROM "Invoices", "Products"
WHERE "Products"."ProductID" =
"Invoices"."ProductID"

The output of the above script:

1 Laptop 25000 2
2 TV 40000 1
3 Mobile 15000 3
4 Laptop 25000 6
5 Printer 9000 3
6 TV 40000 5
7 Laptop 25000 4
8 Router 2000 10
9 Printer 9000 2
10 Scanner 5000 3

To join the ‘Invoices’ table with the ‘Customers’ table and display the name of the corresponding Customer as well, add another condition in the filter – equating their CustID columns). Change the looping statement as follows:

Example

print ("InvID,Customer,Product,Price,Quantity") 
for i,p,c in q.filter \ 
(and_(Product.ProductID==Invoice.ProductID, \ 
Customer.CustID==Invoice.CustID)).all( ): 
print ( ' { } , { } , { } , { } ' . format(i.InvID, 
c.name,p.name, p.price, i.quantity))

Set the echo parameter to False and run the script to obtain the following result:

InvID,Customer,Product,Price,Quantity
1 , Ravikumar , Laptop , 25000
2 , John , TV , 40000
3 , Divya , Mobile , 15000
4 , Nair , Laptop , 25000
5 , John , Printer , 9000
6 , Patel , TV , 40000
7 , Patel , Laptop , 25000 
8 , Shah , Router , 2000
9 , Irfan , Printer , 9000 
10 , Nitin , Scanner , 5000

As mentioned at the beginning of this chapter, SQLAlchemy defines schema-specific SQL Expression Language which is at the core of the domain-centric ORM model. The functionality of Expression Language is closer to raw SQL than ORM which offers a layer of abstraction over it. In the following section, a brief overview of SQLAlchemy’s Expression Language is covered.

Python Data Persistence – Core – Inserting Records

Python Data Persistence – Core – Inserting Records

Next, is how to insert a record in this table? For this purpose, use the insert ( ) construct on the table. It will produce a template INSERT query.

Example

>>> ins=Products.insert()
>>> str(ins)
'INSERT INTO "Products" ("ProductID", name, "Price")
VALUES (:ProductID, :name, :Price)'

We need to put values in the placeholder parameters and submit the ins object to our database engine for execution.

Example

ins.values(name="Laptop",Price=25000) 
con=engine.connect( )
con.execute(ins)

Selecting data from table is also straightforward. There is a select() function that constructs a new Select object.

Example

>>> s=Products.select()
>>> str(s)
'SELECT "Products"."ProductID", "Products".name,
"Products"."Price" \nFROM "Products"'

Provide this Select object to execute the () function. It now returns a result set from which one (fetch one) or all records (fetchall) can be fetched.

Example

>>> result=con.execute(s)
>>> for row in result:
... print (row)


Python Data Persistence – MongoDB – Update Document

Python Data Persistence – MongoDB – Update Document

Predictably, there is an update ( ) method available to the collection object. Just as in SQL UPDATE, the $set operator assigns updated value to a specified key. Its primary usage is, as below:

Example

db.collection.update({"key":"value"}, 
{$set:{"key":"newvalue"}})

For example, the following statement changes the price of ‘TV’ to 50000.

> db.products.update({"Name":"TV"}, 
{$set:{"price":50000}}) 
WriteResult({ "nMatched" : 1, "nUpserted" : 0, "nModified" : 1 })

The WriteResult () confirms the modification. You can also use Boolean operators in the update criteria. To perform updates on multiple documents, use the update many ( ) method. The following command uses the $inc operator to increment the price by 500 for all products with ProductID greater than 3.

> db.products.updateMany({"ProductID":{$gt:3}}, 
{$inc:{"price":5 0 0}}) 
{ "acknowledged" : true, "matchedCount" : 2, "modifiedCount" : 2 }


Python Data Persistence – Core – Updating Records

Python Data Persistence – Core – Updating Records

SQLalchemy’s core API defines the update ( ) function which lets the value of one or more columns in one or more rows be modified.

table.update( ).where(condition).values(Col=newval)

For example, to update the price of the TV to 45000, use

qry=Products.update().where(Products.c.name=="TV"). 
values(name=45000) 
con.execute(qry)

Similarly, to delete a certain record from the table, use the following statement:

qry=Products.delete().where(Products.c.name='TV') con.execute(qry)

At the outset, there appears to be some overlap among the usage patterns of the ORM and the Expression Language. However, the similarity is rather superficial. ORM approach is from the perspective of a user-defined domain model. SQL Expression Language looks at it from the perspective of literal schema and SQL expression representations.

While an application may use either approach exclusively, sometimes, in advanced scenarios, it may have to make occasional usage of the Expression Language directly in an otherwise ORM-oriented application where specific database interactions are required.

SQLAlchemy library is extensively used in Python-based web frameworks such as Flask and bottle. There are Flask-SQLAlchemy and Bottle_ SQLAlchemy extensions specifically written for them. Other popular ORM libraries are SQLObject and Django ORM.

Python Data Persistence – SQLAlchemy Core

Python Data Persistence – SQLAlchemy Core

We have to use the same process (as used in ORM) to connect to the database i.e. using create-engine () function that returns Engine object.

from sqlalchemy import create_engine
engine = create_engine('sqlite:///mydb.sqlite',
echo=True)

If you plan to use any other database dialect, ensure that you install its respective DB-API module.

engine = create_engine('mysql+pymydsql://root@ localhost/mydb')

In order to create tables in this database, first, we have to set up a MetaData object which stores table information and other scheme-related information.

from sqlalchemy import MetaData 
meta=MetaData( )

The Table class in sqlalchemy module needs this metadata object as one of the arguments to its constructor.

TableName=Table ("name", meta, Columnl, Column2, ...)

As we have used before, the Column object represents a column in the database table and needs its name, data type, and constraints (if any) to be specified.

Example

from sqlalchemy import create_engine, MetaData,
Table, Column, Integer, String
engine = create_eng'ine ('sqlite:///mydb. sqlite1 ,
echo=True)
meta=MetaData()
Products = Table('Products', meta,
Column('ProductID', Integer, primary_key=True),
Column('name', String), Column('Price', Integer), ) meta.create_all(engine)

The create_all ( ) function emits equivalent SQL query as follow:

Example

CREATE TABLE "Products" (
"ProductID" INTEGER NOT NULL, name VARCHAR,
"Price" INTEGER,
PRIMARY KEY ("ProductID")
)

Python Data Persistence – ORM – Update Data

Python Data Persistence – ORM – Update Data

Modifying attributes of an object is very easy in SQLAlchemy. First, you have to fetch the desired object, either by the primary key (using the get ( ) method) or by applying the proper filter. All you have to do is assign a new value to its attribute and commit the change.

Following code will fetch an object from the ‘Products’ table whose ProductJD=2 (Product name is TV and price is 40000 as per sample data)

Example

p=q.get(2) 
SELECT "Products"."ProductID" AS "Products_ ProductID", 
"Products".name AS "Products_name", 
"Products".price AS "Products_price" 
FROM "Products" 
WHERE "Products"."ProductID" =? 
2, )

Change the price to 45000 and commit the session.

p.price=45000 
sessionobj.commit( )

SQLAlchemy internally executes the following UPDATE statement:

UPDATE "Products" SET price=? 
WHERE "Products"."ProductID" = ? 
(45000, 2)
 COMMIT