Python Data Persistence – shelve Module

Python Data Persistence – shelve Module

Serialization and persistence affected by functionality in this module depend on the pickle storage format, although it is meant to deal with a dictionary-like object only and not with other Python objects. The shelve module defines an all-important open( ) function that returns the ‘shelf object representing the underlying disk file in which the ‘pickled’ dictionary object is persistently stored.

Example

>>> import shelve
>>> obj =shelve.open('shelvetest1)

In addition to the filename, the open( ) function has two more optional parameters. One is ‘flag’ which is by default set to ‘c’ indicating that the file has read/write access. Other accepted values for flag parameters are ‘w’ (write-only), ‘r’ (read-only), and ‘n’ (new with reading/write access). The second optional parameter is ‘writeback’ whose default value is False. If this parameter is set to True, any modification made to the shelf object will be cached in the memory and will only be written to file on calling sync () or close ( ) methods, which might result in the process becoming slow.

Once a shelf object is declared, you can store key-value pair data to it. However, the shelf object accepts only a string as the key. Value can be any valid Python object.

Example

>>> obj ['name'] = 'Virat Kohli'
>>> obj ['age']=29
>>> obj ['teams']=['India', 'IndiaU19', 'RCB', 'Delhi']
>>> obj.close( )

In the current working directory, a file named ‘shelveset.dir’ will store the above data. Since the shelf is a dictionary-like object, it can invoke familiar methods of built-in diet class. Using the get () method, one can fetch a value associated with a certain key. Similarly, the update () method can be used to add/modify k-v pairs in shelf objects.

Example

>>> obj.get('name')
'Virat Kohli'
>>> dct = { '100s' :64, '50s' :69}
>>> obj.update(dct)
>>> diet(obj)
{'name': 'Virat Kohli', 'age': 29, 'teams':
['India', 'IndiaU19', 'RCB', 'Delhi'], '100s': 64,' 50s' : 69}

The shelf object also returns views of keys, values, and items,same as the built-in dictionary object.

Example

>>> keys=list(obj.keys())
>>> keys
['name', 'age', 'teams', '100s', '50s']
>>> values=list(obj.values() )
>>> values
['Virat Kohli', 29, ['India' , 'IndiaU19' 'RCB', 'Delhi’], 64, 69]
>>> items=list(obj.items())
>>> items
[('name', 'Virat Kohli'), (' age 1, 29), ( teams',
['India', ’IndiaU19', 'RCB', 'Delhi']), ' 100s ' , 64), ( ' 50s 1 , 69)]


Python Data Persistence – RDBMS Concepts

Python Data Persistence – RDBMS Concepts

The previous chapter discussed various tools offered by Python for data persistence. While the built-in file object can perform basic read/write operations with a disk file, other built-in modules such as pickle and shelve enable storage and retrieval of serialized data to/from disk files. We also explored Python libraries that handle well-known data storage formats like CSV, JSON, and XML.

Drawbacks of Flat File

However, files created using the above libraries are flat. They are hardly useful when it comes to real-time, random access, and in-place updates. Also, files are largely unstructured. Although CSV files do have a field header, the comma-delimited nature of data makes it very difficult to modify the contents of a certain field in a particular row. The only alternative that remains, is to read the file in a Python object such as a dictionary, manipulate its contents, and rewrite it after truncating the file. This approach is not feasible especially for large files as it may become time-consuming and cumbersome.

Even if we keep this issue of in-place modification of files aside for a while, there is another problem of providing concurrent r/w access to multiple applications. This may be required in the client-server environment. None of the persistence libraries of Python have built-in support for the asynchronous handling of files. If required, we have to rely upon the locking features of the operating system itself.

Another problem that may arise is that of data redundancy and inconsistency. This arises primarily out of the unstructured nature of data files. The term ‘redundancy’ refers to the repetition of the same data more than one time while describing the collection of records in a file. The first row of a typical CSV file defines the column headings, often called fields and subsequent rows are records.
Following table 7.1 shows a ‘pricelistxsv’ represented in the form of a table. Popular word processors (MS Word, OpenOffice Writer) and spreadsheet programs (MS Excel, OpenOffice Calc) have this feature of converting text delimited by comma or any other character to a table.

No Customer Name Product Price Quantity Total
1 Ravikumar Laptop 25000 2 50000
2 John TV 40000 1 40000
3 Divya Laptop 25000 1 25000
4 Divya Mobile 15000 3 45000
5 John Mobile 15000 2 30000
6 Ravi Kumar TV 40000 1 40000

As we can see, data items such as customer’s name, product’s name, and price are appearing repeatedly in the rows. This can lead to two issues: One, a manual error such as spelling or maintaining correct upper/lower case can creep up. Secondly, a change in the value of a certain data item needs to reflect at its all occurrences, failing which may lead to a discrepancy. For example, if the price of a TV goes up to 45000, the price and total columns in invoice numbers 2 and 6 should be updated. Otherwise, there will be inconsistency in the further processing of data. These problems can be overcome by using a relational database.

SQLite installation

Installation of SQLite is simple and straightforward. It doesn’t need any elaborate installation. The entire application is a self-contained executable ‘sqlite3.exe’. The official website of SQLite, (https://sqIite.org/download.html) provides pre-compiled binaries for various operating system platforms containing the command line shell bundled with other utilities. All you have to do is download a zip archive of SQLite command-line tools, unzip to a suitable location and invoke sqlite3.exe from DOS prompt by putting the name of the database you want to open.

If already existing, the SqLite3 database engine will connect to it; otherwise, a new database will be created. If the name is omitted, an in-memory transient database will open. Let us ask SQLite to open a new mydatabase.sqlite3.

E:\SQLite>sqlite3 mydatabase.sqlite3 
SQLite version 3.25.1 2018-09-18 20:20:44 
Enter ".help" for usage hints. 
sqlite>

In the command window, a SQLite prompt appears before which any SQL query can be executed. In addition, there “dot commands” (beginning with a dot “.”) typically used to change the output format of queries or to execute certain prepackaged query statements.
An existing database can also be opened using the .open command.

E:\SQLite>sqlite3
SQLite version 3.25.1 2018-09-18 20:20:44 
Enter ".help" for usage hints.
Connected to a transient in-memory database. 
Use ".open FILENAME" to reopen on a persistent database.
sqlite> .open test.db

The first step is to create a table in the database. As mentioned above, we need to define its structure specifying the name of the column and its data type.

SQUte Data Types

ANSI SQL defines generic data types, which are implemented by various RDBMS products with a few variations on their own. Most of the SQL database engines (Oracle, MySQL, SQL Server, etc.) use static typing. SQLite, on the other hand, uses a more general dynamic type system. Each value stored in SQLite database (or manipulated by the database engine) has one of the following storage classes:

  • NULL
  • INTEGER
  • REAL
  • TEXT
  • BLOB

A storage class is more general than a datatype. These storage classes are mapped to standard SQL data types. For example, INTEGER in SQLite has a type affinity with all integer types such as int, smallint, bigint, tinyint, etc. Similarly REAL in SQLite has a type affinity with float and double data type. Standard SQL data types such as varchar, char, char, etc. are equivalent to TEXT in SQLite.
SQL as a language consists of many declarative statements that perform various operations on databases and tables. These statements are popularly called queries. CREATE TABLE query defines table structure using the above data types.

CREATE TABLE

This statement is used to create a new table, specifying the following details:

  • Name of the new table
  • Names of columns (fields) in the desired table
  • Type, width, and the default value of each column.
  • Optional constraints on columns (PRIMARY KEY, NOT NULL, FOREIGN KEY)

Example

CREATE TABLE table_name ( 
column 1 datatype [width] [default] [constraint], 
column2 , 
column3..., 
 ) ;

DELETE Statement

If you need to remove one or more records from a certain table, use the DELETE statement. The general syntax of the DELETE query is as under:

Example

DELETE FROM table_name WHERE [condition];

In most circumstances, the WHERE clause should be specified unless you intend to remove all records from the table. The following statement will remove those records from the Invoices table having Quantity>5.

sqlite> select customers.name, products. name, the quantity from invoices, customers, products
...> where invoices.productID=Products.ProductID ...> and invoices.CustID=Customers.CustID;
Name               Name          Quantity
---------           ---------        ---------
Ravikumar        Laptop              2
Divya                Mobile              3
Ravikumar        Mobile              1
John                 Printer               3
Patel                 Laptop             4
Irfan                 Printer              2
Nit in Scanner 3

ALTER TABLE statement

On many occasions, you may want to make changes in a table’s structure. This can be done by the ALTER TABLE statement. It is possible to change the name of a table or a column or add a new column to the table.

The following statement adds a new column in the ‘Customers’ table:

sqlite> alter table customers add column address text (20);
sqlite> .schema customers CREATE TABLE Customers (
CustID INTEGER PRIMARY KEY AUTOINCREMENT, Name TEXT (20),
GSTIN TEXT (15), address text (20));

DROP TABLE Statement

This statement will remove the specified table from the database. If you try to drop a non-existing table, the SQLJte engine shows an error.
sqlite> drop table invoices; sqlite> drop table employees; Error: no such table: employees
When the ‘IF EXISTS’ option is used, the named table will be deleted only if exists and the statement will be ignored if it doesn’t exist.
sqlite> drop table if exists employees;

SQLiteStudio

SQLiteStudio is an open-source software from https://sqlitestudio.pl. It is portable, which means it can be directly run without having to install. It is powerful, fast, and yet very light. You can perform CRUD operations on a database using GUI as well as by writing SQL queries.

Download and unpack the zip archive of the latest version for Windows from the downloads page. Run SQLiteStudio.exe to launch the SqliteStudio. Its opening GUI appears as follows:(figure 7.3)

Python Data Presistence - RDBMS Concepts chapter 1 img 1

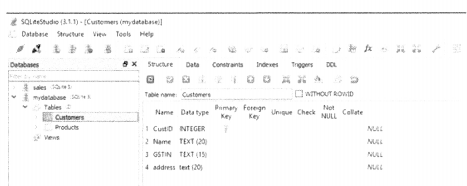
Currently attached databases appear as expandable nodes in the left column. Click any one to select and the ‘Tables’ sub-node shows tables in the selected database. On the right, there is a tabbed pane. The first active tab shows structure of the selected table and the second tab shows its data. The structure, as well as data, can be modified. Right-click on the Tables subnode on the left or use the Structure menu to add a new table. User-friendly buttons are provided in the Structure tab and data tab to insert/ modify column/row, commit, or rollback transactions.

This concludes the current chapter on RDBMS concepts with a focus on the SQLite database. As mentioned in the beginning, this is not a complete tutorial on SQLite but a quick hands-on experience of interacting with SQLite database to understand Python’s interaction with databases with DB-API that is the subject of the next chapter.


Python Data Persistence – ORM – Filter Criteria

Python Data Persistence – ORM – Filter Criteria

The query object has a filter ( ) method that implements the WHERE clause as used in the raw SQL SELECT statement. The argument to filter can be any Boolean expression. In the following snippet, the filter is ‘price>20000’.

rows=q.filter (Product .price>20000)

This will translate into corresponding SQL statements as under:

Example

SELECT "Products"."ProductID" AS "Products_ ProductID", "Products". 
name AS "Products_name", "Products".price AS "Products_price" 
FROM "Products" 
WHERE "Products".price >?
(20000, )

SQLAlchemy supports the use of wild cards for filter operations on string columns. The LIKE keyword in SQL is implemented by applying a ( ) filter. Products. name. like (‘ %er’) filters rows with product name ending with ‘er’>

rows=q.filter (Product .name. like (1 %er') )

In effect above statement is equivalent to the following SQL query:

Example

SELECT "Products"."ProductID" AS "Products_ ProductID", 
"Products".name AS "Products_name", "Products".price AS "Products_price" 
FROM "Products" 
WHERE "Products".name LIKE ? 
(' %er' ,)


As you will expect, the following output will be displayed:

name: Router price: 2000 
name: Scanner Price: 5000 
name: Printer price: 9000

The filter ( ) can have AND/OR conjunctions implemented by and_ ( ) and or_( ).

Following filter returns products with a price between 10000 and 30000

from sqlalchemy 
import and_ rows=q.filter(and_
(Product.price>10000, Product. price<30000) )

Here is the generated SQL:

Example

SELECT "Products"."ProductID" AS "Products_ ProductID", 
"Products".name AS "Products_name", "Products" .price AS "Products__price" 
FROM "Products" 
WHERE "Products".price > ? AND "Products".price < ? 
(10000, 30000)

The OR operation is performed by the following statement

Example

from sqlalchemy import or_ 
rows=q.filter(or_(Product.price>20000, Product.name. like (' %er' ) ) )

which is equivalent to the following SQL statement:

Example

SELECT "Products"."ProductID" AS "Products_ ProductID", 
"Products".name AS "Products_name", "Products".price AS "Products_price" 
FROM "Products", 
"Customers" WHERE "Products".price <=? 
OR "Customers".name LIKE? 
(5000, '%er')


Python Data Persistence – List Comprehension

Python Data Persistence – List Comprehension

Python supports many functional programming features. List comprehension is one of them. This technique follows mathematical set builder notation. It is a very concise and efficient way of creating a new list by performing a certain process on each item of the existing list. List comprehension is considerably efficient than processing a list by for loop.
Suppose we want to compute the square of each number in a list and store squares in another list object. We can do it by a for loop as shown below:

Example

#new list with loop
list1= [4,7,2,5,8]
list2= [ ]
for num in listl:
sqr=num*num
list2.append(sqr)
print ('new list:', list2)

The new list will store squares of the existing list.
The list comprehension method achieves the same result more efficiently. List comprehension statement uses the following syntax:

new list = [x for x in sequence]

We use the above format to construct a list of squares by using list comprehension.

Example

>>> list1=[ 4 , 7 , 2 , 5 , 8 ]
>>> list2=[num*num for num in list1]
>>> list2
[ 16 , 49 , 4 , 25 , 64 ]
> > >

We can even generate a dictionary or tuple object as a result of list comprehension.

Example

>>> list1= [ 4 , 7 , 2 , 5 , 8 ]
>>> dict1=[{num:num*num} for num in list1]
>>> dict1
[{4 16}, {7: 49}, {2:4}, {5 : 25},{8 : 64 } ]
>>>

List comprehension works with any iterable. Nested loops can also be used in a list comprehension expression. To obtain list of all combinations of characters from two strings:

Example

>>> list1= [x+y for x in 'ABC' for y in ' 123 ' ]
>>> list1
[ 'A1' , 'A2', 'A3', 'B11,' B2 ', 'B3', 'Cl', 'C2', ' C3 ']
>>>

The resulting list stores all combinations of one character from each string.

We can even have if condition in a list comprehension. The following statement will result in a list of all non-vowel alphabets in a string.

Example

>>> consonents=[char for char in "Simple is better
than complex" if char not in [ 'a', 'e' , 'i' , 'o' , 'U' ] ]
>>> consonents
[ 'S' , 'm' , 'p' , '1' , ' ' , 'b' , 't' , 'r' , ' ' , 't' , 'h' , 'n' , ' ' , 'c' , 'm' , 'p' , 'l' , 'x' ]

Conditionals and looping constructs are the two most important tools in a programmer’s armory. Along with them, we also learned about controlling repetition with break and continue statements.
The next chapter introduces the concept of structured programming through the use of functions and modules.

Python Data Persistence – Create Keyspace

Python Data Persistence – Create Keyspace

As mentioned above. Cassandra Query Language (CQL) is the primary tool for communication with the Cassandra database. Its syntax is strikingly similar to SQL. The first step is to create a keyspace.

A keyspace is a container of column families or tables. CQL provides CREATE KEYSPACE statement to do exactly the same – create a new keyspace. The statement defines its name and replication strategy.

Example

CREATE KEYSPACE name with replication {options}

The replication clause is mandatory and is characterized by class and replication_factor attributes. The ‘class’ decides the replication strategy to be used for the keyspace. Its value is. by default, SimpleStrategy indicating that data will be spread across the entire cluster. Another value of the class is NetworkTopologyStrategy. It is a production-ready strategy with the help of which replication factor can be set independently on each data center.

The replication_factor attribute defines the number of replicas per data center. Set its value to 3, which is considered optimum, so that the data availability is reasonably high.

The following statement creates ‘ My Key Space ’ with ‘ SimpleStrategy’ and a replication factor of 3.

cqlsh> create keyspace my keyspace with
. . . replication={'class': 'SimpleStrategy',
'replication_factor 1 : 3};

Note that, the name of keyspace is case-insensitive unless given in double quotes. CQL provides the use keyword to set a certain keyspace as current. (Similar to MySQL ‘use” statement isn’t it?). To display a list of keyspaces in the current cluster, there is DESCRIBE keyword.

cq1sh> describe keyspaces;
castest            system_auth my keyspace
system_traces
system_schema system           system_distributed
cq1sh> use my keyspace; 
cq1sh:mykeyspace>

Create New Table

As mentioned earlier, one or more column families or tables may be present in a keyspace. The CREATE TABLE command in CQL creates a new table in the current keyspace. Remember the same command was used in SQL?

The general syntax is, as follows:

Example

create table if not exists table_name 
(
col1_definition, 
col2_ definition,
. .
. .
)

Column definition contains its name and data type, optionally setting it as the primary key. The primary key can also be set after the list of columns has been defined. The ‘if not exists” clause is not mandatory but is recommended to avoid error if the table of the given name already exists.
The following statement creates the ‘Products’ table in mykeyspace.

cq1sh:mykeyspace> create table if not exists products
                           . . . (
                           . . . productID int PRIMARY KEY,
                           . . . name text,
                           . . . price int 
                           . . . ) ;

The following definition is also identical:

cq1sh:mykeyspace> create table products
                              . . . (
                              . . . productID int,
                              . . . name text,
                              . . . price int,
                              . . . primary key (productID) 
                              . . . ) ;

Partition Key

Partition key determines on which node will a certain row will be stored. If a table has a single primary key (as in the above definition), it is treated as a partition key as well. The hash value of this partition key is used to determine the node or replica on which a certain row is located. Cassandra stores row having the primary keys in a certain range on one node. For example, rows with a productID value between 1 to 100 are stored on Node A, between 2 to 200 on node B, and so on.

The primary key may comprise more than one column. In that case, the first column name acts as the partition key and subsequent columns are cluster keys. Let us change the definition of the Products table slightly as follows:

cq1sh:mykeyspace> create table products
                                    . . . (
                                    . . . productID int,
                                    . . . manufacturer text,
                                    . . . name text,
                                    . . . price int,
                                    . . . primary key(manufacturer,
productID)
                                   . . . ) ;

In this case, the ‘manufacturer’ column acts as the partition key and ‘productID’ as a cluster key. As a result, all products from the same manufacturer will reside on the same node. Hence a query to search for products from a certain manufacturer will return results faster.

Python Data Persistence – Repetition Control

Python Data Persistence – Repetition Control

A looping construct is normally designed to make a certain number of repetitions. For example, the Boolean expression in a while statement decides how many times the block will be repeatedly executed. In the case of for loop, it is decided by the length of iterable.
But what if a situation requires early termination of the loop? Consider an example: your program gives the user 10 chances to guess a secret number. Obviously, user input and comparison logic form the body of the loop. However, if the user guesses it right earlier than stipulated chances, naturally the loop should terminate without undergoing all repetitions. Following figure 2.14 explains this scenario:

Python Data Presistence - Repetition Control chapter 2 img 1

Python’s break keyword serves exactly this purpose. This keyword appears in a conditional statement inside the loop’s body. If and when the statement evaluates to true, the break statement causes the current loop to be abandoned before the stipulated number of repetitions.
Following Python code implements figure 2.14 flowchart algorithm. To start with a random integer is set as a secret number. (The randint ( ) function is defined in a built-in random module. More about it in the next chapter.) The while loop gives 10 chances for the user to guess it correctly but terminates early if the user gets it right.

Example

#secret-number.py
import random
secret=random.randint(1,10)
chances=0
while chances<10:
guess = int(input(1 enter your guess..'))
if guess==secret:
print ('you got that right!')
break
print ('try again..')chances=chances+1
if chances==10:
print ('chances exhausted, secret number is : 1,secret)

The output of the above code is shown below. However, your result is likely to be different because a secret number is generated randomly.

Output

E:\python37>python secret-number.py 
enter your guess . . 1 try again . . 
enter your guess . . 2 try again . . 
enter your guess . . 3 try again . . 
enter your guess . . 4 you got that right!

Python also has to continue the keyword which is more or less opposite to break. Instead of breaking out of the current loop, when encountered, continue sends program control back to the beginning of the loop. The remaining statements in the current iteration will not be executed.
A typical scenario of continuing in a loop is like this:
A loop accepts five numbers from the user and displays the sum. However, if a negative number is input, the user is forced to input again. The negative number is kept away from the sum operation. Look at the following flowchart (figure 2.16):

Python Data Presistence - Repetition Control chapter 2 img 2
Following Python code implements the above algorithm (figure 2.16).

Example

#continue-example.py
count=1
sum=0
while count<=5:
num=int ( input ( ' enter a number . . ' ) )
if num< 0:
print ('negative number is not accepted. Try again..')
continue
sum=sum+num
count=count+1
print ('sum=',sum)

Output:

E:\python3 7>python continue-example.py 
enter a number . . 2 
enter a number . . 4 
enter a number . . -1 
negative number is not accepted. Try again . .

enter a number . . 6 
enter a number . . -9 
negative number is not accepted. Try again . .

enter a number . . 3 
enter a number . . 1 
sum= 16

E:\python37>

else Statement with Loop

This might be a bit of a surprise to you if you know any C family language (e.g. C, C++, Java, C#, and so on.) The else keyword is normally used to describe the action to be taken when the expression in the if statement is false. While this usage is also defined in Python, else is also used along with looping constructs, both while and for.
When constructing a loop, you can use an optional else block just after the loop’s body. The rest of the statements follow after the else block. The else block comes into play after the loop is over, but before leaving the loop.

Example

#else with loop
while expression==True:
#while block
. .
#end of while block
else:
#else block
. .
#end of else block
#ret of the statements
. .

Following code is typical to use case of else with a loop. The objective is to determine whether the input number is prime or not. The number is successively divided by all numbers between 2 and n. If any number is able to divide it without leaving a remainder, it is a prime. After completion of the loop, else block displays a message of a prime number.

Example

#else-in-loop.py
num=int ( input ( " enter a number . . " ) )
x=2
while x<num:
if num%x==0:
print ("{ } is not prime.".format(num))
break
x=x+1
else:
print ("{ } is prime.".format(num))
print ('end of program')

Note that the else block won’t come into the picture if the loop breaks prematurely as it would happen in case the number is not prime. Here is the output of the above script:

Output:

E : \python37 'python else - in- loop . py 
enter a number . . 31 
31 is prime. end of program 

E:\python37 >python else-in-loop.py 
enter a number . . 24 
24 is not prime. end of program 

E:\python3 7.

It is possible to provide else block for the loop also. You can try writing the above prime number example using for loop.
Hint: You may have to use the range ( ) function in it.

Python Data Persistence – for loop with dictionary

Python Data Persistence – for loop with dictionary

Dictionary object is not iterable as it is an unordered collection of k-v pairs. However, its views returned by methods – items () , keys ( ) , and values ( ) – do return iterables. So, it is possible to use for statement with them. The following code snippet displays each state-capital pair in a given dictionary object.

Example

#for-5.py
dict1={'Maharashtra': 'Bombay', 'Andhra Pradesh': 'Hyderabad', 'UP': 'Lucknow', 'MP': 'Bhopal'}
for pair in dict1.items():
print (pair)

Output:

E:\python37>python for-5.py 
('Maharashtra', 'Bombay') 
('Andhra Pradesh1, 'Hyderabad') 
('UP' , 1 Lucknow') 
('MP' , 1 Bhopal')

 E:\python3 7 >

As you can see, each pair happens to be a tuple. You can easily unpack it in two different variables as follows:

Example

#for-6.py
dict1={ ' Maharashtra ' : ' Bombay ' , ' Andhra Pradesh ' : ' Hyderabad ' , ' UP ' : ' Lucknow ' , ' MP ' : ' Bhopal ' }
for k ,v in dict1 . items ( ) :
print ( ' capital of { } is { } .'. format ( k , v ) )

Output:

E:\python37>python for-6.py
capital of Maharashtra is Bombay,
capital of Andhra Pradesh is Hyderabad.
capital of UP is Lucknow.
capital of MP is Bhopal.E:\python37>

The keys( ) and values ( ) methods also return iterables. The keys ( ) view returns a collection of keys. Each key is then used to fetch the corresponding value by get ( ) method of the dictionary object.

Example

#for-7.py
dict1={'Maharashtra': 'Bombay', 'Andhra Pradesh': 'Hyderabad', 'UP': 'Lucknow', 'MP': 'Bhopal'}
for k in dict1.keys ( ) :
state=k
capital=dict1.get(k)
print ( 'capital of { } is
{ } .'. format ( state , capital ) )

Python Data Persistence – Program Flow Control

Python Data Persistence – Program Flow Control

In the previous chapter, although we briefly discussed the scripting mode of the Python interpreter, we mostly worked with Python in interactive mode. It is definitely useful in getting acquainted with the features and syntax of Python especially while learning. It doesn’t prove to be useful though if you want to execute a certain set of instructions repeatedly. In case, if you want to automate a certain process, scripting mode is needed. As we saw in the previous chapter, the script is executed from the command prompt as follows (figure 2.1) :

C:\Users\acer>python hello.py 
enter your name..Akshay 
Hello Akshay how are you?

A program is a set of instructions, which is saved as a script and can be executed together as and when needed. A Python program is simply a text file with .py extension and contains one or more Python statements. Statements are executed in the order in which they are written in script.

Statements in a program follow input-process-output patterns sequentially. However, it is useful only in very simplistic problems, where one or more inputs are collected, processed and, the result of the process is displayed. More realistic and real-world problems require appropriate decisions to be taken depending on varying situations. In other words, we definitely want the program to have a ‘decision’ taking ability.

Many a time an entire process, or a part of it, maybe required to be executed repeatedly until a situation arrives or is encountered. In such a case, the default sequential flow of the program is diverted back to one of earlier statements, thereby constituting a ‘loop’.

The decision statements and looping statements are essential parts of any programming language. In this chapter, you will learn to use Python keywords implementing decision control (if, else, and elif) and repetition control (while and for).

Both these programming constructs, decision and repetition controls are implemented conditionally i.e. based on whether a certain logical expression evaluates to a Boolean value (True or False). Python uses a set of comparison operators to form a logical expression.
The symbols >, <, >=, and <= carry their conventional meaning. The ‘==’ symbol is defined as ‘is equal to’’ operator that returns True if both operands are equal and False otherwise. The ‘!=’ symbol acts as the opposite. It may be called ‘not equal to5 operator

Example

>>> a = 10
>>> b = 5
>>> a > b
True
>>> a < b
False
>>> a>=b*2
True
>>> a*2<=b*4
True
>>> a/2!=b
False
>>>

Repetition

Python’s keywords to construct conditional statements are more or less similar to those found in other languages such as C/C++, Java, and so on. The same is with the repletion control statements. Python has keywords – while and for – using which a loop can be formed in a program. While their usage is similar to that of other languages, there are certain Python-specific changes.
As mentioned at the beginning of this chapter, by default the statements in a program are executed sequentially. However, instead of going to the next instruction, if the program flow redirected to any of the earlier steps, it results in repetitive execution of part of statements in the script.

Python Data Presistence - Program Flow Control img 1

If, as shown in figure 2.5, we somehow manage to make the program go back to statement-1 after statement-m (instead of next in line), the result will be a continuous execution of statements 1 to m which won’t stop on its own and it forms a loop called as an infinite loop. Obviously, this situation is never desired. Instead, we should have a mechanism by which repetition is conditional. The while keyword does exactly the same – it constructs a conditional loop.

Python Data Persistence – Decision Control

Python Data Persistence – Decision Control

Python’s if keyword constructs a conditional statement. It evaluates a boolean expression and executes an indented block of statements following it. The block is initiated by putting the Y symbol after the expression. (Indentation was already explained in the previous chapter.) The following skeleton shows typical usage of if statement and conditional block in a Python script:

Example

#using if statement
if expression==True:
#block of one or more statements
statement 1
statement 2
. . .
. . .
end of if block
#rest of the statements

Let us try to understand this with the help of a simple example. Following script computes tax on employee’s salary @10% if it is greater than or equal to 50,000. No tax is deducted if the salary is less than 50,000.

Example

# tax1 . py
salary= int (input("enter salary . . " ) )
tax=0
if salary>=50000:
#tax @10%
tax=salary*10/100
net_sal=salary-tax
print ("salary={ } tax= { } net payable= { }".
format (salary, tax , net_sal) )

Save the above script as ‘tax1.py’ and run it from the command prompt as shown below (figure 2.2):


C:\python37>python tax1.py 
enter salary..75000 
Salary=75000 tax=7500.0 net payable=67500.0 

C:\python37>python tax1.py 
enter salary..30000 
Salary=30000 tax=0 net payable=30000 

C:\python3 7 >

Python also provides else keywords. If there is another block of statements to be executed when the expression in if statement happens to be no True (False), it appears as:

Example

#using if statement
if expression==True:
#if block
statement 1
statement 2
. . .
. . .
#end of if block
else:
#else block
statement 1
statement 2
. . .
. . .
#end of else block
#rest of the statements

To show the use of else block, let us modify the previous example of computation of tax, assuming that tax is calculated 5% for salary<50000

Example

#tax2 . py
salary=int (input("enter salary . . " ) )
tax = 0
if salary>=50000:
# tax@10%
tax=salary*10/100
else:
#tax@5%
tax=salary*5/100
net_sal=salary-tax
print ("salary={ } tax={ } net payable = { }".
format (salary, tax, net_sal ) )

Two sample executions of the above script (tax2.py) are as shown below

C:\python37>python tax2.py
enter salary..60000
Salary=60000 tax=6000.0 net payable=54000.0
C:\python37 >python tax2.py
enter salary..20000
Salary=20000 tax=1000.0 net payable;=19000.0

C:\python3 7 >

Python also has elif keyword. Before using it in a Python script, let us modify the above tax calculation program to include few more tax slabs. The tax rate for salary above 50,000 is the same @10%. However, 5% tax is imposed for salary between 25,001 – 50,000. An employee with a salary between 10,001 – 25000 pays 2% tax, and anything below it requires no tax to be deducted. The script looks like as:

Example

#tax3 . py
salary=int ( input ( " enter salary . . " ) )
tax=0
if salary>=50000:
#tax @10%
tax=salary*10/100
else:
if salary>25000 :
#tax @5%
tax=salary*5/100
else:
if salary>10000:
#tax @2%
tax=salary*2/100
else:
#no tax
print ("No tax applicable")
net_sal=salary-tax
print ("Salary={ } tax={ } net payable={ }".
format(salary, tax, net_sal))

Here’s the output showing different tax slabs (figure 2.4)

C:\python37>python tax3.py 
enter salary..60000 
Salary=60000 tax=6000.0 net payable=54000.0 

C:\python37>python tax3.py 
enter salary..40000 
Salary=40000 tax=2000.0 net payable = 38000.0 

C:\python37>python tax3.py 
enter salary..18000 
Salary=18000 tax=360.0 net payable=17640.0 

C:\python37>python tax3.py 
enter salary..5000 
No tax applicable Salary=5000 tax=0 net payable=5000 

E:\python37>


While the output is satisfactory as per the expectations, the code (tax3. py) looks a little clumsy because of the increasing indent level of successive if blocks which fall in else part of the previous if statement. This is where the use of elif keyword provides a more elegant way to avoid these indentations and combine empty else with subsequent if block. The general syntax of if- elif- else usage is as shown below:

Example

#using elif statement
if exprl==True:
#first block
. . .
#end of the first block
elif expr2==True:
#second block executes if expr1 is False and expr2 is true.
. . .
#end of the second block
elif exp3==True:
#third block executes if expr2 is false and expr3 is true
. . .
#end of the third block
else:
#else block, executes if all preceding expressions are false
. . .
end of else block
#rest of the statements

In this structure, there is one if block, followed by one or more elif blocks and one else block at the end. Each subsequent elif is evaluated if the previous expression fails. The last else block is run only when all previous expressions turn out to be not true. Importantly all blocks have the same level of indentation. Here, is another version of tax3.py which uses elif blocks.

Example

#tax4.py
salary=int(input("enter salary.."))
tax=0
if salary>=50000:
#tax @10%
tax=salary*10/100
elif salary>25000:
#tax @5%
tax=salary*5/100
elif salary>10000:
#tax @2%
tax=salary*2/100
else :
#no tax
print ("No tax applicable")
net_sal=salary-tax
print ("Salary={ } tax={ } net payable={ }". format(salary, tax, net_sal))

The output of course will be similar to before.

Python Data Persistence – for Keyword

Python Data Persistence – for Keyword

Like many other languages, Python also provides for keywords to construct a loop. However, Python’s for loop is a little different from others. Instead of a count-based looping mechanism, Python’s for loop iterates over each item in a collection object such as list, tuple, and so on.
Python’s sequence-type objects are the collections of items. These objects have an in-built iterator. An iterator is a stream that serves one object at a time until it is exhausted. Such objects are also called iterable. Python’s for loop processes one constituent of an iterable at a time till it is exhausted. The general form of usage of for statement is as follows:

Example

#using for loop
for obj in iterable:
#for block
#processing instructions of each object
. . .
end of block

Unlike the while loop, any other Boolean expression is not required to control the repetition of this block. Let us take a simple example. If you want to calculate the square of each number in a list, use for loop as shown below:

Example

#for-1.py
numbers=[4,7,2,5,8]
for num in numbers:
sqr=num*num
print ( ' sqaure of { } is { } ' . format ( num , sqr ) )

Output:

E:\python3 7 >python for-1.py 
square of 4 is 16 
square of 7 is 49 
square of 2 is 4 
square of 5 is 25 
square of 8 is 64 

E:\python37 >

Just like a list, a tuple or string object is also iterable. The following code snippet uses a for loop to traverse the characters in a sentence and count the number of words in it assuming that a single space (‘ ‘)separates them.

Example

#for-2.py
sentence=1 Simple is better than complex and Complex is. better than complicated. '
wordcount=1
for char in sentence:
if char==' ':
wordcount=wordcount+1
print ('the sentence has { } words'.
format(wordcount))

Output

E:\python37>python for-2.py 
the sentence has 11 words 

E:\python37>