Python Data Persistence – dbm Modules

Python Data Persistence – dbm Modules

6.3 dbm Modules

These modules in Python’s built-in library provide a generic dictionary-like interface to different variants of DBM style databases. These databases use binary encoded string objects as key, as well as value. The dbm. gnu module is an interface to the DBM library version as implemented by the GNU project. On the other hand, dbm.ndbm module provides an interface to UNIX nbdm implementation. Another module, dbm. dumb is also present which is used as a fallback option in the event, other dbm implementations are not found. This requires no external dependencies but is slower than others.

Example

>>> import dbm
> > > db=dbm.open(1mydbm.db' , 'n' )
>>> db[1 title']=1 Introduction to Python'
>>> db['publisher 1] = 'BPB'
>>> db[1 year'] = '2 019 1
>>> db.close( )

As in the case of shelve database, user-specified database name carries ‘.dir’ postfix. The dbm object’s whichdb( ) function tells which implementation of dbm is available on the current Python installation.

Example

>>> dbm.whichdb('mydbm.db')
'dbm.dumb'

The open() function allows mode these flags: ‘c’ to create a new database with reading/write permission, ‘r’ opens the database in read-only mode, ‘w’ opens an existing database for writing, and ‘n’ flag always create a new empty database with read/write permissions.
The dbm object is a dictionary-like object, just like a shelf object. Hence, all dictionary operations can be performed. The following code opens ‘mydbm.db’ with ‘r’ flag and iterates over the collection of key-value pairs.

Example

> > > db=dbm.open('mydbm.db', 'r')
>>> for k,v in db.items():
print (k,v)
b'title' : b'Introduction to Python'
b'publisher' : b'BPB'
b'year' : b'2019'


Python Data Persistence – Querying Cassandra Table

Python Data Persistence – Querying Cassandra Table

Predictably. CQL also lias the SELECT statement to fetch data from a Cassandra table. The easiest usage is employing to fetch data from all columns in a table.

cq1sh:mykeyspace> select * from products;
productid   |    name        |  price
------------+-------------+---------
      5          |   ’Printer'      |  9000
      1           |  'Laptop'     |   25000
      2          |  'TV'             |  40000
      4           |  'Scanner'    |   5000
      6           | 'Mobile'      |   15000
      3           | 'Router'       |  2000
(6 rows)

All conventional logical operators are allowed in the filter criteria specified with the WHERE clause. The following statement returns product names with prices greater than 10000.

cq1sh:mykeyspace> select * from products where price>10000 allow filtering;
productid   |    name        |  price
------------+-------------+---------
      1          |  'Laptop'     |   25000
      2          |  'TV'            |  40000
      6          | 'Mobile'      |   15000
(3 rows

Use of ALLOW FILTERING is necessary here. By default, CQL only allows select queries where all records read will be returned in the result set. Such queries have predictable performance. The ALLOW FILTERING option allows to explicitly allow (some) queries that require filtering. If the filter criteria consist of partition key columns only = and IN operators are allowed.

UPDATE and DELETE statements of CQL are used as in SQL. However, both must have filter criteria based on the primary key. (Note the use of’—’ as a commenting symbol)

cq1sh:mykeyspace> - -update syntax
cq1sh:mykeyspace> update new products set price=45000
where productID=2;
cq1sh:mykeyspace> --delete syntax
cq1sh:mykeyspace> delete from new products where
productID=6;

Python Data Persistence – Read Data from Worksheet

Python Data Persistence – Read Data from Worksheet

To read data from an existing Excel document, we need to load it with the load_workbook ( ) function.

>>> from openpyxl import load_workbook 
>>> wb=load_workbook (filename= ' test. xlsx ' )

Set the desired worksheet as active and retrieve the value of any cell.

Example

>>> sheet1.cell (row=1, column=1).value
'Hello World'
>>> #or
>>> sheetl['A1'] . value
'Hello World'

Following script writes data in a list object, each item being a tuple comprising of ProductID, name, and price.

Example

#saveworkbook.py 
from openpyxl import Workbook 
wb = Workbook( ) 
sheet1 = wb.active 
sheet1.title='PriceList' 
sheet1.cell(column=l, row=l, value='Pricelist') pricelist=[('ProductID', 'Name', 'Price'), 
                          (1,'Laptop',25000),(2, 'TV',40000), 
                          (3, 'Router' ,2000) , (4, 'Scanner',5000) , 
                          (5, 'Printer 1,9000) , (6, 'Mobile',15000)] 
        for col in range(1,4): 
                  for row in range(1,7): 
                     sheet1.cell(column=col, row=1+row, 
value=pricelist[row-1] [col-1]) 
wb. save (filename = "test.xlsx")

The Excel document in the current directory looks like this: (figure 10.3)

Python Data Presistence - Read Data from Worksheet chapter 10 img 1

Let us find out how to perform certain formatting actions on worksheet data.

Python Data Persistence – Creating a workbook

Python Data Presistence – Creating a workbook

An object of the Workbook class represents an empty workbook with one worksheet. Set it to be active so that data can be added to it.

Example

>>> from openpyxl import Workbook
>>> wb=Workbook( )
>>> sheet1=wb.active
>>> sheetl.title='PriceList'

Each cell in the worksheet is identified by a string made of Column name and row number. The top-left cell is ‘A1’. The normal assignment operator is used to storing data in a cell.

>>> sheet1['A1']='Hello World'

(NB: These operations as well as others that will be described in this chapter will not be immediately visualized in the Python environment itself. The workbook so created needs to be saved and then opened using Excel application to see the effect)

There is another way to assign value to a cell. The cell( ) method accepts row and column parameters with integer values. Column names A, B, C, and so on; will be denoted by 1,2,3, and so on. Rows are also numbered from 1.

>>> sheet1.cell(row=1, column=1).value='Hello World'

Contents of cells are retrieved from their value attribute.

>>> sheet1['a1'].value 
'Hello World'

Use the save ( ) method to store the workbook object as an Excel document. Later, open it to verify the above process, (figure 10.2)

Python Data Presistence - Creating a workbook chapter 10 img 1

Python Data Persistence – Parameterized Queries

Python Data Persistence – Parameterized Queries

The cassandra.query submodule defines the following Statement classes:
SimpleStatement: A simple, unprepared CQL query contained in a query string. For example:

Example

from cassandra.query import SimpleStatement 

stmt=SimpleStatement("select * from products;") 

rows=session.execute(stmt)

BatchStatement: A batch combines multiple DML operations (such as INSERT, UPDATE, and DELETE) and executes at once to achieve atomicity. For the following example, first create a ‘customers’ table in the current keyspace.

create table customers
. . . (
. . . custID int primary key, 
. . . name text,
. . . GSTIN text
. . . ) ;

Customer data is provided in the form of a list of tuples. Individual INSERT query is populated with each tuple and added in a BatchStatement. The batch is then executed at once.

Example

#cassandra-batch.py
from cassandra.cluster import Cluster 
clstr=Cluster( )
session=clstr.connect(1mykeyspace') 
custlist= [ (1, 'Ravikumar', '2 7AAJPL7103N1ZF') ,
(2, 'Pate1' , ' 24ASDFG1234N1ZN' ) ,
(3, 'Nitin' , '27AABBC7895N1ZT') ,
, (4, 1Nair' , '32MMAF8963N1ZK') ,
(5,'Shah','24BADEF2002N1ZB'),
(6,'Khurana','07KABCS1002N1ZV'),
(7,'Irfan','05IIAAV5103N1ZA1),
(8,'Kiran','12PPSDF22431ZC'},
(9,'Divya','15ABCDE1101N1ZA'),
(10, 'John', '2 9AAEEC42 58E1ZR' )] 
from cassandra.query import SimpleStatement, 
BatchStatement 
batch=BatchStatement( ) 
for cst in custlist:
             batch . add(SimpleStatement("INSERT INTO customers 
(custID,name,GSTIN) VALUES (%s, %s, %s) ") , 
\
                                      (cst [0], cst[1],cst [2] ) ) 
session.execute(batch)


Run the above code and then check rows in the ‘customers’ table in the CQL shell.

cq1sh:mykeyspace> select * from customers;


custid       |  gstin                              |    name
-----------+--------------------------+-------------
    5           |  24BADEF2002N1ZB      |     Shah
   10          |  29AAEEC4258E1ZK       |     John
    1           |  27AAJPL7103N1ZF       |     Ravikumar
    8           |  12PPSDF22431ZC         |     Kiran
    2           |  24ASDFG1234N1ZN     |    Patel
    4           |  32MMAF8963N1ZK      |    Nair
     7          | 05IIAAV5103N1ZA         |    Irfan
     6          | 07KABCS1002N1ZV       | Khurana
     9          |  15ABCDEU01N1ZA       |    Divya
     3          | 27AABBC7895N1ZT       |    Nitin
(10 rows)

PreparedStatement: Prepared statement contains a query string that is parsed by Cassandra and then saved for later use. Subsequently, it only needs to send the values of parameters to bind. This reduces network traffic and CPU utilization because Cassandra does not have to re-parse the query each time. The Session.prepare( ) method returns a PreparedStatement instance.

Example

#cassandra-prepare.py from Cassandra.cluster import Cluster 
from cassandra.query import PreparedStatement clstr=Cluster( ) 
session=clstr.connect{'mykeyspace') stmt=session.prepare("INSERT INTO 
customers (custID, name,GSTIN) VALUES (?,?,?)") 
boundstmt=stmt.bind{[11,'HarishKumar1, '12 PQRDF2 2431ZN'] ) 
session.execute(boundstmt)

Each time, the prepared statement can be executed by binding it with a new set of parameters. Note that, the PreparedStatement uses ‘?’ as a placeholder and not ‘%s’ as in BatchStatement.


Python Data Persistence – Python Cassandra Driver

Python Data Persistence – Python Cassandra Driver

Cassandra’s Python module has been provided by apache itself. It works with the latest version CQL version 3 and uses Cassandra’s native protocol. This Python driver also has ORM API in addition to core API which is similar in many ways to DB-API.

To install this module, use the pip installer as always.

E:\python37>scripts\pip3 install Cassandra-driver

Verify successful installation by following commands:

Example

>>> import cassandra 
>>> print (cassandra.__version__)
3.17.0

To execute CQL queries, we have to set up a Cluster object, first.

Example

>>> from cassandra.cluster import Cluster 
>>> clstr=Cluster( )

Next up, we need to start a session by establishing a connection with our keyspace in the cluster.

Example

>>> session=clstr.connect('mykeyspace')

The ubiquitous execute( ) method of the session object is used to perform all CQL operations. For instance, the primary SELECT query over the ‘products’ table in ‘niykeypace’ returns a result set object. Using atypical for loop, all rows can be traversed.

Example

#cassandra-select.py from cassandra.cluster import 
Cluster clstr=Cluster() session=clstr.connect(1mykeyspace1) . 
rows=session.execute("select * from products;") for row in rows: 
print (’Manufacturer: {} ProductID:{} Name:{ }
 priceformat(row[1] ,row [0] , 
row [2], row [3]) )

Output

E:\python37>python cassandra-select.py Manufacturer: ’Epson’ ProductID:5 Name:1 Printer’
price:9000
Manufacturer: 1IBall’ ProductID:10 Name:’Keyboard1
price : 1000
Manufacturer: ’Acer’ ProductID:l Name:’Laptop’
price:25000
Manufacturer: ’Acer’ ProductID:8 Name:’Tab’
price:10000
Manufacturer: ’Samsung’ ProductID:2 Name:’TV’
price:40000
Manufacturer: ’Epson’ ProductID:4 Name:1 Scanner’
price:5000
Manufacturer: ’IBall’ ProductID:7 Name:’Mouse' price:500
Manufacturer: ’Samsung’ ProductID:6 Name:’Mobile’
price:15000
Manufacturer: ’Samsung’ ProductID:9 Name:’AC’
price:35000
Manufacturer: ’IBall’ ProductID:3 Name:’Router’
price:2000

Python Data Persistence – Installation

Python Data Persistence – Installation

Python’s official website hosts the official distribution of Python at https:// www.python.org/downloads/. Precompiled installers, as well as source code tarballs for various operating system platforms (Windows, Linux, and Mac OS X) and hardware architectures (32 and 64-bit), are available for download. The bundle contains a Python interpreter and a library of more than 200 modules and packages.

Precompiled installers are fairly straightforward to use and recommended. Most distributions of Linux have Python included. Installation from source code is a little tricky and needs the expertise to use compiler tools.

Currently, there are two branches of Python software versions (Python 2.x and Python 3.x) on the Python website. At the time of writing, the latest versions in both branches are Python 2.7.15 and Python 3.7.2 respectively. Python Software Foundation (PSF) is scheduled to discontinue supporting the Python 2.x branch after 2019. Hence it is advised to install the latest available version of the Python 3.x branch.

It is also desirable to add Python’s installation directory to your system’s PATH environment variable. This will allow you to invoke Python from anywhere in the filesystem.

It is now time to start using Python. Open the Windows Command Prompt terminal (or Linux terminal), type ‘python ’ in front of the prompt as shown below: (figure 1.1)

C:\Users\acer>Python
Python 3 . 7 . 2 (tags/v3 . 7 . 2 : 9a3ffc0492, Dec 23 2018,
23 : 09 : 28) [MSC v . 1916 64 bit (AMD64) ] on win32
Type "help", "copyright" , "credits" or "license" for more information.
>>>

If a Python prompt symbol »> (made up of three ‘greater than characters) appears, it means Python has been successfully installed on your computer.
Congratulations!!!

Most Python distributions are bundled with Python’s Integrated Development and Learning Environment (IDLE). It also presents an interactive shell as shown in Figure 1.1. Additionally, it also has a Python-aware text editor with syntax highlighting and smart indent features. It also has an integrated debugger.

python data presistance - Installation chapter 1 img 2

Interactive Mode

The >>> prompt means that Python is ready in REPL mode. You can now work with Python interactively. The prompt reads user input evaluates if it is a valid Python instruction, prints the result if it is valid or shows an error if invalid, and waits for input again. In this mode, the Python interpreter acts as a simple calculator. Just type any expression in front of the prompt and press Enter. Expression is evaluated with the usual meanings of arithmetic operators used and the result is displayed on the next line.

Example

>>> 5-6/2*3
-4.0
>>> (5-6/2)*3
6.0
>>>

You can assign a certain value to a variable by using the ‘=’ symbol. (What is variable? Don’t worry. I am explaining it also later in this chapter!) However, this assignment is not reflected in the next line before the prompt. The assigned variable can be used in further operations. To display the value of a variable, just type its name and press Enter.Python operators follow the BODMAS order of precedence. There are few more arithmetic operators defined in Python. You will learn about them later in this chapter.

Example

>>> length=20
>>> breadth=30
>>> area=length*breadth
>>> area
600

Scripting ModeType ‘quit( )’ before the prompt to return to the command prompt.

Interactive mode as described above executes one instruction at a time. However, it may not be useful when you have a series of statements to be repetitively executed. This is where Python’s scripting mode is used. The script is a series of statements saved as a file with the ‘.py’ extension. All statements in the script are evaluated and executed one by one, in the same sequence in which they are written.

The script is assembled by using any text editor utility such as Notepad (or similar software on other operating systems). Start Notepad on Windows computer, enter the following lines and save as ‘area.py’

Example

#area.py
length=20
breadth=30
area=length*breadth
print (1area=',area)

Open the command prompt. Ensure that the current directory is the same in which the ‘area.py’ script (you can call it a program) is saved. To run the script, enter the following command (figure 1.2):

C : \ Users \ acer>Python area . py
area = 600

Comments

Any text that follows the ‘#’ symbol is ignored by the Python interpreter. This feature can be effectively used to insert explanatory comments in the program code. They prove to be very useful while debugging and modifying the code. If a symbol appears in a line after a valid Python statement, the rest of the line is treated as a comment.

Example

>>> #this line is a comment
... print ("Hello world!")
Hello, world!
>>> print ("hello world again!") #this also a comment
hello, the world again!

Multiple lines of text which are enclosed within triple quote marks are similar to comments. Such text is called ‘docstring’ and appears in the definition of the function, module, and class. You will come across docstrings when we discuss these features in subsequent chapters.

Python Data Persistence – Getting Started

Python Data Persistence – Program Flow Control

Python Data Persistence – Opening File

Python Data Persistence – Opening File

The open ( ) function takes a string corresponding to the disk file’s name along with its path as an argument. The second argument indicates the mode in which the file is intended to be opened. Default file opening is ‘r’ which stands for ‘read’ mode which means data in the file is read into program variables. In order to use the file as the output destination, use ‘w’ as the value of the mode parameter. The function returns a file object.

Example

>>> obj=open( ' test.txt' , 'r')
Traceback (most recent call last):
File "<pyshell#16>", line 1, in <module>
obj =open('test.txt' , ' r ')
FileNotFoundError: [Errno 2] No such file or
directory: 'test.txt'
>>> obj=open('test.txt' , 'w')
>>> obj.close()
>>>

Noth that when in ‘r’ mode open( ) function can open existing file otherwise raises FileNotFoundError. Always ensure that the opened file object is closed to flush data if any in the buffer.

Python Data Persistence – File I0

Python Data Persistence – File I0

‘File’ is an indispensable word in the vocabulary of even an ordinary computer (even mobile) user. Every day, he is required to deal with files which may be documents, spreadsheets, presentations, images, and so on. Slightly advanced users, to whom we may call developer, prepare scripts, build executables which are also files.

When a user starts an application, he enters certain data, either through a keyboard or any other device such as a mouse, camera, scanner, and so on. The data goes into the computer’s main memory and is further processed as per the process defined in the application. If this data – input or resulting from the process – is needed for subsequent use, it is saved in a computer file, because if left in the computer memory, it will be erased when a computer is turned off. In this chapter, we shall discuss how data from Python program is stored in persistent disk files.

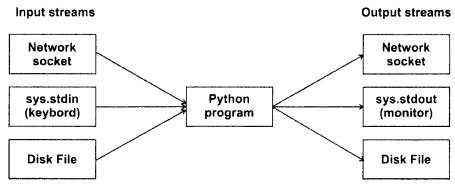
A Python console application interacts with peripheral devices through its built-in input ( ) and print ( ) functions. Channels of interaction between processor and peripheral devices are called streams. A stream is an object that sends/receives a continuous flow of data. Python’s input ( ) function reads data from standard input streaming device i.e. keyboard that is recognized as sys. stdin object defined in sys built-in the module. Similarly, the print ( ) function sends data to a standard output device which is a computer display screen (monitor), defined as sys. stdout object.

The stdin object has read ( ) and readline ( ) methods to accept user input through the keyboard. The read ( ) method accepts data till the stream is terminated by Ctrl+D character. On the other hand readline ( ) method accepts all keystrokes till the ‘Enter’ key is pressed. Both methods leave ‘\n’ at the end of the input.

Example

>>> data=sys.stdin.read( )
Hello
How are you?
>>> data
'Hello\nHow are you?\n'
>>> data=sys.stdin.readline()
Hello How are you?
>>> data
'Hello How are you?\n'
>>>

In fact, the input ( ) function performs stdin. readline ( ) and returns by stripping the trailing ‘\n! character. The write ( ) method available to the stdout object does exactly what the print ( ) function does. It sends the argument data to the default output device – the computer monitor. However, when using interactive mode, it also displays the size of the object in bytes.

Example

>>> sys.stdout.write(data)
Hello, How are you?
19
>>>

Any object that can send/receive the stream of bytes is called ‘File like object in Python. A file (like) object can invoke read ( ) or write ( ) methods depending upon the stream to which it is connected. Hence, stdin and stdout objects are file-like objects too. Python can perform 10 operations with objects representing disk files, network sockets, memory arrays, and so on. In this chapter, we shall deal with computer disk files. These files store data in a persistent manner, which is often the need as the same collection of data may be needed repeatedly. Instead of laboriously keying in the same data again and again from the keyboard, reading it from a file becomes more efficient and less error-prone. Similarly, screen output being temporary and limited, can instead be stored in files, (figure 5.1)

Python Data Presistence - File 10 chapter 5 img 1

Standard 10 streams communicating with stdin and stdout objects are always available. To use a disk file for reading/writing purposes file object needs to be declared first, by using the built-in open () function.

Python Data Persistence – Magic Methods

Python Data Persistence – Magic Methods

Each Python class inherits methods from its ultimate parent class – object class. Methods in objects are peculiarly named – having double underscores on either side. One such method is well known to you by now. The __init__( ) method. To display a list of methods, we have to use the built-in dir ( ) function.

Example

>>> dir(object)
['__class__' , '__delattr__' , '___dir___' , ___doc___' , '__eq__' , 
'__format__' , __ge__' , '__getattribute__' , '__get__' , '__hash___' , '__init__' , 
'___init_subclass__' , '__le__' , '___lt___' , '__ne__' , '__new___' , '__reduce__' , 
'__reduce_ex__' , '__repr__' , '___setattr__' , '___sizeof___' , '___str__' , '__subclasshook__']

These double underscored methods are known as ‘magic’ methods. They have a very important role in the Pythonic brand of object-oriented programming. What is so ‘magical’ about them? You’ll soon come to know.

These methods (sometimes referred to as ‘special’ or ‘dunder’ – short for double underscore) in object class are really abstract methods in the sense they don’t have any particular implementation. Its subclasses override them as per necessity. Take int class for example. It overrides___str___( ) method to return a printable string version of integer object.

Example

>>> a=123
>>> a.__str___( )

Incidentally, many of these ‘dunder’ methods are rarely called directly. A corresponding built-in function internally calls them. The str( ) function implements the __str__( ) method.

Example

>>> a=123 
>>> str(a)
'123'

Another example is setattr( ) function we used earlier in this chapter. It dynamically adds attribute to an object. It in fact performs operation of__setattr__( ) method. Have a look at following code:

Example

>>> class MyClass:
pass
>>> obj1=MyClass( )
>>> setattr(obj1,'myname','Madhav')
>>> #using__setattr__( ) method
>>> obj1.__setattr__(’myage',21)

Even the dir ( ) method used at the beginning of this section actually calls__dir__( ) magic method.

Example

>>> a. dir _( ) 
['__repr__' , '__hash__' , '__str__' , '___getattribute___' , '__lt__' , '___le__' , '__eq__' , '___ne___' , '__gt__' , '___ge__' ,
 '__add__' , '__radd__' ,'___sub__' , '__rsub__' , '__mul__' , ' ___rmul___', '___mod___' , '___rmod___' , '___divmod__' ,
'___rdivmod__' ,'__pow___' , ' ___rpow___' , ' __neg__' , '___pos___ ' , '___ abs__' ,'___bool___ ' , '__invert___' , '___shift__' , 
'___rlshift__ ' , '__rshift___' , '___rrshift___' , '___and___', '___rand___', '___xor__' , '__rxor__' , '__or___' , '___ror__' , '__int__' ,
 ' __float__' , '___floordiv__' , '__rfloordiv__' ,'___truediv___' , '__rtruediv__' , '__index___' , '___new__' , '___conjugate___ ' , 
'__bit length__' , '___to_bytes___' , '___from bytes__' , '___t rune__' , '__floor__' , '___ceil__' , ' ___round___', '__getnewargs___' , 
'__format __', ' __sizeof___' , '___real___', '___imag___ ' , '__numerator__ ' , '____denominator____ ' , '____doc__' , '___setattr__' 
,'___delattr____' , '__init___' , '___reduce_ex__' , '___reduce__' , '__subclasshook___ ' , '__init_subclass___ ' , '__dir__' , '__class__']
>>> #is equivalent to 
>>> dir(int)

It may be noted that dir (int) shows a lot more attributes than that of the object class. These are actually inherited from abstract Number class and overridden in int class. Of particular interest are methods with names indicating arithmetic operations (such as__add__, ___sub___ , ___ mul__ , and so on.) and logical operations (like ___ge__ , __ gt___ , ___eq___ , and so on.) They are mapped to respective operators so that a conventional arithmetic/logical operator invokes the respective method. In other words, a+b actually performs a . __add__(b) call.

Example

>>> a=20
>>> b=10
>>> a+b
30
>>> a.__add__(b)
30
>>> a.__mul__(b)
200
>>> a*b
200
>>> a>b
True
>>> a.__le__(b)
False

The real magic lies ahead. You can override these methods to customize the behavior of operators to achieve operator overloading.

Example

#timerclass.py
class timer:
         def__init__(self, hr=None, min=None):
               self.hrs=hr
               self.mins=min
         def__add__(self, arg):
               temp=timer( )
               temp.hrs=self.hrs+arg.hrs
               temp.mins=self.mins+arg.mins
               if temp.mins>=60:
                        temp.mins=temp.mins-60
                        temp.hrs=temp.hrs+1
                  return temp
         def__str__(self):
                  timestring='{ } Hrs. { }
mins.'.format(self.hrs,self.mins)
                  return timestring

In the above script, the timer class has two instance attributes hrs and mins. The __add__( ) method performs addition of two timer objects. This method is invoked in response to the use of the ‘+’ operator along with two timer object operands. By the way timer class also has overridden the implementation of __str___( ) method to produce string representation of its object.

Example

>>> from timerclass import timer
>>> t1=timer(2,45)
>>> t2=timer(3,30)
>>> t3=t1+t2
>>> print (t3)
6 Hrs. 15 mins.
>>> t3=t1.__add__(t2)
>>> print (t3)
6 Hrs. 15 mins.

Go ahead and overload any operator to suit the needs of your application. A list of all magic methods is provided in Appendix E.
This chapter is a very brief discussion on object-oriented programming as implemented in Python. Only those facets that are required in subsequent chapters of this book have been explained here.