Using compareto in java – How to Compare two Strings lexicographically in Java? | Java String compareTo() Method with Example

How to Compare two Strings lexicographically in Java

Using compareto in java: using compareto in java In this tutorial, we will learn how we can compare two strings lexicographically in Java. Also, know what is the method we use to compare two strings in java ie., Java String compareTo() Method. However, you may also do compare two strings by using the equals() methods in java.

Compare two Strings lexicographically in Java

Compareto string java example: Firstly, you should have some idea of what ‘lexicographically’ means? ‘lexicographically’ means ‘alphabetically ordered’ in simple words. Now, we can check the lexicographical order by comparing two strings.

The Java String Class provides many ways to compare the content of the two Strings. One way to compare the content of the two strings by using the equals() method. But today in this tutorial, we will learn how to compare two strings lexicographically in Java using the compareTo() method.

How to compare two strings without using library function?

Algorithm: 

  1. Input two strings string 1 and string 2.
  2. for (int i = 0; i < str1.length() && i < str2.length(); i ++)
    (Loop through each character of both strings comparing them until one of the string terminates):

    • If unicode value of both the characters is same then continue;
    • If unicode value of character of string 1 and unicode value of string 2 is different then return (str1[i]-str2[i])
  3. if length of string 1 is less than string2
    • return str2[str1.length()]
      else
      return str1[str2.length()]

Source Code: 

String compareto example: Let’s see the implementation of the above program here:

// Java program to Compare two strings
// lexicographically
class Compare {
  
    // This method compares two strings
    // lexicographically without using
    // library functions
    public static int stringCompare(String str1,
                                    String str2)
    {
        for (int i = 0; i < str1.length() && 
                    i < str2.length(); i++) {
            if ((int)str1.charAt(i) == 
                (int)str2.charAt(i)) {
                continue;
            } 
            else {
                return (int)str1.charAt(i) - 
                    (int)str2.charAt(i);
            }
        }
  
        // Edge case for strings like
        // String 1="Geeky" and String 2="Geekyguy"
        if (str1.length() < str2.length()) {
            return (str1.length()-str2.length());
        } 
        else if (str1.length() > str2.length()) {
            return (str1.length()-str2.length());
        }
          
        // If none of the above conditions is true,
        // it implies both the strings are equal
        else {
            return 0;
        }
    }
 // Driver function to test the above program
public static void main(String args[])
{
String string1 = new String("Geeks");
String string2 = new String("Practice");
String string3 = new String("Geeks");
String string4 = new String("BtechGeeks");

System.out.println(stringCompare(string1, string2));
System.out.println(stringCompare(string1, string3));
System.out.println(stringCompare(string2, string1));

// To show for edge case
// In these cases, the output is the difference of 
// length of the string
System.out.println(stringCompare(string1, string4));
System.out.println(stringCompare(string4, string1));
}
}

Output: 

-9
0
9
-8
8

Java String compareTo() Method

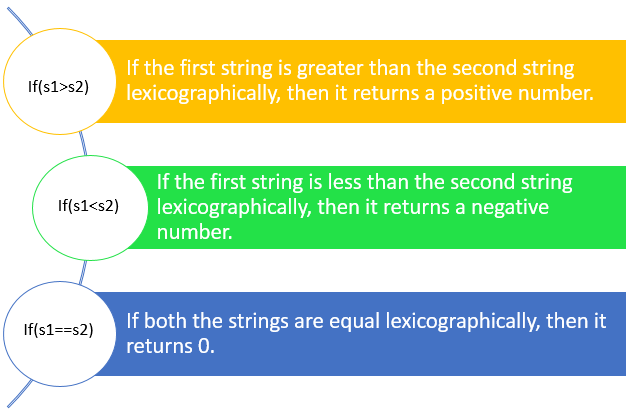
Java compareto function: Java String compareTo() method is used to compare the two strings lexicographically in Java. The comparison is based on the Unicode value of each character in the string. The String compareTo() method returns the positive number, negative number, or 0.

If the first string is greater than the second string lexicographically, then it returns a positive number. If the first string is smaller than the second string lexicographically, then it returns a negative number. If both the strings are equal lexicographically, then it returns 0.

How to Compare two Strings lexicographically

The following are the two ways to use compareTo() method in the java string class:

int compareTo(String str)

Above the comparison is between string literals. For instance,string1.compareTo(string2) where string1 and string2 are String literals.

int compareTo(Object obj)

Here the comparison is between a string and an object. For instance, string1.compareTo("Just a String object")where string1 is literal and its value is compared with the string defined in the method argument.

Do Read: 

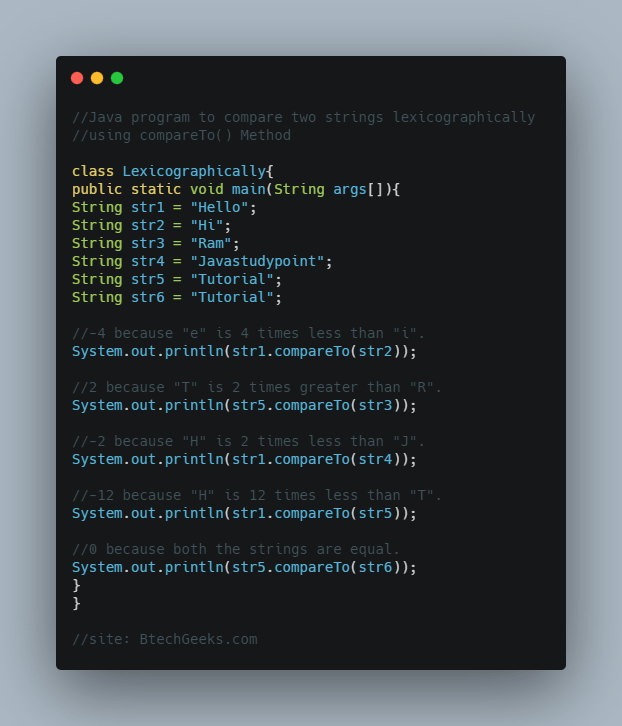
Java program to compare two strings lexicographically using compareTo() Method

Java program to compare two strings lexicographically using compareTo() Method

class Lexicographically
{
public static void main(String args[])
{
String str1 = "Hello";
String str2 = "Hi";
String str3 = "Ram";
String str4 = "Javastudypoint";
String str5 = "Tutorial";
String str6 = "Tutorial";

//-4 because "e" is 4 times less than "i".
System.out.println(str1.compareTo(str2));

//2 because "T" is 2 times greater than "R".
System.out.println(str5.compareTo(str3));

//-2 because "H" is 2 times less than "J".
System.out.println(str1.compareTo(str4));

//-12 because "H" is 12 times less than "T".
System.out.println(str1.compareTo(str5));

//0 because both the strings are equal.
System.out.println(str5.compareTo(str6));
}
}

Output:

-4
2
-2
-12
0

Break statement java – Java Break Statement with Example | How do you Insert a Break in a Statement in Java?

Java Break Statement with Example

Break statement java: A programming language uses control statements to control the flow of execution of a program. In Java programming, we can control the flow of execution of a program based on some conditions. Java control statements can be put into the following three categories: selection, iteration, and jump. In this tutorial, we will learn about the Java jump statement. The jump statement can be used to transfer the control to other parts of the program. Java break statement is one of the jump statements.

Java Break Statement

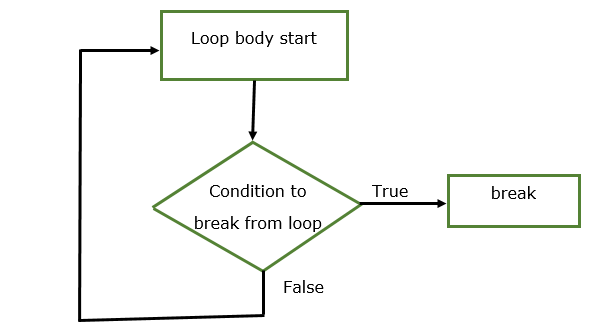
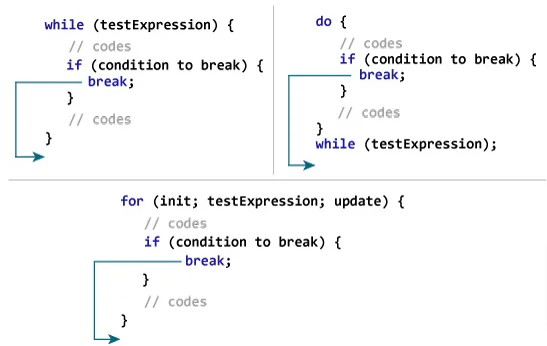
Java break statement: Java break statements can be used to terminate the loop. It can be used inside a loop. We can use a break statement in all types of loops such as: while loop, do-while loop, and for a loop. When a break statement is encountered inside a loop, the loop is terminated and the program control goes to the next statement following the loop. In java, the break statement has three uses.

  1. It terminates a statement sequence in a switch statement.
  2. It can be used to exit a loop.
  3. It can be used as a “civilized” form of goto (labeled break).

Syntax:

break;

Flowchart of Break Statement

Java break statement with Example 1.

Also, Check:

How does Break Statement Work?

Working of Java Break Statement

Use of Break in a While Loop

Java label break: In the below example we are having a while loop that runs from 0 to 100 and as we have a break statement that only reaches when the loop reaches 2, the loop gets terminated and control passes to the next statement after the loop body.

public class BreakExample1 {
public static void main(String args[]){
int num =0;
while(num<=100)
{
System.out.println("Value of variable is: "+num);
if (num==2)
{
break;
}
num++;
}
System.out.println("Out of while-loop");
}
}

Output:

Value of variable is: 0
Value of variable is: 1
Value of variable is: 2
Out of while-loop

Use of Break in a For Loop

What does a break do in java: Soon after the var hits the var value 99 loop gets terminated.

public class BreakExample2 {

public static void main(String args[]){
int var;
for (var =100; var>=10; var --)
{
System.out.println("var: "+var);
if (var==99)
{
break;
}
}
System.out.println("Out of for-loop");
}
}

Output:

var: 100
var: 99
Out of for-loop

Use of Break Statement in Switch Case

Java break label: In the below program we are having a break statement after every case this is because if we don’t have it the subsequent case blocks would also execute. The same Program without break statement after each case would be Case 2 Case 3 Default.

public class BreakExample3 {

public static void main(String args[]){
int num=2;

switch (num)
{
case 1:
System.out.println("Case 1 ");
break;
case 2:
System.out.println("Case 2 ");
break;
case 3:
System.out.println("Case 3 ");
break;
default:
System.out.println("Default ");
}
}
}

Output:

Case 2

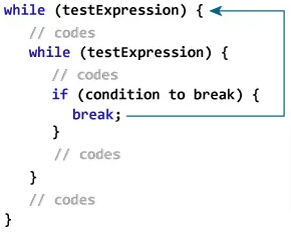
Java Break Nested Loop

Break Statement with Nested Loops

Using the Break to Exit a loop

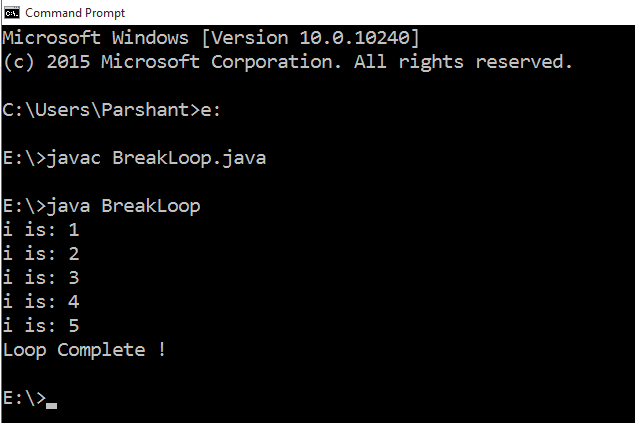
When a break statement is encountered inside a loop, the loop is terminated and the program control goes to the next statement following the loop. See the example below:

Java Break Statement to Exit a Loop with Example

class BreakLoop{
public static void main(String args[]){
for(int i = 1; i<=10; i++){
if(i==6)
break;
System.out.println("i is: " +i);
}
System.out.println("Loop Complete !");
}
}

Output:

Java break statement with Example 2

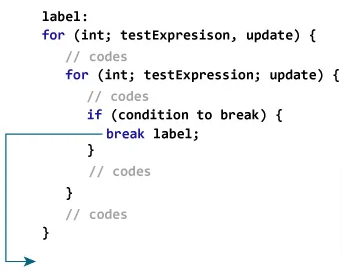
Java Labeled Break Statement

The break statement can also be used by itself to provide a “civilized” form of the goto statement. Java doesn’t provide a goto statement, because it provides a way to branch in any arbitrary and unstructured manner. Java uses the label. A label is a block of code that must enclose the break statement, but it doesn’t need to be immediately enclosing block. This means that you can use a labeled break statement to exit from a set of nested blocks.

Labeled Break Statements

Java Labeled Break Statement with Example

class LabeledBreakLoop{
public static void main(String args[]){
boolean b = true;

// first lable.
first:{
//second lable.
second:{
//third label.
third:{
System.out.println("Before the break statement.");
if(b)
break second;
System.out.println("This would not execute! ");
}
System.out.println("This would not execute! ");
}
System.out.println("This is after the second block.");
}
}
}

Output:

Before the break statement.
This is after the second block.

Java stream interview questions – 10 stream Interview Questions in Java

Java stream interview questions: List of topic-wise frequently asked java interview questions with the best possible answers for job interviews.

10 stream Interview Questions in Java

Question 1.
What is a stream and what are the types of Streams and classes of the Streams?
Answer:
A Stream is an abstraction that either produces or consumes information. There are two types of Streams and they are:
Byte Streams: Provide a convenient means for handling input and output of bytes.
Character Streams: Provide a convenient means for handling the input & output of characters.
Byte Streams classes: Are defined by using two abstract classes, namely InputStream and OutputStream.
Character Streams classes: Are defined by using two abstract classes, namely Reader and Writer.

Question 2.
What is the difference between Reader/Writer and InputStream/Output Stream?
Answer:
The Reader/Writer class is character-oriented and the InputStream/ OutputStream class is byte-oriented.

Question 3.
What is an I/O filter?
Answer:
An I/O filter is an object that reads from one stream and writes to another, usually altering the data in some way as it is passed from one stream to another.

Question 4.
What are serialization and deserialization?
Answer:
Serialization is the process of writing the state of an object to a byte stream. Deserialization is the process of restoring these objects.

Question 5.
What is object serialization?
Answer:
Serializing an object involves encoding its state in a structured way within a byte array. Once an object is serialized, the byte array can be manipulated in various ways; it can be written to a file, sent over a network using a socket-based connection or RMI, or persisted within a database as a BLOB.

The serialization process encodes enough information about the object type within the byte stream, allowing the original object to be easily recreated upon deserialization, at a later point in time.

Question 6.
Can I persist my objects using serialization instead of using a relational or object database?
Answer:
No. While serialization is a highly versatile mechanism having numerous applications, your long-term storage needs should continue to be addressed by conventional relational or object databases.

Note that serialization does not provide any features for transaction management and concurrency control. Nor does it provide typical database features like indexed access, caching, and a query language.

Question 7.
What are the security ramifications of using the Externalizable interface?
Answer:
The methods within the Externalizable interface, readExternal( ) and writeExternal( ) have public scope. This implies some client object could potentially bypass the Java sandbox mechanisms and overwrite or gain access to the state of an externalizable object.
As a general rule of thumb, a class should implement the Externalizable interface only if the object contains nonsensitive information.

Question 8.
Why am I having an InvalidClassException thrown during the serialization of my object which implements the Externalizable interface?
Answer:
Unlike objects which implement the Serializable interface, it is mandatory for objects implementing the Externalizable interface to also implement a public no-arg constructor. This constructor is the very first thing that is invoked by readExternal( ) when reconstructing the object from the byte stream. If a public no-arg constructor is absent, then an InvalidClassException is immediately thrown.

Question 9.
Why doesn’t serialization save the value of static variables?
Answer:
Variables declared as static members are not considered part of the state of an object because they are shared by all instances of that class. Classes that need to preserve the value of static members during serialization should save and restore these values explicitly using private void readObject(ObjectlnputStream) and private void writeObject(ObjectOutputStream).

Question 10.
What is the Stream Unique Identifier (SUID) that is written out as part of the serial stream?
Answer:
The serialization process uses a unique identification value to keep track of the persisted objects. When a Serializable or Externalizable object is saved, its fully- qualified class name and the Stream Unique Identifier (SUID) of the class are written out to the stream. The SUID is a unique 64-bit hash and is obtained by applying the SHA-1 message-digest algorithm to the serialized class, including its name, field types, and method signatures.

This step is important as it prevents the data persisted by one class from being read by another class with the same name. For any class to be able to read successfully from an object stream, it is imperative that its SUID matches the SUID of the serialized data in the stream.

Question 11.
What are the advantages and disadvantages of serialization?
Answer:
The advantages of serialization are:

  • It is easy to use and can be customized.
  • The serialized stream can be encrypted, authenticated, and compressed, supporting the needs of secure Java computing.
  • Serialized classes can support coherent versioning and are flexible enough to allow gradual evolution of your application’s object schema.
  • Serialization can also be used as a mechanism for exchanging objects between Java and C++ libraries, using third-party vendor libraries (like RogueWave’s Tools.h++) within C++.
  • There are simply too many critical technologies that rely upon serialization, including RMI, JavaBeans, and EJB.
    However, serialization has some disadvantages too:
  • It should ideally not be used with large-sized objects, as it offers significant overhead. Large objects also significantly increase the memory requirements of your application since the object input/output streams cache live references to all objects written to or read from the stream until the stream is closed or reset. Consequently, the garbage collection of these objects can be inordinately delayed.
  • The Serializable interface does not offer fine-grained control over object access – although you can somewhat circumvent this issue by implementing the complex Externalizable interface, instead.
  • Since serialization does not offer any transaction control mechanisms per se, it is not suitable for use within applications needing concurrent access without making use of additional APIs.

Question 12.
Does serialization depend on the browser, platform, or VM?
Answer:
The serialization format is independent of the browser, independent of the JVM vendor, and independent of the platform. So serialization should work with any combination of the above. For example, a serialized object written by Windows can be read by Unix, and vice versa. This is generally true of all I/O in Java.

Question 13.
If an object is serialized by a 1.1.x VM, can it be de-serialized by a 1.2.x VM?
Answer:
Yes. No special steps are needed for this to work.

Question 14.
What is a stream and what are the types of Streams and classes of the Streams?
Answer:
A Stream is an abstraction that either produces or consumes information. There are two types of Streams and they are:
Byte Streams: Provide a convenient means for handling input and output of bytes. Character Streams: Provide a convenient means for handling the input & output of characters.
Byte Streams classes: Are defined by using two abstract classes, namely InputStream and OutputStream.
Character Streams classes: Are defined by using two abstract classes, namely Reader and Writer.

Question 15.
What is the purpose of the File class?
Answer:
The File class is used to create objects that provide access to the files and directories of a local file system.

Question 16.
What class allows you to read objects directly from a stream?
Answer:
The ObjectlnputStream class supports the reading of objects from input streams.

Question 17.
What is the difference between the File and RandomAccessFile classes?
Answer:
The File class encapsulates the files and directories of the local file system. The RandomAccessFile class provides the methods needed to directly access data contained in any part of a file.

Question 18.
What interface must an object implement before it can be written to a stream as an object?
Answer:
An object must implement the Serializable or Externalizable interface before it can be written to a stream as an object.

Question 19.
What is serialization?
Answer:
Serialization is a kind of mechanism that makes a class or bean persistence by having its properties or fields and state information saved and restored to and from storage.

Question 20.
How to make a class or a bean serializable?
Answer:
By implementing either the java.io.Serializable interface or the java. io.Externalizable interface. As long as one class in a class’s inheritance hierarchy implements Serializable or Externalizable, that class is serializable.

Question 21.
How many methods are in the Serializable interface?
Answer:
There is no method in the Serializable interface. The Serializable interface acts as a marker, telling the object serialization tools that your class is serializable.

Question 22.
How many methods are in the Externalizable interface?
Answer:
There are two methods in the Externalizable interface. You have to implement these two methods in order to make your class externalizable. These two methods are readExternal( ) and writeExternal( ).

Question 23.
What is the difference between Serializable and Externalizable interfaces?
Answer:
When you use the Serializable interface, your class is serialized automatically by default. But you can override write object( ) and read object( ) two methods to control more complex object serialization process. When you use the Externalizable interface, you have complete control over your class’s serialization process.

Question 24.
What is a transient variable?
Answer:
A transient variable is a variable that may not be serialized. If you don’t want some field to be serialized, you can mark that field as transient or static.

Question 25.
What is the difference between the Reader/Writer class hierarchy and the InputStream/OutputStream class hierarchy?
Answer:
The Reader/Writer class hierarchy is character-oriented, and the InputStream/OutputStream class hierarchy is byte-oriented.

Question 26.
What class allows you to read objects directly from a stream?
Answer:
The ObjectlnputStream class supports the reading of objects from input streams.

Question 27.
What interface must an object implement before it can be written to a stream as an object?
Answer:
An object must implement the Serializable or Externalizable interface before it can be written to a stream as an object.

Question 28.
What is the difference between a Serializable and Externalizable interface? How can you control the serialization process Le? how can you customize the serialization process?
Answer:
When you use the Serializable interface, your class is serialized automatically by default. But you can override write object( ) and read object( ) two methods to control more complex object serialization process. When you use the Externalizable interface, you have complete control over your class’s serialization process. This interface contains two methods namely readExternal and writeExternal. You should implement these methods and write the logic for customizing the serialization process.

Question 29.
How to make a class or a bean serializable? How do I serialize an object to a file?
Or
What interface must an object implement before it can be written to a stream as an object?
Answer:
An object must implement the Serializable or Externalizable interface before it can be written to a stream as an object. The class whose instances are to be serialized should implement an interface Serializable. Then you pass the instance to the ObjectOutputStream which is connected to a file output stream. This will save the object to a file.

Question 30.
What happens to the object references included in the object?
Answer:
The serialization mechanism generates an object graph for serialization. Thus it determines whether the included object references are serializable or not. This is a recursive process. Thus when an object is serialized, all the included objects are also serialized along with the original object.

Question 31.
What is serialization?
Answer:
Serialization is a kind of mechanism that makes a class or a bean persistent by having its properties or fields and state information saved and restored to and from storage. That is, it is a mechanism with which you can save the state of an object by converting it to a byte stream.

Common Usage of serialization.
Whenever an object is to be sent over the network or saved in a file, objects are serialized.

Question 32.
What happens to the static fields of a class during serialization?
Answer:
There are three exceptions in which serialization doesn’t necessarily read and write to the stream.
These are

  1. Serialization ignores static fields because they are not part of any particular state.
  2. Base class fields are only handled if the base class itself is serializable.
  3. Transient fields.

Question 33.
What one should take care of while serializing the object?
Answer:
One should make sure that all the included objects are also serializable. If any of the objects is not serializable then it throws a NotSerializableException.

Question 34.
What is a transient variable?
Or
Explain the usage of the keyword transient?
Or
What are Transient and Volatile Modifiers
Answer:
A transient variable is a variable that may not be serialized i.e. the value of the variable can’t be written to the stream in a Serializable class. If you don’t want some field to be serialized, you can mark that field as transient or static. In such a case when the class is retrieved from the ObjectStream the value of the variable is null. Volatile modifier applies to variables only and it tells the compiler that the variable modified by volatile can be changed unexpectedly by other parts of the program.

Question 35.
What is Externalizable?
Answer:
Externalizable is an interface that contains two methods read external( ) and write external( )- These methods give you control over the serialization mechanism. Thus if your class implements this interface, you can customize the serialization process by implementing these methods.

Question 36.
What happens to the static fields of a class during serialization?
Answer:
There are three exceptions in which serialization does not necessarily read and write to the stream. These are

  1. Serialization ignores static fields because they are not part of any particular state.
  2. Base class fields are only handled if the base class itself is serializable.
  3. Transient fields.

JSP scriptlets example – JSP Scripting Elements with Example | Scriptlets in JSP | Definition, Syntax & Examples of Scripting Elements in JSP

JSP Scripting Elements with Example

JSP scriptlets example: In the previous tutorials, we have learned so many concepts related to JSP. In this tutorial, we will be going to learn about JSP Scripting Elements with Example. Primarily, there are 3 types of Scripting Elements in JSP. Get proper knowledge on JSP Comment, JSP Declaration, JSP Scriptlet, and JSP Expression from here and understand completely what is JSP Scripting Elements?

What are JSP Scripting Elements?

JSP comments syntax: JSP Scripting elements are utilized to enter java codes into JSP pages. To manages the objects, and do some computation on an object or runtime value, scripting elements are usually used. There are three scripting element types. These are the declaration, scriptlets, and expressions.

Syntax of Scripting Elements in JSP

The syntax starts with <% as follows:
<%! this is a declaration %>
<% this is a scriptlet %>
<%= this is an expression %>

Also Read: 

JSP Comment Tag

Comments are listed as text or statements that are overlooked by the JSP container. Moreover, JSP comment is utilized to note some parts of the JSP page to make it clearer and easier to manage. These comments in JSP are not involved in servlet source code while translation phase, nor they seem in the HTTP response.

The syntax of the JSP Comment is as follows:

<%-- JSP comment --%>

Example of Comment Tag in JSP

<%@ page import="java.util.Date"%>
<!DOCTYPE html>
<html>
<head>
<title>Comments in JSP Page</title>
</head>
<body>
<%-- A JSP comment --%>
<!-- An HTML comment -->
<!—The current date is <%= new Date() %>
-->
</body>
</html>

JSP Declarations Tag

Declaration tag in JSP Page is used to declare variables and methods. To define variables and methods of instance scope, it is used. Variable defined in declarations may be accessed from multiple threads, so they must be thread-safe. When JSP Page is initialized, then the declaration is initialized and is made available to other declarations, scriptlets, and expressions.
The syntax of Declaration Tag in JSP is as follows:

<%! declaration; [ declaration; ]+ ... %>
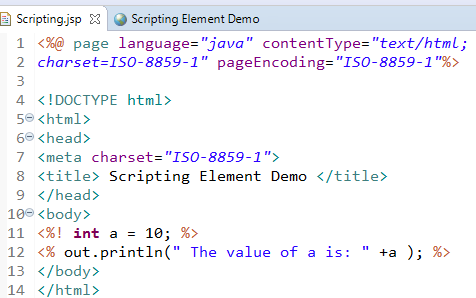
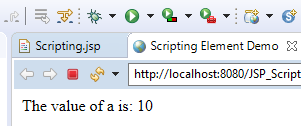
Example of JSP Declaration Tag:

JSP Scripting Elements with Example 1

JSP Scripting Elements with Example 2

JSP Scriptlet Tag

Scriptlet tag is used to write java code into JSP Page. It is typical that scriptlets are intermingled with template text. Because the variable and the code are local to the _jspService() method, therefore scriptlets don’t have the same thread-safety issue as declarations.

The syntax of Scriptlet Tag in JSP

<% java source code %>

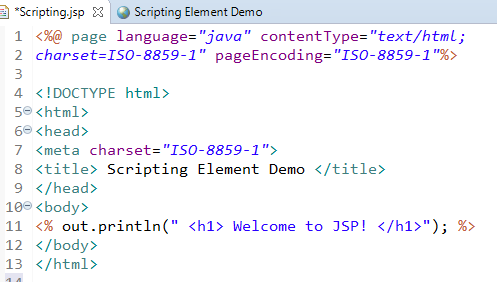
Example of JSP Scriptlet Tag:

JSP Scripting Elements with Example 3

JSP Scripting Elements with Example 4

JSP Expression Tag

JSP Expression tag is used to print the value of variables and methods. At request processing time, the expression is evaluated, and then the result is converted into a String. If the result of the expression is an object, the toString() method is called. A ClassCastException will be raised if the value can’t be coerced into a String at translation time.

If you don’t know about Exceptions, we will be recommended you first learn the basics of Exceptions in Java.

<%=expression/statement %>

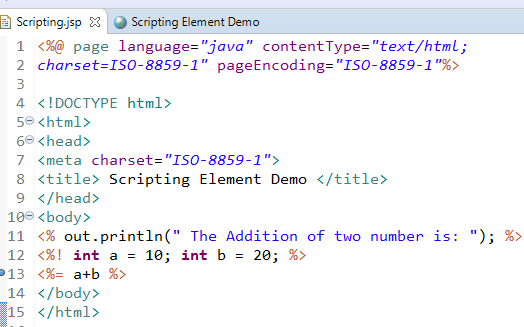
Example of JSP Expression Tag:

JSP Scripting Elements with Example 5

JSP Scripting Elements with Example 6

Engineering Thermodynamics Lecture Notes | Syllabus, Reference Books and Important Questions

Engineering Thermodynamics Lecture Notes

Engineering Thermodynamics Lecture Notes: Engineering thermodynamics has been an indispensable part of the engineering curriculum for a long time. One needs to have a clear concept and a deep understanding of the subject to perform better, apart from the necessary inclusion of thermodynamics in most of the graduate syllabus. Understanding engineering thermodynamics is also an essential part of many post-graduate and research syllabus. Hence, a student must be able to grasp the concept. Students can refer to the Big Data Lecture Notes For CSE as per the latest and updated syllabus from this article.

There are many books, online courses, and pdfs available online to help a student with a better understanding of physics. This site will give them an idea about the topics and patterns of courses to be followed to perform and understand better. Also, there will be an introduction and FAQs and suggestions to make sure you have a hassle-free experience understanding thermodynamics. And This article has been divided into a few parts to help you plan better.

Introduction to Engineering Thermodynamics

Thermodynamics lecture notes mechanical engineering: In general, Thermodynamics is that part of physics that generally deals with work, heat and temperature and also about how it work by concerning the energy, radiation, and other material properties. Thermo stands for heat, and dynamics stand for the changing nature of the world, physically or chemically.

In layman terms, thermodynamics can be explained as the understanding of how heat exchange works between different materials in nature. The two other materials involved in the heat exchange can be in the state of solid, liquid, air, or otherwise. And knowing the universe as we know it, exchanging energy in forms of heat and otherwise is always happening. Thermodynamics applies to a lot of fields, not only practically but also theoretically.

The laws and working of thermodynamics govern a big part of our daily life. It is nearly impossible to research anything without involving thermodynamics. When it comes to engineering thermodynamics, the topics are taught, keeping under consideration the requirements of that particular engineering subject.

Hence, different types of thermodynamics are introduced in other streams of engineering. The two basic types that we find mostly in all subjects are applied thermodynamics and introductory thermodynamics. The primary branches of engineering that need thermodynamics to be involved are mechanical, chemical, civil, and electrical.

In modern science, Thermodynamics has been a matter of interest and research since the earliest ages of science development. And most of the mathematical formulae we use, theories we apply, or equations we trust were derived from thermodynamics as a base.

Books to refer to for thermodynamics

Different books are suggested for an extra level of study. For graduation, post-graduation, or research purposes, other books are recommended to suffice the different syllabus. However, a few of the books that have been around for  a while:

  1. Time’s Arrow – Origin of thermodynamic behavior by Michael c. Mackey
  2. Thermodynamics by Enrico Fermi
  3. Statistical Physics by Chris Ferrie
  4. Non –equilibrium Statistical mechanics by Ilya Prigogine
  5. General Chemistry by  Linus Pauling
  6. Physical chemistry – thermodynamics, statistical thermodynamics and kinetics by Thomas Engel and Philip Reid
  7. Heat and mass transfer by P. K. Nag.
  8. Engineering thermodynamics by P.K. Nag.
  9. Understanding thermodynamics by H. C. Van Ness
  10. Fundamental of thermodynamics by Claus Borg

Course Syllabus

MODULE LESSON
Basic concepts of Thermodynamics 1- Thermodynamic System and its Properties.

2- Thermodynamics Cycle and Energy of Thermodynamic System.

Ideal Gases 3- Laws of Ideal Gases: Compression and Expansion of Gases.
The first law of thermodynamics 4- First Law of Thermodynamics and Non-Flow Process.

5- Non-Flow and Flow Processes.

6- Numerical Problems.

The second law of thermodynamics 7- Second Law of Thermodynamics, Entropy, Carnot Cycle.

8- Entropy and Availability.

9- General Expression for change in Entropy Numerical Problems.

Air Cycles 10- Otto Cycle and Diesel Cycle.

11- Dual Combustion Cycle, Numerical Problems.

I.C. engine 12- Classifications and Working of the I.C. engine.

13- Comparison of S.I. and C.I. engine.

14- Parts of I.C. Engine.

15- Fuel Supply Systems of I.C. Engine.

16- Two-Stroke Cycle Engine.

Performance of I.C. engine 17- Performance Parameters of the I.C. engine.

18- Numerical Problems.

Fuels 19- Classification and Combustion Chemistry of Fuels.

20- Numerical Problems.

21- Determination of Calorific Value, Oil Burners.

Steam and its properties 22- Formation of Steam and its Properties.

23- Use of Steam Tables and Mollier Chart, Numerical Problems.

Steam Generators 24- Classification and performance parameters of Boilers/Steam Generators.

25- Boiler Mountings and Accessories.

26- Indian Boiler Regulation Act.

The layout of the Steam pipeline 27- Steam pipeline, Fittings, Joints, Material, and Insulation.
Boiler draught 28- Production of Draught and its Losses.

29- Natural Draught.

30- Power Requirement of Mechanical Draught, Numerical problems.

Air Compressor 31- Air compressors.

32- Air Compressor’s Work, Numerical Problems.

Some Important Questions

  1. State Zeroth Law of Thermodynamics?
  2. How will you Classify Thermodynamics System?
  3. What are the influences of Heat Losses or Gains on the Surface of the Conducting Body?
  4. Explain the Stages of Combustion in S.I. Engines?
  5. What are the Drawbacks (Disadvantages) of the Conventional Ignition System?
  6. What is meant by a closed system? Give an example.
  7. Define specific heat capacity at constant pressure.
  8. Define specific heat capacity at constant volume.
  9. Define intensive and extensive properties.
  10. What do you understand by the equilibrium of a system?
  11. What is meant by thermodynamics equilibrium?

FAQ’s on Engineering Thermodynamics Lecture Notes

Question 1.
How is the study of thermodynamics critical?

Answer:
Thermodynamics is based on everything around us, be it a physical or chemical process, be it a natural or an artificial process. No process in this universe happens without involving thermodynamics. Hence, the study of thermodynamics helps a great deal in understanding the exchange of material in the universe.

Question 2. 
Does thermodynamics study have any physical application?

Answer:
Yes, thermodynamics undoubtedly have physical applications. Since everything around us works based on energy exchange, and thermodynamics is all about energy exchange, it plays a significant role in determining the balance and the working of the universe. The three laws of thermodynamics govern most things happening around us.

Question 3.
What is the scope of studying thermodynamics?

Answer:
Studying thermodynamics has enough scopes because every day, more and more discoveries are coming up, and thermodynamics play a significant role in those discoveries. Hence, being able to contribute to this field dictates an outstanding career.

Question 4.
What are a few of the best books to refer to for a better understanding of thermodynamics?

Answer:
Different levels of studies of thermodynamics require an extra level of understanding of the same thing. Hence, there are other books to guide at a different level. However, if we talk about the bais thermodynamics application part, few good books are Applied thermodynamics by T. D. Eastop and A. McConkey, engineering thermodynamics by McGraw Hill and The Laws of thermodynamics by Peter Atkins.

Question 5.
Is there any stream that is solely responsible for teaching thermodynamics?

Answer:
There is no stream by the name of thermodynamics. But there is no field of study that does not include thermodynamics. As we go on for higher studies, the involvement of thermodynamics goes or increases. However, on the research level, it is possible to devote a lot of time to the field of interest. That time working with a project that is based on the thermodynamics laws is possible. It will be helpful in both gaining physical and theoretical knowledge at the same time.

Question 6.
What are a few applications in real life that we witness daily that connect to thermodynamics?

Answer:
It is a never-ending list, honestly. Everything is governed by thermodynamics laws, from candle lighting and melting to the cooking of food to adsorption and absorption.

Conclusion

With the changing environment and dynamics of the world, there is something new coming up every day. There is no better way to stay updated with those changes apart from learning and knowing thermodynamics. And engineering thermodynamics tops the list when it comes to learning about thermodynamics. This site will help make sure you don’t miss any vital topic when understanding engineering thermodynamics.  You can refer to the materials available and choose the ones that seem useful to you.

Python Programming – Data Structures – List Using Square Brackets

Python square brackets: In this Page, We are Providing Python Programming – Data Structures – List Using Square Brackets. Students can visit for more Detail and Explanation of Python Handwritten Notes Pdf.

Python Programming – Data Structures – List Using Square Brackets

List creation

The list can be created in many ways.

Using square brackets

As discussed before, the most common way of creating a list is by enclosing comma-separated values (items) between square brackets. Simply assigning a square bracket to a variable creates an empty list.

>>> a= [ ]
>>> a
[ ]
>>> type ( a ) 
< type ' list ’ >

Using other lists

A list can also be created by copying a list or slicing a list.

>>> a= [ ' spam ' , ' eggs ' , 100 , 1234 ]
>>> b=a [ : ]
>>> b
[ ' spam ' , ' eggs ' , 100 , 1234 ]
>>> c=a [ 1 : 3 ]
>>> c
[ ' eggs ' , 100 ]

List comprehension

List comprehension provides a concise way to create a list. A list comprehension consists of brackets containing an expression followed by a for clause, then zero or more for or if clauses. The result will be a new list resulting from evaluating the expression in the context of the for and if clauses that follow it.

Common applications are to make new lists where each element is the result of some operations applied to each member of another sequence or iterable or to create a sub-sequence of those elements that satisfy a certain condition. For example, creating a list of squares using an elaborate approach is as follows:

>>> squares= [ ]
>>> for x in range ( 10 ) :
. . . squares. append ( x**2 )
. . .
>>> squares
[ 0 , 1 , 4 , 9 , 16 , 25 , 36 , 49 , 64 , 81 ]

The same can be obtained using list comprehension as:

squares= [ x**2 for x in range ( 10 ) ] 
>>> squares
[ 0 , 1 , 4 , 9 , 16 , 25 , 36 , 49 , 64 , 81 ]

Alternatively, it can also be obtained using map ( ) built-in function:

squares=map ( 1ambda x : x**2 , range ( 10 ) )
>>> squares
[ 0 , 1 , 4 , 9 , 16 , 25 , 36 , 49 , 64 , 81 ]

The following list comprehension combines the elements of two lists if they are not equal:

>>> [ ( x , y ) for x in [ 1 , 2 , 3 ] for y in [ 3 , 1 , 4 ] if x !=y ]
[ ( 1 , 3 ) , ( 1 , 4 ) , ( 2 , 3 ) , ( 2 , 1 ) , ( 2 , 4 ) , ( 3 , 1 ) , ( 3 , 4 ) ]

and it’s equivalent to:

>>> combs= [ ]
>>> for x in [ 1 , 2 , 3 ] :
. . . for y in [ 3 , 1 , 4 ] :
. . . if x !=y :
. . . combs. append ( ( x , y ) )
. . . 
>>> combs
[ ( 1 , 3 ) , ( 1 , 4 ) , ( 2 , 3 ) , ( 2 , 1 ) , ( 2 , 4 ) , ( 3 , 1 ) , ( 3 , 4 ) ]

Using built-in function

The list can also be created using a built-in function list ( ). The list ( [iterable] ) function returns a list whose items are the same and in the same order as iterable items. The iterable can be either a sequence, a container that supports iteration, or an iterator object. If iterable is already a list, a copy is made and returned. If no argument is given, a new empty list is returned.

>>> list ( ( ' hi ' ' hello ' , ' bye ' ) )
[ ' hi ' , ' hello ' , ' bye ' ]
>>> list ( ' hello ' )
[ ' h ' , ' e ' , ' 1 ' , ' 1 ' , ' o ' ]
>>> list ( ( 10 , 50 , ) )
[ 10 , 50 ]
>>> list ( )
[ ]

Accessing list elements

Like string indices, list indices start at 0. To access values in a list, use the square brackets with the index or indices to obtain a slice of the list.

>>> a= [ ' spam ' , ' eggs ' , 100 , 1234 ]
>>> a [ 0 ] 
' spam ' 
>>> a [ 0 ] [ 1 ]
' p '
>>> a [ 1 : 3 ] 
[ ' eggs ' , 100 ]

Java architecture interview questions – Architecture Interview Questions in Java

Java architecture interview questions: We have compiled most frequently asked Java J2EE Interview Questions which will help you with different expertise levels.

Java J2EE Interview Questions on Architecture

Question 1.
What was the underlying need for J2EE? Elaborate.
Answer:
With the onset of web-centric applications that grew more dependent than ever on server-side technologies such as middleware, information technology departments of corporations needed a sustainable way to develop applications and related middleware that was both portable as well as scalable. These applications need to be designed to handle thousands of users simultaneously 24 hours a day, seven days a week, without any downtime. One of the major challenges to building such a complex application is to be able to design and test it.

J2EE simplifies the creation of enterprise-wide applications since the functionality is encapsulated in components of J2EE. This enables designers and programmers to organize the application into functionality that is distributed across the server-side components built using J2EE. Furthermore, J2EE is a versatile technology since application components built using J2EE are able to communicate with each other behind the scenes using standard communication methods such as HTTP, SSL, HTML, XML, RMI, and IIOP.

All J2EE programs are written in Java enabling a corporation to use its existing staff of Java programmers to create programs that work at each layer of the multi-tier infrastructure. J2EE contains all the interfaces and libraries to handle multithreading and synchronization as well. Java Beans, Java Servlets, and JavaServer Pages are core components of J2EE. In addition, J2EE consists of seven more standard services, all of which increase its usefulness and contribution to the industry.

Question 2.
Explain and elaborate on the J2EE multi-tier architecture.
Answer:
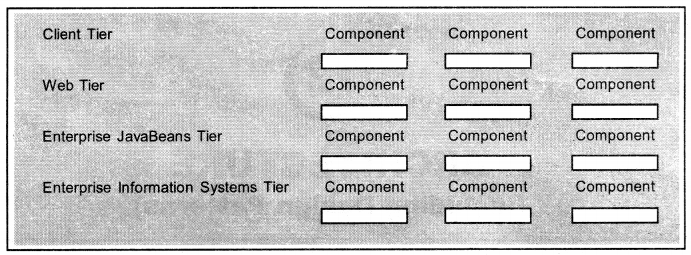
J2EE is a four-tier architecture (refer to Figure 16) consisting of the Client Tier (also referred to as the Presentation or Application Her), Web Tier, Enterprise JavaBeans Tier (also referred to as Business Her), and the Enterprise Information Systems Her. Each tier is focused on providing a specific type of functionality to an application. It’s important to delineate between functionality and physical location. Two or more tiers can physically reside on the same Java Virtual Machine (JVM) although each tier provides a different type of functionality to a J2EE application.

ARCHITECTURE Interview Questions in Java chapter 12 img 1

And, since the J2EE multi-tier architecture is functionally centric, a J2EE application accesses only tiers whose functionality is required by the J2EE application. It’s also important to disassociate a J2EE API with a particular tier, i.e. some APIs (that is, XML API) and J2EE components can be used on more than one tier while others APIS (that is, Enterprise JavaBeans API) are associated with a particular tier.

The Client Tier consists of programs that interact with the user. These programs prompt the user for input and then convert the users’ responses into requests that are forwarded to software on a component that processes the request and returns results to the client program. The Web Tier provides Internet functionality to a J2EE application. Components that operate on the Web Tier use HTTP to receive requests from and send responses to clients that could reside on any tier fa client being any component that initiates a request). The Enterprise JavaBeans Tier contains the business logic for J2EE applications. It’s here that where one or more Enterprise JavaBeans reside, each encoded with business rules that are called upon indirectly by clients.

Although an Enterprise JavaBean can access components on any tier, typically an Enterprise JavaBean accesses components and resources such as DBMS on the Enterprise Information System (EIS) tier. The EIS links a J2EE application to resources and legacy systems that are available on the corporate backbone network. It’s on the EIS inhere a J2EE application directly or indirectly interfaces with a variety of technologies including DBMS and mainframes which are part of the mission-critical systems that keep the corporation operational Components that work on the EIS communicate to resources using CORE A or Java connectors, referred to as J2EE Connector Extensions.

Question 3.
What do you understand by design patterns?
Answer:
By design patterns, we mean certain standard solutions for certain common problems which occur while designing a software system, e.g. whenever we want to restrict an application to create only one instance of a class, we make use of the Singleton Design Pattern.

Question 4.
Elucidate the Singleton Design Pattern.
Answer:
As already mentioned in the previous question, the Singleton Design Pattern is made use of whenever we need to design a class which can just one instance. The Singleton design pattern is very useful from the software engineering point of view.
The rules for creating the Singleton class are:-

(1) Constructor should be protected (it could be made private to prevent inheritance).
(2) Declare a static “self” pointer to hold a reference to the single instance of the class when it is created and initialize it to null.
(3) Declare a static “instance” function which creates and returns the newly created instance of the class when the static “self” pointer is null, otherwise, it returns the previously created instance.
(4) Declare a protected destructor that deletes the “self” pointer.

Question 5.
What do you understand by design principles?
Answer:
Design principles provide certain rules that an Object-Oriented software designer should keep in mind during the software design phase in order that:-

  • each module/class is zero or less dependent on other modules/classes; and,
  • each module/class is less affected by frequent requirement changes.

Question 6.
What is the Open-Closed Principle (OCP)?
Answer:
The OCP states that – “A module should be open for extension, but closed for modification”.

Question 7.
What is the Liskov Substitution Principle (LSP)?
Answer:
The LSP states that – “Subclasses should be substitutable for their superclasses; derived classes should be substitutable for their base classes”. Thus, a user of a base class should continue to function properly even if a derivative of that superclass is passed to it.

Question 8.
How would you go about writing a singleton in EJB?
Answer:
As already elaborated, a singleton is a very useful design pattern in software engineering. In a nutshell, a singleton is a single instantiation of a class with one global point of access. You would normally create a singleton in Java by using the ‘static’ keyword when defining a class.
However, one restriction of EJB is that you cannot use static fields in your beans. This precludes the use of the singleton design pattern. But, if you still have to use a singleton, here are a couple of strategies:-

  • Limit the pool size
  • Use RMI-IIOP and JNDI

Question 9.
Explain briefly the JNDI architecture.
Answer:
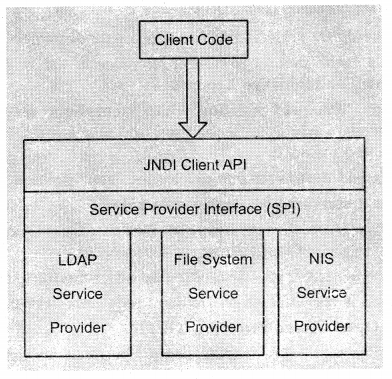
JNDI is made up of two halves: the client API and the Service Provider Interface (SPI). The client API allows your Java code to perform directory operations. This API is uniform for all types of directories. You will spend most of the time using the client API. The JNDI SPI is a framework for JNDI implementers: an interface that implementations of naming and directory services can be plugged into. The SPI is the converse of the API: while the API allows clients to code to a single unified interface, the SPI allows naming and directory service vendors to fit their particular proprietary protocols into the system, as shown in Figure 17. This allows client code to leverage proprietary naming and directory services in Java while maintaining a high level of code portability.

ARCHITECTURE Interview Questions in Java chapter 12 img 2

Question 10.
Can you elaborate on the similarities between JNDI architecture and JDBC?
Answer:
The JNDI architecture is somewhat like the Java Database Connectivity (JDBC) package in that:-

  • In JDBC, one uniform client API performs database operations. In JNDI, naming and directory service clients invoke a unified API for performing naming and directory operations.
  • In JDBC, relational database vendors provide JDBC drivers to access their particular databases. In JNDI, directory vendors provide service providers to access their specific directories. These providers are aware of specific directory protocols, and they plug into the JNDI SPI.

Question 11.
What do you understand by “design patterns” in general? Elucidate.
Answer:
Design patterns offer simple and elegant solutions to specific problems in object-oriented software design such as Java, C++, Smalltalk, and so on. They capture solutions that have developed and evolved over time. They reflect untold redesign and recoding as developers have struggled for greater reuse and flexibility in their software. Design patterns capture these solutions in a succinct and easily applied form. In other words, “design patterns” make it easier to reuse successful designs and architectures. Simply put, they help a designer get a design “right” faster!

Question 12.
What are the types of design patterns? Enumerate with suitable examples.
Answer:
There are, in general, three kinds of design patterns:-

  1. Creational, e.g. Abstract Factory, Factory Method, Singleton, Builder, and Prototype.
  2. Structural, e.g. Facade, Adapter, Bridge, Composite, Decorator, Flyweight, and Proxy.
  3. Behavioral, e.g. Chain of Responsibility, Command, Interpreter, Iterator, Mediator, Momenta, Observer, State, Strategy, Template Method, and Visitor.

Question 13.
Elaborate on the following design patterns as regards their applicability and consequences:

  • Abstract Factory Creational Pattern;
  • Factory Method Creational Pattern;
  • Singleton Creational Pattern; and,
  • Facade Structural Pattern

Answer:
Applicability

(a) The Abstract Factory pattern should be used when:

  • A system is independent of how its products are created, composed, and represented;
  • A system is configured with one of the multiple families of products;
    A family of related product objects is designed to be used together, and you need to enforce this constraint; and,
  • You want to provide a class library of products, and you want to reveal just their interfaces, not their implementations. –

(b) The Factory Method pattern should be used when:

  • A class cannot anticipate the class of objects it must create;
  • A class wants its subclasses to specify the objects it creates;.and,
  • Classes delegate responsibility to one of several helper subclasses, and you want to localize the knowledge of which helper subclass is the delegate.

(c) The Singleton creational pattern should be used when:

  • There must be exactly one instance of a class, and it must be accessible to clients from a well-known access point; and,
  • When the sole instance should be extensible by subclassing, and clients should be able to use an extended instance without modifying their code.

(d) Use the Facade structural pattern when:

  • You want to provide a simple interface to a complex subsystem;
  • There are many dependencies between clients and the implementation classes of abstraction; and,
  • You want to layer your subsystems. Use a facade to define an entry point to each subsystem level.

Consequences

(a) The Abstract Factory pattern has the following benefits and liabilities:

  • It isolates concrete classes;
  • It makes exchanging product families easy;
  • It promotes consistency among products, and 1
  • Supporting new kinds of products is difficult.

(b) The Factory Method pattern has the following consequences:

  • Provides hooks for subclasses; and,
  • Connects parallel class hierarchies.

(c) The Singleton pattern has several benefits:

  • Controls access to sole instance;
  • It creates a reduced namespace;
  • Permits refinement of operations and representation;
  • Permits a variable number of instances; and
  • More flexible than class operations.

(d) The Facade pattern has the following consequences:

  • It shields clients from subsystem components, thereby reducing the number of objects that clients deal with and making the subsystem easier to use;
  • It promotes weak coupling between the subsystem and its clients; and,
  • It doesn’t prevent applications from using subsystem classes if they need to. Thus, you can choose between the ease of use and generality.

Question 14.
What is JAXB?
Answer:
JAXB (Java Architecture for XML Binding) is a popular data binding framework. It supports most XML Schema, excluding wildcards, notations, redefinitions, keys, and substitution groups. And, the binding is customizable.

Question 15.
Elucidate the Model-View-Controller (MVC) pattern.
Answer:
Web applications when seen as collections of JSP pages (or servlets) that the client navigates between referring to a design known as the Model 1 approach. For larger applications, this architecture is ad hoc. Instead, it is recommended to use the Model 2 approach, which is an instance of the Model-View-Controller (MVC) design pattern that dates back to GUI (Graphical User Interface) applications in the early Smalltalk-80 system.

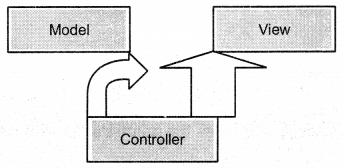
ARCHITECTURE Interview Questions in Java chapter 12 img 3

1. The MVC pattern distributes an application into three main parts: model, view, and controller.

2. The model encapsulates the data and accompanying operations (the business logic), and is typically programmed as Java classes, perhaps with an underlying database.

3. The view is typically a collection of JSP pages that interact with the model to present various data to the client.

4. The controller is written as a single servlet that handles all interactions with the client, updates the model, and selects appropriate views as responses.

5. The MVC pattern is often illustrated by the above general picture (Figure 18) wherein, the arrows indicate method invocations.

Java remove leading whitespace – How to remove Leading and Trailing Whitespaces from String in Java? | Trim Spaces from Start and End of a String

Java remove leading whitespace: In this tutorial, we will learn how to remove leading and trailing whitespaces from String. There are various methods to remove the leading and trailing spaces in Java. Java String trim() method is used to remove leading and trailing whitespaces from String. In this tutorial, we will learn the trim() method with a small case study. So that, you can understand Java String trim() method with much clarity. Here, we will discuss first what is the need for that method. We will explain its need with an example.

String.replaceAll() Method

Java remove leading whitespace: replaceAll() Method finds all the leading whitespace. Once you find all the leading spaces you can replace them with an empty string.

Remove Leading Spaces using replaceAll() Method

String.replaceFirst() Method

Java remove trailing whitespace: As an alternative method, you can also go with the replaceFirst() also. It considers a regular expression and searches for the first occurrence at the beginning of the string. Then the method matches the replaced string part with the string value passed as the second argument.

replaceFirst() Method to trim leading and trailing white spaces

Java String trim() Method

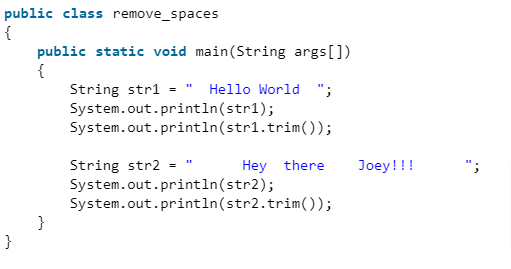
Trim whitespace java: Java String trim() method is used to remove whitespaces either from the beginning and the end of a string. It returns a copy of the string, with leading and trailing whitespace omitted.

Also, Refer:

How does Java trim() Method Work?

C++ trim leading whitespace: The Unicode Value for Space Character is ‘\u0020’. This method checks for the Unicode value before and after the string and if it is present then eliminates the space and returns without any spaces.

Trim Leading and Trailing Spaces of a String in Java

Output:

  Hello World  
Hello World
      Hey  there    Joey!!!  
Hey  there    Joey!!!

Example Program to Remove Leading and Trailing Spaces in Java

import java.util.Scanner;
class TrimExample{
public static void main(String args[]){
Scanner sc = new Scanner(System.in);
System.out.println("Enter Country Name: ");
String country = sc.nextLine();

if(country.equals("india")){
System.out.println("Capital of india is delhi");
}
else if(country.equals("australia")){
System.out.println("Capital of australia is canberra");
}
else if(country.equals("england")){
System.out.println("Capital of england is london");
}
else{
System.out.println("Please enter a valid country name.");
}
}
}

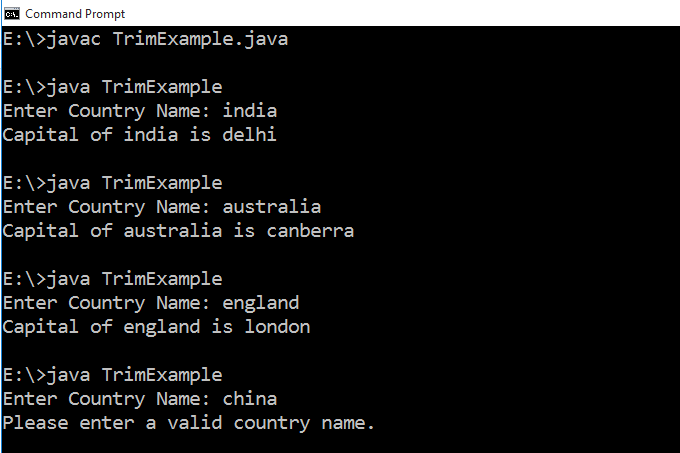
Here, I wrote a simple program where the user entered a country name, and corresponding to the entered country name user will see a message where the country capital is printed. Let’s run this program. The code compiled and runs fine there is no problem at all.

How to remove leading and trailing whitespaces from String in Java 1

But there are two biggest problems in this code from the programmer’s point of view.

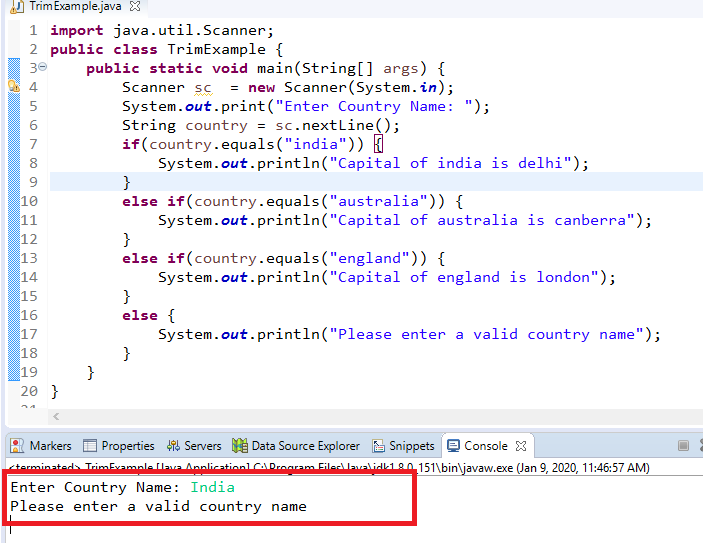
1. In this program, the end-user is responsible to enter the country name. The end-user entered the country name either lower case or upper case or mixture. But our program always considered lower case only. If the end-user entered country name only in lower case then only our program works. By mistake, if the end-user entered the country name in the upper case letter then our program will not wok. Let’s see the example.

How to remove leading and trailing whitespaces from String in Java 2

There are two solutions to the above problem. First, We can replace equals() method with equalIgnoreCase(). But if in your program there are 1000 lines or 10000 lines then you need to replace the equals() method with an equalIgnoreCase() method with 1000 or 10000 times, which is not a good practice.

The second solution is, as we know our program accepts only lower case letters. So, what we will do is, If the end-user entered the country name we will convert it into a lower case letter. Then our problem will be solved. So the second solution is very easy because we need to write only one line. See the example below.

import java.util.Scanner;
class TrimExample{
public static void main(String args[]){
Scanner sc = new Scanner(System.in);
System.out.println("Enter Country Name: ");
String country = sc.nextLine().toLowerCase();

if(country.equals("india")){
System.out.println("Capital of india is delhi");
}
else if(country.equals("australia")){
System.out.println("Capital of australia is canberra");
}
else if(country.equals("england")){
System.out.println("Capital of england is london");
}
else{
System.out.println("Please enter a valid country name.");
}
}
}

Output:

Enter Country Name: INdia
Capital of india is delhi
Enter Country Name: ENGLand
Capital of england is london
Enter Country Name: AUSTRALIA
Capital of australia is canberra

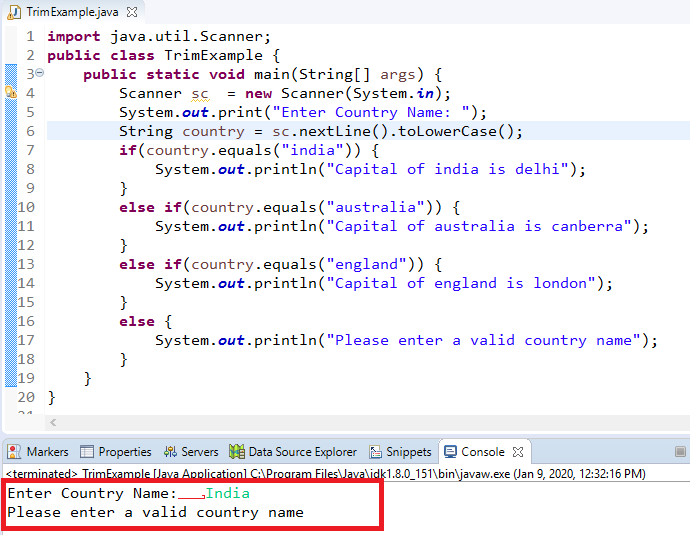
2. But still, there is one more problem with this code. As we know, the end-user is responsible to enter the country name. If the end-user entered the country name with some spaces at the starting or ending then our program check is there some spaces followed by a country name is available or not. In our code, this case is not available, then our code will not works and show a message to the end-user please enter a valid country name. Let’s see the example.

How to remove leading and trailing whitespaces from String in Java 3

To resolve this problem, What we can do, before comparing the country name if any spaces entered by the end-user either at the beginning or at the end, If we remove those spaces then our problem will be solved. We can remove spaces either at the beginning or end of the string by using the trim() method.

Removing Leading and Trailing WhiteSpaces from a String in Java Example Program

import java.util.Scanner;
class TrimExample{
public static void main(String args[]){
Scanner sc = new Scanner(System.in);
System.out.print("Enter Country Name: ");
String country = sc.nextLine().toLowerCase().trim();

if(country.equals("india")){
System.out.println("Capital of india is delhi");
}
else if(country.equals("australia")){
System.out.println("Capital of australia is canberra");
}
else if(country.equals("england")){
System.out.println("Capital of england is london");
}
else{
System.out.println("Please enter a valid country name.");
}
}
}

Output:

Enter Country Name: INdia
Capital of india is delhi
Enter Country Name: ENGLand
Capital of england is london
Enter Country Name: AUSTRALIA
Capital of australia is canberra

Java bitwise operators examples – BitWise Operators in Java with Example Programs | Java Bitwise Operators Syntax, Symbols, Truth Tables

BitWise Operators in Java with Example

Java bitwise operators examples: In this tutorial, we will discuss the Bitwise Operators in Java with Examples. Bitwise Operators are used in general to manipulate the individual bits of a number. You can use these Java BitWise Operators with any kind of Integral Types such as Char, int, Short, etc., and can’t be applied to double and float. Learn all the Java Bitwise Operators in detail and how each of them works.

Read More: Java Map Interface with Example

Bitwise Operators

Explain bitwise operators in java with example: Bitwise Operators usually work on the binary digits of input values. You can apply these to several integer types such as long, short, char, int, and byte. Bitwise Operators work on the binary equivalent of decimal numbers and then perform the given operation on them bit by bit.

Now that you are aware of the Bitwise Operators let us understand how they work by looking at an example.

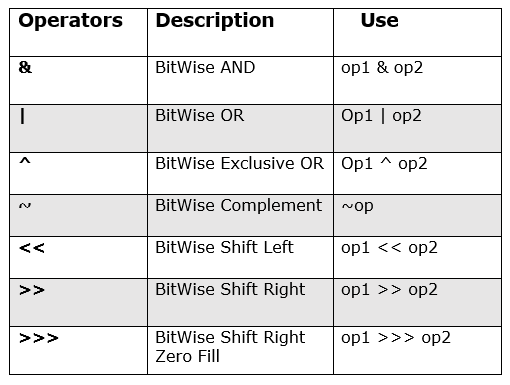
Types of Bitwise Operators in Java

Below is the table listing all the 7 BitWise Operators along with symbols, descriptions. Learn how to use these Java Bitwise operators as well.

BitWise Operators in Java with Example 1

Bitwise AND Operator (&)

This operator returns 1 if both the operands are 1 or else it returns 0.

Check out the below truth table for understanding the Bitwise AND Operator. Let us consider two operands A and B that can only take the Binary Values 1 or 0.

A B A & B
0 0 0
0 1 0
1 0 0
1 1 1

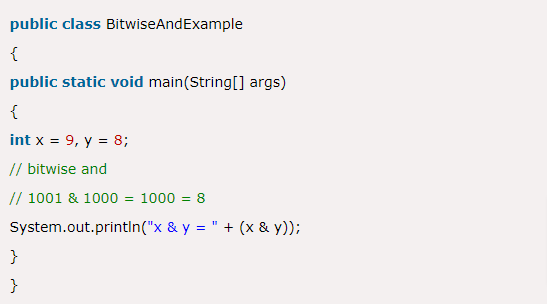
Bitwise AND Operator Example

Bitwise AND Operator Example

Output:

x & y = 8

Bitwise OR Operator (|)

This operator returns 1 if either of the bits in the operand is 1, else it returns 0.

Below is the Truth Table for Bitwise OR Operator and you can learn the demonstration of the Bitwise OR Operator. Here A, B are Two Operands on which Bitwise OR Operation is performed.

A B A | B
0 0 0
0 1 1
1 0 1
1 1 1

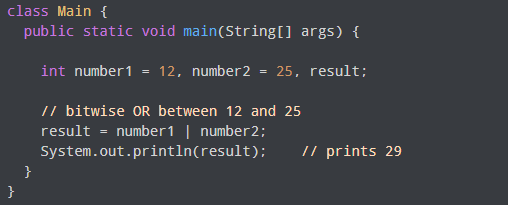
Bitwise OR Operator with Example

Bitwise OR Operator Example

Bitwise Complement Operator(~)

This operator inverts all of the bits of its operands. It is denoted by the symbol ~. However, this Bitwise Complement Operator in Java works with a single operand only unlike others.

Bitwise Complement Operator Example

public class BitwiseComplimentExample
{
public static void main(String[] args)
{
int x = 2;
// bitwise compliment // ~0010= 1101 = -3
System.out.println("~x = " + (~x));
}
}

Output:

~x = -3

Have a look at the below example to understand the same.

0 1 0 1

↓ ↓ ↓ ↓

1 0 1 0

Note: Remember that the Bitwise Complement of an Integer N is the same as -(N+1).

1’s Complement can be simply obtained by doing the negation of inputs i.e. if we have 1 the 1’s complement of it is 0 and if 1 is the input 1’s complement would be 0.

2’s Complement:

2’s Complement of a Number can be found by simply adding 1 to the result of 1’s complement.

24 in Binary  = 00011000

1’s Complement of 24 = 11100111

2’s Complement of 24 = 11100111

+1

——–––––

11101000

——–––––

Bitwise Exclusive OR Operator (^)

This operator returns 1 if the corresponding bits are different, else it returns 0. If both the operators are 0 or if both of them are 1 then the result is 0.

Check out the below truth table to understand the Bitwise Exclusive OR Operator clearly. Let A and B be two operands that take the binary values i.e. 0 or 1.

A B A ^ B
0 0 0
0 1 1
1 0 1
1 1 0

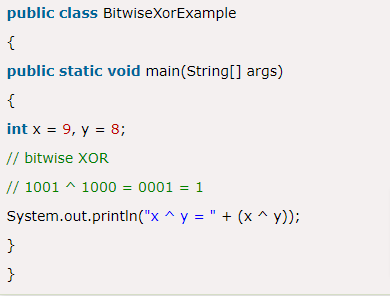
Bitwise XOR Operator Example

Bitwise XOR Operator Example

Output:

x ^ y = 1

Do Check: Vector in Java with Example

Bitwise Shift Operators in Java

There are three different types of Shift Operators in Java and they are in the below fashion. Each of them is explained clearly with their respective truth tables. They are as such

  • Bitwise Shift Left Operator (<<)
  • Bitwise Shift Right Operator(>>)
  • Shift Right Zero Fill Operator(>>>)

The syntax for the Shift Right Operators is as such

value <operator> <number_of_times>

Bitwise Shift Left Operator (<<)

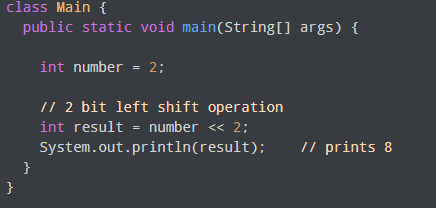
This operator shifts the bits of the number to the left and fills 0 in the void spaces that are left as a result. Left Shift Operator shifts all the bits towards the left by a certain number of bits specified and is denoted using the symbol <<.

Example:

If we Perform 1 Bit Left Shift Operation each individual bit is shifted by 1 bit. The Leftmost bit is discarded and the rightmost bit remains vacant and filled with 0s.

1    1    0   0
↙ ↙ ↙ ↙
Discarded 1 ←   1000←0(Replacement Bit)

Bitwise Left Shift Operator Example

Bitwise Left Shift Operator Example

Bitwise Shift Right Operator(>>)

This operator shifts the bits of the number to the right and fills 0 in the void spaces that are left as a result. It is denoted using the symbol >>. If we shift any number to the right least significant bit or rightmost digit is discarded and the most significant position(leftmost bit) is filled with the respective sign bit.
In Shift Right Operators there are two types namely

Signed Right Shift Operator: In this case, bits of the number are filled to the right and the void spaces are filled with the sign bit i.e. 1 for a negative number and 0 for a positive number. The leftmost bit depends on the initial number sign. Signed Right Shift is denoted using the symbol >>.

Example 1:
a = 10
a>>1 = 5 

Example 2:
a = -10 
a>>1 = -5
We store the sign bit.

Unsigned Right Shift Operator: Shifts the numbers of the bits to the right and fills 0 on the voids left as a result. The leftmost bit is set to 0. Unsigned Shift is represented using the symbol >>>.

Example 1:
a = 10
a>>>1 = 5

Example 2:
a = -10 
a>>>1 = 2147483643
Doesn't  preserve the sign bit.

Shift Right Zero Fill Operator(>>>)

This operator shifts the bits of the number to the right and fills 0 in the void spaces that are left as a result. The leftmost bit is set to be 0.

Bitwise Operators in Java Example Program

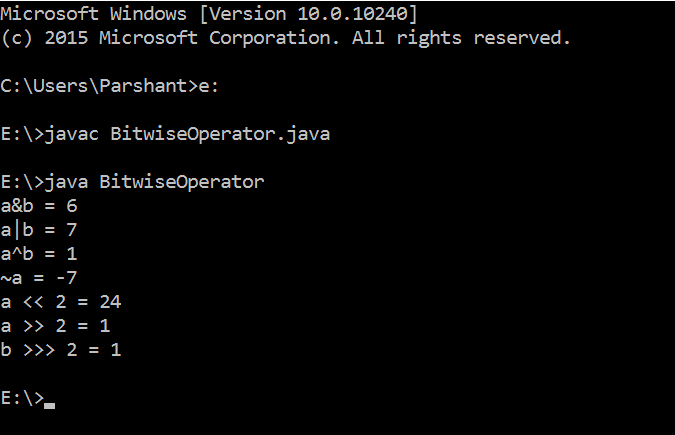
The following is a sample program that demonstrates all the Bitwise Operators. You can simply copy-paste the following program in your Java Compilers and run the same as it is.

public class BitwiseOperator {
public static void main(String[] args)
{
//Initial values
int a = 6;
int b = 7;

// bitwise and
// 0110 & 0111=0110 = 6
System.out.println("a&b = " + (a & b));

// bitwise or
// 0110 | 0111=0111 = 7
System.out.println("a|b = " + (a | b));

// bitwise xor
// 0110 ^ 0111=0001 = 1
System.out.println("a^b = " + (a ^ b));

// bitwise and
// ~0110=1001
// will give 2's complement of 1001 = -7
System.out.println("~a = " + ~a);

// bitwise left shift
System.out.println("a << 2 = " +(a << 2)); // bitwise right shift System.out.println("a >> 2 = " +(a >> 2));

// bitwise shift right zero fill
System.out.println("b >>> 2 = " +(b >>> 2));
}

}

Output:

The following Output is obtained for the above program.

BitWise Operators in Java with Example 2

JSP Action Tags – jsp useBean, jsp include, jsp forward | What are Action Tags in JSP? | List of JSP Action Tags

JSP Action Tags - jsp useBean, jsp include, jsp forward

jsp:forward: In this tutorial, we will discuss JSP Action Tags – JSP useBean, JSP include, JSP forward, and JSP param in detail with an example. First and foremost, let’s understand what is JSP Action Tags. In JSP, to use the bean, we need Action Tags. Also, know what is the difference between Directives & Actions along with the ultimate list of Action Tags in JSP.

This JSP Action Tags – JSP useBean, JSP include, JSP forward, and JSP param Tutorial Includes:  

What is JSP Action?

jsp include vs include: The tags which are used to implement the bean in a JSP are called JSP Action tags. JSP action tags are a set of predefined tags given by the JSP container to do some common tasks thus reducing the Java code in JSP.

A few of the common tasks are listed below:

  1. Instantiate java bean object.
  2. Setting values to beans.
  3. Reading values from beans.
  4. Forwarding the requests to another resource.
  5. Including another resource.

Directives vs Actions

  • Directives are applied while the translation phase whereas Actions are utilized at the time of the request processing phase.
  • Unlike Directives, Actions are re-evaluated each time the page is accessed.

List of some Action Tags in JSP

The following are some of the Action Elements used in JSP:

JSP Action Tags Description
jsp:forward forwards the request and response to another resource.
jsp:include includes another resource.
jsp:useBean creates or locates bean object.
jsp:setProperty sets the value of property in bean objects.
jsp:getProperty prints the value of the property of the bean.
jsp:plugin embeds another component such as applet.
jsp:param sets the parameter value. It is used in forward and includes mostly.
jsp:fallback can be used to print the message if a plugin is working. It is used in jsp:plugin.

Do Refer:

1. <jsp:include> Action

It is used for both static and dynamic resources on a JSP page. The resources must be in the same context as the current page. It includes the output of the included page during runtime. It doesn’t include the content of the page, it includes only response.

Attributes:

S.No. Attribute & Description
1. page The relative URL of the page to be included.
2. flush The boolean attribute determines whether the included resource has its buffer flushed before it is included.

Syntax:

 <jsp:include page="page name" />

Example:

JSP Action Tags - jsp useBean, jsp include, jsp forward 1

JSP Action Tags - jsp useBean, jsp include, jsp forward 2

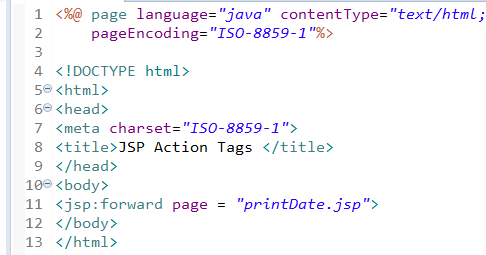
2. <jsp:forward> Action

The JSP forward action tag is used to forward the content of one JSP page to another JSP page. The forward action terminates the action of the current page and forwards the request to another resource such as a static page, another JSP page, or a java servlet.

The static or dynamic resource to which control has to be transferred is represented as a URL. The user can have the target file as an HTML file, another JSP file, or a servlet. It implements the same functionality as the forward() method in the RequestDispatcher interface. It is used for forwarding the request from one JSP page to another JSP page.

Syntax:

<jsp:forward page ="URL"/>

Example:

JSP Action Tags - jsp useBean, jsp include, jsp forward 3

JSP Action Tags - jsp useBean, jsp include, jsp forward 4

3. <jsp:param> Action

The JSP param action is used to add the specific parameter to the current request. Using a name/value pair this is done.The JSP:param action tag can be used inside a jsp:include, jsp:forward and jsp:plugin. A translation error will occur if is used within any other action besides the ones just mentioned.

Syntax:

 <jsp:paramname="parametername" value = "parametervalue" />

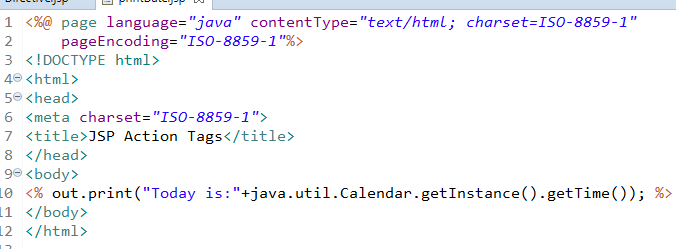
Example:

JSP Action Tags - jsp useBean, jsp include, jsp forward 5

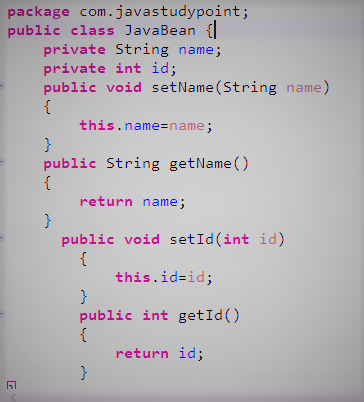
JavaBeans class:

JSP Action Tags - jsp useBean, jsp include, jsp forward 6

4. <jsp:useBean> Action

It is the standard action, which can make a java object available for use. Then it is possible to get and set the properties on the object(JavaBean). Within a given scope, the bean is determined and with a newly declared scripting variable, It is given an Id. When an element is used then no java scripting variables are created, instead, an EL variable is created. It is possible to use a variety of attributes with

  • id: It is used to identify the object instance in the specified scope.
  • scope: The scope in which the reference to the bean is available.
  • class: a fully qualified class name.
  • bean name: The name of the bean, as provided to the instantiate() method of the java.beans.Bean class.
  • type: It is an optional attribute that defines the type of the scripting variable defined.

Syntax:

<jsp:useBean id="name" class= "package.class" scope="page/request/session/application"/>

Example: 

<%@ page language="java" contentType="text/html; charset=ISO-8859-1"
pageEncoding="ISO-8859-1"%>
<!DOCTYPE html PUBLIC "-//W3C//DTD HTML 4.01 Transitional//EN" "http://www.w3.org/TR/html4/loose.dtd">
<html>
<head>
<meta http-equiv="Content-Type" content="text/html; charset=ISO-8859-1">
<title>Action JSP1</title>
</head>
<body>
<jsp:useBean id="name" class="demotest.DemoClass">
</body>
</html>

5. <jsp:setProperty> Action

A bean property is set by this property. Using the standard action, the bean must have been previously defined. you can set a bean property by using it in the following ways:

  • using a parameter in the request object.
  • using a String constant value.
  • using a value from a request-time attribute

Syntax:

<jsp:setProperty name= "propertyname" property="some property" value ="some value" />

6. <jsp:getProperty> Action

The getProperty action tag is used to retrieve the value of a given property and convert it to a string and finally insert it into the output. The property value is converted into a String within the action in one of the two ways: The toString() method is called if the property is an object. The valueOf() method of the wrapper class is called if the property is primitive.

Syntax:

 <jsp:getProperty name="name" property="propertyname" />

Example using JSP useBean, JSP setProperty, and JSP getProperty:

JavaBean class:

JSP Action Tags - jsp useBean, jsp include, jsp forward 7

JSP Action Tags - jsp useBean, jsp include, jsp forward 8