How to Setup Tailwind with PurgeCSS and PostCSS? | Tailwind Installation and Usage

How to Setup Tailwind with PurgeCSS and PostCSS

In this tutorial, we will learn how to use Tailwind with any kind of project. Know how to set up Tailwind with PurgeCSS and PostCSS, how to create a Tailwind File, what do PurgeCSS and PostCSS mean. This tutorial makes you familiar with the concept of How to Remove Unused CSS using the PurgeCSS.

Tailwind Installation

We have to install tailwind via npm or yarn:

npm init -y (if its a barebone project, -y stands for yes)
npm install tailwindcss

Create the Configuration File

We have to create a configuration for a tailwind to use:

npx tailwind init

This will create a file named tailwind.config.js in the root location of our project folder.

PostCSS Config Tailwind

Tailwind needs PostCSS (PostCSS is a software development tool that uses JavaScript-based plugins to automate routine CSS operations) and autoprefixer (Autoprefixer will use the data based on current browser popularity and property support to apply prefixes for you) to work. So we need to apply that in the postcss.config.js file:

module.exports = {
  plugins: [
    require('tailwindcss'),
    require('autoprefixer')
  ]
}

Note: If the postcss.config.js doesn’t exist, we have to create one.

We need to install PostCSS and autoprefixer from npm too:

npm install autoprefixer
npm install -g postcss-cli (-g stands for global)

How to Create the Tailwind CSS File?

Now, we will create a CSS file (style.css) and add these lines at the top:

@tailwind base;
@tailwind components;
@tailwind utilities;

Create the build command

We need to specify a build command that will help us to generate the actual CSS file after compiling with PostCSS and autoprefixer. For that, we need to add the command to the package.json file at scripts like:

"scripts": {
  "build:css": "postcss src/tailwind.css -o static/dist/tailwind.css"
}

Build Tailwind

For building the final CSS file we need to run the command npm run build in the root of the project folder.

The resulting file is in static/dist/tailwind.css

Automatically regenerate the CSS upon file changes

There is a great npm package that will compile our CSS in real-time without running the build command every time after edits. For that we need to install the watch using the command:

npm install watch

Then we need to edit the package.json file at scripts like:

"scripts": {
  "build:css": "postcss src/tailwind.css -o static/dist/tailwind.css",
  "watch": "watch 'npm run build:css' ./layouts"
}

Now for running we simply need to execute the command npm run watch and it’s all good.

Trim the File Size

If we check the final CSS file i.e after building, we can see that it’s huge in size. That large file is never appropriate for web pages. For that, we can actually trim the file to make it smaller than the original.

We need to install two more npm packages:

npm install cssnano
npm install @fullhuman/postcss-purgecss

What is PurgeCSS?

PurgeCSS is a development tool used for removing the unused CSS in a Project. It is the default library to control the Tailwind CSS Bundle Sizes. It removes unused styles and optimizes CSS Build Sizes.

How to Remove Unused Classes from Tailwind with PurgeCSS?

To remove unused CSS we use the following code. Then we add this to our PostCSS configuration file postcss.config.js:

const purgecss = require('@fullhuman/postcss-purgecss')
const cssnano = require('cssnano')

module.exports = {
  plugins: [
    require('tailwindcss'),
    require('autoprefixer'),
    cssnano({
      preset: 'default'
    }),
    purgecss({
      content: ['./layouts/**/*.html', './src/**/*.vue', './src/**/*.jsx'],
      defaultExtractor: content => content.match(/[\w-/:]+(?<!:)/g) || []
    })
  ]
}

In development, avoid too much processing

In development, we can use this just to add prefixes and remove comments. We need to edit the postcss.config.js like:

const purgecss = require('@fullhuman/postcss-purgecss')
const cssnano = require('cssnano')

module.exports = {
  plugins: [
    require('tailwindcss'),
    process.env.NODE_ENV === 'production' ? require('autoprefixer') : null,
    process.env.NODE_ENV === 'production'
      ? cssnano({ preset: 'default' })
      : null,
    purgecss({
      content: ['./layouts/**/*.html', './src/**/*.vue', './src/**/*.jsx'],
      defaultExtractor: content => content.match(/[\w-/:]+(?<!:)/g) || []
    })
  ]
}


Learn React JS — Build a Portfolio Single Page Application (SPA)

Learn React JS — Build a Portfolio Single Page Application (SPA)

How to create your portfolio website using React.js

Things you’ll soak in:

  1. Creating and implementing custom Components.
  2. Working with external components.
  3. Working with Props.
  4. Working with States.
  5. Dynamic Rendering.
  6. React Routing.
  7. and Using CSS in React JS.

Let’s understand some concepts…

React follows Component architecture, which means every part of a web app or website is a component, all are made separately and finally fitted into a parent component which is then rendered.

A Component is a Javascript File, for example, you want to create a sidebar component then you have to create a “Sidebar.js” file.

A component can be of two types:-

  1. Sub-Component
    A sub-component is a component that resides inside of another component.
  2. Parent Component
    A Parent component is a component in which sub-components reside in.

How does a “Component” look like in code?

“ YourComponentName.js ”

import React, { Component } from 'react'
class YourComponentName extends Component {
render() {
return (
<div>
{/* Your Html/JSX code goes here */}
<h1>This is my component</h1>
</div>
)
}
}
export default YourComponentName

All the components have a parent component, it might be either “App.js” or some other component.

import React, { Component } from 'react';

That’s a common line of code you’ll see in almost all the components everywhere. In that, we are importing React and Component class from the ‘react’ module. Which enables us to create custom components.

class YourComponentName extends Component {

This is a class component, replace “YourComponentName” to whatever name you want.

render() {
return (
<div>
<h1>This is my component</h1>
</div>
)

The render() method along with the return() method renders the content into the DOM.

And for now “YourComponentName.js” component will return “This is my component”.

export default YourComponentName

The above line of code is very important, make sure you add it compulsory, “export” keyword defines what are all the methods(functions) that should be accessible to the component importing this component.

Now that the component is built “How to use it”?

Once a component is built, we import it in the parent component or in the “App.js” file according to its functionality.

for now, let’s consider you are importing “YourComponentName.js” in “ParentComponent.js”

import YourComponentName from './YourComponentName.js'

and then the imported component is accessed just like an HTML tag inside the return() method of “ParentComponent.js”.

<YourComponentName> </YourComponentName>

now “ParentComponent.js” will look like this

import React, { Component } from 'react'
import YourComponentName from './YourComponentName.js'
class ParentComponent extends Component {
render() {
return (
<div>
<YourComponentName> </YourComponentName>
</div>
)
}
}
export default ParentComponent

At the time of rendering “<YourComponentName> </YourComponentName>” will be replaced by “<h1> This is my component </h1>” as “YourComponentName.js” is returning that <h1> tag.

If you call the “<YourComponentName> </YourComponentName>” two times then “This is my component ”will be rendered two times, meaning every time a component is called the return() method of that component is called.

What is App.js?

The “App.js” file is like the Parent container of all the components, all the parent components are imported into this “App.js” file. This is the final file that will be rendered into the Browser.

What are Props?

Props are just like parameters that are passed in a function or attributes in HTML tags, but these are user-defined, they carry some inputs to the component.

<!--For example consider a component "ComponentX" imported in some other component "ComponentY.js". "prop1" and "prop2" are the user-defined props. -->
<ComponentX prop1="xyz" prop2="zyx" ></ComponentX>
/* This is how props values are accessed in ComponentX.js. Sent from "ComponentY" */
{this.props.prop1} //returns xyz
{this.props.prop2} //return zyx

Props sent to a component is accessed through the “props” object.

What are States?

Components data will be stored in the component’s State just like a variable. This state can be modified based on user action or other action. when a value of a component’s state is changed React will re-render that component to the browser.

States are defined inside the constructor of the component class.

class YourComponentName extends Component {
constructor(props)
{
super(props);
this.state={
'myname':'Abdul wahid naafi',
'myage':'20'
}
}
render(){

here “ this.state ={} ” is the state variable and we define each state as an object inside of it. ‘myname’ and ‘myage’ are two states with some values.

To access these state values

this.state.myname //returns 'Abdul wahid naafi'
this.state.myage //returns '20'

let’s take our “YourComponetName.js” component and see states in action.

import React, { Component } from 'react'
class YourComponentName extends Component {
constructor(props)
{
super(props);
this.state={
'myname':'Abdul wahid naafi',
'myage':'20'
}
}
render() {
return (
<div>
{/* Your Html/JSX code goes here */}
<h1>This is my component</h1>
<h2>My Name is {this.state.myname}</h2>
<h3>My Age is {this.state.myage}</h3>
</div>
)
}
}
export default YourComponentName

To access javascript variables, methods, states inside return() method, insert the javascript code inside “ {} ” curly brace, it’s called “JSX”.

now the output of “YourComponetName.js” component is

This is my component
My Name is Mainak Das
My Age is 22

To modify the values of the state object

this.setState({'myage':'19'},()=>{ //this is a callback fucntion });

setState method is used to modify state values.

Let’s take our “YourComponetName.js” component to see setState in action.

import React, { Component } from 'react'
class YourComponentName extends Component {
constructor(props)
{
super(props);
this.state={
'myname':'Mainak Das',
'myage':'22'
}
}
changemyage= ()=>
{
this.setState({'myage':'19'},()=>{ alert("Age Modified ") });
}
render() {
return (
<div>
{/* Your Html/JSX code goes here */}
<h1>This is my component</h1>
<h2>My Name is {this.state.myname}</h2>
<h3 onClick={this.changemyage}>My Age is {this.state.myage}</h3>
</div>
)
}
}
export default YourComponentName

A function/method “changemyage()” is created in that the state ‘myage’ is modified from ‘20’ to ‘19’.

To call this method/function an “onClick” listener is added to <h3> tag calling the “changemyage()” method.

Once the “changemyage()” method fires up the state ‘myage’ is modified and on successful modification, an alert message will be shown telling “Age Modified”.

What Single Page Application (SPA) is?

In Wikipedia, it’s simply stated as:

A single-page application (SPA) is a web application or website that interacts with the user by dynamically rewriting the current page rather than loading entire new pages from a server.
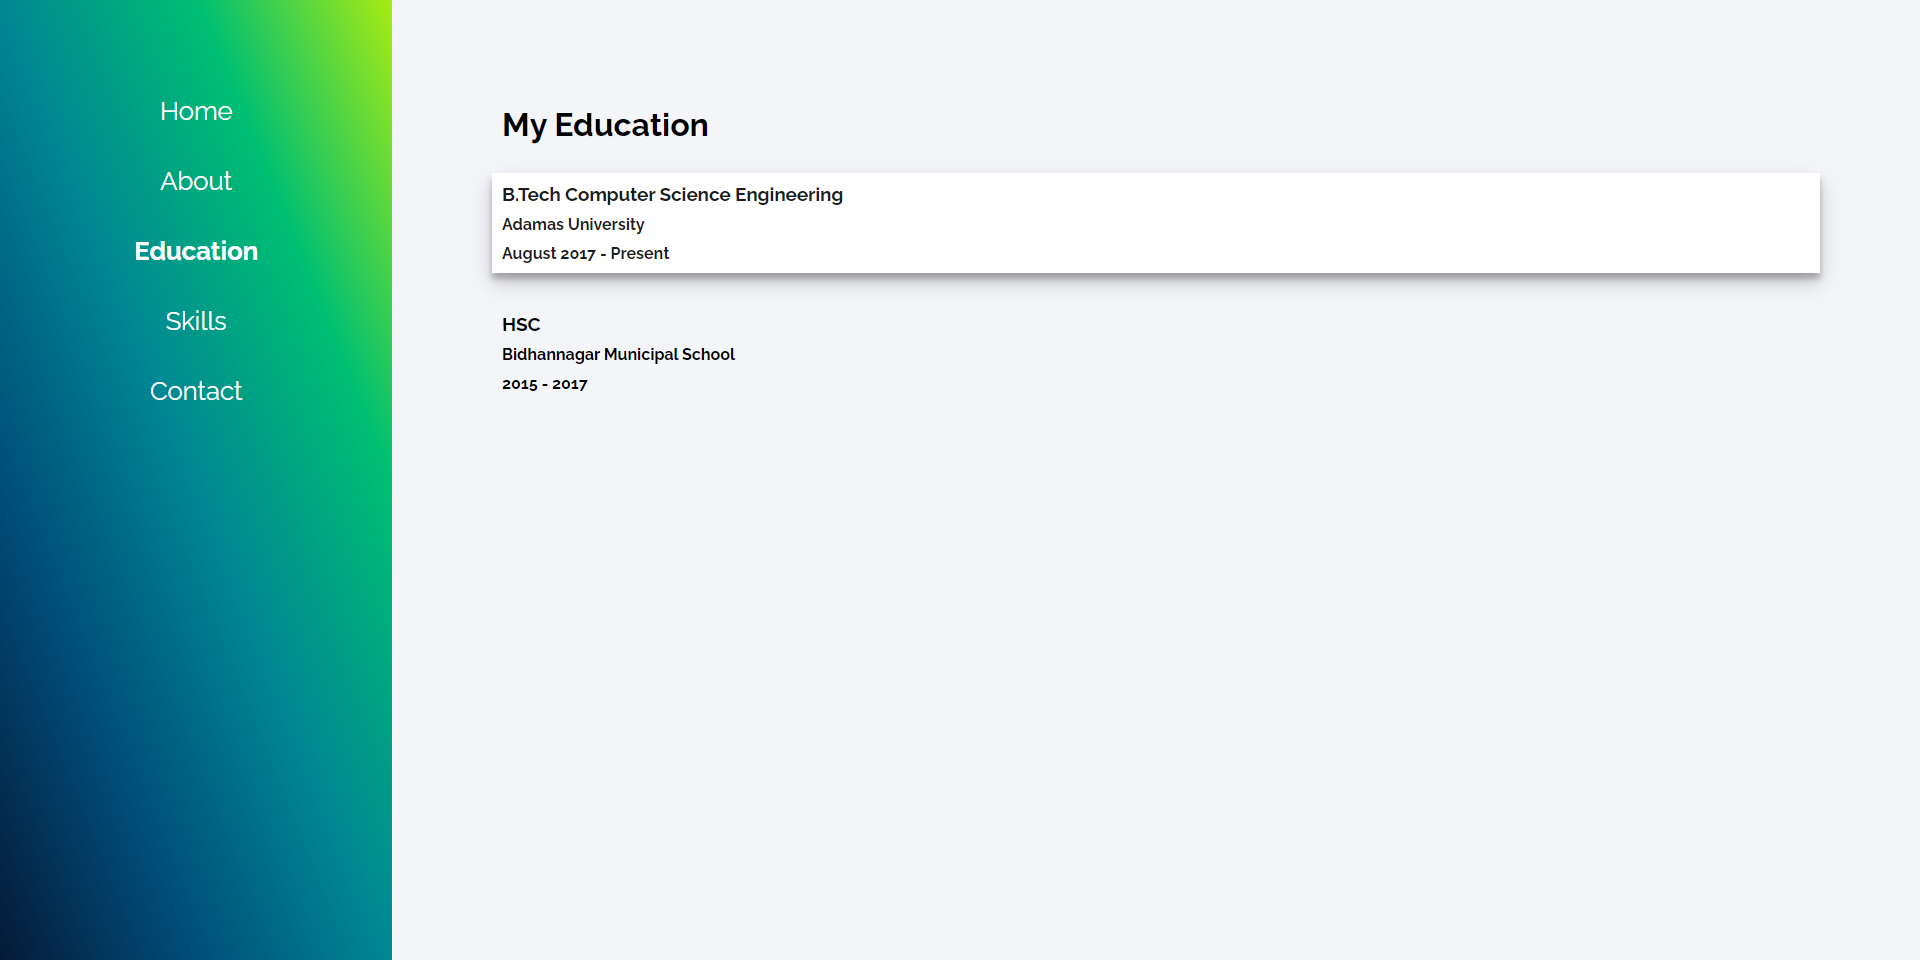
in our project, the right side of the webpage (“contents” as shown in the layout below) will be rewritten every time the user navigates to a new route(Home, About, Education, etc.,).

Now let’s get started with Building the portfolio website using React JS

If “Node JS” is not installed, <ahref=”https://nodejs.org/en/download/” rel=”noopener nofollow”>Download Node JS and install it.

I use Visual Studio Code for most of my React JS project and I highly recommend you to use.

Now, create a new folder, name it whatever you want.

  1. Open vs code.
  2. Press ctrl-shift-n (cmd-shift-n) to open a new vs code window.
  3. in the new window, click the “Open Folder” blue button on the Explorer pane,
  4. Browse and select the folder you created.
  5. Go to View → Terminal to open a terminal inside vs code.

After that, create a React JS project using “create-react-app” CLI, now name the project whatever you want for now I’ll name it as “Portfolio_Website_ReactJS”.

$ npx create-react-app Portfolio_Website_ReactJS

after you get the message “Happy Hacking”, move inside the project directory

$ cd Portolio_Website_ReactJS

Folder structure for this project!

folder structure

Inside the “src” folder, create three new folders and name them “components”, “contents”, and “img” respectively.

Inside the “Components” folder

Create the below components as javascript files in the “ components ” folder.

  • Navbar.jsThis component is the sidebar and will hold a set of “NavItems” components(Home, About, Education, Skills, Contact). It’s just the pink and blue gradient box.
  • NavItem.js This component will be the navigation items (e.g. Home, About, Education,…).
  • Social.jsThis component holds the Social media icon with links.
  • Widecard.js
    This component will hold the Education Details (as shown in the final result GIF above).

Inside the “contents” folder

The contents folder will contain the contents to be rendered on the right side of the page based on the route(Home, About, Education, etc.,).

Create the below-mentioned javascript files in the “contents” folder.

  1. Home.js
  2. About.js
  3. Education.js
  4. Skills.js
  5. Contact.js

Now your project directory should look like this:
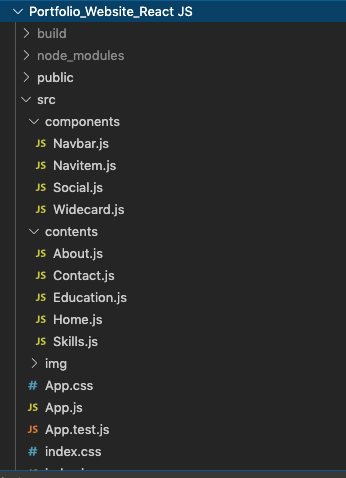
folder structure inside

Now let’s jump into coding

Open App.js and remove all the codes inside the render() method.

Remove all the “imports” except

import React from ‘react’;
import ‘./App.css’;

Now open App.css and remove all the styles(code) and save both the files.

We will be adding all our CSS code to the “App.css” file.

Add these lines of CSS first for this project

@import url('https://fonts.googleapis.com/css?family=Raleway:300,400,500,700&display=swap');
:root{
--sidebar-flex:1.5;
--condiv-flex:6;
--fontsize-p:1.2rem;
--fontsize-nav:1.6rem;
--typing-font:3rem;
}
*
{
margin:0;
padding: 0;
}
body
{
font-family: 'Raleway';
}
.App
{
display: flex;
width: 100vw;
min-height: 100vh;
}
/* .condiv class is for the right side content container*/
.condiv
{
padding: 100px ;
background-color: #f4f5f9;
flex:var(--condiv-flex);
}

Navbar is just the wrapper of the Navitem, its just that pink blue gradient box that will contain the Navitem.

Navitem” is the sub-component and “Navbar” is the parent component.

Open “Navbar.js”

import React, { Component } from 'react';
import Navitem from './Navitem';
// We'll code Navitem.js later for now let's focus on Navbar.js
// “Navitem” is the sub-component.
class Navbar extends Component {
   
    render() {
        return (
            <nav>
            <ul>
            <Navitem item="Home" tolink="/" ></Navitem>
            <Navitem item="About" tolink="/about" ></Navitem>
            <Navitem item="Education" tolink="/education"></Navitem>
            <Navitem item="Skills" tolink="/skills"></Navitem>
            <Navitem item="Contact" tolink="/contact"></Navitem>
            </ul>
            </nav>
            )
        }
    }
    
export default Navbar

Inside the <ul> tag we have

<Navitem item="Home" tolink="/"></Navitem>

<Navitem> component tag with two props (“item” and “tolink”). It just takes the content from here and delivers there in the “Navitem” component.

In here “item” prop holds the Navigation item name (Home, About, Education, etc,.). And “tolink” prop holds the Navigation route (“/”, “/about”, “/education”, etc.,)

Five Navitem components are created and props are set.

Styling the Navbar

Open App.css and copy-paste the below CSS styles and save.

nav
{
padding:60px 30px 0px 30px ;
flex:var(--sidebar-flex);
background: rgb(238,103,143);
background: linear-gradient(180deg, rgba(238,103,143,1) 50%, rgba(132,124,252,1) 80%);
}
Go to terminal and type the following
npm install react-router-dom -g --save

navbar

“react-router-dom” is a node module used to perform routing operations in React JS.

import { Link } from "react-router-dom";

This will import the “Link” class from the “react-router-dom” module.

It acts just like the “Anchor <a>” tag in HTML.

import React, { Component } from 'react';
import { Link } from "react-router-dom";
class Navitem extends Component {
render() {
return (
<li>
<Link to={this.props.tolink} >
{this.props.item}
</Link>
</li>
)
}
}
export default Navitem

Getting the values of “item” and “tolink” prop and setting to the Link component.

<Link> tag is the component imported above from the “react-router-dom” as I mentioned they act just like Anchor tag in HTML, in there we have an attribute called “href” to define the URL, in here for the Link tag we have “to” attribute, it’s not an attribute it is a prop of Link component.

Time to do some CSS

Open “App.css”, add your styles, and save.

nav ul
{
  font-size:var(--fontsize-nav) ;
  text-align: center;
  list-style-type: none;
  text-decoration: none;
  color: white !important;
}
nav ul li
{
  margin:40px;

Now, let’s do something like whichever “Navitem” is clicked I want that Navitem text to be styled “Bold”.

We’ll be adding a CSS class “.active” to that “Navitem” which is clicked.

/* css for active class */
.active
{
font-weight: bolder;
}

For this, we’ll create a Function that will take the “Navitem’s id” as an input parameter and set that to a state object called “NavItemActive” on the Navbar component, and then the CSS “.active” class will be added to that element whose id is stored in that “NavItemActive” state object.

constructor(props)
{
super(props);
this.state={
'NavItemActive':''
}
}

Now that function to add CSS class (.active) on Navitem.

activeitem=(x)=>
{
if(this.state.NavItemId.length>0)
{
document.getElementById(this.state.NavItemActive).classList.remove('active');
}
this.setState({'NavItemActive':x},()=>{
document.getElementById(this.state.NavItemActive).classList.add('active');
});
};

( “Navitem’s” id ) refers to the DOM element ID of the Navitem(Home or About or Education …)

The “activeitem()” function or method takes an input parameter “x” which is the clicked Navitem’s ID. It will then check if there’s already anything(any element’s ID) stored in the “NavItemActive” state object if TRUE then it’ll remove the CSS “.active” class from that element, else it’ll set the state object to the Navitem’s ID which’s clicked by the user. And then a callback function will run which will add the CSS “.active” class to the Navitem which is clicked.

Here, we have this function/method in the “Navbar.js” component but we have to trigger it when the “Navitem” component is clicked. for that, we’ll be passing the “activeitem()” method as a prop to the “Navitem” component.

Now we have to set the “activeitem()” in the onClick attribute of the <Link> tag in “Navitem.js”

onClick={this.props.activec.bind(this,this.props.item)}

“bind” method is used to bind the current instance(1st parameter) and the input to be sent (2nd parameter).

“Navitem.js” will finally look like this

import React, { Component } from 'react';
import { Link } from "react-router-dom";
class Navitem extends Component {
render() {
return (
<li id={this.props.item}>
<Link to={this.props.tolink} onClick={this.props.activec.bind(this,this.props.item)}>{this.props.item}</Link>
</li>
)
}
}
export default Navitem

And, “Navbar.js” will finally look like this

import React, { Component } from 'react';
import Navitem from './Navitem';
class Navbar extends Component {
constructor(props)
{
super(props);
this.state={
'NavItemActive':''
}
}
activeitem=(x)=>
{
if(this.state.NavItemActive.length>0){
document.getElementById(this.state.NavItemActive).classList.remove('active');
}
this.setState({'NavItemId':x},()=>{
document.getElementById(this.state.NavItemActive).classList.add('active');
});
};
render() {
return (
<nav>
<ul>
<Navitem item="Home" tolink="/"  activec={this.activeitem}></Navitem>
<Navitem item="About" tolink="/about"  activec={this.activeitem}></Navitem>
<Navitem item="Education" tolink="/education"  activec={this.activeitem}></Navitem>
<Navitem item="Skills" tolink="/skills"  activec={this.activeitem}></Navitem>
<Navitem item="Contact" tolink="/contact"  activec={this.activeitem}></Navitem>
</ul>
</nav>
)
}
}
export default Navbar

In the <Navitem> component, added a new prop “activec” which will send the “activeitem()” function/method to Navitem component which will be then called whenever a Navitem is click.

<Navitem item="Home" tolink="/"  activec={this.activeitem}></Navitem>

Our Navbar is complete. Congratulations.

Now we have to Add this Navbar(sidebar) component to “App.js”

Open “App.js” add the following code

import React from 'react';
import './App.css';
import
{
BrowserRouter as Router,
Route,
} from "react-router-dom";
import Navbar from './components/Navbar';
function App() {
return (
<Router>
<div className="App">
<Navbar />
</div>
</Router>
)
}
export default App;

In React JS we access the CSS class with the “className” attribute.

import
{
BrowserRouter as Router,
Route,
} from "react-router-dom";

“BrowserRouter” is the parent component that holds all of your <Route> components. The <Route> components tell your app which other components to render (display) based on the route.

And are classes of the “react-router-dom” module.

“as” keyword is used to assign an alias name for the component in this project we’ll call “BrowserRouter” as “Router”.

import Navbar from './components/Navbar';

Here we are importing the “Navbar” component that we created, which is inside the “components” folder.

<Router>
<div className="App">
<Navbar />
</div>
</Router>

here the Div with className “App” is the parent div. As mentioned before a component should return only one node.

And inside that, we are calling the <Navbar /> component. You can call it as <Navbar></Navbar> also.

Now, save and run your application to test

npm start

A browser tab on the address http://localhost:3000/ will be opened, there you can see your React JS application.

Until here you might have understood

  1. How custom components are made and used.
  2. How CSS is implemented in React JS.
  3. And how props are sent and received across components.
  4. And how to define and modify/set State for a component.

Contents folder will contain the contents to be rendered on the right side of the page based on the route(Home, About, Education, etc.,).

  1. Home.js
  2. About.js
  3. Education.js
  4. Skills.js
  5. Contact.js

these are the five content pages we have to create.

home

Three things we’ll be focusing on Home.js

  1. Image element in React JS.
  2. Using external components in your React JS project.
  3. How to work with CDN in React JS.

Just as in HTML, to place an image you can use <img> tag in React JS.

But

<img src={} ></img>

In the JSX, the image element has a closing tag also.

And for image source, you have to import it first and then use it. As shown below.

import React, { Component } from 'react';
//importing the picture as "profilepic".
import profilepic from '../img/naafi_photo.png';
class XYZ extends Component {
render() {
return (
<img src={profilepic} className="profilepic"></img>
)
}
}
export default XYZ

For this project we gonna use an external React JS component called“React-typing-effect“

To install it in your project, in the terminal make sure you are in the project directory, and then run the below-mentioned command.

npm install react-typing-effect --save

once it’s installed, Import it wherever you want and use it as mentioned below.

import React, { Component } from 'react';
import ReactTypingEffect from 'react-typing-effect';
class XYZ extends Component {
render() {
return (
<ReactTypingEffect className="typingeffect" text={['I am Abdul Wahid Naafi','I am a web developer']} speed={100} eraseDelay={700}/>
)
}
}
export default XYZ

Usually in plain HTML, we paste the CDN links in the <head> tag.

Just like that, copy your CDN.

Goto your_project_directory/public/index.html

Paste the CDN there inside the <head> tag.

And use it just how you use it normally.

Now, as you learned all these concepts, check out the code for “Home.js” below you’ll understand it easily.

import React, { Component } from 'react';
import ReactTypingEffect from 'react-typing-effect';
import profilepic from '../img/naafi_photo.png';
class Home extends Component {
render() {
return (
<div className="condiv home">
<img src={profilepic} className="profilepic"></img>
<ReactTypingEffect className="typingeffect" text={['I am Abdul Wahid Naafi','I am a web developer']} speed={100} eraseDelay={700}/>
</div>
)
}
}
export default Home

we got one more thing to add, the “SOCIAL” component.

import React, { Component } from 'react';
class Social extends Component {
render() {
return (
<div class="social">
<a href="https://codepen.io/naafi" target="_blank"><i class="fab fa-codepen"></i></a>
<a href="https://github.com/naaficodes" target="_blank"><i class="fab fa-github"></i></a>
<a href="https://Instagram.com/iam_naafi" target="_blank"><i class="fab fa-instagram"></i></a>
<a href="https://www.facebook.com/abdul.w.naafi" target="_blank"><i class="fab fa-facebook-f"></i></a>
<a href="https://Linkedin.com/in/naafi" target="_blank"><i class="fab fa-linkedin-in"></i></a>
<a href="https://medium.com/@iam_naafi" target="_blank"><i class="fab fa-medium-m"></i></a>
</div>
)
}
}
export default Social

Just another simple component returning the HTML for social media links.

CSS code for “.social” class. Add the below code to “App.css”

.social
{
position: absolute;
margin-top: 20px;
display: flex;
bottom: 60px;
}
.social i
{
padding-right: 30px;
font-size: 25px;
color: #9a9b9c;
}
.social i:hover
{
color: #ffffff;
}

social js

let’s add this component to “Home.js” and complete the Home.js content.

Home.js

import React, { Component } from 'react';
import ReactTypingEffect from 'react-typing-effect';
import profilepic from '../img/naafi_photo.png';
import Social from '../components/Social'
class Home extends Component {
render() {
return (
<div className="condiv home">
<img src={profilepic} className="profilepic"></img>
<ReactTypingEffect className="typingeffect" text={['I am Abdul Wahid Naafi','I am a web developer']} speed={100} eraseDelay={700}/>
<Social />
</div>
)
}
}
export default Home

Time to route !!

Open “App.js”, modify the already existing route we made before.

<Router>
<div className="App">
<Navbar />
<Route exact path="/">
<Home />
</Route>
</div>
</Router>

We already learned what <Router> or <BrowserRouter> is.

<Route> is the subtag of <Router> or <BrowserRouter>, with <Route> we decide what content has to be rendered based on the path/URL.

<Route exact path="/">

exact” attribute is used when we have multiple identical paths.

And “exact” is used almost every time for path=”/”.

“Home.js” section is done !!

From here onwards all the processes will be smooth and quick, as you’ve learned pretty much needed to build this project.

about

this content page is pretty simple we are just returning a bunch of HTML.

import React, { Component } from "react";

class About extends Component {
  render() {
    return (
      <div className="condiv">
        <h1 className="subtopic">About Me</h1>
        <h4>Hey there,</h4>
        <h1>I'm Mainak Das</h1>
        <h3>
          Full Stack Web <u>Developer</u> | UI/UX <u>Designer</u>
        </h3>
        <br></br>
        <p>
          I started my journey in the world of computers from an young age, now
          I’m 22 years old, Pursuing my Computer Science Engineering Degree in
          Adamas University Barasat Kolkata. Web development is my center of
          interest, i always love the idea of cross-platform development, 1-n
          one code base deploy into almost any platform, which web technology
          like Javascript enables me to do. I also like creating Interactive UI
          components for better UX and share those desgin and codes to the world
          through Github and Instagram.
        </p>
      </div>
    );
  }
}

export default About;

There’s just contents to be rendered nothing else.

CSS code for the “About” section. Add the below code to “App.css”

.subtopic
{
margin:10px 10px 30px 10px !important;
}
p
{
font-size: var(--fontsize-p);
}
h1,h2,h3,h4,p
{
margin: 10px;
}

Time to route !!

Open “App.js”, modify the already existing route we made before.

<Router>
<div className="App">
<Navbar />
{/* Route for Home.js contents */}
<Route exact path="/">
<Home />
</Route>
{/* Route for About.js contents */}
<Route path="/about">
<About />
</Route>
</div>
</Router>

“About.js” section is done !!

education

For this page(Education.js), we’ll be creating a component to display education details. let’s call that component “Widecard” and we will have four props in that “title” “where” “from” and “to” respectively.

Widecard.js

import React, { Component } from 'react'
class Widecard extends Component {
render() {
return (
<div class="widecard">
<div class="compdet">
<h3>{this.props.title}</h3>
<h4 class="secondtext">{this.props.where}</h4>
<h4 class="secondtext">{this.props.from} - {this.props.to}</h4>
</div>
</div>
)
}
}
export default Widecard

In that component, we have an <h3> element to display the value of “title” prop, <h4> element to display the value of “where” prop, another <h4> element to display the value of “from” and “to” props.

CSS for Widecard

.widecard
{
border:0px solid #9a9b9c;
display: flex;
margin:30px 0px 30px 0px;
}
.widecard:hover
{
color: #1b1d20;
background-color: #ffffff;
box-shadow: 0 10px 20px rgba(0,0,0,0.19), 0 6px 6px rgba(0,0,0,0.23);
}

Let’s import this component into “Education.js”

import React, { Component } from "react";
import Widecard from "../components/Widecard";

class Education extends Component {
  render() {
    return (
      <div className="condiv">
        <h1 className="subtopic">My Education</h1>
        <Widecard
          title="B.Tech Computer Science Engineering"
          where="Adamas University"
          from="August 2017"
          to="Present"
        />
        <Widecard
          title="HSC"
          where="Bidhannagar Municipal School"
          from="2015"
          to="2017"
        />
      </div>
    );
  }
}

export default Education;

It’s simple right, on line 2 imported our “Widecard” component.

<Widecard title="B.Tech Computer Science Engineering" where="Adamas University" from="August 2017" to="Present"/>

Look how clean it looks, this is the benefit of custom components.

Let’s set the Routes

Open “App.js”

first, import the “Education.js” into “App.js”.

import Education from './contents/Education';

Now the Routes.

<Router>
<div className="App">
<Navbar />
{/* Route for Home.js contents */}
<Route exact path="/">
<Home />
</Route>
{/* Route for About.js contents */}
<Route path="/about">
<About />
</Route>
{/* Route for Education.js contents */}
<Route path="/education">
<Education />
</Route>
</div>
</Router>

OK, now the “Education” content is also done.

Our fourth content “Skills.js”
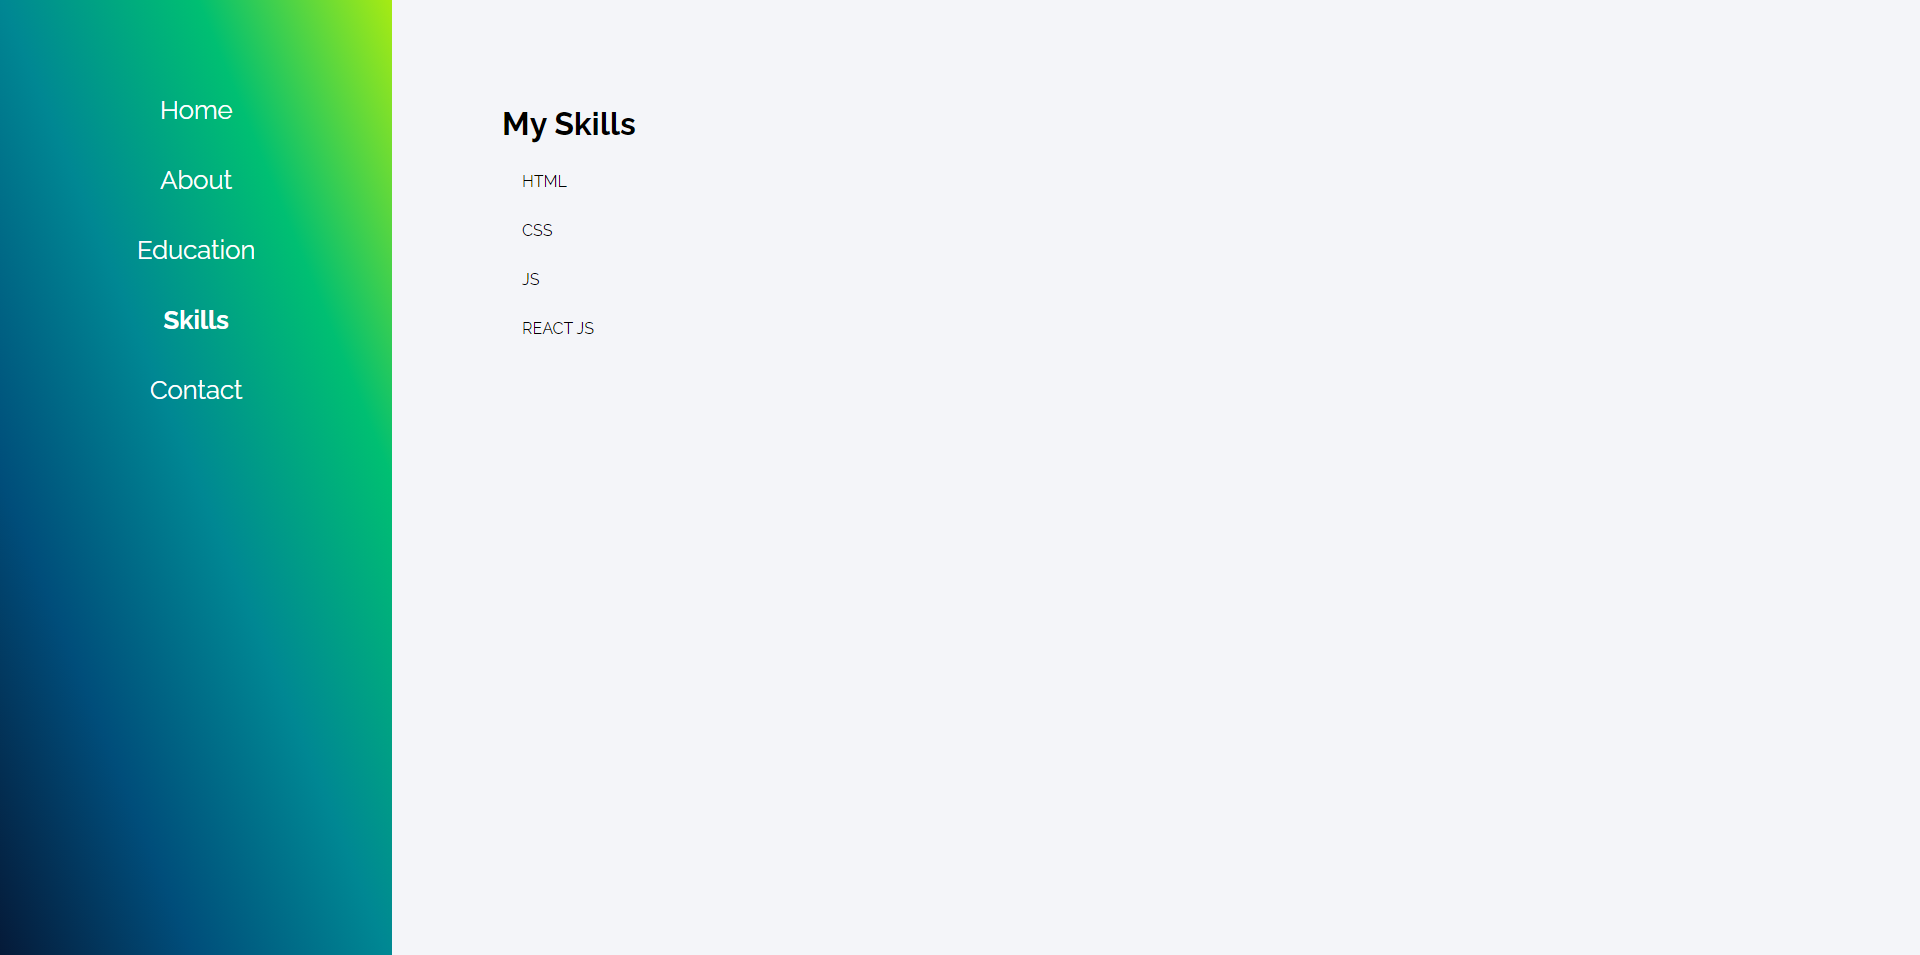
skills

In this, we’ll learn how to work with Dynamic rendering.

What is Dynamic rendering?

To generate DOM elements dynamically, for example, rendering the items in a javascript array as HTML <li> items.

Open “Skills.js”

So, now we’ll have a javascript array filled with the skillset as a state variable, and it’ll look like this.

constructor(props)
{
super(props);
this.state={
'myskills':['HTML','CSS','JS','PHP','REACT JS','FIREBASE','MIT APP']
};
}

We’ll loop through the array items and render it as <li> items.

<ul>
{this.state.myskills.map((value)=>{
return <li>{value}</li>
})}
</ul>

Instead of using a “for loop” to loop through every item in the array, we use the map() method.

In that function that’ll be called by the map method will return “<li>”.

import React, { Component } from 'react'
class Skills extends Component {
constructor(props)
{
super(props);
this.state={
'myskills':['HTML','CSS','JS','PHP','REACT JS','FIREBASE','MIT APP']
};
}
render() {
return (
<div className="condiv skills">
<h1 className="subtopic">My Skills</h1>
<ul>
{this.state.myskills.map((value)=>{
return <li>{value}</li>
})}
</ul>
</div>
)
}
}
export default Skills

Let’s set the Routes

Open “App.js”

First, import the “Skills.js” into “App.js”.

import Skills from './contents/Skills';

Now the Routes.

<Router>
<div className="App">
<Navbar />
{/* Route for Home.js contents */}
<Route exact path="/">
<Home />
</Route>
{/* Route for About.js contents */}
<Route path="/about">
<About />
</Route>
{/* Route for Education.js contents */}
<Route path="/education">
<Education />
</Route>
{/* Route for Skills.js contents */}
<Route path="/skills">
<Skills />
</Route>
</div>
</Router>

Yes! now the “Skills” content is also done.

contact

This “Contact” content page is just a simple page displaying the contact information.

Look!! the “Social” component is imported again!

This is the Advantage of components, make it once use it anytime anywhere.

import React, { Component } from 'react';
import Social from '../components/Social';
class Contact extends Component {
render() {
return (
<div className="condiv">
<h1 className="subtopic">Contact Me</h1>
<h3>Email  :   mainakdas104@gmail.com</h3>
<h3>Instagram   :   @mainak_ds</h3>
<Social />
</div>
)
}
}
export default Contact

Imported the “Social.js” component , and used <h1>, <h3> element to fill in the contents. As simple as that.

Let’s set the Routes for the last time !!!

Open “App.js”

First, import the “Contact.js” into “App.js”.

import Contact from './contents/Contact';

Now the Routes.

<Router>
<div className="App">
<Navbar />
{/* Route for Home.js contents */}
<Route exact path="/">
<Home />
</Route>
{/* Route for About.js contents */}
<Route path="/about">
<About />
</Route>
{/* Route for Education.js contents */}
<Route path="/education">
<Education />
</Route>
{/* Route for Skills.js contents */}
<Route path="/skills">
<Skills />
</Route>
{/* Route for Contact.js contents */}
<Route path="/contact">
<Contact />
</Route>
</div>
</Router>

Now Save the file

Go to terminal

Move to your project directory ( $ cd Resume_Website_ReactJS )

npm start

You’ll be served a new browser tab with your React JS Portfolio Website.


Why Would You Implement A Backend For Your React App?

INTRODUCTION

A React app interacts with the user dynamically. It avoids interruptions of the user experience between successive pages. It rather appears to be a desktop application than a website.
You can do quite a lot with a React web-app. Even if it has no backend.


Why would your app need a backend?

Maybe you need to write your own web-services. Services that access your database. Services that cater to the specific needs of your app. Services that provide the exact data your app needs in the exact format your app needs.

Maybe you need to render your web-app at the server-side. Completely rendered HTML pages enable search engines to crawl the content of your app.

Maybe your app needs to open socket-communication to support real-time events.

There are plenty of good reasons, why your app needs a backend. If your app needs a backend to achieve its purpose, then go ahead.

There are some great backend options for React. Some reasons:

  1. Integration with other 3rd party systems

  2. Scalability

But what if your app does not yet really need a backend?

When you start coding your React app, you may not know for sure whether you would need a backend later.

This best practice in software development tells you to not add anything to your code until you actually need it. You implement the code you need to solve your problem at hand. Not more.

But a backend is nothing that adds to your app. It changes your app! For instance, whether you do client-side rendering or server-side rendering determines the whole architecture of your app. Changing it means rewriting large parts of your app.

One of the best implantation is integrating React with Django, which enhances the website’s look in ways that is just not possible via django. It worth both ways. So, particularly in this case backend needs React and not the other way around.

Another implementation when React does need backend is when using cloud storage such as Firebase for storing data securely.


CONCLUSION

If you don’t need a backend right now, then don’t implement it. And once you do, it is not too late to add it.


Four ways to Style React Components

Styling Components in React

There are four ways to style React components. They are :

  • CSS StyleSheet
  • Inline Styling
  • CSS Modules
  • styled-components

CSS Stylesheet

When the program is big and complex, then you can use CSS Stylesheet with different className in the React file to keep it understandable and distinguishable. Here is an example below.

import React from 'react';
import './Style.css';

const Box = () => (
  <div className="container">
    <p className="content">Get started with CSS styling</p>
  </div>
);

export default DottedBox;

The above file is a ReactJS file, and below is the style.css file.

.container {
  margin: 40px;
  border: 5px dotted pink;
}

.content {
  font-size: 15px;
  text-align: center;
}

Inline Styling

In React inline styling is not specified as a string, instead they are specified with an object whose key is camelCased, version of style name and value is a string. The example is given below.

import React from 'react';

const divStyle = {
  margin: '40px',
  border: '5px solid gray'
};
const pStyle = {
  fontSize: '15px',
  textAlign: 'center'
};

const Box = () => (
  <div style={divStyle}>
    <p style={pStyle}>Inline style</p>
  </div>
);

export default Box;

The above file is the ReactJs file along with its inline styling. Also we could pass the values directly, as shown below.

import React from 'react';


const Box = () => (
  <div style={{margin: '40px',border: '5px solid pink'}>
    <p style={{fontSize: '15px',textAlign: 'center'}>Get started with inline style</p>
  </div>
);

export default Box;

CSS Modules

A CSS Module is a CSS file in which all class names and animation names are scoped locally by default.

import React from 'react';
import styles from './Style.css';

const Box = () => (
  <div className={styles.container}>
    <p className={styles.content}>Get started with CSS Modules style</p>
  </div>
);

export default Box;

After we import the styles.css file, we access className as we access an object.

:local(.container) {
  margin: 40px;
  border: 5px dashed pink;
}
:local(.content) {
  font-size: 15px;
  text-align: center;
}

To make CSS modules work with Webpack you only have to include the modules mentioned above and add the following loader to your webpack.config.js file

. . .
{
  test: /\.css$/,
  loader: 'style!css-loader?modules&importLoaders=1&localIdentName=[name]__[local]___[hash:base64:5]' 
}
. . .

Styled Components

Styled-components is a library for React and React Native that allows you to use component-level styles in your application that are written with a mixture of JavaScript and CSS. They are quite popular among developers and used a lot to avoid to make another .css file and it is to remove any cluster caused by inline styling if it is have many lines of code.

Steps to install and use before implementation:

  1. npm install styled-components
  2. create a variable by selecting a particular html element where we store our style keys 
  3. Then we use the name of our variable as a wrapper  kind of react component.
import React from 'react';
import styled from 'styled-components';

const Div = styled.div`
  margin: 40px;
  border: 5px outset gray;
  &:hover {
   background-color: yellow;
 }
`;

const Paragraph = styled.p`
  font-size: 15px;
  text-align: center;
`;

const Box= () => (
  <Div>
    <Paragraph> styled-components </Paragraph>
  </Div>
);

export default Box;

Conclusion

All these four styling options of React Components ultimately achieve the same results. All have its pros and cons. It all comes down to personal developer preference and the complexity of your application.

Props.children react – A quick intro to React’s props.children

INTRODUCTION

Props.children react: At the first sight, the this.props.children can be a bit overwhelming when studying class based components. As many developers and tutorials use React class based components as it gives access to state, it is very necessary to be familiar with props.children (if you are using stateless functional components) and this.props.children (if you are using class components)

What is ‘children’?

What this.props.children  does is that it displays whatever you include between the opening and closing tags when invoking a component.

A simple example

For example, in a class based component.

import React, { Component } from "react";

class Welcome extends Component {
  render(props) {
    return (
      <div>
        <p>Hello Class Component</p>
        <p>{this.props.children}</p>
      </div>
    );
  }
}
export default Welcome;

Here the component is receiving children from , say, app.js which can be passed in the manner shown below.

import Welcome from "./components/React/Welcome";

function App() {
  return (
    <>
      <div className="App">
        <Welcome children="I am a child" />
      </div>
    </>
  );
}

export default App;

As you can see, when the string “I am a child” is passed through to the Welcome component the output looks similar to what is shown below.

Hello Class Component.

I am a child 

Whenever this component is invoked {props.children} will also be displayed and this is just a reference to what is between the opening and closing tags of the component.


A complex example

I will now demonstrate an error solving method via this.props.children , where if there is an error in code it will display Something Went Wrong  or if it is error free code it will simply say Error Free Code

import React, { Component } from "react";

class ErrorBoundary extends Component {
  constructor(props) {
    super(props);

    this.state = {
      hasError: true,
    };
  }

  componentDidCatch(error, info) {
    console.log(error);
  }

    render() {
        if (this.state.hasError) {
        return <h1>Something Went Wrong</h1>;
        } else if (!this.state.hasError) {
        return (<>
                   <h1>Error Free Code</h1>
                   {this.props.children};
                </>);
        }
    }
    }
export default ErrorBoundary;

So, if there is error in the code, then the first return statement will be implemented and all others will be ignored. Or else, the this.props.children that is passed via another (parent) component will be displayed.


CONCLUSION

I hope this shed a little bit more light on React and how you can use props.children to help you customize your app’s content while still being able to reuse the same components in my case for error checking purposes.


React projects ideas – Interesting React Project Topics and Ideas for Beginners to help you Start Learning

React Project Ideas & Topics for Beginners

React projects ideas: Have you completed the basics of React? Are you looking for ways to utilize your knowledge? Then, you are at the right spot. Here, we will discuss some ways by which you can efficiently utilize your knowledge. The article will discuss some of the best React Projects Topics. If you are also a React student and are searching for ways to move forward with your career, then the best way is to take up small real-world projects.

We have mentioned some of the best React Project Ideas for Beginners in this article for your convenience. By developing small React projects, you can easily enhance your skills and knowledge and become a professional developer. The projects will help you develop your skills and become creative with each development. But, before you jump directly into developing a project, you should know the reason for taking up small React projects and how to get started with the project ideas.

This article will provide a quick guide to kick start your React career with small React Project ideas and topics; check out the article for further details.

Reasons to work on React Projects

Algolia react instantsearch: As we know, every field requires practical skills and theoretical knowledge; without practical knowledge, a theoretical study is of no use, and both go hand-in-hand. The same applies to the React course; without proper practical skills, you cannot move forward in the React field with only theoretical knowledge. So, the best way to enhance and utilize your react knowledge is to work on small real-world projects.

You will get a proper hold of your knowledge and become a professional app developer in the process. The best part about React projects is that they help you know the react ecosystem and tools in detail. Moreover, if you successfully develop a react project, you can add it to your resume to improve your impression of potential employers. However, most students fail to think of ideas for a React app when it comes to project development. But, to help you with your React project, we have listed some of the best React Project Ideas below.

How to get started with React Project Development?

React native spotify auth: Before you start working on any react project, you should know that React projects are mostly self-learned. While working on React projects, you won’t get any guide or materials to work with; it is a process of self-learning and is purely based on trial and error methods. However, you can look for articles on React Projects Topics on the internet for reference. You will also find other study materials to guide you through the process of project development.

Moreover, there are journals and articles on app development based on the course available on the internet, which is very helpful. We know that as a fresher, developing an application can be pretty challenging, but the best way to do it is by dividing the whole project into separate components.

You can break down the entire project idea into smaller parts and work on a single app feature at a time. Breaking down the entire project into different parts makes it easier to develop the app without being misled from your path. Moreover, if you design one app feature, you will have to work with various React tools and ecosystems, which strengthens your knowledge of app development using React tools.

React Project Ideas And Topics

React app ideas: Below, we have mentioned the list of Best React Project Topics For Beginners.

Social Media Applications

Beginner react projects: Social media play a crucial role in connecting people today; therefore, social media apps and platforms are considered the future of communication. With the help of social media applications, it becomes easier for people to reach every nuke and corner of the world with ease. Some of the most used Social media applications over the internet include Facebook, Instagram, and Twitter.

Building a social media application can be one of the best React Project Ideas since it requires new features and tools with every new application. Building a Social Media application using your React knowledge is easy as you know exactly what features to include in the application to make it attractive. Here are some of the most common features of popular Social Media platforms:

  • Easy and advanced user authentication features.
  • Strong data security features.
  • App notifications and feeds.
  • The app can easily integrate with other platforms.
  • Sharing and Posting media files and texts.

The features mentioned above are the basic requirements of any Social Media platform. However, you can add some extra and innovative features to allow the end-users to enhance and modify their profile on the app with these features. Below are some of the technologies and tools that you can use to build your React Social Media App:

  • For posts and messages, you can use React Native for providing an interactive user interface.
  • For real-time data sequence, you can opt for AWS Amplify or Hasura.
  • For enabling app notifications, you can use AWS Lambda or Firebase.
  • For uploading media files, you can use Firebase.

Weather Applications

Algolia firebase: If you are a React Fresher and are looking to work on a project, then the Weather app is the best project you can work on. Building a Weather application is easy and takes a few hours to program. You need to design the app to display at least 5-7 days of the weather forecast at a time, which most weather applications do.

The Weather application you design must include locations, current temperature, humidity, and weather icon. Furthermore, the app must be capable of recording the highest and the lowest temperatures of the day. It should also display icons according to the current weather recordings.

Interesting React Project Topics And Ideas For Beginners

Before building a weather app, you must remember that the app must refresh after every 5-8 minutes to provide accurate weather details. Once you add the essential details to your app, you can add extra features to make your app more exciting and interactive. Here is the list of some additional features that you can incorporate into your weather app:

  • Include features to view the hourly weather forecast of a day.
  • To make your app better, you can install react-router, which displays the weekly forecast along with the day and hourly forecasts.
  • To get the weather data for your app, you can log in to an Open Weather app to obtain an API Key, with the help of which you can access the weather data easily.
  • If you are still unhappy with the app, you can also add graphics to enhance the app.

The best part about working on a weather application is learning the techniques to connect to an external API to fetch data. This technique will help you develop single-page apps that are programmed to fetch data from external sources. Below are some of the techniques and tools you can use to build weather applications:

  • For weather apps, Bower and Node.js are the best options.
  • For coding and task creation, you can opt for Gulp task runner and SASS CSS Preprocessor.
  • For interactive weather symbols and icons, you can visit Erik Flowers.

Messaging Applications

In Today’s time, messaging applications have a more significant influence on the netizens. We send and receive thousands of messages regularly. Moreover, online messaging platforms and apps such as WhatsApp messenger and Facebook messenger have gained popularity and have become an inseparable part of our lives.

Interesting React Project Topics And Ideas For Beginners

In a world where instant messaging has become a faster way to communicate, building a messaging application is the best a React fresher can opt for. While designing a messaging application, you should ensure the platform facilitates communication between two or more people simultaneously, which is the essential feature of any messaging platform. Technologies and Tools that you can opt for the Project:

  • You can use React Native, which is used in designing hybrid messaging applications.
  • Firebase and Hasura can be used for smooth and instant transmission of messages.
  • Firebase or Cloudinary tools can be used for the smoother passage of messages containing media files.
  • Messaging apps are incomplete without emojis; you can opt for the npm emoji-mart package for adding emojis to your application.

Entertainment Applications

With the growing demand of the entertainment industry, the need for innovative and advanced Entertainment applications is also rising. In such scenarios, building an Entertainment application can prove to be beneficial for React Freshers. The Entertainment applications focus on providing content that includes movies, video clips, music, and podcasts. Today some of the best media content providers are available on the internet, including Netflix, YouTube, Spotify, and Amazon Movies & Music.

Furthermore, many entertainment apps are a perfect combination of social media and entertainment, for example, TikTok & Moj. However, building an application that resembles TikTok or YouTube can be challenging, but we can build a simple yet attractive Entertainment application. While building an entertainment application, you should always focus on an entertainment media you are interested in and try designing your application accordingly.

It will be better to design an app that can help users view and save the content for watching later, which most people find impressive. Once you add the basics to your application, you can easily integrate the application with additional features. Technologies to help you build an Entertainment application:

  • For an interactive User Interface, you can use Gatsby or Next.js, which are excellent tools.
  • You can add the search option to your application using the Algolia tool.
  • For Media Player, you can opt for React-Player npm Package.
  • For data storage, Cloudinary or Firebase are the best options.

E-Commerce Applications

With the advent of the internet, businesses have grown multi-folds. Today, businesses are being operated on the web rather than in physical stores. The E-commerce industry has seen significant growth in the past few years, and E-Commerce companies like Amazon, Flipkart, and Nykaa have a significant share in the market. Today, people prefer shopping from Amazon and Flipkart rather than going to the market to purchase the item. Building an E-Commerce Application is the best React Project Idea a fresher can opt for in such situations.

Moreover, building a functional E-commerce application can help you skill up and impress your potential employers. Before building the application, you need to select a particular industry or category of product that you would feature on the app. Always focus on a particular product and never add products from different markets, making it challenging to build the app.

You can opt for any industry you are interested in, starting from Electronics to Home Decor. The most crucial part of an e-commerce platform is its customer service; apart from the smooth delivery of products and services, you need to focus on providing hassle-free customer support.

Interesting React Project Topics And Ideas For Beginners

Furthermore, it would help if you design the app interface to be straightforward and user-friendly; it should also facilitate smooth navigation allowing users to shop hassle-free. The app should have a location option, which is compulsory for delivering the product or service. It should also facilitate Cart and Wishlist features. Technologies you can use to design the apps:

  • For designing the User Interface and Store display, React app or Gatsby are the best options.
  • For the instant search feature, you can opt for the Algolia tool.
  • For a smoother checkout process, you can implement Netlify or AWS Lambda.
  • For safe and secure payments, you can use the Stripe tool.
  • For Cart creation and wishlist, Snipcart comes in handy.

Calculator Applications

Calculators are devices that help us in mathematical calculations. However, we don’t prefer a calculator nowadays as we have built-in calculator apps on our mobile phones. If you are looking to develop something simple yet valuable with your react skills, designing a calculator application can be the best choice.

For designing a calculator, you need to keep in mind that the calculator is programmed well to display answers to mathematical equations. Building a calculator requires different components to be synced together to carry out mathematical calculations. Interesting React Project Topics And Ideas For Beginners

Steps in building a calculator application are as follows:

  • Create a well-equipped setup for different aspects of the calculator.
  • Develop a user-friendly and interactive interface.
  • Design an advanced support system to handle all sorts of program breakdowns.

Productivity Applications

Building Productivity application is one of the easiest React Project Ideas for beginners. You can easily find thousands of tutorials and journals on designing a productivity application over the internet, making it convenient to work on the project. The Productivity apps are those which help in increasing the efficiency and productivity in our day-to-day activities.

Some of the most common productivity apps include task lists, note apps, and team-management software. However, you can also think differently and build different apps from common productivity apps, such as a productivity app that will assist users in app-building. While designing a productivity application, you need to understand and add features that will simplify the daily activities for the users.

First, try to add the basic features, and once done, try to add more elements to make the app more innovative. You can also program these apps to integrate well with other third-party applications. Technologies and Tools you can opt for:

  • For a better user interface, choose React Native or Create React Application.
  • For displaying markdown in the app, opt for React Markdown npm package tool.
  • For writing codes, you can use React codemirror2 npm package.
  • For arranging the contents of the list using the drag function, you can use React draggable.

Book Finder

Book Finder app is another innovation React Project Topic. The project is completely based on creating an application that will help users find their favorite books over the internet. The app should be so designed that it would help the users find the books they are searching for using simple queries, including the Book’s name or Author’s name. Features you can include:

  • Develop a search option where the users can input their queries to search for their books.
  • Program the application to display the list of all the books related to the users’ query.

Recipe App

The basic idea here is to create an application capable of providing delicious recipes and assisting the users through the process of cooking. It is one of the best React Project topics one can opt for. Features to include:

  • Add a search feature, using which the users can search for different recipes.
  • Design the app in such a way that it shows the list of all recipes at once.
  • The app should also include all the details and the cooking method for the recipe.

Wrapping Up

If you are a React fresher searching for ideas and projects to utilize and develop your skills, we hope your search has ended with our article. Above, we have mentioned some of the best and innovative React Projects Topics for beginners, and we hope the information was helpful to you. You can choose any of the project ideas mentioned above to practice and enhance your skills. Always remember the more you practice, the better you build.

React js alternatives – Lightweight Alternatives to React

Lightweight Alternatives to React

React js alternatives: React.js is a marvelous JavaScript library that employs Virtual DOM. React is the prime choice of developers when it comes to building single-page applications.

Why do you need an alternative to React.js?

  • Most of the React developers find it challenging to manage the huge library size of the React.js framework. Surely you can not afford to invest in a framework that demands an exquisite memory space.
  • Secondly, React lacks MVC architecture, especially since the View functionality is not managed by its Model and Controller. Hence, you need an alternative React framework, which is view-oriented.
  • React has a steep learning curve, and developers need to invest a lot of time to learn new technology. Project ignition is delayed.
  • Many React.js developers find it hard to grasp the documentation of JSX React. Beginners are never comfortable with this framework.

In this blog, I am recalling and bringing in front of you the list of React.js alternatives that those experts realized in the tech-talk show. Along with the javascript frameworks, I have mentioned the pros and cons of each of the frameworks and their comparison with React.js.

Preact

Alternatives to react: Jason Miller introduced Preact under the open-source MIT license. You can think of Preact as a lightweight alternative to the React library for developing mobile or web applications, and progressive web apps PWA.

Preact Pros

React js alternatives: It is much compact, precise, and lightweight in size (3KB) so your application can perform faster.

  • Preact uses ES6 API, which enables you to uplift your application from React to Preact very easily. You can even adapt it as a library to create fantastic user interfaces for your project.
  • Entrepreneurs can create new projects easily by using the official CLI without the trouble of getting into Babel and Webpack configuration.
  • You can get all the help from the official website examples and Preact documentation to kick-start your application development.
  • Along with all the inspiring features of React, the Preact library also consists of some special features like the LinkedState.

Preact Cons

You do not get the context support.

  • For the stateful functionalities of your application, the createClass function is missing. Preact only allows you to use ES6 class and stateless components.
  • Preact doesn’t care about the React propTypes.
  • The community size is yet to reach the competition with React.
  • Preact lacks innovation and mostly mimics React.

Preact Vs. React

  • API: Not all the React features are present in Preact; it contains only a small part of the React Application Interface functionality.
  • Size: As I mentioned in the beginning, Preact is much lighter than React. React is 5.3 KB, whereas Preact is only 3 KB.
  • Performance: Because of being lightweight, Preact is faster as compared to React applications.

Svelte

React alternatives: Svelte is a free and open-source front-end compiler created by Rich Harris and maintained by the Svelte core team members. Svelte applications do not include framework references.

Svelte Pros

  • The building time is blazing fast when compared to React or even other frameworks. Usage of the rollup plugin as the bundler might be the secret here.
  • Bundle size is smaller and tiny when gzipped when compared to React, and this is a huge plus point. Even with the shopping cart application I built, the initial load time and the duration to render the UI is extremely low, only the chunky images I have added takes some time :).
  • Binding classes and variables are relatively easy, and custom logic is not needed when binding classes.
  • Scoping CSS <style> within the component itself allows flexible styling.
  • Easier to understand and get started when compared to other frameworks as the significant portion of Svelte is plain JavaScript, HTML, and CSS.
  • More straightforward store implementation when compared to React’s context API, granted context API provides more features, and Svelte might be simple enough for common scenarios.

Svelte Cons

  • Svelte won’t listen for reference updates and array mutations, which is a bummer, and developers need to actively lookout for this and make sure arrays are reassigned so the UI will be updated.
  • Usage style for DOM events can also be annoying, as we need to follow Svelte’s specific syntax instead of using the predefined JS syntax. Cannot directly use onClick like in React, but instead, have to use special syntax such as on:click.
  • Svelte is a new and young framework with minimal community support, thereby doesn’t have support for a wide range of plugins and integrations that might be required by a heavy production application. React is a powerful contender here.
  • No additional improvements. Ex- React suspense actively controls your code and how it runs and tries to optimize when the DOM is updated and sometimes even provides automatic loading spinners when waiting for data. These extra features and continued improvements are relatively low in Svelte.
  • Some developers might not prefer using special syntaxes such as #if and #each within their templates and instead would want to use plain JavaScript, which React allows. This might come down to personal preferences.

Svelte Vs. React

Svelte does provide noticeable improvements in certain features when compared to React. But it may not still be significant or large enough to replace React completely. React is still robust and broadly adopted. Svelte has quite some catching up to do. But concept-wise, the compiling approach taken by Svelte has proven that virtual DOM diffing isn’t the only approach to build fast reactive applications, and a good enough compiler can get the same job done as well as it gets.

Vanilla JS

Vanilla JS is nothing but plain JS without any external libraries or frameworks. Using this we can build powerful and cross-platform applications.

The major differences

Since there are so many ways to write vanilla JS, it can be difficult to pin down a list of differences that applies to 100% of apps. But here we’ll define some key differences that apply to many plain JS apps that are written without a framework.

Those differences are:

  • How the user interface is first created
  • How functionality is split up across the app
  • How data is stored on the browser
  • How the UI is updated

Is Vanilla JS worth over React

Vanilla JS is awesome but it’s not a great alternative when it comes to building huge applications with complex dynamic functionalities. Besides, it cannot create complex and efficient UIs. So if you have an app that changes frequently and drastically with thousands of pages, it is better to use a modern Javascript framework.

On the other hand, React which allows us to use reusable components and is capable of keeping the UI in sync with the state can definitely solve this problem.

React bootstrap side navbar – How to Create a Navigation Bar and Sidebar Using React

INTRODUCTION

React bootstrap side navbar: The navbar I focus on will be a sidebar via React. I will guide you through the React project creation. Make sure you have node.js installed in your system.

  1. Make a workspace folder and name it.
  2. Use npx create-react-app navbar to create a new project in the directory.
  3. Navigate inside it by using cd navbar in your IDE, I would recommend using Visual Studio Code.
  4. npm start in terminal to start the localhost server in your browser, I would recommend using Google Chrome.


DEPENDENCIES REQUIRED

React sidebar navigation: Go into package.json file and paste these dependencies in there:

"bootstrap": "^4.3.1",
"react": "^16.10.2",
"react-bootstrap": "^1.0.0-beta.14",
"react-dom": "^16.10.2",
"react-router-dom": "^5.0.1",
"react-scripts": "3.1.1",
"styled-components": "^4.3.2"

Now actually install these dependencies by opening a terminal and typing:

npm install

Paste this CDN link in the <head> tag inside index.html. It is for Font Awesome icons.

<link rel="stylesheet" href="https://use.fontawesome.com/releases/v5.15.3/css/all.css" integrity="sha384-SZXxX4whJ79/gErwcOYf+zWLeJdY/qpuqC4cAa9rOGUstPomtqpuNWT9wdPEn2fk" crossorigin="anonymous">


MAKING COMPONENT STRUCTURE

React menu bar: Right click on the src folder and create a folder called components.

Right click on the components folder and create a Navbar.js file. Paste the code written below.

import React from "react";

export const NavigationBar = () => (
  <nav class="navbar navbar-expand-lg navbar-light bg-light">
    <div class="container-fluid">
      <a class="navbar-brand" href="#">
        Navbar
      </a>
      <button
        class="navbar-toggler"
        type="button"
        data-bs-toggle="collapse"
        data-bs-target="#navbarSupportedContent"
        aria-controls="navbarSupportedContent"
        aria-expanded="false"
        aria-label="Toggle navigation"
      >
        <span class="navbar-toggler-icon"></span>
      </button>
      <div class="collapse navbar-collapse" id="navbarSupportedContent">
        <ul class="navbar-nav me-auto mb-2 mb-lg-0">
          <li class="nav-item">
            <a class="nav-link active" aria-current="page" href="#">
              Home
            </a>
          </li>
          <li class="nav-item">
            <a class="nav-link" href="#">
              Link
            </a>
          </li>
          <li class="nav-item dropdown">
            <a
              class="nav-link dropdown-toggle"
              href="#"
              id="navbarDropdown"
              role="button"
              data-bs-toggle="dropdown"
              aria-expanded="false"
            >
              Dropdown
            </a>
          </li>
          <li class="nav-item">
            <a
              class="nav-link disabled"
              href="#"
              tabindex="-1"
              aria-disabled="true"
            >
              Disabled
            </a>
          </li>
        </ul>
        <form class="d-flex">
          <input
            class="form-control me-2"
            type="search"
            placeholder="Search"
            aria-label="Search"
          />
          <button class="btn btn-outline-success" type="submit">
            Search
          </button>
        </form>
      </div>
    </div>
  </nav>
);

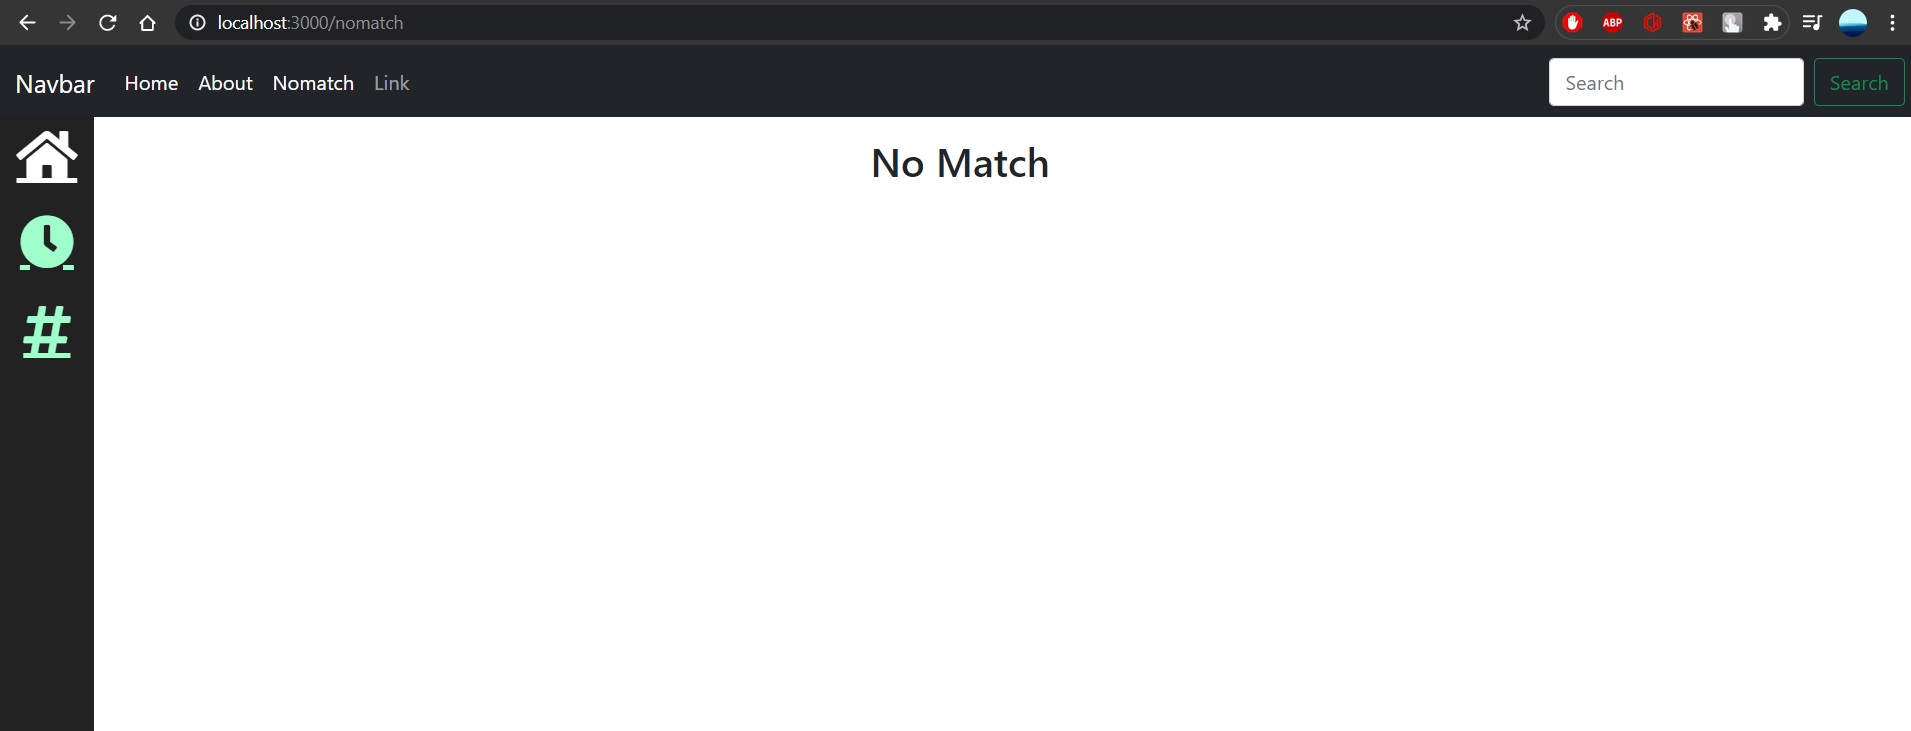
Now the header will look similar to the picture mentioned below.

Routing is how you get from page to page, so paste the code below inside <Router>. It basically says, if on this path, render this particular component:

<Switch>
  <Route exact path="/" component={Home} />
  <Route path="/about" component={About} />
  <Route component={NoMatch} />
</Switch>

This currently breaks the app because we do not have these components. So, let’s add these pages to make sure navigation will work.

Inside of src/components/Pages, create Home.js and paste this inside:

import React from "react";
import styled from "styled-components";
const GridWrapper = styled.div`
  display: grid;
  grid-gap: 10px;
  margin-top: 1em;
  margin-left: 6em;
  margin-right: 6em;
  grid-template-columns: repeat(12, 1fr);
  grid-auto-rows: minmax(25px, auto);
`;
export const Home = (props) => (
  <GridWrapper>
    <p>This is a paragraph and I am writing on the home page</p>
    <p>This is another paragraph, hi hey hello whatsup yo</p>
  </GridWrapper>
);

Inside of src/components/Pages, create About.js and paste this inside:

import React from "react";
import styled from "styled-components";
const GridWrapper = styled.div`
  display: grid;
  grid-gap: 10px;
  margin-top: 1em;
  margin-left: 6em;
  margin-right: 6em;
  grid-template-columns: repeat(12, 1fr);
  grid-auto-rows: minmax(25px, auto);
`;
export const About = () => (
  <GridWrapper>
    <h2>About Page</h2>
    <p>
      State at ceiling lay on arms while you're using the keyboard so this human
      feeds me.
    </p>
    <p>I am a kitty cat, sup, feed me, no cares in the world</p>
    <p>Meow meow, I tell my human purr for no reason but to chase after</p>
  </GridWrapper>
);

Inside of src/components/Pages, create Nomatch.js and paste this inside:

import React from 'react';
import styled from 'styled-components';
const Wrapper = styled.div`
  margin-top: 1em;
  margin-left: 6em;
  margin-right: 6em;
`;
export const NoMatch = () => (
  <Wrapper>
    <h2>No Match</h2>
  </Wrapper>
)

Do not forget to include the components in App.js file.

import { Home } from "./components/Pages/Home";
import { About } from "./components/Pages/About";
import { Nomatch } from "./components/Pages/Nomatch";

Alright, we can actually create the sidebar now.

Inside of components, create Sidebar.js

We know that we want to create a Sidebar component and export it for use inside of App.js. Put this inside Sidebar.js:

import React, { Component } from 'react'

export class Sidebar extends Component {
    render() {
        return (
            <div>
                
            </div>  
        )
    }
}

export default Sidebar

This basically is a class component, which renders a given code.

Then paste the code given below inside the return statement.

<SideNav></SideNav>

Now creating all the components required in separate files namely,  SideNav.js and NavItem.js.

NavItem.js

class NavItem extends React.Component {
  render() {
    return (
    );
  }
}

Inside of render, but above return, type:

const { active } = this.props;

This gets the active variable out of NavItem’s props. Now import the following

import { BrowserRouter as Router, Route, Link } from "react-router-dom";

Inside NavItem’s return, add this:

<StyledNavItem active={active}>
  <Link to={this.props.path} className={this.props.css} onClick={this.handleClick}>
    <NavIcon></NavIcon>
  </Link>
</StyledNavItem>

If you look at the props on <Link>, to is the path to go to, className passes in the CSS for the Font Awesome icon, and onClick will call the handleClick() method. Let’s create that method. Put it above render:

handleClick = () => {
  const { path, onItemClick } = this.props;
  onItemClick(path);
}

This arrow function gets path and onItemClick from NavItem’s props and then calls onItemClick().

Create StyledNavItem. The <Link> tag uses an anchor, so, the anchor selector is used. The only confusing part about the CSS is the part that uses props. It says: using the active prop, decide which of the colors to choose. So, if the home page is active, make the home page icon white:

const StyledNavItem = styled.div`
  height: 70px;
  width: 75px; /* width must be same size as NavBar to center */
  text-align: center; /* Aligns <a> inside of NavIcon div */
  margin-bottom: 0;   /* Puts space between NavItems */
  a {
    font-size: 2.7em;
    color: ${(props) => props.active ? "white" : "#9FFFCB"};
    :hover {
      opacity: 0.7;
      text-decoration: none; /* Gets rid of underlining of icons */
    }  
  }
`;


SideNav.js

Styled components used for styling the sidenav component.

const StyledSideNav = styled.div`
  position: fixed; /* Fixed Sidebar (stay in place on scroll and position relative to viewport) */
  height: 100%;
  width: 75px; /* Set the width of the sidebar */
  z-index: 1; /* Stay on top of everything */
  top: 3.4em; /* Stay at the top */
  background-color: #222; /* Black */
  overflow-x: hidden; /* Disable horizontal scroll */
  padding-top: 10px;
`;

We want SideNav to be a stateful component. This is because it needs to store what the current path is and based on that decide which icon should be selected and colored white.

Create a constructor. In there, create a state that holds the activePath, which we will set to the home path for now, and items that holds the information for our selectable icons

constructor(props) {
  super(props);
  this.state = {
    activePath: '/',
    items: [
      {
        path: '/', 
        name: 'Home',
        css: 'fa fa-fw fa-home',
        key: 1 
      },
      {
        path: '/about',
        name: 'About',
        css: 'fa fa-fw fa-clock',
        key: 2
      },
      {
        path: '/NoMatch',
        name: 'NoMatch',
        css: 'fas fa-hashtag',
        key: 3
      },
    ]
  }  
}
onItemClick = (path) => {
  this.setState({ activePath: path }); /* Sets activePath which causes rerender which causes CSS to change */
}

All this code says is change the activePath by setting the state. If you do not know, whenever you call setState(), React will rerender your component, which will render the change to show you selected a different icon.

Change your render to look like this:

render() {
  const { items, activePath } = this.state;
  return (
    <StyledSideNav>
      {
        /* items = just array AND map() loops thru that array AND item is param of that loop */
        items.map((item) => {
          /* Return however many NavItems in array to be rendered */
          return (
            <NavItem path={item.path} name={item.name} css={item.css} onItemClick={this.onItemClick} /* Simply passed an entire function to onClick prop */ active={item.path === activePath} key={item.key}/>
          )
        })
      }
    </StyledSideNav>
  );
}

Before return, items and activePath are retrieved from the state. In order to render out all NavItems, we loop through all of the items using map().


NOTE: Remember to import all required imports that are used in the files, specially the custom HTML tags.


React native sqlite – Getting started with SQLite in React-Native | Creating, Using & Integrating the React Native SQLite Database

Getting started with SQLite in React-Native

React native sqlite: React Native apps come with a simple user interface, code reusability, and allows for the production of stable apps. With React-Native being one of the most popular and ideal frameworks for creating cross-platform mobile applications, the vast majority of the developers and engineers depend on the structure of the framework to deliver high-performing local applications.

Because of this, it’s often challenging for developers to choose the right technology stack (including the appropriate database for React Native). In this article, we will be discussing SQLite as a local database for React-Native, and work on how to pre-populate data into the database so as to use it in the application.

React Native SQLite Database

Sqlite react native: The word “lite” in SQLite describes it as being a lightweight library-based database that requires minimal setup. SQLite can be coordinated with a versatile application, allowing us to get to the database in an easy, straightforward manner. It’s also helpful to note that SQLite was designed to provide local storage to mobile apps.

The two main benefits of using SQLite database are:

  1. It’s ACID-compliant (an acronym for atomicityconsistencyisolation, and durability)
  2. Its offline persistence (which means that it works even when the device is offline)

Also Check:

Creating a Database

Sqlite react native: First, we need to create a database and store some data in it. SQLite Online can help in creating an SQLite database.

CREATE TABLE table_name (
 column1 datatype,
 column2 datatype,
 column3 datatype,
 ….
);

For example-

CREATE TABLE Users(
Title varchar(20),
Age number
);

Now we need to insert values to this table structure:

INSERT INTO table_name (column1, column2, column3, ...)
VALUES (value1, value2, value3, ...);

For example:

INSERT INTO Users(Title,Age)
VALUES ("Rohit" , 42);

Now your database is ready and you can download the user.db that you have created. For now, store the file in a temporary location.

How to Use React-native-SQLite-storage?

First, we have to import the library like shown below:

import { openDatabase } from 'react-native-sqlite-storage';

Then, open the database with the help of the below code

var db = openDatabase({ name: 'UserDatabase.db' });

Now, whenever you want to execute some database calls, you can utilize db variable to perform the database

query.db.transaction(function(txn)
{
txn.executeSql(
query, //Query to execute as prepared statement
argsToBePassed[], //Argument to pass for the prepared statement
function(tx, res) {} //Callback function to handle the result
);
});

Integrating the database with react-native

Step 1: After setting up your react native environment install the SQLite package

npm install react-native-sqlite-storage
react-native link

Step 2:

For iOS:

open ./ios/podfile
pod 'react-native-sqlite-storage', :path => '../node_modules/react-native-sqlite-storage'
cd ./ios && pod install

For Android:

Open and modify android/settings.gradle file as follows:

rootProject.name = 'react_native_sqlite_storage_exercise'
...
 include ':react-native-sqlite-storage'
 project(':react-native-sqlite-storage').projectDir = new    
 File(rootProject.projectDir, '../node_modules/react-native-sqlite-          storage/src/android')
...
include ':app'

Modify android/app/build.gradle file as follows:

...   
dependencies {    
implementation fileTree(dir: "libs", include: ["*.jar"])    implementation"com.android.support:appcompatv7:${rootProject.ext.supportLibVersion}"    
implementation "com.facebook.react:react-native:+"  
...    
implementation project(':react-native-sqlite-storage')   \
} 
...

Open and modify MainApplication.java file as below:

...   
import org.pgsqlite.SQLitePluginPackage;   
...   
public class MainApplication extends Application implements ReactApplication { 
...   
...  
@Override
protected List<ReactPackage> getPackages() {
return Arrays.<ReactPackage>asList(
...
new SQLitePluginPackage(),
...
new MainReactPackage()
  );
 }
}

Step 3: Adding the database file to the correct location

For iOS:

Create ios/[project name]/www folder and copy the database on it.

For Android:

Create www folder in the main project directory and copy the database on it.

Step 4: Create a constructor and add these lines of code:

constructor(props) {
    super(props);
    this.state={
      userList:[],
    }
    db = SQLite.openDatabase(
      {
        name: 'user.db',
        createFromLocation : 1,
      },
      this.success.bind(this),  //okCallback
      this.fail                // error callback
    );
    }

The constructor consists of four parts:

  1. The state — which is initially declared as an empty array (this will later be populated with data from the database).
  2. SQLite is imported and openDatabase function is called where the argument it takes is the name of the database and the location of the database.
  3. The success callback function ( which is called if there are no errors).
  4. The error callback function ( which is executed if there is an error).

Step 5:

Now we have to add the success and the fail call back functions:

success=()=>{
      db.transaction(tx => {
        tx.executeSql('SELECT * FROM user', [], (tx, results) => {  // sql query to get all table data and storing it in 'results' variable
          let data = results.rows.length;                          
          let users = [];    //creating empty array to store the rows of the sql table data
  
          for (let i = 0; i < results.rows.length; i++) {
            users.push(results.rows.item(i));                   //looping through each row in the table and storing it as object in the 'users' array
          }
  
           this.setState({ userList:users});         //setting the state(userlist) with users array which has all the table data
        });
      });
      // alert("ok")
    }
  
    fail=(error)=>{ 
      console.error(error) // logging out error if there is one
    }

In the success function, we declare a function db.transaction wherein the first argument we run the SQL query Select * from table_name (this selects all the rows in the SQL database). These rows are stored in a variable called “results”. Now we have to loop through each row of the “results” so that we can store data row by row in the array, thus we use the for loop. Now, after all the rows are pushed to the array, we use setState to update the state value.

In the fail function definition, we console.error the error so that debugging can be easier

Step 6: 

<ScrollView>
        {
           this.state.userList.map(function(item, i){  //map through each element of array(each row of the sql table)
             return(
               <View key={i} style={styles.card}>   //we display the name and age of the user
                <Text>{item.Title}</Text>  
                <Text>{item.age}</Text>   
               </View>
             )
           })
         }    
</ScrollView>

We use Scrollview to make a scrollable view of the list of all items we stored in the database. Now, since the rows are stored as an array of objects in the userList variable, we have to map through each element of the array and print the title and the age of the person.

Run and Test React Native and SQLite Offline Mobile App

In the first step, we have to run the React Native and SQLite app with the help of the below command.

react-native run-android
react-native run-ios

Once the new terminal window opens, simply go to the project folder then run this command.

react-native start

Finally, you will observe the whole application on the Android/iOS Device as shown in below image:

sqlite database run on android device

react native SQLite Offline Android

Conclusion

That’s it! In just six simple steps we have the basic setup of an SQLite database that is rendering its data to the front-end using React-Native. As discussed earlier, React-Native can be an incredibly helpful tool for developers and engineers, but knowing which technology stack is right for the task at hand can be a complicated process.