

How to create your portfolio website using React.js
Things you’ll soak in:
- Creating and implementing custom Components.
- Working with external components.
- Working with Props.
- Working with States.
- Dynamic Rendering.
- React Routing.
- and Using CSS in React JS.
Let’s understand some concepts…
What is a “ Component “ in React JS?
React follows Component architecture, which means every part of a web app or website is a component, all are made separately and finally fitted into a parent component which is then rendered.
A Component is a Javascript File, for example, you want to create a sidebar component then you have to create a “Sidebar.js” file.
A component can be of two types:-
- Sub-Component
A sub-component is a component that resides inside of another component. - Parent Component
A Parent component is a component in which sub-components reside in.
How does a “Component” look like in code?
“ YourComponentName.js ”
import React, { Component } from 'react'
class YourComponentName extends Component {
render() {
return (
<div>
{/* Your Html/JSX code goes here */}
<h1>This is my component</h1>
</div>
)
}
}
export default YourComponentName
All the components have a parent component, it might be either “App.js” or some other component.
import React, { Component } from 'react';
That’s a common line of code you’ll see in almost all the components everywhere. In that, we are importing React and Component class from the ‘react’ module. Which enables us to create custom components.
class YourComponentName extends Component {
This is a class component, replace “YourComponentName” to whatever name you want.
render() {
return (
<div>
<h1>This is my component</h1>
</div>
)
The render() method along with the return() method renders the content into the DOM.
And for now “YourComponentName.js” component will return “This is my component”.
export default YourComponentName
The above line of code is very important, make sure you add it compulsory, “export” keyword defines what are all the methods(functions) that should be accessible to the component importing this component.
Now that the component is built “How to use it”?
Once a component is built, we import it in the parent component or in the “App.js” file according to its functionality.
for now, let’s consider you are importing “YourComponentName.js” in “ParentComponent.js”
import YourComponentName from './YourComponentName.js'
and then the imported component is accessed just like an HTML tag inside the return() method of “ParentComponent.js”.
<YourComponentName> </YourComponentName>
now “ParentComponent.js” will look like this
import React, { Component } from 'react'
import YourComponentName from './YourComponentName.js'
class ParentComponent extends Component {
render() {
return (
<div>
<YourComponentName> </YourComponentName>
</div>
)
}
}
export default ParentComponent
At the time of rendering “<YourComponentName> </YourComponentName>” will be replaced by “<h1> This is my component </h1>” as “YourComponentName.js” is returning that <h1> tag.
If you call the “<YourComponentName> </YourComponentName>” two times then “This is my component ”will be rendered two times, meaning every time a component is called the return() method of that component is called.
What is App.js?
The “App.js” file is like the Parent container of all the components, all the parent components are imported into this “App.js” file. This is the final file that will be rendered into the Browser.
What are Props?
Props are just like parameters that are passed in a function or attributes in HTML tags, but these are user-defined, they carry some inputs to the component.
<!--For example consider a component "ComponentX" imported in some other component "ComponentY.js". "prop1" and "prop2" are the user-defined props. -->
<ComponentX prop1="xyz" prop2="zyx" ></ComponentX>
/* This is how props values are accessed in ComponentX.js. Sent from "ComponentY" */
{this.props.prop1} //returns xyz
{this.props.prop2} //return zyx
Props sent to a component is accessed through the “props” object.
What are States?
Components data will be stored in the component’s State just like a variable. This state can be modified based on user action or other action. when a value of a component’s state is changed React will re-render that component to the browser.
States are defined inside the constructor of the component class.
class YourComponentName extends Component {
constructor(props)
{
super(props);
this.state={
'myname':'Abdul wahid naafi',
'myage':'20'
}
}
render(){
here “ this.state ={} ” is the state variable and we define each state as an object inside of it. ‘myname’ and ‘myage’ are two states with some values.
To access these state values
this.state.myname //returns 'Abdul wahid naafi'
this.state.myage //returns '20'
let’s take our “YourComponetName.js” component and see states in action.
import React, { Component } from 'react'
class YourComponentName extends Component {
constructor(props)
{
super(props);
this.state={
'myname':'Abdul wahid naafi',
'myage':'20'
}
}
render() {
return (
<div>
{/* Your Html/JSX code goes here */}
<h1>This is my component</h1>
<h2>My Name is {this.state.myname}</h2>
<h3>My Age is {this.state.myage}</h3>
</div>
)
}
}
export default YourComponentName
To access javascript variables, methods, states inside return() method, insert the javascript code inside “ {} ” curly brace, it’s called “JSX”.
now the output of “YourComponetName.js” component is
This is my component
My Name is Mainak Das
My Age is 22
To modify the values of the state object
this.setState({'myage':'19'},()=>{ //this is a callback fucntion });
setState method is used to modify state values.
Let’s take our “YourComponetName.js” component to see setState in action.
import React, { Component } from 'react'
class YourComponentName extends Component {
constructor(props)
{
super(props);
this.state={
'myname':'Mainak Das',
'myage':'22'
}
}
changemyage= ()=>
{
this.setState({'myage':'19'},()=>{ alert("Age Modified ") });
}
render() {
return (
<div>
{/* Your Html/JSX code goes here */}
<h1>This is my component</h1>
<h2>My Name is {this.state.myname}</h2>
<h3 onClick={this.changemyage}>My Age is {this.state.myage}</h3>
</div>
)
}
}
export default YourComponentName
A function/method “changemyage()” is created in that the state ‘myage’ is modified from ‘20’ to ‘19’.
To call this method/function an “onClick” listener is added to <h3> tag calling the “changemyage()” method.
Once the “changemyage()” method fires up the state ‘myage’ is modified and on successful modification, an alert message will be shown telling “Age Modified”.
What Single Page Application (SPA) is?
In Wikipedia, it’s simply stated as:
A single-page application (SPA) is a web application or website that interacts with the user by dynamically rewriting the current page rather than loading entire new pages from a server.
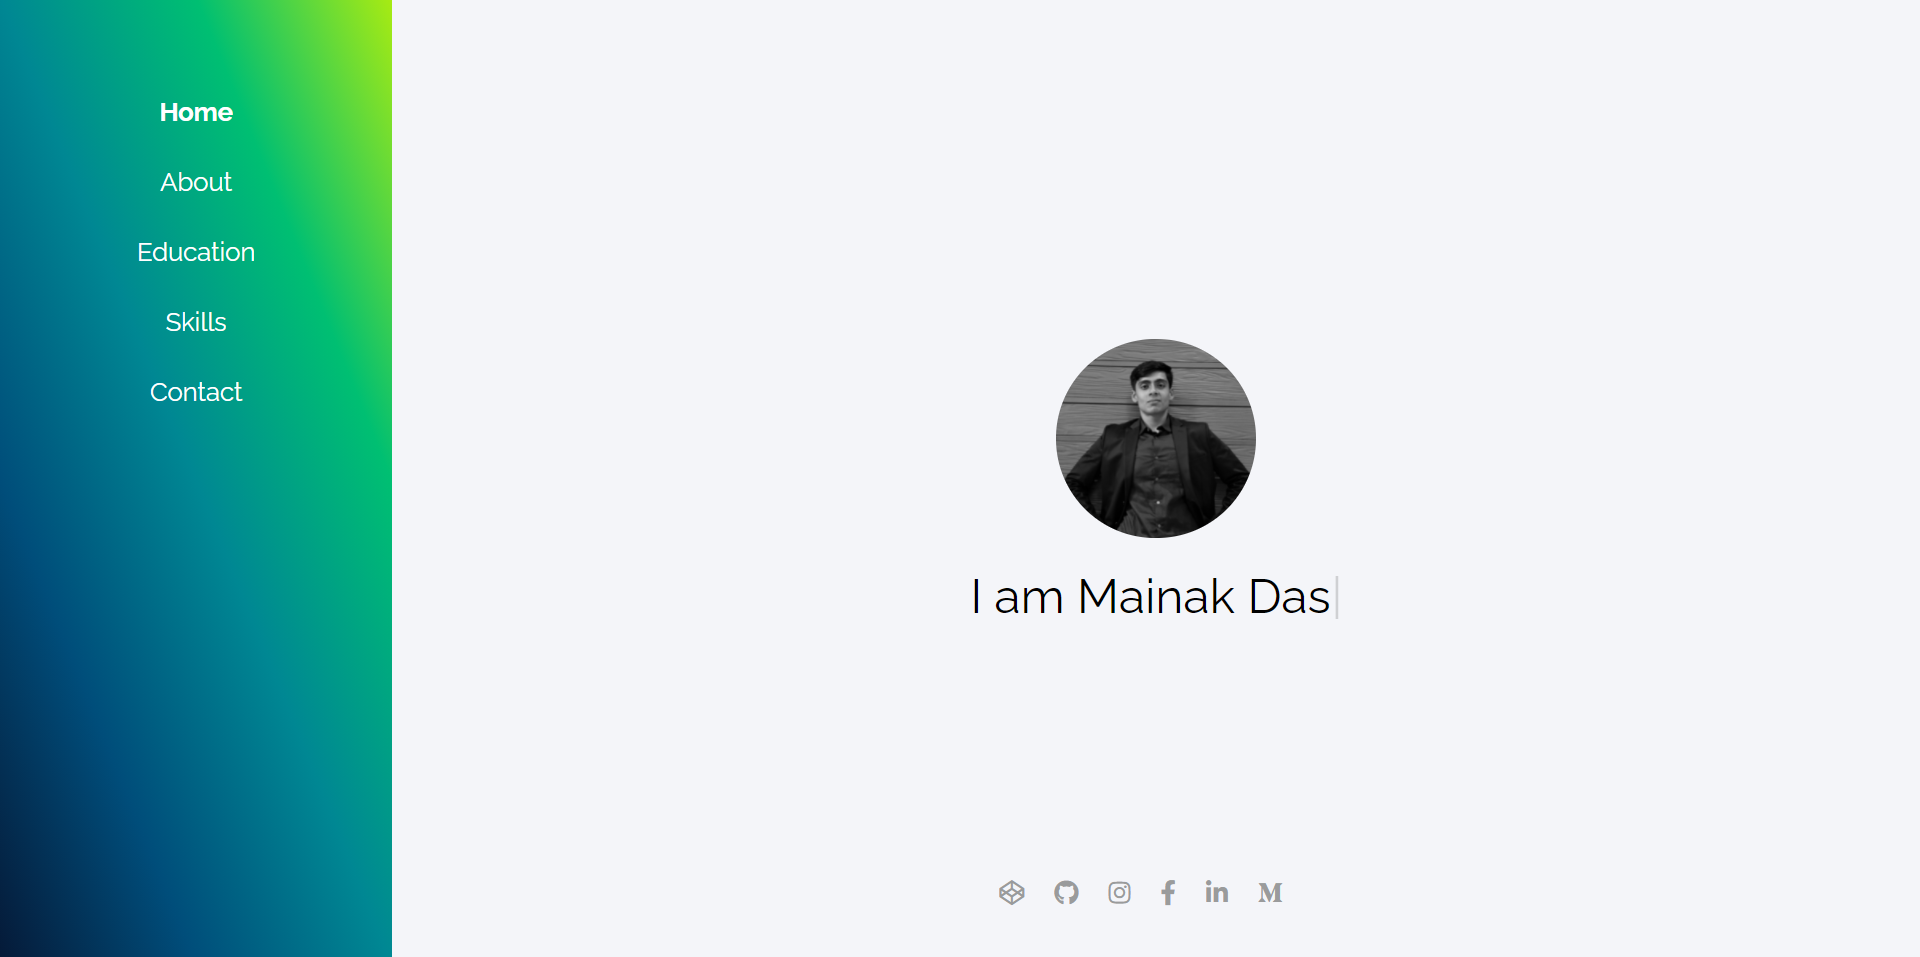
in our project, the right side of the webpage (“contents” as shown in the layout below) will be rewritten every time the user navigates to a new route(Home, About, Education, etc.,).
Now let’s get started with Building the portfolio website using React JS
If “Node JS” is not installed, <ahref=”https://nodejs.org/en/download/” rel=”noopener nofollow”>Download Node JS and install it.
I use Visual Studio Code for most of my React JS project and I highly recommend you to use.
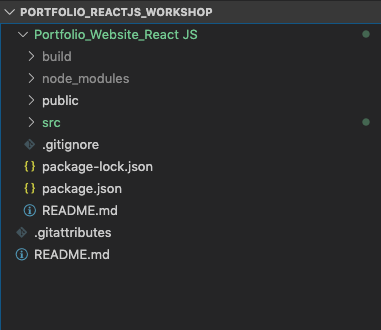
Now, create a new folder, name it whatever you want.
- Open vs code.
- Press ctrl-shift-n (cmd-shift-n) to open a new vs code window.
- in the new window, click the “Open Folder” blue button on the Explorer pane,
- Browse and select the folder you created.
- Go to View → Terminal to open a terminal inside vs code.
After that, create a React JS project using “create-react-app” CLI, now name the project whatever you want for now I’ll name it as “Portfolio_Website_ReactJS”.
$ npx create-react-app Portfolio_Website_ReactJS
after you get the message “Happy Hacking”, move inside the project directory
$ cd Portolio_Website_ReactJS
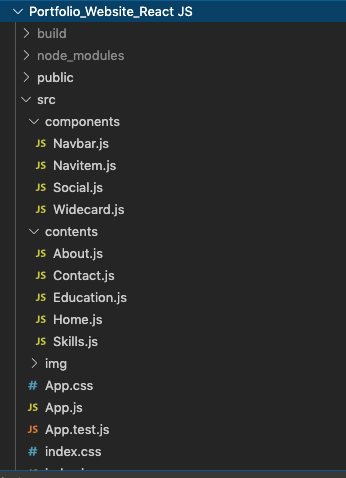
Folder structure for this project!
Inside the “src” folder, create three new folders and name them “components”, “contents”, and “img” respectively.
Inside the “Components” folder
Create the below components as javascript files in the “ components ” folder.
- Navbar.jsThis component is the sidebar and will hold a set of “NavItems” components(Home, About, Education, Skills, Contact). It’s just the pink and blue gradient box.
- NavItem.js This component will be the navigation items (e.g. Home, About, Education,…).
- Social.jsThis component holds the Social media icon with links.
- Widecard.js
This component will hold the Education Details (as shown in the final result GIF above).
Inside the “contents” folder
The contents folder will contain the contents to be rendered on the right side of the page based on the route(Home, About, Education, etc.,).
Create the below-mentioned javascript files in the “contents” folder.
- Home.js
- About.js
- Education.js
- Skills.js
- Contact.js
Now your project directory should look like this:
Now let’s jump into coding
Open App.js and remove all the codes inside the render() method.
Remove all the “imports” except
import React from ‘react’;
import ‘./App.css’;
Now open App.css and remove all the styles(code) and save both the files.
We will be adding all our CSS code to the “App.css” file.
Add these lines of CSS first for this project
@import url('https://fonts.googleapis.com/css?family=Raleway:300,400,500,700&display=swap');
:root{
--sidebar-flex:1.5;
--condiv-flex:6;
--fontsize-p:1.2rem;
--fontsize-nav:1.6rem;
--typing-font:3rem;
}
*
{
margin:0;
padding: 0;
}
body
{
font-family: 'Raleway';
}
.App
{
display: flex;
width: 100vw;
min-height: 100vh;
}
/* .condiv class is for the right side content container*/
.condiv
{
padding: 100px ;
background-color: #f4f5f9;
flex:var(--condiv-flex);
}
Creating the first component the “Navbar”.
Navbar is just the wrapper of the Navitem, its just that pink blue gradient box that will contain the Navitem.
“Navitem” is the sub-component and “Navbar” is the parent component.
Open “Navbar.js”
import React, { Component } from 'react';
import Navitem from './Navitem';
// We'll code Navitem.js later for now let's focus on Navbar.js
// “Navitem” is the sub-component.
class Navbar extends Component {

    render() {
        return (
            <nav>
            <ul>
            <Navitem item="Home" tolink="/" ></Navitem>
            <Navitem item="About" tolink="/about" ></Navitem>
            <Navitem item="Education" tolink="/education"></Navitem>
            <Navitem item="Skills" tolink="/skills"></Navitem>
            <Navitem item="Contact" tolink="/contact"></Navitem>
            </ul>
            </nav>
            )
        }
    }

export default Navbar
Inside the <ul> tag we have
<Navitem item="Home" tolink="/"></Navitem>
<Navitem> component tag with two props (“item” and “tolink”). It just takes the content from here and delivers there in the “Navitem” component.
In here “item” prop holds the Navigation item name (Home, About, Education, etc,.). And “tolink” prop holds the Navigation route (“/”, “/about”, “/education”, etc.,)
Five Navitem components are created and props are set.
Styling the Navbar
Open App.css and copy-paste the below CSS styles and save.
nav
{
padding:60px 30px 0px 30px ;
flex:var(--sidebar-flex);
background: rgb(238,103,143);
background: linear-gradient(180deg, rgba(238,103,143,1) 50%, rgba(132,124,252,1) 80%);
}
Open “Navitem.js”
Go to terminal and type the following
npm install react-router-dom -g --save

“react-router-dom” is a node module used to perform routing operations in React JS.
import { Link } from "react-router-dom";
This will import the “Link” class from the “react-router-dom” module.
It acts just like the “Anchor <a>” tag in HTML.
import React, { Component } from 'react';
import { Link } from "react-router-dom";
class Navitem extends Component {
render() {
return (
<li>
<Link to={this.props.tolink} >
{this.props.item}
</Link>
</li>
)
}
}
export default Navitem
Getting the values of “item” and “tolink” prop and setting to the Link component.
<Link> tag is the component imported above from the “react-router-dom” as I mentioned they act just like Anchor tag in HTML, in there we have an attribute called “href” to define the URL, in here for the Link tag we have “to” attribute, it’s not an attribute it is a prop of Link component.
Time to do some CSS
Open “App.css”, add your styles, and save.
nav ul
{
  font-size:var(--fontsize-nav) ;
  text-align: center;
  list-style-type: none;
  text-decoration: none;
  color: white !important;
}
nav ul li
{
  margin:40px;
Now, let’s do something like whichever “Navitem” is clicked I want that Navitem text to be styled “Bold”.
We’ll be adding a CSS class “.active” to that “Navitem” which is clicked.
/* css for active class */
.active
{
font-weight: bolder;
}
For this, we’ll create a Function that will take the “Navitem’s id” as an input parameter and set that to a state object called “NavItemActive” on the Navbar component, and then the CSS “.active” class will be added to that element whose id is stored in that “NavItemActive” state object.
constructor(props)
{
super(props);
this.state={
'NavItemActive':''
}
}
Now that function to add CSS class (.active) on Navitem.
activeitem=(x)=>
{
if(this.state.NavItemId.length>0)
{
document.getElementById(this.state.NavItemActive).classList.remove('active');
}
this.setState({'NavItemActive':x},()=>{
document.getElementById(this.state.NavItemActive).classList.add('active');
});
};
( “Navitem’s” id ) refers to the DOM element ID of the Navitem(Home or About or Education …)
The “activeitem()” function or method takes an input parameter “x” which is the clicked Navitem’s ID. It will then check if there’s already anything(any element’s ID) stored in the “NavItemActive” state object if TRUE then it’ll remove the CSS “.active” class from that element, else it’ll set the state object to the Navitem’s ID which’s clicked by the user. And then a callback function will run which will add the CSS “.active” class to the Navitem which is clicked.
Here, we have this function/method in the “Navbar.js” component but we have to trigger it when the “Navitem” component is clicked. for that, we’ll be passing the “activeitem()” method as a prop to the “Navitem” component.
Now we have to set the “activeitem()” in the onClick attribute of the <Link> tag in “Navitem.js”
onClick={this.props.activec.bind(this,this.props.item)}
“bind” method is used to bind the current instance(1st parameter) and the input to be sent (2nd parameter).
“Navitem.js” will finally look like this
import React, { Component } from 'react';
import { Link } from "react-router-dom";
class Navitem extends Component {
render() {
return (
<li id={this.props.item}>
<Link to={this.props.tolink} onClick={this.props.activec.bind(this,this.props.item)}>{this.props.item}</Link>
</li>
)
}
}
export default Navitem
And, “Navbar.js” will finally look like this
import React, { Component } from 'react';
import Navitem from './Navitem';
class Navbar extends Component {
constructor(props)
{
super(props);
this.state={
'NavItemActive':''
}
}
activeitem=(x)=>
{
if(this.state.NavItemActive.length>0){
document.getElementById(this.state.NavItemActive).classList.remove('active');
}
this.setState({'NavItemId':x},()=>{
document.getElementById(this.state.NavItemActive).classList.add('active');
});
};
render() {
return (
<nav>
<ul>
<Navitem item="Home" tolink="/"  activec={this.activeitem}></Navitem>
<Navitem item="About" tolink="/about"  activec={this.activeitem}></Navitem>
<Navitem item="Education" tolink="/education"  activec={this.activeitem}></Navitem>
<Navitem item="Skills" tolink="/skills"  activec={this.activeitem}></Navitem>
<Navitem item="Contact" tolink="/contact"  activec={this.activeitem}></Navitem>
</ul>
</nav>
)
}
}
export default Navbar
In the <Navitem> component, added a new prop “activec” which will send the “activeitem()” function/method to Navitem component which will be then called whenever a Navitem is click.
<Navitem item="Home" tolink="/" activec={this.activeitem}></Navitem>
Our Navbar is complete. Congratulations.
Now we have to Add this Navbar(sidebar) component to “App.js”
Open “App.js” add the following code
import React from 'react';
import './App.css';
import
{
BrowserRouter as Router,
Route,
} from "react-router-dom";
import Navbar from './components/Navbar';
function App() {
return (
<Router>
<div className="App">
<Navbar />
</div>
</Router>
)
}
export default App;
In React JS we access the CSS class with the “className” attribute.
import
{
BrowserRouter as Router,
Route,
} from "react-router-dom";
“BrowserRouter” is the parent component that holds all of your <Route> components. The <Route> components tell your app which other components to render (display) based on the route.
And are classes of the “react-router-dom” module.
“as” keyword is used to assign an alias name for the component in this project we’ll call “BrowserRouter” as “Router”.
import Navbar from './components/Navbar';
Here we are importing the “Navbar” component that we created, which is inside the “components” folder.
<Router>
<div className="App">
<Navbar />
</div>
</Router>
here the Div with className “App” is the parent div. As mentioned before a component should return only one node.
And inside that, we are calling the <Navbar /> component. You can call it as <Navbar></Navbar> also.
Now, save and run your application to test
npm start
A browser tab on the address http://localhost:3000/ will be opened, there you can see your React JS application.
Until here you might have understood
- How custom components are made and used.
- How CSS is implemented in React JS.
- And how props are sent and received across components.
- And how to define and modify/set State for a component.
Now let’s jump into “contents”
Contents folder will contain the contents to be rendered on the right side of the page based on the route(Home, About, Education, etc.,).
- Home.js
- About.js
- Education.js
- Skills.js
- Contact.js
these are the five content pages we have to create.
Let’s start with “Home.js”
Three things we’ll be focusing on Home.js
- Image element in React JS.
- Using external components in your React JS project.
- How to work with CDN in React JS.
Image element in React JS
Just as in HTML, to place an image you can use <img> tag in React JS.
But
<img src={} ></img>
In the JSX, the image element has a closing tag also.
And for image source, you have to import it first and then use it. As shown below.
import React, { Component } from 'react';
//importing the picture as "profilepic".
import profilepic from '../img/naafi_photo.png';
class XYZ extends Component {
render() {
return (
<img src={profilepic} className="profilepic"></img>
)
}
}
export default XYZ
Using external components in your React JS project
For this project we gonna use an external React JS component called“React-typing-effect“
To install it in your project, in the terminal make sure you are in the project directory, and then run the below-mentioned command.
npm install react-typing-effect --save
once it’s installed, Import it wherever you want and use it as mentioned below.
import React, { Component } from 'react';
import ReactTypingEffect from 'react-typing-effect';
class XYZ extends Component {
render() {
return (
<ReactTypingEffect className="typingeffect" text={['I am Abdul Wahid Naafi','I am a web developer']} speed={100} eraseDelay={700}/>
)
}
}
export default XYZ
How to work with CDN in React JS
Usually in plain HTML, we paste the CDN links in the <head> tag.
Just like that, copy your CDN.
Goto your_project_directory/public/index.html
Paste the CDN there inside the <head> tag.
And use it just how you use it normally.
Now, as you learned all these concepts, check out the code for “Home.js” below you’ll understand it easily.
import React, { Component } from 'react';
import ReactTypingEffect from 'react-typing-effect';
import profilepic from '../img/naafi_photo.png';
class Home extends Component {
render() {
return (
<div className="condiv home">
<img src={profilepic} className="profilepic"></img>
<ReactTypingEffect className="typingeffect" text={['I am Abdul Wahid Naafi','I am a web developer']} speed={100} eraseDelay={700}/>
</div>
)
}
}
export default Home
we got one more thing to add, the “SOCIAL” component.
Social.js
import React, { Component } from 'react';
class Social extends Component {
render() {
return (
<div class="social">
<a href="https://codepen.io/naafi" target="_blank"><i class="fab fa-codepen"></i></a>
<a href="https://github.com/naaficodes" target="_blank"><i class="fab fa-github"></i></a>
<a href="https://Instagram.com/iam_naafi" target="_blank"><i class="fab fa-instagram"></i></a>
<a href="https://www.facebook.com/abdul.w.naafi" target="_blank"><i class="fab fa-facebook-f"></i></a>
<a href="https://Linkedin.com/in/naafi" target="_blank"><i class="fab fa-linkedin-in"></i></a>
<a href="https://medium.com/@iam_naafi" target="_blank"><i class="fab fa-medium-m"></i></a>
</div>
)
}
}
export default Social
Just another simple component returning the HTML for social media links.
CSS code for “.social” class. Add the below code to “App.css”
.social
{
position: absolute;
margin-top: 20px;
display: flex;
bottom: 60px;
}
.social i
{
padding-right: 30px;
font-size: 25px;
color: #9a9b9c;
}
.social i:hover
{
color: #ffffff;
}

let’s add this component to “Home.js” and complete the Home.js content.
Home.js
import React, { Component } from 'react';
import ReactTypingEffect from 'react-typing-effect';
import profilepic from '../img/naafi_photo.png';
import Social from '../components/Social'
class Home extends Component {
render() {
return (
<div className="condiv home">
<img src={profilepic} className="profilepic"></img>
<ReactTypingEffect className="typingeffect" text={['I am Abdul Wahid Naafi','I am a web developer']} speed={100} eraseDelay={700}/>
<Social />
</div>
)
}
}
export default Home
Time to route !!
Open “App.js”, modify the already existing route we made before.
<Router>
<div className="App">
<Navbar />
<Route exact path="/">
<Home />
</Route>
</div>
</Router>
We already learned what <Router> or <BrowserRouter> is.
<Route> is the subtag of <Router> or <BrowserRouter>, with <Route> we decide what content has to be rendered based on the path/URL.
<Route exact path="/">
“exact” attribute is used when we have multiple identical paths.
And “exact” is used almost every time for path=”/”.
“Home.js” section is done !!
Our second content “About.js”
From here onwards all the processes will be smooth and quick, as you’ve learned pretty much needed to build this project.

this content page is pretty simple we are just returning a bunch of HTML.
About.js
import React, { Component } from "react";

class About extends Component {
  render() {
    return (
      <div className="condiv">
        <h1 className="subtopic">About Me</h1>
        <h4>Hey there,</h4>
        <h1>I'm Mainak Das</h1>
        <h3>
          Full Stack Web <u>Developer</u> | UI/UX <u>Designer</u>
        </h3>
        <br></br>
        <p>
          I started my journey in the world of computers from an young age, now
          I’m 22 years old, Pursuing my Computer Science Engineering Degree in
          Adamas University Barasat Kolkata. Web development is my center of
          interest, i always love the idea of cross-platform development, 1-n
          one code base deploy into almost any platform, which web technology
          like Javascript enables me to do. I also like creating Interactive UI
          components for better UX and share those desgin and codes to the world
          through Github and Instagram.
        </p>
      </div>
    );
  }
}

export default About;
There’s just contents to be rendered nothing else.
CSS code for the “About” section. Add the below code to “App.css”
.subtopic
{
margin:10px 10px 30px 10px !important;
}
p
{
font-size: var(--fontsize-p);
}
h1,h2,h3,h4,p
{
margin: 10px;
}
Time to route !!
Open “App.js”, modify the already existing route we made before.
<Router>
<div className="App">
<Navbar />
{/* Route for Home.js contents */}
<Route exact path="/">
<Home />
</Route>
{/* Route for About.js contents */}
<Route path="/about">
<About />
</Route>
</div>
</Router>
“About.js” section is done !!
Our third content “Education.js”
For this page(Education.js), we’ll be creating a component to display education details. let’s call that component “Widecard” and we will have four props in that “title” “where” “from” and “to” respectively.
Widecard.js
import React, { Component } from 'react'
class Widecard extends Component {
render() {
return (
<div class="widecard">
<div class="compdet">
<h3>{this.props.title}</h3>
<h4 class="secondtext">{this.props.where}</h4>
<h4 class="secondtext">{this.props.from} - {this.props.to}</h4>
</div>
</div>
)
}
}
export default Widecard
In that component, we have an <h3> element to display the value of “title” prop, <h4> element to display the value of “where” prop, another <h4> element to display the value of “from” and “to” props.
CSS for Widecard
.widecard
{
border:0px solid #9a9b9c;
display: flex;
margin:30px 0px 30px 0px;
}
.widecard:hover
{
color: #1b1d20;
background-color: #ffffff;
box-shadow: 0 10px 20px rgba(0,0,0,0.19), 0 6px 6px rgba(0,0,0,0.23);
}
Let’s import this component into “Education.js”
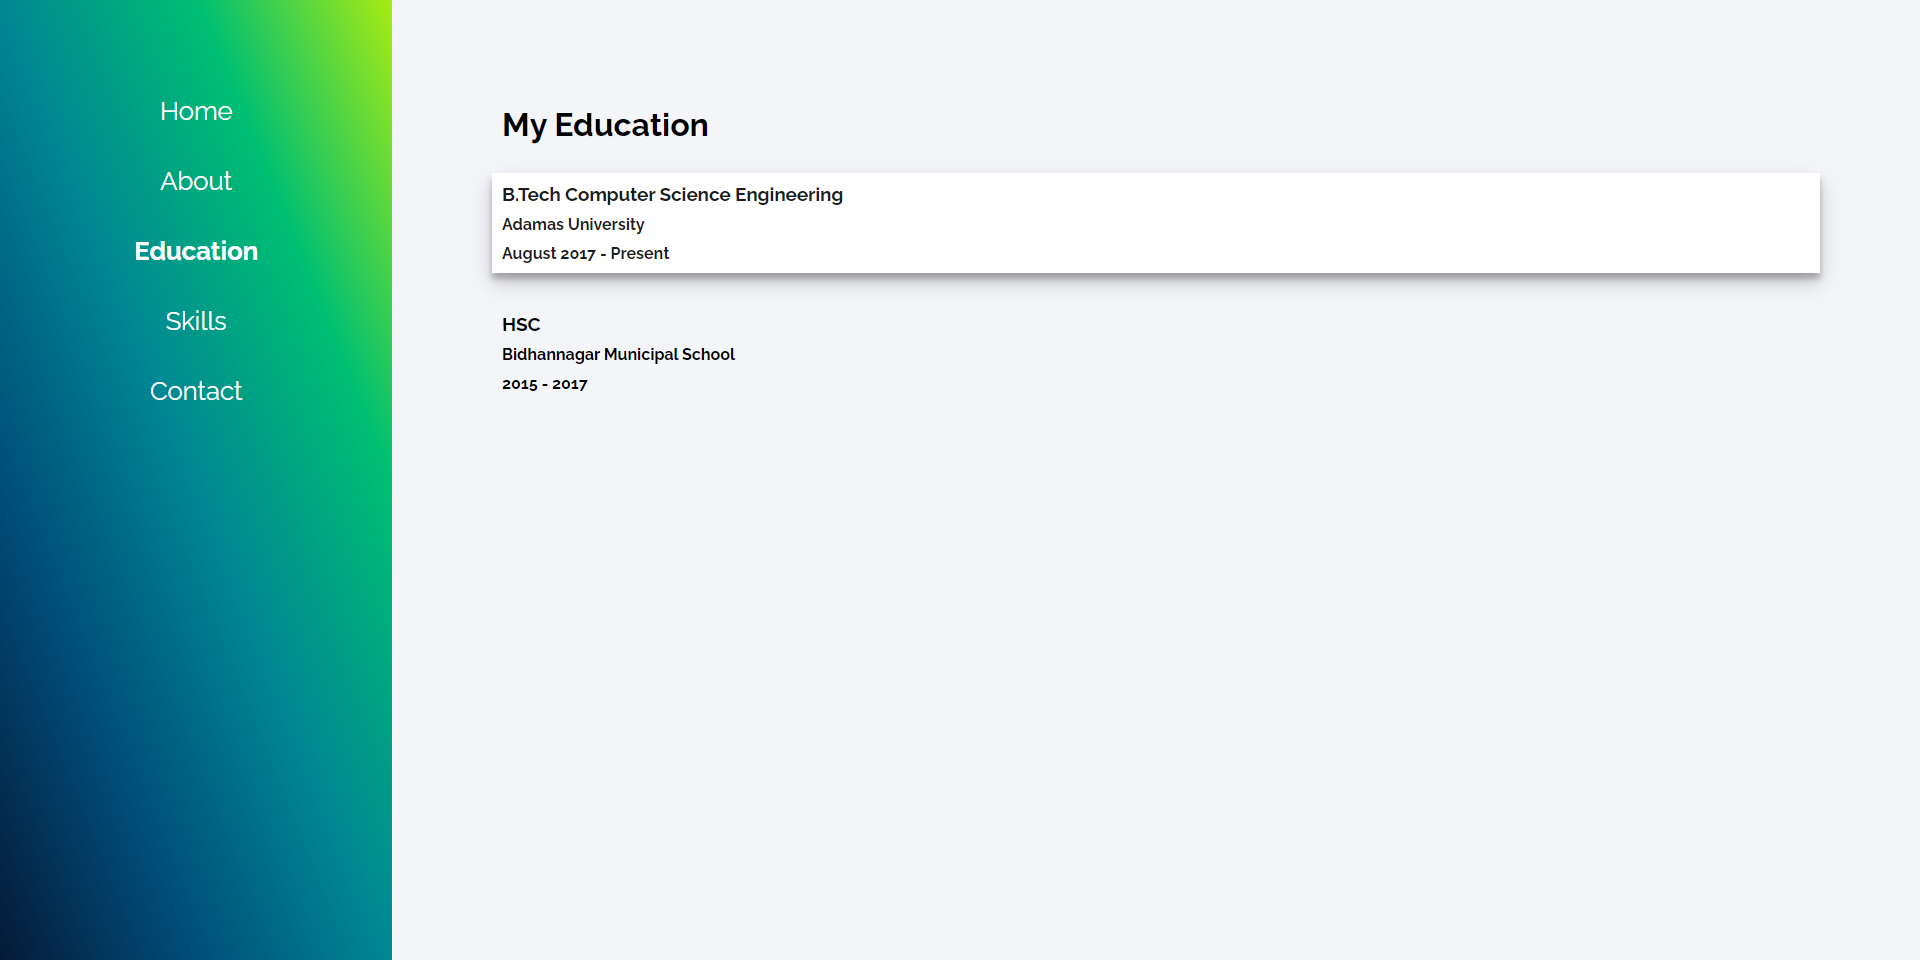
Education.js
import React, { Component } from "react";
import Widecard from "../components/Widecard";

class Education extends Component {
  render() {
    return (
      <div className="condiv">
        <h1 className="subtopic">My Education</h1>
        <Widecard
          title="B.Tech Computer Science Engineering"
          where="Adamas University"
          from="August 2017"
          to="Present"
        />
        <Widecard
          title="HSC"
          where="Bidhannagar Municipal School"
          from="2015"
          to="2017"
        />
      </div>
    );
  }
}

export default Education;
It’s simple right, on line 2 imported our “Widecard” component.
<Widecard title="B.Tech Computer Science Engineering" where="Adamas University" from="August 2017" to="Present"/>
Look how clean it looks, this is the benefit of custom components.
Let’s set the Routes
Open “App.js”
first, import the “Education.js” into “App.js”.
import Education from './contents/Education';
Now the Routes.
<Router>
<div className="App">
<Navbar />
{/* Route for Home.js contents */}
<Route exact path="/">
<Home />
</Route>
{/* Route for About.js contents */}
<Route path="/about">
<About />
</Route>
{/* Route for Education.js contents */}
<Route path="/education">
<Education />
</Route>
</div>
</Router>
OK, now the “Education” content is also done.
Our fourth content “Skills.js”
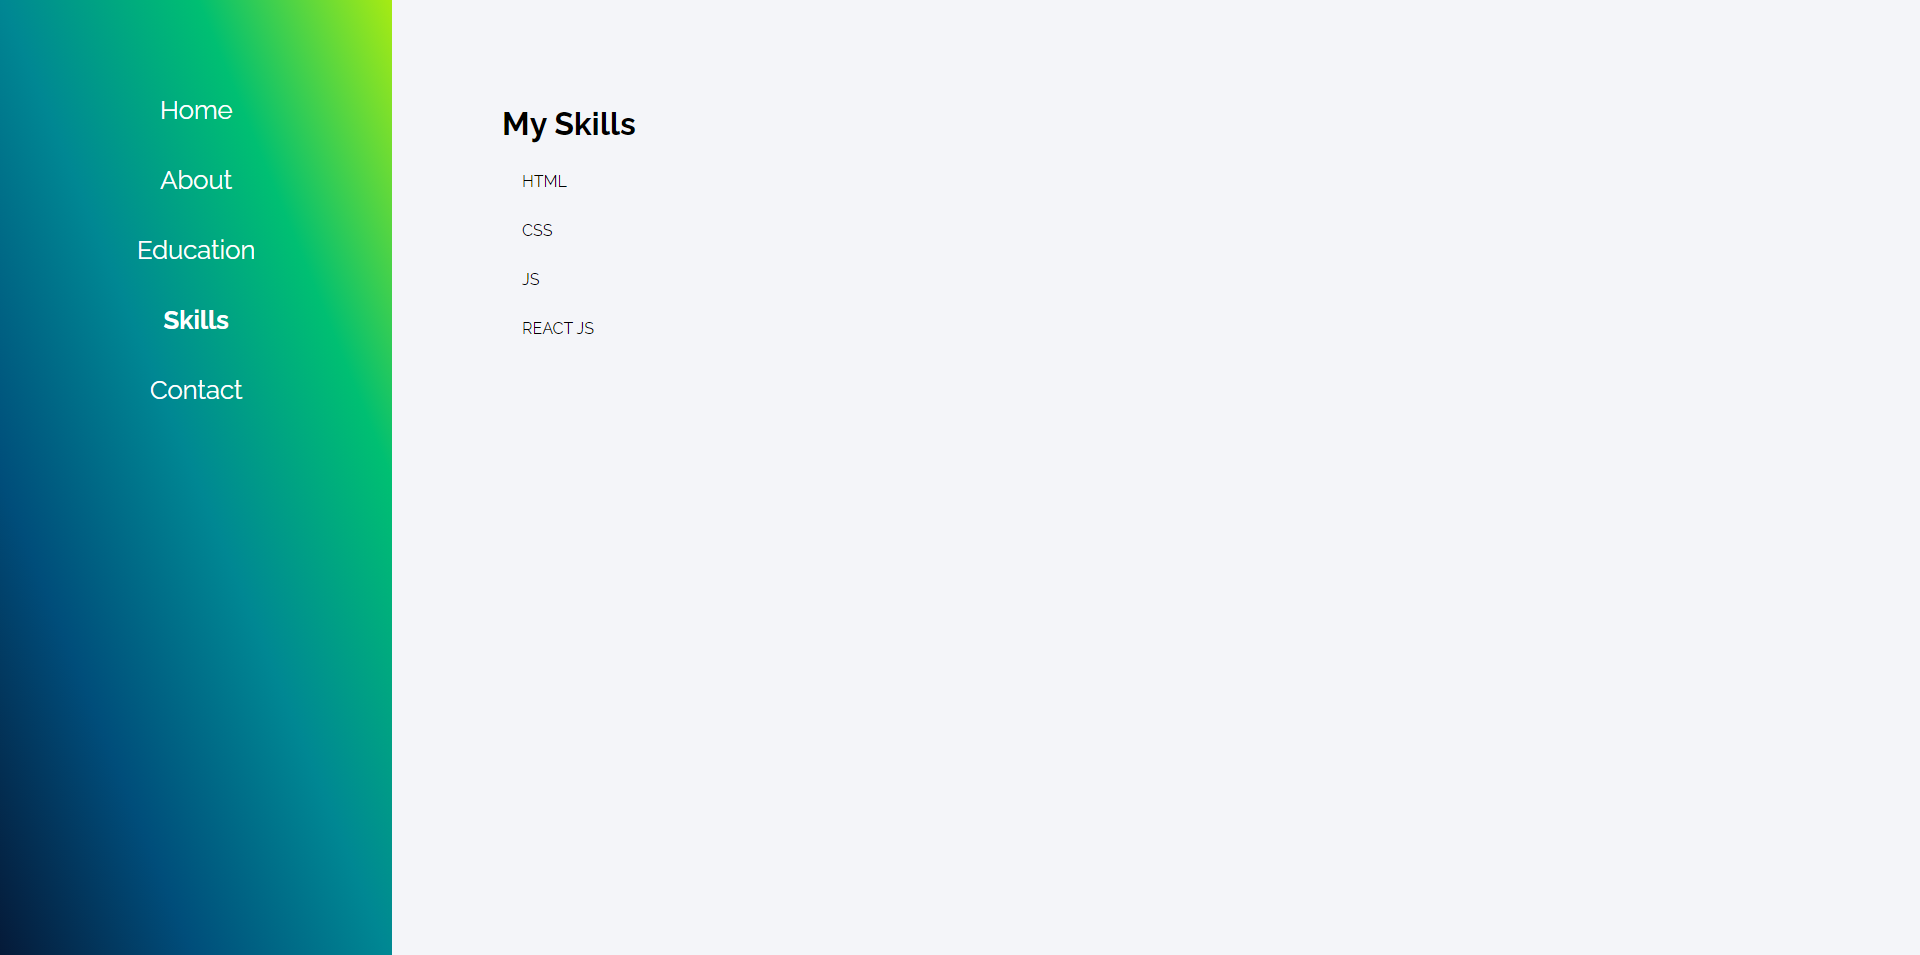
In this, we’ll learn how to work with Dynamic rendering.
What is Dynamic rendering?
To generate DOM elements dynamically, for example, rendering the items in a javascript array as HTML <li> items.
Open “Skills.js”
So, now we’ll have a javascript array filled with the skillset as a state variable, and it’ll look like this.
constructor(props)
{
super(props);
this.state={
'myskills':['HTML','CSS','JS','PHP','REACT JS','FIREBASE','MIT APP']
};
}
We’ll loop through the array items and render it as <li> items.
<ul>
{this.state.myskills.map((value)=>{
return <li>{value}</li>
})}
</ul>
Instead of using a “for loop” to loop through every item in the array, we use the map() method.
In that function that’ll be called by the map method will return “<li>”.
That’s all, now the complete code of “Skills.js”
import React, { Component } from 'react'
class Skills extends Component {
constructor(props)
{
super(props);
this.state={
'myskills':['HTML','CSS','JS','PHP','REACT JS','FIREBASE','MIT APP']
};
}
render() {
return (
<div className="condiv skills">
<h1 className="subtopic">My Skills</h1>
<ul>
{this.state.myskills.map((value)=>{
return <li>{value}</li>
})}
</ul>
</div>
)
}
}
export default Skills
Let’s set the Routes
Open “App.js”
First, import the “Skills.js” into “App.js”.
import Skills from './contents/Skills';
Now the Routes.
<Router>
<div className="App">
<Navbar />
{/* Route for Home.js contents */}
<Route exact path="/">
<Home />
</Route>
{/* Route for About.js contents */}
<Route path="/about">
<About />
</Route>
{/* Route for Education.js contents */}
<Route path="/education">
<Education />
</Route>
{/* Route for Skills.js contents */}
<Route path="/skills">
<Skills />
</Route>
</div>
</Router>
Yes! now the “Skills” content is also done.
Our Final content “Contact.js”

This “Contact” content page is just a simple page displaying the contact information.
Look!! the “Social” component is imported again!
This is the Advantage of components, make it once use it anytime anywhere.
“Contact.js”
import React, { Component } from 'react';
import Social from '../components/Social';
class Contact extends Component {
render() {
return (
<div className="condiv">
<h1 className="subtopic">Contact Me</h1>
<h3>Email  :   mainakdas104@gmail.com</h3>
<h3>Instagram   :   @mainak_ds</h3>
<Social />
</div>
)
}
}
export default Contact
Imported the “Social.js” component , and used <h1>, <h3> element to fill in the contents. As simple as that.
Let’s set the Routes for the last time !!!
Open “App.js”
First, import the “Contact.js” into “App.js”.
import Contact from './contents/Contact';
Now the Routes.
<Router>
<div className="App">
<Navbar />
{/* Route for Home.js contents */}
<Route exact path="/">
<Home />
</Route>
{/* Route for About.js contents */}
<Route path="/about">
<About />
</Route>
{/* Route for Education.js contents */}
<Route path="/education">
<Education />
</Route>
{/* Route for Skills.js contents */}
<Route path="/skills">
<Skills />
</Route>
{/* Route for Contact.js contents */}
<Route path="/contact">
<Contact />
</Route>
</div>
</Router>
Done!
Now Save the file
Go to terminal
Move to your project directory ( $ cd Resume_Website_ReactJS )
npm start
You’ll be served a new browser tab with your React JS Portfolio Website.