How to comment in HTML, CSS and JavaScript

Programming languages (or any markdown languages) offer an option of leaving notes for yourself or others. The comment feature simplifies the production of more readable code. Code or other text that is commented out is ignored by the browser.

Comments in HTML, CSS, JavaScript

Write comments in HTML

  • The <!– –> is a HTML comment tag.
  • To comment out in HTML, insert information between <!– and –> tags.
    • The browser won’t show these comments/ notes.

Single-line HTML comments

To add a single line comment, write the information between <!– –>  tags.

Example

<!-- Comment line-->
<p>single-line comment</p>

Multi-line HTML comments

In a few cases you need to add many information inside the comment tags which will require more lines to deal with, there you’ll need multi-line comments.

Example

<!--
multi
comment line
-->
<p>multi-line comment</p>

Write comments in CSS

  • The /* */ is a comment tag in CSS.

Single-line CSS comments

To add a single line CSS comment put the information between the /* and */ tag.

Example:

h1{
font-size: 2rem /* 1rem =5px */
}

Multi-line CSS comments

To write a multi-line CSS comment or to add more information, write those lines in between the /* and */ tags.

Example

/* 
This font
size will
be used 
*/

h1{ 
font-size: 2rem 
}

Write comments in JavaScript

  • Comments can also be used to prevent some code lines from being executed. This is useful when testing.

Comment out

In javascript comment out means block a single line of code as it will not be executed by the app/browser. This can help you debugging the code without erasing part of your codes.

Example

//document.getElementById('root')

Single-line comments

It is used to write some very specific information or block a line of code for debugging purposes.

Example

//This is a single-line comment
document.getElementById('root')

Multi-line comments

The multi-line comment has the same purpose as the single-line comment. It is used to give much more detailed information about the code. To use a multi-line comment you have to write the information in between the /* and */ tag.

Example

/*
function fun
returns a string value
*/

const fun = () =>{
    return 'string'
}

Conclusion

Comments are really helpful during debugging the code in a testing environment as they will disable some lines of code without actually removing them. But make sure to remove every possible comment line during deployment in the production field.

How to Setup Tailwind with PurgeCSS and PostCSS? | Tailwind Installation and Usage

How to Setup Tailwind with PurgeCSS and PostCSS

In this tutorial, we will learn how to use Tailwind with any kind of project. Know how to set up Tailwind with PurgeCSS and PostCSS, how to create a Tailwind File, what do PurgeCSS and PostCSS mean. This tutorial makes you familiar with the concept of How to Remove Unused CSS using the PurgeCSS.

Tailwind Installation

We have to install tailwind via npm or yarn:

npm init -y (if its a barebone project, -y stands for yes)
npm install tailwindcss

Create the Configuration File

We have to create a configuration for a tailwind to use:

npx tailwind init

This will create a file named tailwind.config.js in the root location of our project folder.

PostCSS Config Tailwind

Tailwind needs PostCSS (PostCSS is a software development tool that uses JavaScript-based plugins to automate routine CSS operations) and autoprefixer (Autoprefixer will use the data based on current browser popularity and property support to apply prefixes for you) to work. So we need to apply that in the postcss.config.js file:

module.exports = {
  plugins: [
    require('tailwindcss'),
    require('autoprefixer')
  ]
}

Note: If the postcss.config.js doesn’t exist, we have to create one.

We need to install PostCSS and autoprefixer from npm too:

npm install autoprefixer
npm install -g postcss-cli (-g stands for global)

How to Create the Tailwind CSS File?

Now, we will create a CSS file (style.css) and add these lines at the top:

@tailwind base;
@tailwind components;
@tailwind utilities;

Create the build command

We need to specify a build command that will help us to generate the actual CSS file after compiling with PostCSS and autoprefixer. For that, we need to add the command to the package.json file at scripts like:

"scripts": {
  "build:css": "postcss src/tailwind.css -o static/dist/tailwind.css"
}

Build Tailwind

For building the final CSS file we need to run the command npm run build in the root of the project folder.

The resulting file is in static/dist/tailwind.css

Automatically regenerate the CSS upon file changes

There is a great npm package that will compile our CSS in real-time without running the build command every time after edits. For that we need to install the watch using the command:

npm install watch

Then we need to edit the package.json file at scripts like:

"scripts": {
  "build:css": "postcss src/tailwind.css -o static/dist/tailwind.css",
  "watch": "watch 'npm run build:css' ./layouts"
}

Now for running we simply need to execute the command npm run watch and it’s all good.

Trim the File Size

If we check the final CSS file i.e after building, we can see that it’s huge in size. That large file is never appropriate for web pages. For that, we can actually trim the file to make it smaller than the original.

We need to install two more npm packages:

npm install cssnano
npm install @fullhuman/postcss-purgecss

What is PurgeCSS?

PurgeCSS is a development tool used for removing the unused CSS in a Project. It is the default library to control the Tailwind CSS Bundle Sizes. It removes unused styles and optimizes CSS Build Sizes.

How to Remove Unused Classes from Tailwind with PurgeCSS?

To remove unused CSS we use the following code. Then we add this to our PostCSS configuration file postcss.config.js:

const purgecss = require('@fullhuman/postcss-purgecss')
const cssnano = require('cssnano')

module.exports = {
  plugins: [
    require('tailwindcss'),
    require('autoprefixer'),
    cssnano({
      preset: 'default'
    }),
    purgecss({
      content: ['./layouts/**/*.html', './src/**/*.vue', './src/**/*.jsx'],
      defaultExtractor: content => content.match(/[\w-/:]+(?<!:)/g) || []
    })
  ]
}

In development, avoid too much processing

In development, we can use this just to add prefixes and remove comments. We need to edit the postcss.config.js like:

const purgecss = require('@fullhuman/postcss-purgecss')
const cssnano = require('cssnano')

module.exports = {
  plugins: [
    require('tailwindcss'),
    process.env.NODE_ENV === 'production' ? require('autoprefixer') : null,
    process.env.NODE_ENV === 'production'
      ? cssnano({ preset: 'default' })
      : null,
    purgecss({
      content: ['./layouts/**/*.html', './src/**/*.vue', './src/**/*.jsx'],
      defaultExtractor: content => content.match(/[\w-/:]+(?<!:)/g) || []
    })
  ]
}


The JavaScript Event Loop | What is an Event loop in JavaScript? | How it works with Example

The JavaScript Event Loop

Event Loop in JavaScript

The Event Loop is one of the most important aspects to understand about JavaScript.

This post aims to explain the inner details of how JavaScript works with a single thread, and how it handles asynchronous functions.

Your JavaScript code runs single-threaded. There is just one thing happening at a time.

This is a limitation that’s actually very helpful, as it simplifies a lot how you program without worrying about concurrency issues.

You just need to pay attention to how you write your code and avoid anything that could block the thread, like synchronous network calls or infinite loops.

Do Check: 

In general, in most browsers there is an event loop for every browser tab, to make every process isolated and avoid a web page with infinite loops or heavy processing to block your entire browser.

The environment manages multiple concurrent event loops, to handle API calls for example. Web Workers run in their own event loop as well.

You mainly need to be concerned that your code will run on a single event loop, and write code with this thing in mind to avoid blocking it.

This tutorial of JavaScript Event Loop Include the following:

Blocking the event loop

Any JavaScript code that takes too long to return back control to the event loop will block the execution of any JavaScript code in the page, even block the UI thread, and the user cannot click around, scroll the page, and so on.

Almost all the I/O primitives in JavaScript are non-blocking. Network requests, Node.js filesystem operations, and so on. Blocking is the exception, which is why JavaScript is based so much on callbacks, and more recently on promises and async/await.

The call stack

The call stack is a LIFO queue (Last In, First Out).

The event loop continuously checks the call stack to see if there’s any function that needs to run.

While doing, it adds any function call it finds to the call stack and executes each one in order.

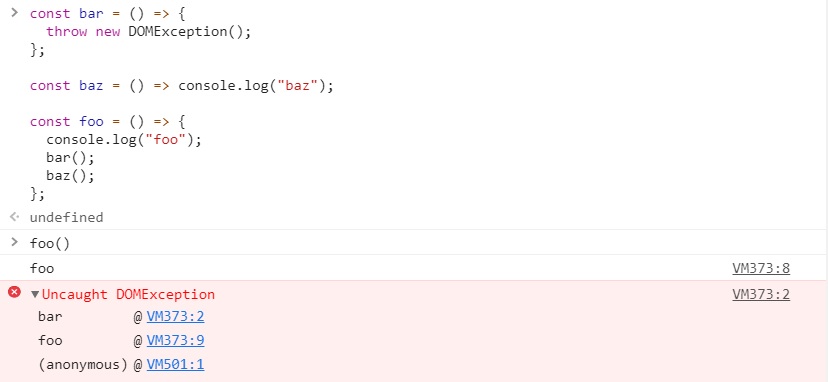
You know the error stack trace you might be familiar with, in the debugger or in the browser console? The browser looks up the function names in the call stack to inform you which function originates the current call:

A simple event loop explanation

An example to explain it through,

Consider the previous code, but this time not throwing any DOMexception.

const bar = () => {
  console.log("bar")
};

const baz = () => console.log("baz")

const foo = () => {
  console.log("foo")
  bar()
  baz()
};
foo()

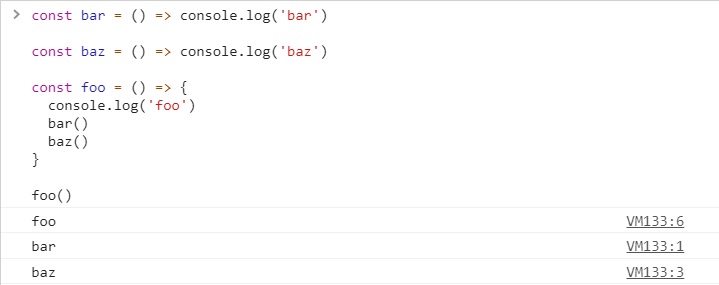
The Output would be:

foo
bar
baz

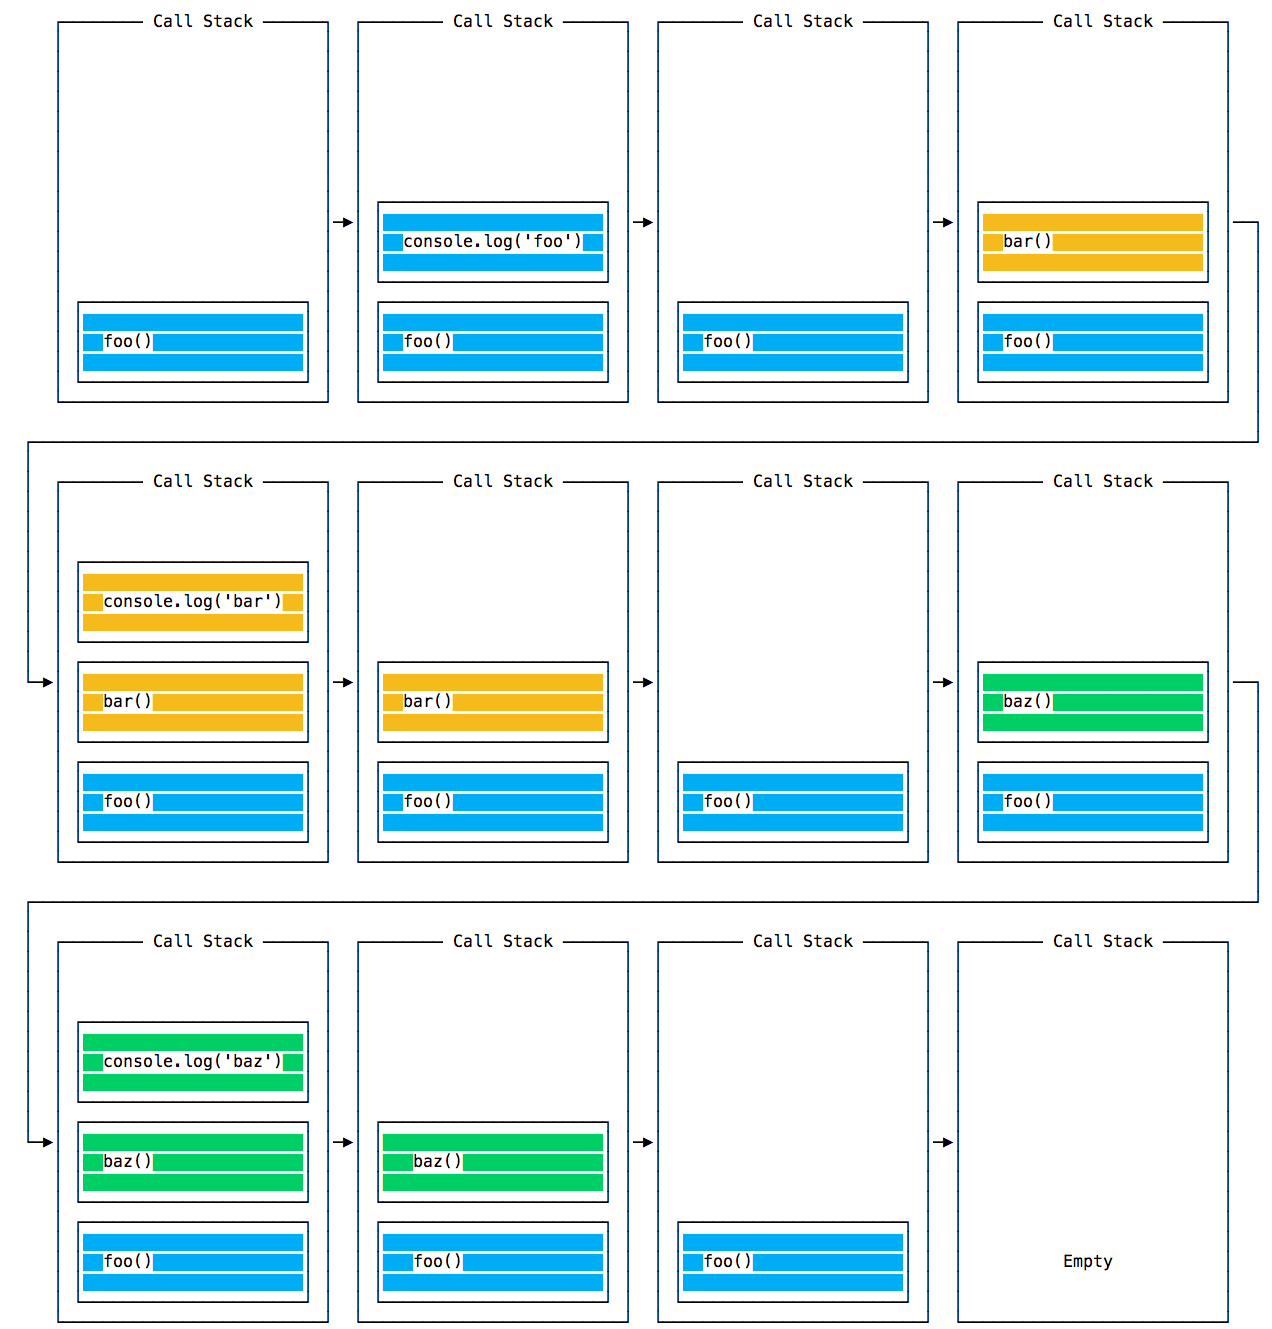
When this code runs, first, foo() is called. Inside foo() we first call, bar() then we call baz().

At this point the call stack looks like this:

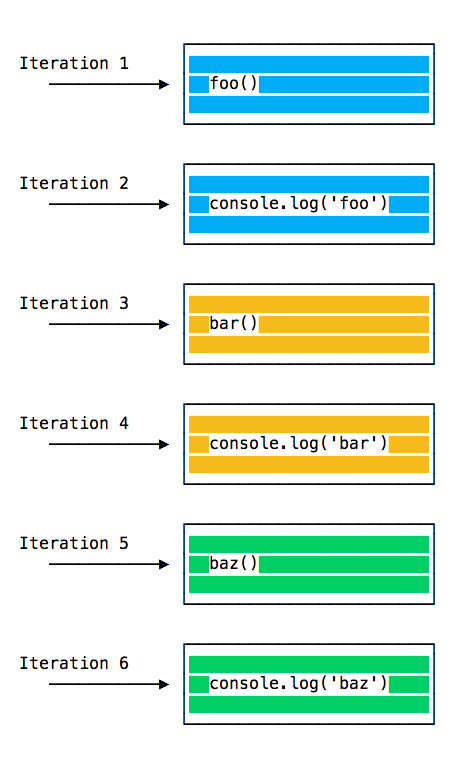
The event loop on every iteration looks if there’s something in the call stack, and executes it until stack is empty.

Queuing function execution

The above example looks normal, there’s nothing special about it: JavaScript finds things to execute, runs them in order.

Let’s see how to defer a function until the stack is clear.

The use case of setTimeout(() => {}), 0) is to call a function, but execute it once every other function in the code has been executed.

Take this example:

const bar = () => console.log('bar')

const baz = () => console.log('baz')

const foo = () => {
  console.log('foo')
  setTimeout(bar, 0)
  baz()
}

foo()

Result:

When setTimeout() is called, the Browser or Node.js start the timer. Once the timer expires, in this case immediately as we put 0 as the timeout, the callback function is put in the Message Queue.

The Message Queue is also where user-initiated events like click or keyboard events, or fetch responses are queued before your code has the opportunity to react to them. Or also DOM Events like onLoad.

The loop gives priority to the call stack, and it first processes everything it finds in the call stack, and once there’s nothing in there, it goes to pick up things in the message queue.

We don’t have to wait for functions likesetTimeout, fetch or other things to do their own work, because they are provided by the browser, and they live on their own threads. For example, if you fix thesetTimeouttimeout to 2 seconds, you don’t have to wait 2 seconds – then wait happens elsewhere.

ES6 Job Queue

ECMA introduced the concept of the Job Queue, which is used by Promises (also introduced in ES6/ES2015). It’s a way to execute the result of an async function as soon as possible, rather than being put at the end of the call stack.

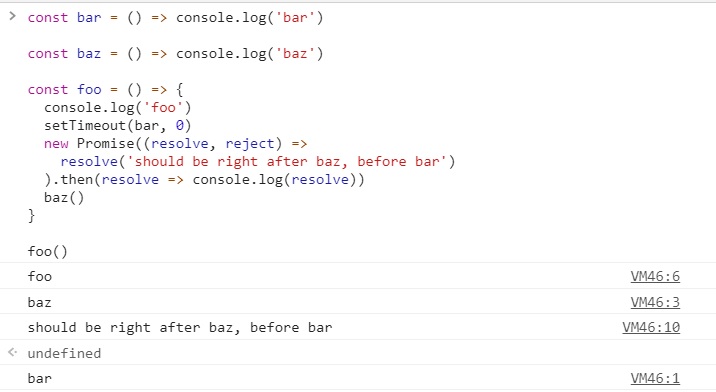
Promises that resolve before the current function ends will be executed right after the current function.

I find nice the analogy of a rollercoaster ride at an amusement park: the message queue puts you at the back of the queue, behind all the other people, where you will have to wait for your turn, while the job queue is the Fastpass ticket that lets you take another ride right after you finished the previous one.

Example:

const bar = () => console.log('bar')

const baz = () => console.log('baz')

const foo = () => {
  console.log('foo')
  setTimeout(bar, 0)
  new Promise((resolve, reject) =>
    resolve('should be right after baz, before bar')
  ).then(resolve => console.log(resolve))
  baz()
}

foo()

Output:

The Object is() method | JavaScript Object is() method Syntax, Description, Parameters & Examples

The Object is() method

Javascript Object is() Method with Example is discussed here elaborately for better understanding to beginners and experienced programmers. Want to gain more knowledge about the javascript object.is() method? Look at the below sections by using the direct links available here.

JavaScript Object is() Method

This method was introduced in ES2015. Mainly, it intends to help to compare values. TheObject.is()method is used to decide whether two values are the same or not. Two values can be the same if they hold one of the following properties:

  • In case both the values are undefined.
  • If both the values are null.
  • In case both the values are true or false.
  • If both the strings are of the same length with the same characters and in the same order.
  • In case both the values are numbers and both are “+0”.
  • If both the values are numbers and both are “-0”.
  • In case both the values are numbers and both are “NaN” or both non-zero and both not NaN and both have the same value.

Syntax of Object is() Javascript Method:

Object.is(value1, value2); 
//Object.is(a, b);

The result is always false unless:

  • a and b are the same exact object
  • a and b are equal strings (strings are equal when composed by the same characters, in the same order)
  • a and b are equal numbers (numbers are equal when their value is equal)
  • a and b are both undefined, both null, both NaN, both true or both false

0 and -0 are different values in JavaScript, so pay attention in this special case (convert all to +0 using the + unary operator before comparing, for example).

Also Check:

Parameters Used

  • value1: The first value to compare.
  • value2: The second value to compare.

Return Value

Javascript Object.is() method takes two arguments which are the values to be compared and declares a boolean indicating whether the two arguments are the same or not.

Browser Support

Chrome 30
Edge Yes
Firefox 22
Opera Yes

Example Using Object.is() Method

// Case 1: Evaluation result is the same as using ===
Object.is(25, 25);                // true
Object.is('foo', 'foo');          // true
Object.is('foo', 'bar');          // false
Object.is(null, null);            // true
Object.is(undefined, undefined);  // true
Object.is(window, window);        // true
Object.is([], []);                // false
var foo = { a: 1 };
var bar = { a: 1 };
Object.is(foo, foo);              // true
Object.is(foo, bar);              // false

// Case 2: Signed zero
Object.is(0, -0);                 // false
Object.is(+0, -0);                // false
Object.is(-0, -0);                // true
Object.is(0n, -0n);               // true

// Case 3: NaN
Object.is(NaN, 0/0);              // true
Object.is(NaN, Number.NaN)        // true

Polyfill

if (!Object.is) {
  Object.defineProperty(Object, "is", {
    value: function (x, y) {
      // SameValue algorithm
      if (x === y) {
        // return true if x and y are not 0, OR
        // if x and y are both 0 of the same sign.
        // This checks for cases 1 and 2 above.
        return x !== 0 || 1 / x === 1 / y;
      } else {
        // return true if both x AND y evaluate to NaN.
        // The only possibility for a variable to not be strictly equal to itself
        // is when that variable evaluates to NaN (example: Number.NaN, 0/0, NaN).
        // This checks for case 3.
        return x !== x && y !== y;
      }
    }
  });
}

How to list all methods of an object in JavaScript | Javascript get methods of Object

How to list all methods of an object in JavaScript

Objects in JavaScript are combinations of key/value pairs. The values can be made up of properties and methods and may include all other JavaScript data types, like strings, numbers, and Booleans. All javascript objects descend from the parent Object constructor.

An Object has many helpful built-in methods we can utilize and access to start working with individual objects straightforward. In this tutorial, you will learn How to list all methods of an object in JavaScript with examples from the below direct links.

JavaScript Object Methods – Example

var person = {
  firstName: "John",
  lastName : "Doe",
  id       : 5566,
  fullName : function() {
    return this.firstName + " " + this.lastName;
  }
};

JavaScript Methods

JavaScript Methods are operations that can be implemented on objects. The definition of a JavaScript method is a property containing a function.

Property Value
firstName John
lastName Doe
age 50
eyeColor blue
fullName function() {return this.firstName + ” ” + this.lastName;}

Do Check:

Accessing Object Methods of JavaScript

Here is the syntax to access the object method:

objectName.methodName()

List all Methods of an Object in JavaScript

We can use theObject.getOwnPropertyNames()function to get all the property names linked to an object.

Then we can filter the resulting array, to only include that property name if it’s a function.

We determine if it’s a function by usingtypeofon it.

For example here is how we might create a utility function to do what we need:

getMethods = (obj) => Object.getOwnPropertyNames(obj).filter(item => typeof obj[item] === 'function')

This lists only the methods defined on that specific object, not any method defined in its prototype chain.

To do that we must take a slightly different route. We must first iterate the prototype chain and list all the properties in an array. Then we check if each single property is a function.

An easy way to make sure we don’t duplicate methods as we navigate the prototype chain (like constructor which is always present), we use a Set data structure that makes sure values are unique:

const getMethods = (obj) => {
  let properties = new Set()
  let currentObj = obj
  do {
    Object.getOwnPropertyNames(currentObj).map(item => properties.add(item))
  } while ((currentObj = Object.getPrototypeOf(currentObj)))
  return [...properties.keys()].filter(item => typeof obj[item] === 'function')
}

Example usage:

getMethods("")
getMethods(new String('test'))
getMethods({})
getMethods(Date.prototype)

Example on Get all methods of any object JavaScript

const returnMethods = (obj = {}) => {
   const members = Object.getOwnPropertyNames(obj);
   const methods = members.filter(el => {
      return typeof obj[el] === 'function';
   })
   return methods;
};
console.log(returnMethods(Array.prototype));

Output:

Here is the output in the console:

[
'constructor', 'concat', 'copyWithin',
'fill', 'find', 'findIndex', 'lastIndexOf', 'pop', 'push',
'reverse', 'shift', 'unshift', 'slice', 'sort', 'splice',
'includes', 'indexOf', 'join',
'keys', 'entries', 'values',
'forEach', 'filter', 'flat',
'flatMap', 'map', 'every',
'some', 'reduce', 'reduceRight',
'toLocaleString', 'toString'
]

JavaScript, how to export a function | Export function in Javascript with Example Programs

JavaScript, how to export a function

In this tutorial, you will be learning Javascript, how to export a function, Syntax, Example codes using Export functions. The exportstatement is utilized when building JavaScript modules to export live bindings to functions, objects, or primitive values from the module so they can be done by other programs with the import statement. Export and import functions in Javascript directives have different syntax variants.

JavaScript Export Function

In JavaScript, we can separate a program into separate files. How do we make a function we define in a file available to other files?

You typically write a function, like below

function sum(a, b) {
  return a + b
}

Export Syntax

We have two types of exports in Javascript:

  1. Named Exports (Zero or more exports per module)
  2. Default Exports (One per module)

1. Named Export Syntax

// Export list
export { name1, name2, …, nameN };

2. Default Export Syntax

Also, you can make it possible for any other file with the help of this javascript export function syntax

 export default sum

The above syntax code defines the default export function.

Also Check:

Import Function Syntax

The files that need the function exported will import it using this syntax

import sum from 'myfile'

Sample Code Using Named Exports

// export features declared earlier
export { myFunction, myVariable };

// export individual features (can export var, let,
// const, function, class)
export let myVariable = Math.sqrt(2);
export function myFunction() { ... };

Sample Code using Default Exports

// module "my-module.js"

export default function cube(x) {
  return x * x * x;
}

Export apart from declarations

Moreover, we can place export separately.

Here we first declare, and then export:

// say.js
function sayHi(user) {
  alert(`Hello, ${user}!`);
}

function sayBye(user) {
  alert(`Bye, ${user}!`);
}

export {sayHi, sayBye}; // a list of exported variables

Or, technically we could placeexport above functions as well.

Export before declarations

We can identify any declaration as exported by puttingexportbefore it, be it a variable, function, or a class.

For example, below all exports are valid:

// export an array
export let months = ['Jan', 'Feb', 'Mar','Apr', 'Aug', 'Sep', 'Oct', 'Nov', 'Dec'];

// export a constant
export const MODULES_BECAME_STANDARD_YEAR = 2015;

// export a class
export class User {
  constructor(name) {
    this.name = name;
  }
}

The Object getOwnPropertyDescriptors() method | JavaScript Object.getOwnPropertyDescriptors() Method Syntax with Example

The Object getOwnPropertyDescriptors() method

Object.getOwnPropertyDescriptors(obj) accepts an object, and returns a new object that provides a list of the descriptors. Also, this method states all own (non-inherited) properties descriptors of an object. Stay continue with this tutorial and get complete details about JavaScript Object.getOwnPropertyDescriptors() Method, declaration or syntax, parameters, description, example using getOwnPropertyDescriptors().

JavaScript Object.getOwnPropertyDescriptors() Method

The Object.getOwnPropertyDescriptors() method returns all own property descriptors of a given object. The getOwnPropertyDescriptors() method ignores symbolic properties so this is the biggest difference between getOwnPropertyDescriptors() and getOwnPropertyDescriptor() method.

Do Check: 

Syntax

The syntax of the JavaScript getOwnPropertyDescriptors() method is:

Object.getOwnPropertyDescriptors(obj)

The getOwnPropertyDescriptors()method, signifying a static method, is described applying the Object class name.

getOwnPropertyDescriptors() Parameters

ThegetOwnPropertyDescriptors()method needs in:

obj – It is the object for which to get all own property descriptors.

Return value from getOwnPropertyDescriptors()

JavaScript getOwnPropertyDescriptors() method returns an object containing all own property descriptors of an object. Also, it may return an empty object in case there are no properties.

Browser Support:

Firefox 50
Edge 15
Chrome 54
Opera 41

Example using JavaScript getOwnPropertyDescriptors() Method

let obj = {
  x: 10,
  get number() {
    return this.x;
  },
};

let value = Object.getOwnPropertyDescriptors(obj);
console.log(value);

// getOwnPropertyDescriptors() can be used for shallow clone
let cloneObj = Object.create(
  Object.getPrototypeOf(obj),
  Object.getOwnPropertyDescriptors(obj)
);

console.log(cloneObj); // { x: 10, number: [Getter] }

Output:

{
  x: { value: 10, writable: true, enumerable: true, configurable: true },
  number: {
    get: [Function: get number],
    set: undefined,
    enumerable: true,
    configurable: true
  }
}
{ x: 10, number: [Getter] }

Other Example on getOwnPropertyDescriptors() in JavaScript

const dog = {}
Object.defineProperties(dog, {
  breed: {
    value: 'Siberian Husky'
  }
})
Object.getOwnPropertyDescriptors(dog)
/*
{
  breed: {
    value: 'Siberian Husky',
    writable: false,
    enumerable: false,
    configurable: false
  }
}
*/

Use Case for Object.getOwnPropertyDescriptors() – Copying Properties into an object 

There is one use case that makes this property very useful. ES2015 gave us Object.assign(), which copies all enumerable own properties from one or more objects, and returns a new object. However, there is a problem with that, because it does not correctly copy properties with non-default attributes.

If an object for example has just a setter, it’s not correctly copied to a new object, using Object.assign(). For example with this object:

const person1 = {
  set name(newName) {
    console.log(newName)
  }
}

This copy attempt won’t work:

const person2 = {}
Object.assign(person2, person1)

But this will work and copy over the setter correctly:

const person3 = {}
Object.defineProperties(person3, Object.getOwnPropertyDescriptors(person1))

As you can see with a console test:

person1.name = 'x'
"x"
person2.name = 'x'
person3.name = 'x'
"x"

person2 misses the setter, it was not copied over.

The same limitation goes for shallow cloning objects with Object.create().

Write JavaScript loops using map, filter, reduce and find | How to use Map, reduce, and filter in Javascript?

Write JavaScript loops using map, filter, reduce and find

In JavaScript, Map, reduce, and filter is considered array methods. Individually one will iterate over an array and make a transformation or computation. Also, each will return a new array on the basis of the result of the function. In this tutorial, our expert programming team discussed in-depth knowledge on how to write JavaScript Loops using map(), filter(), reduce(), and find():

JavaScript Loops

Loops are generally used, in any programming language, to perform operations on arrays: given an array, you can iterate over its elements and perform a calculation.

map, filter, reduce, find

Those are 3 really powerful array functions:

  • map returns an array with the same length.
  • filter as the name implies, it returns an array with fewer items than the original array.
  • reduce returns a single value (or object).
  • find returns the first items in an array that satisfies a condition.

mapfilter and reduce were introduced in ES5, so you can safely use them as implemented in every browser for years.

find was introduced in ES6/ES2015.

Also Check:

Execute something on every element with a map

A loop would look like this:

const doSomething = (item) => {
  //...
  return item
}
const items = ['a', 'b', 'c']
items.forEach((item) => {
  doSomething(item)
})

With a declarative approach, you tell JavaScript to perform something on every element using:

const items = ['a', 'b', 'c']
const newItemsArray = items.map((item) => doSomething(item))

This generates a new array, without editing the original one (what we call immutability).

Finding a single element in the array

Sometimes you need to look for a specific item in the array and return it.

This is how you would do so with a loop:

const items = [
  { name: 'a', content: { /* ... */ }},
  { name: 'b', content: { /* ... */ }},
  { name: 'c', content: { /* ... */ }}
]
for (const item of items) {
  if (item.name === 'b') {
    return item
  }
}

Here is the non-loop version, using find() (ES6+):

const b = items.find((item) => item.name === 'b')

Here is the same functionality using filter() (ES5+):

const b = items.filter((item) => item.name === 'b').shift()

Note: shift() mutates the array, but the array it mutates is the one returned by filter(), not the original array. If this sounds unacceptable, you can check if the array is not empty and get the first item using b[0].

filter() and reduce() will iterate over all the array items, while find() will be faster.

Iterate over an array to count the property of each item

Use reduce() to get a single value out of an array. For example sum the items content.value property:

const items = [
  { name: 'A', content: { value: 5 }},
  { name: 'B', content: { value: 6 }},
  { name: 'C', content: { value: 7 }}
]

using a loop:

let count = 0
for (const item of items) {
  count += item.content.value
}

can be syntax as

const count = items.reduce((result, { content: { value } }) => result + value, 0)

How to Replace all Occurrences of a String in JavaScript? | Using JavaScript RegEx(), Spilt() & Join() Methods

How to Replace all Occurrences of a String in JavaScript

From this tutorial, beginners or experienced programmers can easily gain complete knowledge on how to replace all occurrences of a string in javascript. Make use of these available direct links and directly jump into the respective stuff related to the Javascript program related to all Occurrences of a String.

How to Replace all Occurrences of a String in JavaScript?

There are two proper ways to replace all occurrences of a string in JavaScript. Below, we have described them neatly including an example program. Okay, Let’s have a look at these methods and learn the javascript program to replace all occurrences of a string.

  1. Using a Regular Expression (RegEx)
  2. Using JavaScript Split() and Join() method

Using a Regular Expression (RegEx)

String.replace(/<TERM>/g, '')

This works as a case sensitive substitution.

For example,

const phrase = "I love my dog! Dogs are great";
const stripped = phrase.replace(/dog/g, "");
console.log(stripped);

The output would be

I love my ! Dogs are great

To perform a case insensitive replacement, use the i option,

const phrase = "I love my dog! Dogs are great";
const stripped = phrase.replace(/dog/gi, "");
console.log(stripped);

The output would be

I love my ! s are great

NOTE: Remember that if the string contains some special characters, it won’t play well with regular expressions, so the suggestion is to escape the string using this function.

Do Check:

Using JavaScript Split() and Join() method

An alternative solution, albeit slower than the regex, is using two JavaScript functions.

The first is split(), which truncates a string when it finds a pattern (case sensitive), and returns an array with the tokens:

const phrase = "I love my dog! Dogs are great";
const tokens = phrase.split("dog").join();

console.log(tokens);

The final output would however be the same. (case sensitive)

I love my ! Dogs are great

Learn React JS — Build a Portfolio Single Page Application (SPA)

Learn React JS — Build a Portfolio Single Page Application (SPA)

How to create your portfolio website using React.js

Things you’ll soak in:

  1. Creating and implementing custom Components.
  2. Working with external components.
  3. Working with Props.
  4. Working with States.
  5. Dynamic Rendering.
  6. React Routing.
  7. and Using CSS in React JS.

Let’s understand some concepts…

React follows Component architecture, which means every part of a web app or website is a component, all are made separately and finally fitted into a parent component which is then rendered.

A Component is a Javascript File, for example, you want to create a sidebar component then you have to create a “Sidebar.js” file.

A component can be of two types:-

  1. Sub-Component
    A sub-component is a component that resides inside of another component.
  2. Parent Component
    A Parent component is a component in which sub-components reside in.

How does a “Component” look like in code?

“ YourComponentName.js ”

import React, { Component } from 'react'
class YourComponentName extends Component {
render() {
return (
<div>
{/* Your Html/JSX code goes here */}
<h1>This is my component</h1>
</div>
)
}
}
export default YourComponentName

All the components have a parent component, it might be either “App.js” or some other component.

import React, { Component } from 'react';

That’s a common line of code you’ll see in almost all the components everywhere. In that, we are importing React and Component class from the ‘react’ module. Which enables us to create custom components.

class YourComponentName extends Component {

This is a class component, replace “YourComponentName” to whatever name you want.

render() {
return (
<div>
<h1>This is my component</h1>
</div>
)

The render() method along with the return() method renders the content into the DOM.

And for now “YourComponentName.js” component will return “This is my component”.

export default YourComponentName

The above line of code is very important, make sure you add it compulsory, “export” keyword defines what are all the methods(functions) that should be accessible to the component importing this component.

Now that the component is built “How to use it”?

Once a component is built, we import it in the parent component or in the “App.js” file according to its functionality.

for now, let’s consider you are importing “YourComponentName.js” in “ParentComponent.js”

import YourComponentName from './YourComponentName.js'

and then the imported component is accessed just like an HTML tag inside the return() method of “ParentComponent.js”.

<YourComponentName> </YourComponentName>

now “ParentComponent.js” will look like this

import React, { Component } from 'react'
import YourComponentName from './YourComponentName.js'
class ParentComponent extends Component {
render() {
return (
<div>
<YourComponentName> </YourComponentName>
</div>
)
}
}
export default ParentComponent

At the time of rendering “<YourComponentName> </YourComponentName>” will be replaced by “<h1> This is my component </h1>” as “YourComponentName.js” is returning that <h1> tag.

If you call the “<YourComponentName> </YourComponentName>” two times then “This is my component ”will be rendered two times, meaning every time a component is called the return() method of that component is called.

What is App.js?

The “App.js” file is like the Parent container of all the components, all the parent components are imported into this “App.js” file. This is the final file that will be rendered into the Browser.

What are Props?

Props are just like parameters that are passed in a function or attributes in HTML tags, but these are user-defined, they carry some inputs to the component.

<!--For example consider a component "ComponentX" imported in some other component "ComponentY.js". "prop1" and "prop2" are the user-defined props. -->
<ComponentX prop1="xyz" prop2="zyx" ></ComponentX>
/* This is how props values are accessed in ComponentX.js. Sent from "ComponentY" */
{this.props.prop1} //returns xyz
{this.props.prop2} //return zyx

Props sent to a component is accessed through the “props” object.

What are States?

Components data will be stored in the component’s State just like a variable. This state can be modified based on user action or other action. when a value of a component’s state is changed React will re-render that component to the browser.

States are defined inside the constructor of the component class.

class YourComponentName extends Component {
constructor(props)
{
super(props);
this.state={
'myname':'Abdul wahid naafi',
'myage':'20'
}
}
render(){

here “ this.state ={} ” is the state variable and we define each state as an object inside of it. ‘myname’ and ‘myage’ are two states with some values.

To access these state values

this.state.myname //returns 'Abdul wahid naafi'
this.state.myage //returns '20'

let’s take our “YourComponetName.js” component and see states in action.

import React, { Component } from 'react'
class YourComponentName extends Component {
constructor(props)
{
super(props);
this.state={
'myname':'Abdul wahid naafi',
'myage':'20'
}
}
render() {
return (
<div>
{/* Your Html/JSX code goes here */}
<h1>This is my component</h1>
<h2>My Name is {this.state.myname}</h2>
<h3>My Age is {this.state.myage}</h3>
</div>
)
}
}
export default YourComponentName

To access javascript variables, methods, states inside return() method, insert the javascript code inside “ {} ” curly brace, it’s called “JSX”.

now the output of “YourComponetName.js” component is

This is my component
My Name is Mainak Das
My Age is 22

To modify the values of the state object

this.setState({'myage':'19'},()=>{ //this is a callback fucntion });

setState method is used to modify state values.

Let’s take our “YourComponetName.js” component to see setState in action.

import React, { Component } from 'react'
class YourComponentName extends Component {
constructor(props)
{
super(props);
this.state={
'myname':'Mainak Das',
'myage':'22'
}
}
changemyage= ()=>
{
this.setState({'myage':'19'},()=>{ alert("Age Modified ") });
}
render() {
return (
<div>
{/* Your Html/JSX code goes here */}
<h1>This is my component</h1>
<h2>My Name is {this.state.myname}</h2>
<h3 onClick={this.changemyage}>My Age is {this.state.myage}</h3>
</div>
)
}
}
export default YourComponentName

A function/method “changemyage()” is created in that the state ‘myage’ is modified from ‘20’ to ‘19’.

To call this method/function an “onClick” listener is added to <h3> tag calling the “changemyage()” method.

Once the “changemyage()” method fires up the state ‘myage’ is modified and on successful modification, an alert message will be shown telling “Age Modified”.

What Single Page Application (SPA) is?

In Wikipedia, it’s simply stated as:

A single-page application (SPA) is a web application or website that interacts with the user by dynamically rewriting the current page rather than loading entire new pages from a server.
in our project, the right side of the webpage (“contents” as shown in the layout below) will be rewritten every time the user navigates to a new route(Home, About, Education, etc.,).

Now let’s get started with Building the portfolio website using React JS

If “Node JS” is not installed, <ahref=”https://nodejs.org/en/download/” rel=”noopener nofollow”>Download Node JS and install it.

I use Visual Studio Code for most of my React JS project and I highly recommend you to use.

Now, create a new folder, name it whatever you want.

  1. Open vs code.
  2. Press ctrl-shift-n (cmd-shift-n) to open a new vs code window.
  3. in the new window, click the “Open Folder” blue button on the Explorer pane,
  4. Browse and select the folder you created.
  5. Go to View → Terminal to open a terminal inside vs code.

After that, create a React JS project using “create-react-app” CLI, now name the project whatever you want for now I’ll name it as “Portfolio_Website_ReactJS”.

$ npx create-react-app Portfolio_Website_ReactJS

after you get the message “Happy Hacking”, move inside the project directory

$ cd Portolio_Website_ReactJS

Folder structure for this project!

folder structure

Inside the “src” folder, create three new folders and name them “components”, “contents”, and “img” respectively.

Inside the “Components” folder

Create the below components as javascript files in the “ components ” folder.

  • Navbar.jsThis component is the sidebar and will hold a set of “NavItems” components(Home, About, Education, Skills, Contact). It’s just the pink and blue gradient box.
  • NavItem.js This component will be the navigation items (e.g. Home, About, Education,…).
  • Social.jsThis component holds the Social media icon with links.
  • Widecard.js
    This component will hold the Education Details (as shown in the final result GIF above).

Inside the “contents” folder

The contents folder will contain the contents to be rendered on the right side of the page based on the route(Home, About, Education, etc.,).

Create the below-mentioned javascript files in the “contents” folder.

  1. Home.js
  2. About.js
  3. Education.js
  4. Skills.js
  5. Contact.js

Now your project directory should look like this:
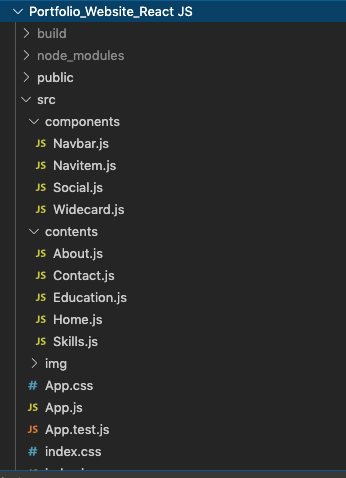
folder structure inside

Now let’s jump into coding

Open App.js and remove all the codes inside the render() method.

Remove all the “imports” except

import React from ‘react’;
import ‘./App.css’;

Now open App.css and remove all the styles(code) and save both the files.

We will be adding all our CSS code to the “App.css” file.

Add these lines of CSS first for this project

@import url('https://fonts.googleapis.com/css?family=Raleway:300,400,500,700&display=swap');
:root{
--sidebar-flex:1.5;
--condiv-flex:6;
--fontsize-p:1.2rem;
--fontsize-nav:1.6rem;
--typing-font:3rem;
}
*
{
margin:0;
padding: 0;
}
body
{
font-family: 'Raleway';
}
.App
{
display: flex;
width: 100vw;
min-height: 100vh;
}
/* .condiv class is for the right side content container*/
.condiv
{
padding: 100px ;
background-color: #f4f5f9;
flex:var(--condiv-flex);
}

Navbar is just the wrapper of the Navitem, its just that pink blue gradient box that will contain the Navitem.

Navitem” is the sub-component and “Navbar” is the parent component.

Open “Navbar.js”

import React, { Component } from 'react';
import Navitem from './Navitem';
// We'll code Navitem.js later for now let's focus on Navbar.js
// “Navitem” is the sub-component.
class Navbar extends Component {
   
    render() {
        return (
            <nav>
            <ul>
            <Navitem item="Home" tolink="/" ></Navitem>
            <Navitem item="About" tolink="/about" ></Navitem>
            <Navitem item="Education" tolink="/education"></Navitem>
            <Navitem item="Skills" tolink="/skills"></Navitem>
            <Navitem item="Contact" tolink="/contact"></Navitem>
            </ul>
            </nav>
            )
        }
    }
    
export default Navbar

Inside the <ul> tag we have

<Navitem item="Home" tolink="/"></Navitem>

<Navitem> component tag with two props (“item” and “tolink”). It just takes the content from here and delivers there in the “Navitem” component.

In here “item” prop holds the Navigation item name (Home, About, Education, etc,.). And “tolink” prop holds the Navigation route (“/”, “/about”, “/education”, etc.,)

Five Navitem components are created and props are set.

Styling the Navbar

Open App.css and copy-paste the below CSS styles and save.

nav
{
padding:60px 30px 0px 30px ;
flex:var(--sidebar-flex);
background: rgb(238,103,143);
background: linear-gradient(180deg, rgba(238,103,143,1) 50%, rgba(132,124,252,1) 80%);
}
Go to terminal and type the following
npm install react-router-dom -g --save

navbar

“react-router-dom” is a node module used to perform routing operations in React JS.

import { Link } from "react-router-dom";

This will import the “Link” class from the “react-router-dom” module.

It acts just like the “Anchor <a>” tag in HTML.

import React, { Component } from 'react';
import { Link } from "react-router-dom";
class Navitem extends Component {
render() {
return (
<li>
<Link to={this.props.tolink} >
{this.props.item}
</Link>
</li>
)
}
}
export default Navitem

Getting the values of “item” and “tolink” prop and setting to the Link component.

<Link> tag is the component imported above from the “react-router-dom” as I mentioned they act just like Anchor tag in HTML, in there we have an attribute called “href” to define the URL, in here for the Link tag we have “to” attribute, it’s not an attribute it is a prop of Link component.

Time to do some CSS

Open “App.css”, add your styles, and save.

nav ul
{
  font-size:var(--fontsize-nav) ;
  text-align: center;
  list-style-type: none;
  text-decoration: none;
  color: white !important;
}
nav ul li
{
  margin:40px;

Now, let’s do something like whichever “Navitem” is clicked I want that Navitem text to be styled “Bold”.

We’ll be adding a CSS class “.active” to that “Navitem” which is clicked.

/* css for active class */
.active
{
font-weight: bolder;
}

For this, we’ll create a Function that will take the “Navitem’s id” as an input parameter and set that to a state object called “NavItemActive” on the Navbar component, and then the CSS “.active” class will be added to that element whose id is stored in that “NavItemActive” state object.

constructor(props)
{
super(props);
this.state={
'NavItemActive':''
}
}

Now that function to add CSS class (.active) on Navitem.

activeitem=(x)=>
{
if(this.state.NavItemId.length>0)
{
document.getElementById(this.state.NavItemActive).classList.remove('active');
}
this.setState({'NavItemActive':x},()=>{
document.getElementById(this.state.NavItemActive).classList.add('active');
});
};

( “Navitem’s” id ) refers to the DOM element ID of the Navitem(Home or About or Education …)

The “activeitem()” function or method takes an input parameter “x” which is the clicked Navitem’s ID. It will then check if there’s already anything(any element’s ID) stored in the “NavItemActive” state object if TRUE then it’ll remove the CSS “.active” class from that element, else it’ll set the state object to the Navitem’s ID which’s clicked by the user. And then a callback function will run which will add the CSS “.active” class to the Navitem which is clicked.

Here, we have this function/method in the “Navbar.js” component but we have to trigger it when the “Navitem” component is clicked. for that, we’ll be passing the “activeitem()” method as a prop to the “Navitem” component.

Now we have to set the “activeitem()” in the onClick attribute of the <Link> tag in “Navitem.js”

onClick={this.props.activec.bind(this,this.props.item)}

“bind” method is used to bind the current instance(1st parameter) and the input to be sent (2nd parameter).

“Navitem.js” will finally look like this

import React, { Component } from 'react';
import { Link } from "react-router-dom";
class Navitem extends Component {
render() {
return (
<li id={this.props.item}>
<Link to={this.props.tolink} onClick={this.props.activec.bind(this,this.props.item)}>{this.props.item}</Link>
</li>
)
}
}
export default Navitem

And, “Navbar.js” will finally look like this

import React, { Component } from 'react';
import Navitem from './Navitem';
class Navbar extends Component {
constructor(props)
{
super(props);
this.state={
'NavItemActive':''
}
}
activeitem=(x)=>
{
if(this.state.NavItemActive.length>0){
document.getElementById(this.state.NavItemActive).classList.remove('active');
}
this.setState({'NavItemId':x},()=>{
document.getElementById(this.state.NavItemActive).classList.add('active');
});
};
render() {
return (
<nav>
<ul>
<Navitem item="Home" tolink="/"  activec={this.activeitem}></Navitem>
<Navitem item="About" tolink="/about"  activec={this.activeitem}></Navitem>
<Navitem item="Education" tolink="/education"  activec={this.activeitem}></Navitem>
<Navitem item="Skills" tolink="/skills"  activec={this.activeitem}></Navitem>
<Navitem item="Contact" tolink="/contact"  activec={this.activeitem}></Navitem>
</ul>
</nav>
)
}
}
export default Navbar

In the <Navitem> component, added a new prop “activec” which will send the “activeitem()” function/method to Navitem component which will be then called whenever a Navitem is click.

<Navitem item="Home" tolink="/"  activec={this.activeitem}></Navitem>

Our Navbar is complete. Congratulations.

Now we have to Add this Navbar(sidebar) component to “App.js”

Open “App.js” add the following code

import React from 'react';
import './App.css';
import
{
BrowserRouter as Router,
Route,
} from "react-router-dom";
import Navbar from './components/Navbar';
function App() {
return (
<Router>
<div className="App">
<Navbar />
</div>
</Router>
)
}
export default App;

In React JS we access the CSS class with the “className” attribute.

import
{
BrowserRouter as Router,
Route,
} from "react-router-dom";

“BrowserRouter” is the parent component that holds all of your <Route> components. The <Route> components tell your app which other components to render (display) based on the route.

And are classes of the “react-router-dom” module.

“as” keyword is used to assign an alias name for the component in this project we’ll call “BrowserRouter” as “Router”.

import Navbar from './components/Navbar';

Here we are importing the “Navbar” component that we created, which is inside the “components” folder.

<Router>
<div className="App">
<Navbar />
</div>
</Router>

here the Div with className “App” is the parent div. As mentioned before a component should return only one node.

And inside that, we are calling the <Navbar /> component. You can call it as <Navbar></Navbar> also.

Now, save and run your application to test

npm start

A browser tab on the address http://localhost:3000/ will be opened, there you can see your React JS application.

Until here you might have understood

  1. How custom components are made and used.
  2. How CSS is implemented in React JS.
  3. And how props are sent and received across components.
  4. And how to define and modify/set State for a component.

Contents folder will contain the contents to be rendered on the right side of the page based on the route(Home, About, Education, etc.,).

  1. Home.js
  2. About.js
  3. Education.js
  4. Skills.js
  5. Contact.js

these are the five content pages we have to create.

home

Three things we’ll be focusing on Home.js

  1. Image element in React JS.
  2. Using external components in your React JS project.
  3. How to work with CDN in React JS.

Just as in HTML, to place an image you can use <img> tag in React JS.

But

<img src={} ></img>

In the JSX, the image element has a closing tag also.

And for image source, you have to import it first and then use it. As shown below.

import React, { Component } from 'react';
//importing the picture as "profilepic".
import profilepic from '../img/naafi_photo.png';
class XYZ extends Component {
render() {
return (
<img src={profilepic} className="profilepic"></img>
)
}
}
export default XYZ

For this project we gonna use an external React JS component called“React-typing-effect“

To install it in your project, in the terminal make sure you are in the project directory, and then run the below-mentioned command.

npm install react-typing-effect --save

once it’s installed, Import it wherever you want and use it as mentioned below.

import React, { Component } from 'react';
import ReactTypingEffect from 'react-typing-effect';
class XYZ extends Component {
render() {
return (
<ReactTypingEffect className="typingeffect" text={['I am Abdul Wahid Naafi','I am a web developer']} speed={100} eraseDelay={700}/>
)
}
}
export default XYZ

Usually in plain HTML, we paste the CDN links in the <head> tag.

Just like that, copy your CDN.

Goto your_project_directory/public/index.html

Paste the CDN there inside the <head> tag.

And use it just how you use it normally.

Now, as you learned all these concepts, check out the code for “Home.js” below you’ll understand it easily.

import React, { Component } from 'react';
import ReactTypingEffect from 'react-typing-effect';
import profilepic from '../img/naafi_photo.png';
class Home extends Component {
render() {
return (
<div className="condiv home">
<img src={profilepic} className="profilepic"></img>
<ReactTypingEffect className="typingeffect" text={['I am Abdul Wahid Naafi','I am a web developer']} speed={100} eraseDelay={700}/>
</div>
)
}
}
export default Home

we got one more thing to add, the “SOCIAL” component.

import React, { Component } from 'react';
class Social extends Component {
render() {
return (
<div class="social">
<a href="https://codepen.io/naafi" target="_blank"><i class="fab fa-codepen"></i></a>
<a href="https://github.com/naaficodes" target="_blank"><i class="fab fa-github"></i></a>
<a href="https://Instagram.com/iam_naafi" target="_blank"><i class="fab fa-instagram"></i></a>
<a href="https://www.facebook.com/abdul.w.naafi" target="_blank"><i class="fab fa-facebook-f"></i></a>
<a href="https://Linkedin.com/in/naafi" target="_blank"><i class="fab fa-linkedin-in"></i></a>
<a href="https://medium.com/@iam_naafi" target="_blank"><i class="fab fa-medium-m"></i></a>
</div>
)
}
}
export default Social

Just another simple component returning the HTML for social media links.

CSS code for “.social” class. Add the below code to “App.css”

.social
{
position: absolute;
margin-top: 20px;
display: flex;
bottom: 60px;
}
.social i
{
padding-right: 30px;
font-size: 25px;
color: #9a9b9c;
}
.social i:hover
{
color: #ffffff;
}

social js

let’s add this component to “Home.js” and complete the Home.js content.

Home.js

import React, { Component } from 'react';
import ReactTypingEffect from 'react-typing-effect';
import profilepic from '../img/naafi_photo.png';
import Social from '../components/Social'
class Home extends Component {
render() {
return (
<div className="condiv home">
<img src={profilepic} className="profilepic"></img>
<ReactTypingEffect className="typingeffect" text={['I am Abdul Wahid Naafi','I am a web developer']} speed={100} eraseDelay={700}/>
<Social />
</div>
)
}
}
export default Home

Time to route !!

Open “App.js”, modify the already existing route we made before.

<Router>
<div className="App">
<Navbar />
<Route exact path="/">
<Home />
</Route>
</div>
</Router>

We already learned what <Router> or <BrowserRouter> is.

<Route> is the subtag of <Router> or <BrowserRouter>, with <Route> we decide what content has to be rendered based on the path/URL.

<Route exact path="/">

exact” attribute is used when we have multiple identical paths.

And “exact” is used almost every time for path=”/”.

“Home.js” section is done !!

From here onwards all the processes will be smooth and quick, as you’ve learned pretty much needed to build this project.

about

this content page is pretty simple we are just returning a bunch of HTML.

import React, { Component } from "react";

class About extends Component {
  render() {
    return (
      <div className="condiv">
        <h1 className="subtopic">About Me</h1>
        <h4>Hey there,</h4>
        <h1>I'm Mainak Das</h1>
        <h3>
          Full Stack Web <u>Developer</u> | UI/UX <u>Designer</u>
        </h3>
        <br></br>
        <p>
          I started my journey in the world of computers from an young age, now
          I’m 22 years old, Pursuing my Computer Science Engineering Degree in
          Adamas University Barasat Kolkata. Web development is my center of
          interest, i always love the idea of cross-platform development, 1-n
          one code base deploy into almost any platform, which web technology
          like Javascript enables me to do. I also like creating Interactive UI
          components for better UX and share those desgin and codes to the world
          through Github and Instagram.
        </p>
      </div>
    );
  }
}

export default About;

There’s just contents to be rendered nothing else.

CSS code for the “About” section. Add the below code to “App.css”

.subtopic
{
margin:10px 10px 30px 10px !important;
}
p
{
font-size: var(--fontsize-p);
}
h1,h2,h3,h4,p
{
margin: 10px;
}

Time to route !!

Open “App.js”, modify the already existing route we made before.

<Router>
<div className="App">
<Navbar />
{/* Route for Home.js contents */}
<Route exact path="/">
<Home />
</Route>
{/* Route for About.js contents */}
<Route path="/about">
<About />
</Route>
</div>
</Router>

“About.js” section is done !!

education

For this page(Education.js), we’ll be creating a component to display education details. let’s call that component “Widecard” and we will have four props in that “title” “where” “from” and “to” respectively.

Widecard.js

import React, { Component } from 'react'
class Widecard extends Component {
render() {
return (
<div class="widecard">
<div class="compdet">
<h3>{this.props.title}</h3>
<h4 class="secondtext">{this.props.where}</h4>
<h4 class="secondtext">{this.props.from} - {this.props.to}</h4>
</div>
</div>
)
}
}
export default Widecard

In that component, we have an <h3> element to display the value of “title” prop, <h4> element to display the value of “where” prop, another <h4> element to display the value of “from” and “to” props.

CSS for Widecard

.widecard
{
border:0px solid #9a9b9c;
display: flex;
margin:30px 0px 30px 0px;
}
.widecard:hover
{
color: #1b1d20;
background-color: #ffffff;
box-shadow: 0 10px 20px rgba(0,0,0,0.19), 0 6px 6px rgba(0,0,0,0.23);
}

Let’s import this component into “Education.js”

import React, { Component } from "react";
import Widecard from "../components/Widecard";

class Education extends Component {
  render() {
    return (
      <div className="condiv">
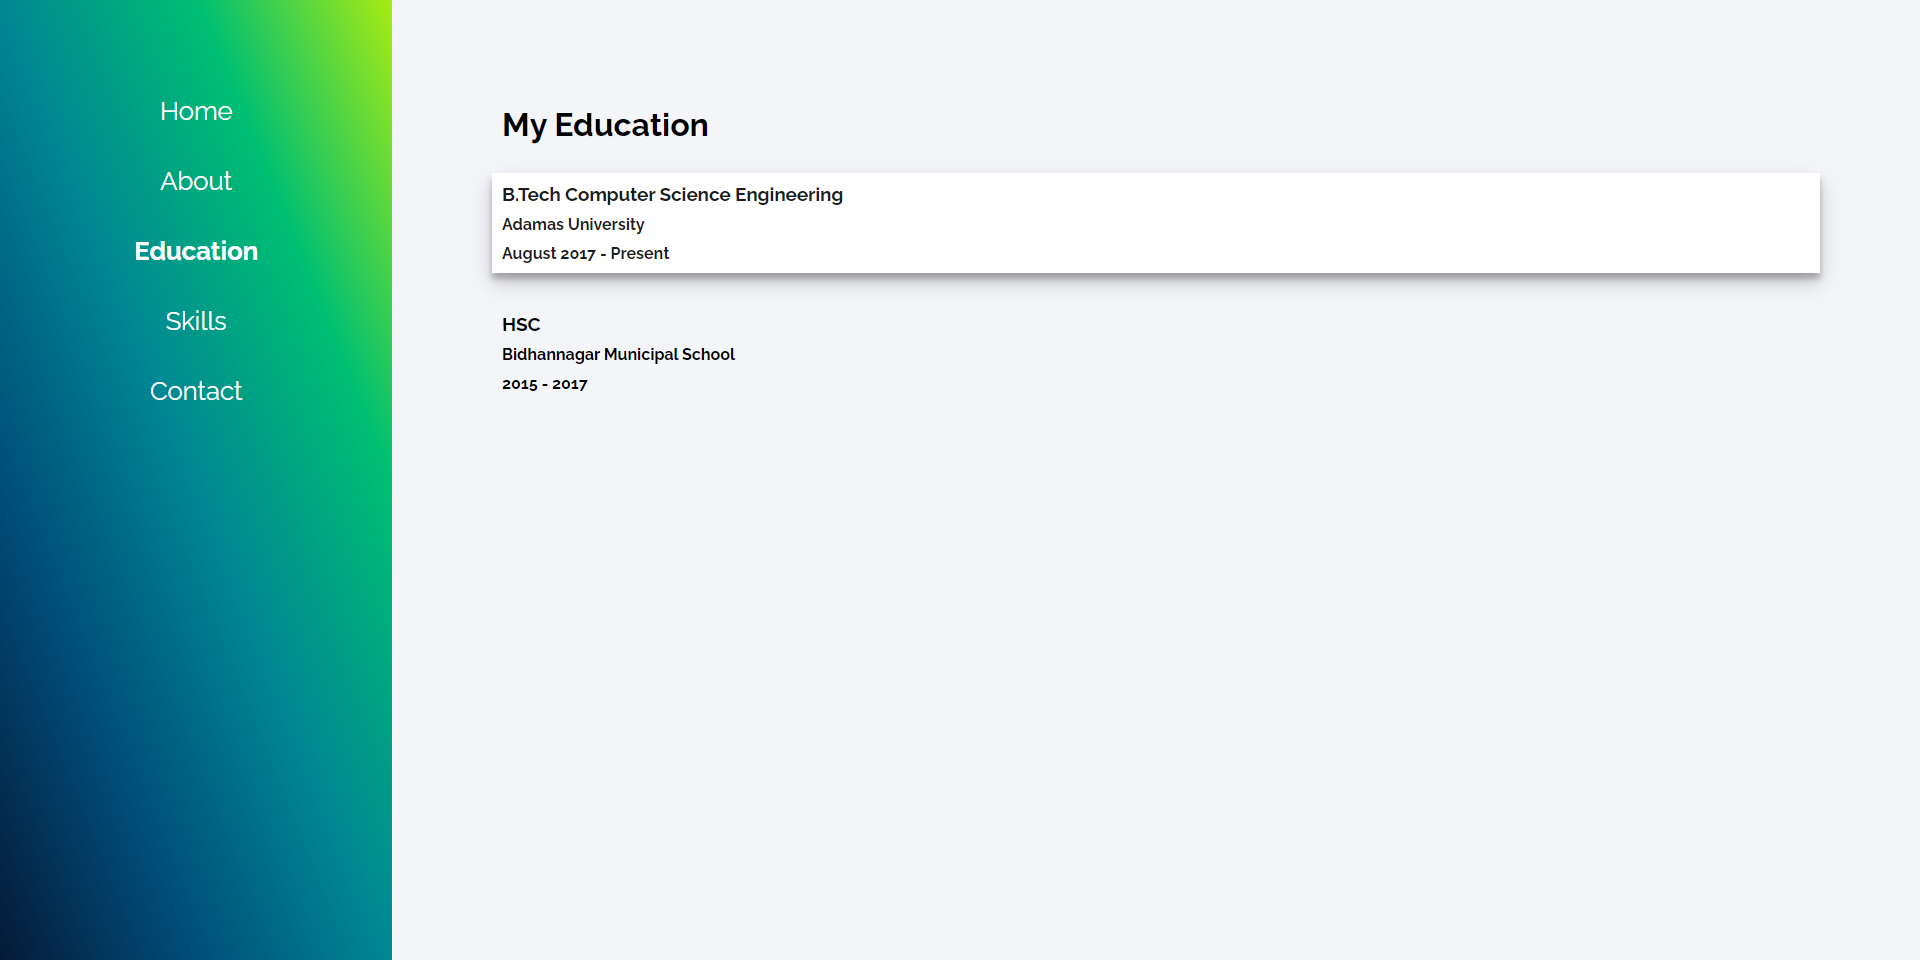
        <h1 className="subtopic">My Education</h1>
        <Widecard
          title="B.Tech Computer Science Engineering"
          where="Adamas University"
          from="August 2017"
          to="Present"
        />
        <Widecard
          title="HSC"
          where="Bidhannagar Municipal School"
          from="2015"
          to="2017"
        />
      </div>
    );
  }
}

export default Education;

It’s simple right, on line 2 imported our “Widecard” component.

<Widecard title="B.Tech Computer Science Engineering" where="Adamas University" from="August 2017" to="Present"/>

Look how clean it looks, this is the benefit of custom components.

Let’s set the Routes

Open “App.js”

first, import the “Education.js” into “App.js”.

import Education from './contents/Education';

Now the Routes.

<Router>
<div className="App">
<Navbar />
{/* Route for Home.js contents */}
<Route exact path="/">
<Home />
</Route>
{/* Route for About.js contents */}
<Route path="/about">
<About />
</Route>
{/* Route for Education.js contents */}
<Route path="/education">
<Education />
</Route>
</div>
</Router>

OK, now the “Education” content is also done.

Our fourth content “Skills.js”

skills

In this, we’ll learn how to work with Dynamic rendering.

What is Dynamic rendering?

To generate DOM elements dynamically, for example, rendering the items in a javascript array as HTML <li> items.

Open “Skills.js”

So, now we’ll have a javascript array filled with the skillset as a state variable, and it’ll look like this.

constructor(props)
{
super(props);
this.state={
'myskills':['HTML','CSS','JS','PHP','REACT JS','FIREBASE','MIT APP']
};
}

We’ll loop through the array items and render it as <li> items.

<ul>
{this.state.myskills.map((value)=>{
return <li>{value}</li>
})}
</ul>

Instead of using a “for loop” to loop through every item in the array, we use the map() method.

In that function that’ll be called by the map method will return “<li>”.

import React, { Component } from 'react'
class Skills extends Component {
constructor(props)
{
super(props);
this.state={
'myskills':['HTML','CSS','JS','PHP','REACT JS','FIREBASE','MIT APP']
};
}
render() {
return (
<div className="condiv skills">
<h1 className="subtopic">My Skills</h1>
<ul>
{this.state.myskills.map((value)=>{
return <li>{value}</li>
})}
</ul>
</div>
)
}
}
export default Skills

Let’s set the Routes

Open “App.js”

First, import the “Skills.js” into “App.js”.

import Skills from './contents/Skills';

Now the Routes.

<Router>
<div className="App">
<Navbar />
{/* Route for Home.js contents */}
<Route exact path="/">
<Home />
</Route>
{/* Route for About.js contents */}
<Route path="/about">
<About />
</Route>
{/* Route for Education.js contents */}
<Route path="/education">
<Education />
</Route>
{/* Route for Skills.js contents */}
<Route path="/skills">
<Skills />
</Route>
</div>
</Router>

Yes! now the “Skills” content is also done.

contact

This “Contact” content page is just a simple page displaying the contact information.

Look!! the “Social” component is imported again!

This is the Advantage of components, make it once use it anytime anywhere.

import React, { Component } from 'react';
import Social from '../components/Social';
class Contact extends Component {
render() {
return (
<div className="condiv">
<h1 className="subtopic">Contact Me</h1>
<h3>Email  :   mainakdas104@gmail.com</h3>
<h3>Instagram   :   @mainak_ds</h3>
<Social />
</div>
)
}
}
export default Contact

Imported the “Social.js” component , and used <h1>, <h3> element to fill in the contents. As simple as that.

Let’s set the Routes for the last time !!!

Open “App.js”

First, import the “Contact.js” into “App.js”.

import Contact from './contents/Contact';

Now the Routes.

<Router>
<div className="App">
<Navbar />
{/* Route for Home.js contents */}
<Route exact path="/">
<Home />
</Route>
{/* Route for About.js contents */}
<Route path="/about">
<About />
</Route>
{/* Route for Education.js contents */}
<Route path="/education">
<Education />
</Route>
{/* Route for Skills.js contents */}
<Route path="/skills">
<Skills />
</Route>
{/* Route for Contact.js contents */}
<Route path="/contact">
<Contact />
</Route>
</div>
</Router>

Now Save the file

Go to terminal

Move to your project directory ( $ cd Resume_Website_ReactJS )

npm start

You’ll be served a new browser tab with your React JS Portfolio Website.