Session Management Using URL Rewriting in Servlet | URL Rewriting Session Tracking in Servlet

Session Management Using URL Rewriting in Servlet

Let us learn in detail about Servlet Session Management using URL Rewriting. You can go with this technique URL Rewriting to manage the session. Before discussing this technique in detail let’s first understand what URL Rewriting means exactly in the further modules. You will get acquainted with Syntax, Advantages, Disadvantages, URL Rewriting for Session Tracking in Servlet Examples.

Also, See:

What is meant by URL Rewriting?

URL Rewriting is another way to maintain session tracking.URL Rewriting technique can be used if the client has disabled the cookies in the browser. You can send textual information from one resource to another resource by utilizing a URL. In URL we can send the parameter name and value and this value we can get using the getParameter() method. In this technique, the session id will be added to the URL of the next resource or request.

Syntax of URL Rewriting:

url?paramname1=paramvalue1&paramname2=paramvalue2...

Advantages of URL Rewriting

There are quite a few advantages that come with the URL Rewriting Tracking Mechanism in Servlet. They are in the below fashion

  1. You can avail this technique if the client disables the cookies in the browser.
  2. URL Writing supports all browsers.

Disadvantages of URL Rewriting

There are certain drawbacks of using the URL Rewriting Method and they are as such

  1. The Drawback with this is technique is it sends only textual information.
  2. It can be tedious.
  3. URL Rewriting works with links.

URL Rewriting Example

In this example, we will show you how to manage the session using URL Rewriting Techniques. Here we have created a login page and validate the username and password. If the user enters the right credential it will show the user profile otherwise it will redirect to the login page and give you a message wrong username and password. Let’s understand this with the example given below.

index.html file:

Session Management Using URL Rewriting in Servlet 1

UrlRewritingServlet1.java file:

Session Management Using URL Rewriting in Servlet 2

UrlRewritingServlet2.java file:

Session Management Using URL Rewriting in Servlet 3

Web.xml file:

Session Management Using URL Rewriting in Servlet 4

Session Management Using URL Rewriting in Servlet 5

Session Management Using URL Rewriting in Servlet 6

Session Management Using URL Rewriting in Servlet 7

Session Management in Servlet Using HttpSession | Session Tracking using HttpSession

Session Management in Servlet Using HttpSession

Among different techniques for session management in servlet, we will learn about one of them i.e. HTTPSession to manage the session. In the previous technique, we have learned session management using URL Rewriting Here we will learn the Fourth and last techniques HttpSession to manage the session. Before discussing this technique in detail let’s first understand about HttpSession.

What is HttpSession?

The HttpSession interface is implemented by the server. The servlet container uses this interface to create a session between the Http client and Http server. It allows the servlet to read and write the state information that is involved with an HttpSession.

How to get a HttpSession Object?

There are 2 different methods to obtain the HttpSession Object
1. public HttpSession getSession(): This method returns the current session associated with this request or if the request doesn’t have any session it creates a new session,

2. public HttpSession getSession(boolean create): This method returns the HttpSession object. It returns the HttpSession object if a request has a session otherwise it returns null.

How HttpSession Work?

On the left side, there are two clients and in the center, there is a container (webserver). The first client sends the request to the web server, the web server creates the SessionId for the first client and this Session Id send back to the first client. If the first client makes a further request for the second request, the session id will be a part of this request so that the container can identify the particular user using the session id.

Session Management in Servlet Using HttpSession 1

If the second client sends the request to a web server, the web server creates the session for the second client and this Session Id sends it back to the second client. if the second client makes a further request for the second request the session id will be part of this request so the container can identify the particular user using the session id.

Do Read:

Methods of HttpSession Interface

1. public long getCreationTime(): It returns the time(in milliseconds since midnight, January 1, 1970, GMT) when the session was created.

2. public String getId(): It returns the session Id.

3. public void invalidate(): Invalidates this session and removes it from the context.

4. public boolean isNew(): It Returns true if the server created the session and is not yet accessed by the client.

5. public void setAttribute(String str, object obj): Associated the value passed in obj with the attribute name passed in str.

6. public long getLastAccessedTime(): It returns the time(in milliseconds since midnight, January 1, 1970, GMT)when the client last made a request for this session.

HttpSession Example

index.html file:

Session Management in Servlet Using HttpSession 2

HttpSessionServlet1.java file:

Session Management in Servlet Using HttpSession 3

HttpSessionServlet2.java file:

Session Management in Servlet Using HttpSession 4

web.xml file:

Session Management in Servlet Using HttpSession 5

Session Management in Servlet Using HttpSession 6

Session Management in Servlet Using HttpSession 7

Session Management in Servlet Using HttpSession 8

Java if-else-if ladder with Example | Definition, Syntax, Flowchart & Example Program of If-Else-If Statement in Java

Java if-else-if ladder with Example

A programming language utilizes control statements to control the flow of execution of a program. In Java programming, we can control the flow of execution of a program based on some conditions. Java control statements can be put into the following three categories: selection, iteration, and jump. In this tutorial, you will learn completely about the java if-else-if ladder statement with an example.

Java if-else-if ladder Statement

Java if-else-if ladder is applied to work on multiple conditions. The if statements are executed from the top down. When one of the conditions controlling the if and it is true, the statement associated with that if is executed, and the rest of the ladder is bypassed.

If none of the conditions is true, then the final else statement will be executed. The final else acts as a default condition; that is, if all other conditional tests fail, then the last else statement is performed. If there is no final else and all other conditions are false, then no action will take place.

Syntax of if-else-if:

if(condition1){
//statement1;
}
else if(condition2){
//statement2;
}
else if(condition3){
//statement3;
}
.........
.........
.........
else{
//default statement;
}

Do Check:

How the if…else…if ladder works?

  1. Control falls into the if block.
  2. The flow jumps to Condition 1.
  3. Condition is tested.
    • If Condition yields true, go to Step 4.
    • If Condition yields false, go to Step 5.
  4. The present block is executed. Go to Step 7.
  5. The flow jumps to Condition 2.
    • If Condition yields true, go to step 4.
    • If Condition yields false, go to Step 6.
  6. The flow jumps to Condition 3.
    • If Condition yields true, go to step 4.
    • If Condition yields false, execute else block. Go to Step 7.
  7. Exit the if-else-if ladder.

Look at the following image format of Working of the if-else-if ladder:

Working of the if-else-if ladder image

Flowchart if-else-if ladder:

Java if-else-if ladder with Example 1

Java if-else-if ladder Example:

class IfElseLadder {
public static void main(String[] args) {

int examscore = 75;
char grade;

if(examscore >= 90) {
grade = 'A';
} else if (examscore >= 80) {
grade = 'B';
} else if(examscore >= 70) {
grade = 'C';
} else if(examscore >= 60) {
grade = 'D';
} else {
grade = 'F';
}
System.out.println("Grade is = " + grade);
}
}

Output:

Grade is = C

Polymorphism in Java | Types of Polymorphism in Java with Examples | Method Overloading vs Overriding in Java

Polymorphism in Java

In this tutorial, we will be discussing the most important concept of Java ie., Polymorphism. Knowing each and every bit about the polymorphism in java is very crucial for beginners & experienced coders. So, check out this page without missing any of the links available below. Let’s start with understand what is java polymorphism?

Java Polymorphism

Polymorphism in Java is a concept which enables you to do a single action in various ways. It is the ability of an object or method to take many forms according to requirements. One of the most important features of object-oriented programming (OOPs) is Polymorphism. It is a combination of 2 Greek words: poly and morph. The poly word signifies many and morphs words mean forms. Therefore, when one thing has many forms it is called Java Polymorphism.

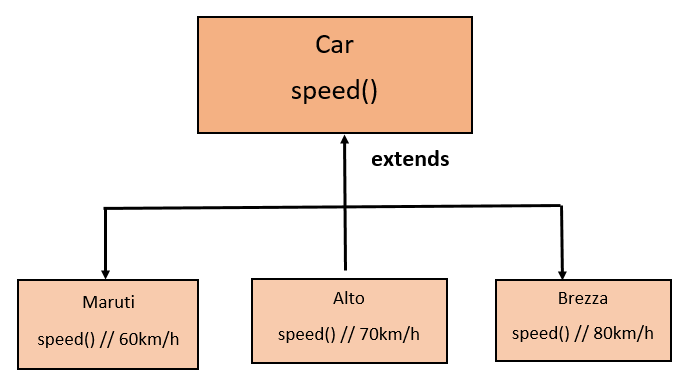
Let’s consider a scenario where Car is a class that has a method speed(). Yet, the speed of the car may change according to cars. For instance, the Maruti car has a speed of 60 Km/h, the Alto car has a speed of 70 km/h, and the Brezza car has a speed of 80 km/h. So here is a single method called speed() but their behavior is different according to cars. This is known as polymorphism in Java.

Polymorphism in Java 1

Types of Polymorphism in Java

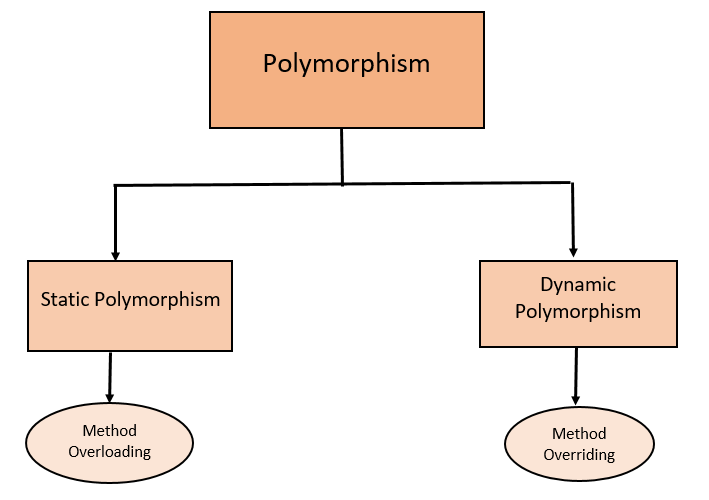
There are two types of polymorphism in Java:

  1. Static Polymorphism.
  2. Dynamic Polymorphism.

Compile-time polymorphism is also recognized as static polymorphism. Method Overloading is a way to implement compile-time polymorphism.

Runtime Polymorphism is also called Dynamic Polymorphism. Method Overriding is a method to perform the run-time polymorphism.

Polymorphism in Java 2

Also Check:

1. Static or Compile-time Polymorphism in Java:

This compile-time type of polymorphism is also known as static polymorphism. It is achieved by function overloading or operator overloading. But, Operator Overloading is not supported by java.

Method Overloading in Java:

Methods are said to be overloaded when many methods in a class having the same name but different parameter lists. It is similar to Constructor Overloading in Java, which allows a class to have more than one constructor having the same name but having different parameter lists. It increases the readability of the program.

Suppose we have a class Addition and you want to perform the addition of the given number, but there can be any number of parameters. If you write a method such as add2(int x, int y) for two parameters, and add3(int x, int y, int z) for three parameters, then it may be difficult for you and others to understand the behavior of the methods because of its name differs.

Ways to overload a method:

There are three ways to overload a method in Java.

  1. By changing the number of parameters.
  2. By changing the data type.
  3. By changing the sequence of the data type.

Example of Method Overloading: changing the number of parameters.

In this instance, we are going to show you how we can overload a method by changing the number of parameters. In this example, we have created two methods named as add(), first, add() method performs the addition of two numbers, and the second add() method performs the addition of three numbers.

class Addition{
public int add(int x, int y){
return x+y;
}
public int add(int x, int y, int z){
return x+y+z;
}
}
class Person{
public static void main(String args[]){
Addition obj = new Addition();
System.out.println("The Addition of two numbers is : " +obj.add(10,20));
System.out.println("The Addition of three numbers is : " +obj.add(10,20,30));
}
}

Output:

Polymorphism in Java 3

Example of Method Overloading: changing the data type of a parameter.

In this example, we are going to show you how we can overload a method by changing the data type of arguments. In this example, we have created two methods named as add(), But that method differs in data type. The first method calculates the addition of two integer value and the second method calculate the addition of two double value.

class Addition{
public int add(int x, int y){
return x+y;
}
public double add(double x, double y, double z){
return x+y+z;
}
}
class Person{
public static void main(String args[]){
Addition obj = new Addition();
System.out.println("The Addition of two numbers is : " +obj.add(10,20));
System.out.println("The Addition of three numbers is : " +obj.add(10.01, 20.02, 30.04));
}
}

Output:

Polymorphism in Java 4

Example of Method Overloading: changing the sequence data type.

In this example, we are going to show you how we can overload a method by changing the sequence of a data type. In this example, we have created two methods named as a display() with a different sequence of the data type of arguments list. The first method having the arguments (int, double), and the second method having the arguments (double, int).

class Addition{
public void display(int x, double y){
System.out.println("Defination of first method");
}
public void display(double x, int y){
System.out.println("Defination of second method");
}
}
class Person{
public static void main(String args[]){
Addition obj = new Addition();
obj.display(5, 4.5);
obj.display(2.5, 5);
}
}

Output:

Polymorphism in Java 5

Note: Method Overloading in Java is not possible by changing the return type of the method only because of the ambiguity problem. Let’s see how ambiguity may occur.

class Addition{
public int add(int x, int y){
return x+y;
}
public double add(int x, int y){
return x+y;
}
}
class Person{
public static void main(String args[]){
Addition obj = new Addition();
System.out.println(obj.add(4,5)); //Ambiguity may occur
}
}

In this example, we have created two methods named add(), But having a different return type. When we call this method Java compiler show compile-time error, because how can the Java compiler determine which add() method should be called?

2. Dynamic or Runtime Polymorphism in Java

Dynamic polymorphism is also known as runtime polymorphism. Method Overriding is a way to implement runtime polymorphism in Java.

Method Overriding in Java:

Method Overriding is a feature that allows you to redefine the parent class method in the child class based on its requirement.

In other words, whatever methods parent has by default available to the child through inheritance. Sometimes a child may not satisfy with parent methods implementation. Then the child is allowed to redefine that method based on its requirements, this process is called method overriding.

  • The parent class method which is overridden is known as an overridden method.
  • The child class method which is overriding is known as an overriding method.

The main purpose of method overriding is that the class gives its own implementation to an inherited method without even modifying the parent class code.

Rules for Method Overriding in Java:

  • The method of the parent class and the method of child class must have the same name.
  • The method of the parent class and the method of child class must have the same parameter.
  • Method Overriding in Java is possible through inheritance only.

Therefore to understand the concept of method overriding you should have the basic knowledge of Inheritance in Java

Example of Java Method Overriding:

Let’s take a simple example to understand the concept of method overriding.
We have two classes: A parent class Animal and a child class Dog. The Dog class extends the Animal class. Both the class have a common method eat(). The Dog class is giving its own implementation to the eat() method. It is an overriding eat() method.

The child class gives its own implementation so that when it calls this method, it prints Dog is eating instead of Animal is eating.

class Animal{
public void eat(){
System.out.println("Animal is eating");
}
}
class Dog extends Animal{
public void eat(){
System.out.println("Dog is eating");
}
}
class Person{
public static void main(String args []){
Dog obj = new Dog();
obj.eat();
}
}

Output:

Dog is eating

Overloading vs Overriding in Java:

  1. Overloading is also known as compile-time polymorphism or static polymorphism or early binding while overriding is also called runtime polymorphism or dynamic polymorphism or late binding.
  2. The main purpose of overloading is to enhance the readability of the program while overriding the class gives its own implementation to an inherited method without even modifying the parent class code.
  3. Overloading occurs at compile-time whereas Overriding occurs at runtime.
  4. Overloading is made in the same class whereas Overriding inheritance is required.
  5. In overloading, the parameter needs to be different while in overriding the parameter must be the same.
  6. Private, static, and final methods can be overloaded but cannot be overridden.
  7. The return type can be the same or different in overloading while the return type must be the same or covariant return type in the overriding.

Statement Interface in Java – JDBC | Definition, Syntax, and Methods of Statement Interface with Example

Statement Interface in Java

In this tutorial, you will learn Statement Interface in Java-JDBC. With the help of the Statement object, we can send our SQL Query to Database. Furthermore, you will also read Statement interface methods with an example.

What is Statement Interface in JDBC?

In JDBC Statement is an Interface. By using the Statement object, we can send our SQL Query to Database. At the time of creating a Statement object, we don’t need to provide any Query. Statement object can work only for the static query.

Whenever we are applying an execute() method, every time Query will be compiled and executed. As Query will be compiled every time, its performance is low. Best choice for Statement object, if you want to work with multiple queries.

Syntax:

Statement stmt=conn.createStatement();

Commonly used Methods of Statement Interface

The important methods of Statement Interface are given below:

1. public boolean execute(String url): This method is used for all types of SQL statements (eg. Select, Insert, Update, etc.). This method returns a boolean value. If you don’t know which method is used (executeQuery() or executeUpdate()) then you should go for execute() method.

2. public ResultSet executeQuery(String url): This method is used for the Select a statement which retrieves some data from the database. This method returns a ResultSet object.

3. public int executeUpdate(String url): If you want to modify in your database, then you should go for the executeUpdate() method. This method returns an int value which indicates the number of rows affected.

4. public int[] executeBatch(): This method is used the execute the batch of commands. This method returns an integer array.

Also Refer:

Here is my empty database:

Statement Interface in Java 1

JDBC Statement Interface Example:

import java.sql.*;
import java.util.*;
class InsertMultipleRows{
public static void main(String args[])throws Exception{
class.forName("com.mysql.jdbc.Driver");
Connection con = DriverManager.getConnection("jdbc:mysql://localhost:3306/emp_record","root"," ");
Statement st = con.createStatement();
Scanner sc = new Scanner(System.in);

while(true){
System.out.println("Enter employee number: ")
int eno = sc.nextInt();
System.out.println("Enter employee name: ")
String ename = sc.next();
System.out.println("Enter employee salary: ")
double esal = sc.nextDouble();
System.out.println("Enter employee address: ")
String eaadr = sc.next();

String sqlquery = String.format("insert into insert_rows values(%d,%s,%f.%s)", eno,ename,esal,eaddr);
st.excecuteUpdate(sqlquery);
System.out.println("Record inserted succesfully ");
System.out.println("Do you want to insert more records[yes/no]");
String option = sc.next();
if(option.equalsIgnoreCase("no")){
break;
}
}
}
}

Output:

Statement Interface in Java 2

Statement Interface in Java 3

Servlet Interface and its Methods Explained with Example | Methods of Servlet Interface

Servlet Interface and its Methods Explained with Example

Learn about Servlet Interface and its methods in detail by going through this tutorial. We will explain the purpose of all the methods with an example. Servlet Interface has five methods and is described below. Let us learn what is a Servlet Interface and the Methods supported by it.

What is the Servlet Interface?

All the servlets must implement the servlet interface. It defines the init(), service(), and destroy() methods that call by the server during the life cycle of a servlet. It also has a method that allows a servlet to obtain any initialization parameters.

Servlet Interface and its Methods

The methods define by servlet are given below:

1. public void init(ServletConfig sc) throws ServletException: It is called when the servlet initialized. The initialization parameter for the servlet can be obtained from sc. If you can’t initialize the servlet then you will get an Unavailable Exception.

2. public void service(ServletRequest req,ServletResponse res): It throws both ServletException, IOException
The Service() method is called to process a request from a client. You can read the request from a client from req. The response to the client can be written to res. You will get an Exception if IO and Servlet Problem Occurs.

3. public void destroy(): On completion of all pending requests or time out to the servlet, the server calls the destroy() method.

4. public String getServletInfo(): This method returns a string describing the servlet.

5. public ServletConfig getServletConfig(): This method returns a ServletConfig object that contains any initialization parameters.

Do Refer Similar Articles:

Java Servlet Interfaces with Examples

In this example, we have created a servlet by extending the Servlet Interface.

ServletInterfaceDemo.java file

Servlet interface and its methods explained with example 1

Web.xml file:

Servlet interface and its methods explained with example 2

Output:

Servlet interface and its methods explained with example 3

What is Enterprise JavaBeans (EJB)? – Architecture, Types, Advantages, Disadvantages

What is Enterprise JavaBeans (EJB)

EJB stands for Enterprise JavaBeans. EJB is a server-side component written in the Java programming language. Enterprise JavaBeans encapsulates the business logic of applications. Enterprise JavaBeans are typically deployed in EJB containers and run on the EJB servers.

EJB Architecture and its Components

EJB Architecture has three main components. They are

  • Enterprise Beans
  • EJB Container
  • Java Application Server

In general, Enterprise Beans run inside an EJB Container whereas EJB Container runs in a Java Application Server. This is how EJB Architecture works.

EJB container has the environment in which one or more Enterprise JavaBeans run. It provides the following control and management services.

  • Life Cycle Management.
  • Naming services.
  • Security checks.
  • Resource pooling.
  • persistence management.
  • Transactions coordinations.
  • Bean runtime context information(meta data).

Types of Enterprise JavaBeans

There are three types of Enterprise JavaBeans – Session beans, Entity beans, and Message-driven beans.

1. Session Bean: It stores the information of a particular client for a single session. Ecan Session bean is associated with one EJB client. It is created and destroyed by the particular client that is associated with it. It either can have stateless or stateful. A session bean can be destroyed if at all the EJB server crashes. Session bean does not represent data that must be stored in a database.

2. Entity Bean: It represents persistent data storage. In a persistent storage mechanism, an Entity bean denotes the business object. The Application Server has a relational database which is the persistent storage mechanism. An entity bean can be shared by multiple EJB clients. An entity bean can share access from many users. These are persistent and can survive when the EJB server crashes.

3. Message-Driven Bean: It is the third form of EJB, which you can initiate by sending a request from Java Message Service (JMS). Message-Driven bean includes the business logic same as in the session bean but it is invoked by passing the message. It can consume JMS messages from external entities.

When to Use Enterprise JavaBeans?

  • If the Application needs remote access i.e. if it is distributed.
  • If you need the Application to be Scalable you can go with Enterprise JavaBeans as it supports load balancing, clustering, and failover.
  • If the Application needs encapsulated business logic you can go with Enterprise JavaBeans. The application can be differentiated from the persistent and demonstration layer.

Advantages of Enterprise JavaBeans (EJB)

  • Enterprise JavaBeans can simplify the development of large, and distributed applications.
  • The EJB container – and not the Bean Developer – provides system-level services, such as transaction management and security authorization. So the developer has to focus only on the business logic of the applications.
  • EJB is of portable components, so the developer can build new applications by using the existing beans.

Disadvantages of Enterprise JavaBeans (EJB)

  • To run the EJB Applications they need an application server.
  • Developing the EJB applications requires only Java Developer.
  • Complex to develop EJB applications.

How to find String length in Java using length method? | Java String length() with Example | length vs length()

How to find String length in Java using length method

In this tutorial, we will discuss how to find the string length in java. We can find string length in java using the length() method of the String class.

Java String length()

This method returns the length of the string. Remember that the length variable is used in the array whereas the length() method is used in the string. If you try to use the length variable to find the string length then the complier will get a compile-time error. The signature of java string length() is written as shown below.

Syntax:

The syntax of the string class length() method is given below:

public int length()

Return Value

This method returns the length of a string in Java.

Internal Implementation

public int length() { 
return value.length; 
}

length vs length()

length  length() Function
The length variable in an array returns the length of an array i.e. a number of elements stored in an array. The length() returns the length of a string object i.e. the number of characters stored in an object.
Once arrays are initialized, their length cannot be changed, so the length variable can directly be used to get the length of an array. String class uses this method because the length of a string can be modified using the various operations on an object.
Examples: length can be used for int[], double[] to know the length of the arrays. Examples: length() can be used for String, StringBuilder, etc. Basically, it is utilized for String class-related Objects to know the length of the String
The length variable is used only for an array. The String class internally uses a char[] array that it does not expose to the outside world.

Also Read:

Example of Java String length() Method

class StringLength{
public static void main(String args[]){
String str1 = "Javastudypoint";
String str2 = "Prashant";
//14 is the length of the str1.
System.out.println("The length of the str1 is: "+str1.length());
//8 is the length of the str2.
System.out.println("The length of the str2 is: "+str2.length());
}
}

Output:

The length of the str1 is: 14
The length of the str2 is: 8

Let’s see an example of what happened if we are using the length variable instead of the length() method in the case of a string. If you do so, then the compiler will get a compile-time error saying cannot find the symbol. Let’s see the sample code on it.

class StringLength{
public static void main(String args[]){
String str1 = "Javastudypoint";
String str2 = "Prashant";
//using length variable instead of length().
System.out.println("The length of the str1 is: "+str1.length);
//using length variable instead of length().
System.out.println("The length of the str2 is: "+str2.length);
}
}

Output:

How to find String length in Java using length method

Session Tracking in Servlet and its Techniques | Session Tracking Methods

Session Tracking in Servlet and its Techniques

In this tutorial, we will learn What is Session, Session tracking in the servlet, why do we use sessions, and various techniques for Sessions. Usually, there are 4 different techniques to manage the session. Before discussing its techniques in detail let’s first understand the basics of the session.

What is a Session?

The session means a particular interval of time. The data of the session are stored on a server. Usually, Session is a conversation between the client browser and a server.

What is Session Tracking in Servlet?

Session tracking means keeping needful information about the user and his action for a series of conversions. Session tracking is also known as Session Management.

Also, Check:

Why do we use Session?

HTTP is a stateless protocol that means each time a user requests to the server, it treats a new request as shown in the figure given below. It provides no built-in-way for a server to recognize that a sequence of requests all originated for the same user. To maintain the state of a user to recognize particular user session tracking will use. To understand this see the image given below:

Session Tracking in Servlet and its Techniques

Session Tracking Techniques

There are 4 ways to manage the session. We have outlined in detail all 4 session tracking methods for your convenience. They are as such

  1. Cookies
  2. Hidden Form Field
  3. URL Rewriting
  4. HttpSession

Cookies

Webserver assigns a unique session ID as a cookie to each web client and on client subsequent requests we can identify them as received cookie. This is not that effective as the browser will not always support a cookie and it is better to use this procedure in order to maintain sessions.

Hidden Form Fields

A Webserver can send hidden HTML Format along with unique session ID as such

<input type = "hidden" name = "sessionid" value = "12345">

This entry means after submitting the form, a specified name and value will be automatically included in the GET or POST-Data. You can keep the track of different web browsers using the sesson_id value whenever the web browser sends a request back.

This can be an effective technique to keep track of the session. However, clicking on a regular hypertext link will not result in form submission. Thus, Hidden Form Fields will not even support general session tracking.

URL Rewriting

You can append extra data at the end of each URL which identifies the session that the server can associate with the session identifier with data, it stored regarding the session.

For example, with http://btechgeeks.com/file.htm;sessionid = 12345, the session identifier is attached as session-id = 12345 with which it can be accessed at the webserver for client identification.

URL Rewriting is a better technique to maintain sessions. This works even if the web browser doesn’t support cookies. The only drawback with this method is you need to generate each URL Dynamically to allot a session ID even if you need a simple static HTML Page.

HttpSession Object

Along with the above listed three ways servlet provides HttpSession Interface provides a way to identify a user across more than one page request or visit to a website and stores info regarding the user.

Servlet Container uses this interface to create a session between HTTp Client and HTTP Server. The session exists for a specific time duration over more than one connection or page request from a user.

You can obtain the HttpSession object by calling the public method getSession() of HttpServletRequest, as such

HttpSession session = request.getSession();

Exception Handling in JSP | What is Exception & Error? | Methods of Handling Exceptions in JSP with Examples

Exception Handling in JSP

In the previous tutorial, we have discussed JSP Directives. Now, we have come with the new JSP Topic ie., Exception Handling in JSP. So, in this tutorial, we will learn JSP Exception Handling with Examples. Before understanding JSP Exception Handling, let’s start learning what is Exception and how it is different from errors. Just use the direct links for quick reference about the JSP Exception Types, Methods, etc.

What is an Exception?

An exception is an event, that occurs during the execution of a program, that disrupts the normal flow of program instructions. when an error occurs within a method, the methods create objects and hands it off to the runtime system.

The object called an exception object. It contains the information about the error, including its type and state of the program when the error occurred. Exception Handling is the process of handle the errors that may occur during runtime.

Types of Exceptions in JSP

There are three types of JSP Exceptions. They are as follows:

Checked Exceptions

It is usually a user error or problems which are not recognized by the developer are named as checked exceptions.

Runtime Exceptions

Runtime exceptions are the one which could have evaded by the programmer. They are overlooked at the time of compilation.

Error Exception

It is an example of the throwable class, and it is used in error pages.

A few of the throwable class methods are:

  • Public String getMessage() – returns the message of the exception.
  • Public printStackTrace()- returns the stacktrace of the exception.
  • Public throwablegetCause() – returns cause of the exception.

What is Error?

Most of the time errors are not caused by our program these are caused by system resources. We cannot handle the errors.

For instance: if OutOfMemory occurs being a programmer we can’t do anything and the program will be terminated automatically.

Also Read:

Methods of Handling Exception in JSP

In JSP, We can handle the exceptions in two ways. They are as such:

  • By errorPage and isErrorPage attributes of page directive
  • By <error-page> element in web.xml file

Handling Exception using page directive attributes

In JSP Page Directive, there are two attributes that help in handling exceptions in JSP. They are:

1. errorPage:

This attribute is utilized to notify the container to jump the control to another JSP page if an exception occurs in the current JSP page. Extra JSP page is used to handle the exception that is happened in the current JSP page.

Syntax: <%@ errorPage = “error.jsp” %>

2. isErrorPage:

This attribute is utilized to notify the container that makes a JSP an error page or not. The default value of this attribute is false. It means a JSP page is not acting as an error page by default. To make a JSP page as an error page than we should write isErrorPage = “true”. If isErrorPage = “true” then only execution objects is passed into a JSP page.

Syntax: <%@ isErrorPage=”true” %>

Example of exception handling in JSP by the elements of page directive:

In this example, we are creating the 3 files.

  1. index.jsp: for input values.
  2. calculation.jsp for dividing the two numbers and display the result.
  3. error.jsp for handle the jsp exception.

index.jsp

Exception Handling in JSP 1

calculation.jsp

Exception Handling in JSP 2

error.jsp

Exception Handling in JSP 3

Output:

Exception Handling in JSP 4

Exception Handling in JSP 5

Handling Exceptions Using error-page Element in web.xml File

The other way of defining the error page for each element, but in place of using the errorPage directive, the error page for each page can be specified in the web.xml file, with the help of the <error-page> element.

The syntax for <error-page> is as follows:

<web-app> 

<error-page> 
<exception-type>Type of Exception</exception-type> 
<location>Error page url</location> 
</error-page> 

</web-app>

Example of JSP exception handling by the error-page element in web.xml file:

The below example shows the usage of this technique to handle exceptions:

index.html

<html>
<head>
<body>
<form action="a.jsp"> 
Number1:<input type="text" name="first" >
Number2:<input type="text" name="second" > 
<input type="submit" value="divide"> 
</form> 
</body>
</html>

a.jsp

// JSP code to divide two numbers
< %

String num1
= request.getParameter("first");
String num2 = request.getParameter("second");
// extracting the numbers
int x = Integer.parseInt(num1);
int y = Integer.parseInt(num2);
int z = x / y; // dividing
out.print("division of numbers is: " + z); // result

% >

error.jsp

// JSP code for error page, which displays the exception
<%@ page isErrorPage="true" %> 

<h1>Exception caught</h1> 

// displaying the exception
The exception is: <%= exception %>

web.xml

<web-app> 

<error-page> 
<exception-type>java.lang.Exception</exception-type> 
<location>/error.jsp</location> 
</error-page> 

</web-app>

Output:

In this case, the output is as same as the previous one.