Introduction to JSP(Java Server Pages) – Syntax, Features, Advantages, Disadvantages

Introduction to JSP

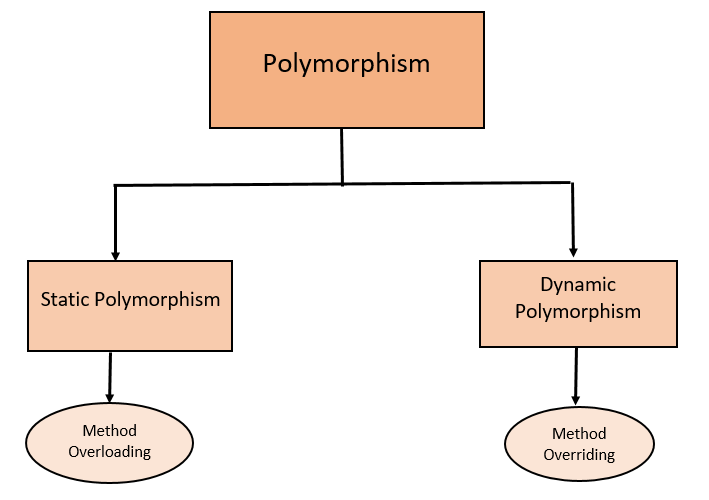
In this, we will learn what is JSP and why we use JSP. Basically, it is an introductory part of JSP. We will learn all the topics related to the JSP tutorial. But first, you need a basic understanding of JSP. Get to Know the Java Server Pages Syntax, Features, Advantages, Disadvantages, Difference Between JSP and Servlet explained in detail.

What is JSP?

JSP stands for Java Server Pages. It is a server-side technology. It is used to create a dynamic web application. The key part of the Java 2 Enterprise Edition(J2EE) platform is the JavaServer Pages(JSP) technology. To simplify dealing with presentation and dynamic data on web pages is the goal of JSP technology.

The JSP technology is based on servlet technology, in fact, all the JSP pages are eventually compiled into a servlet code. However, it is found that writing a JSP page is far less involved compared to writing a servlet code. This is written by those who don’t have java experience. A JSP page is a markup document that can be either in JSP syntax or in Extensible Markup Language(XML ) format.

JSP Syntax

JSP has the following syntaxes.

Declaration Tag: You can use this tag to declare variables and the syntax is as under

Syntax:- 
<%! Dec var %>
Example:-
<%! int var=10; %>

Java Scriplets: Using these you can add any number of Java Code, Expressions, Variables.

Syntax:- 
<% java code %>

JSP Expression: It evaluates the expression and converts it to a string.

Syntax:- 
<%= expression %> 
Example:- 
<% num1 = num1+num2 %>

JAVA Comments: It includes the text for information and should be ignored.

Syntax:- 
<% -- JSP Comments %>

Features of JSP

  • Coding in JSP is easy as it is a simple addition of JAVA code to HTML/XML.
  • In JSP we use action tags, custom tags, etc. for the reduction of code.
  • We can easily connect to the Database and allows us to read or write data to the database.
  • Allows us to create dynamic web pages that help the user to interact in a real-time environment. Permits you to make interactive websites.
  • Powerful, Portable, Flexible, and Easy to Maintain as they are browser and server independent.
  • There is no need for Redeployment and Re-Compilation. It is dynamic, secure, and platform-independent.
  • It has all features of servlets, implicit objects, and custom tags.

Also, Check:

Advantages of JSP Technology

  • Whenever we are developing the one JSP page we no need to configure it inside the web.xml file.
  • Presenting the data is very fast compared to a servlet.
  • Whenever we are modifying the JSP we no need to start the server, stop the server and restart the server.
  • The JSP pages are allowed by the HTML code and textual data and java code also.

Rule of JSP Page

  • Whenever we are developing the JSP page must and should we need to save extension is .jsp.
  • After developing the JSP page must and should we need to place it inside the application scope(under root folder).

Drawbacks of Servlet Technology

  • Whenever we are developing the servlet must and should we have to configure it inside the web.xml file.
  • Whenever we are modifying the servlet must and should we need to stop the server and we need to compile the servlet and restart the server.
  • Servlet is allowed by the java code but not text and HTML code.
  • Whenever we are using the servlet presenting the data is very slow.

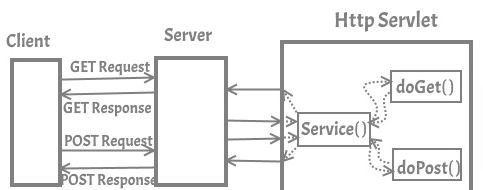
Difference between Servlets and JSP

The difference between servlet and JSP is given below:

1. JSP is an extension of a servlet. It contains all features of servlets and extra it contains an implicit object, tags, custom action, etc.
2. Whenever we are modifying in servlet we have to recompile, redeploy and restart the server. If we do any modification in JSP just the refresh button is enough to reflect the changes.
3. Servlets require more java knowledge, while JSP requires less java knowledge because JSP is tag-based.
4. In the MVC(Model Control View) the servlets are acting as a controller part and JSP is acting as a Model part.
5. In servlets, we are mixing both business logic as well as presentation logic, But in JSP we can separate both presentation and business logic.
6. Servlets are good at writing Business logic while JSP is good at writing presentation logic.
7. To access the servlets web.xml file are mandatory, But to access the JSP file the web.xml file is optional.
8. Performance-wise servlets are better than JSP.
9. Life Cycle methods of servlets are init(),service() and destroy(),while the life cycle methods of JSP are _jspinit(), _jspservice(), _jspdestroy().

What is the difference between final and immutable in Java? | Definitions and Example for Final Vs Immutable in Java

What is the difference between final and immutable in Java

Let’s get into this tutorial and learn completely about What is the difference between final and immutable in Java? Apart from the final vs immutable with example explanation, you may also get to know what is final and immutable in java efficiently from here. Just click on the links available below and start understanding the concept thoroughly.

What is Final in Java?

The Final in Java is a keyword that is relevant only to variables, methods, and classes. The Java Final Keyword is used to restrict the user to use variables, methods, and classes. The Final keyword is applicable for all the types of variables like instance variable, static variable, and local variable.

When a variable indicated as final and assigned a value, you can’t alter the value of the variable. The final method can’t be overridden by the child class. A class that is declared final cannot be extended.

What is Java Immutability?

Immutability means once we create an object it is not permissible to modify the content of that object. If any person trying to change the content if there is a change in the content with those changes a new object will be generated. If there are no changes in the content existing object will be reused.

Difference between Final and Immutable in Java

1. Final means that you can’t change the object reference to point to another reference or another object, but you can still mutate its state (by using the setter method). Where immutable means that the object’s actual value can’t be changed, but you can change its reference to another one.

2. The modifier final is applicable for variables not for objects, Whereas immutability applicable for objects not for variables.

3. Final ensures that the address of the object remains the same, Whereas the immutable suggest that we can’t change the state of the object once created.

4. By declaring the reference variable as final we are not going to get any immutability nature but we can perform any type of changes in the corresponding objects and we can’t reassign the reference variable to any new object.

Also Refer:

Java program to demonstrate the difference between final and immutability:

class Test{
public static void main(String args[]){
final StringBuffer sb = new StringBuffer("Java");

//Even though reference variable is final
//we can perform any changes to corresponding object.
sb.append("studypoint");
System.out.println(sb);

//Here, we will get compile time error because
//we can't reassign reference variable to any new object.
sb = new StringBuffer("Hello Javastudypoint");
System.out.println(sb);
}
}

Output:

What is the difference between final and immutable in Java 1

Diagrammatically representation of the above program

What is the difference between final and immutable in Java 2

Explanation:

In the earlier diagram, we can see that we are creating an object of the StringBuffer class by making the reference variable final.

  1. By declaring a reference variable final, it does not mean that the object is immutable in nature.
  2. In the second line, we are performing append() operation on the created object and it is successfully changed.
  3. If the object is immutable, the above operation can’t be done.
  4. But it is executed successfully as we declare the reference variable as final, which means we can’t reassign anything to that reference variable again.
  5. Therefore when we try to create a new object of the StringBuffer class then it won’t be created and we will get a compile-time error.

HttpServlet Class in Servlet Explained with Example | Definition & Methods of HttpServlet Class with Example

HttpServlet Class in Servlet explained with example

Let’s learn completely about the HttpServlet class in servlet and know what are the most important methods used by HttpServlet Class in this tutorial. You may also discover the purpose of all the methods with an example from here. So, make use of these links available & understand the concept thoroughly with ease.

What is HttpServlet class?

The HttpServlet class extends the GenericServlet. It is commonly used when developing servlets that receive and process HttpRequest. Basically, HttpServlet class totally depends on HTTP Request Methods. HttpServlet class implements Http specific methods like doGet(), doPost(), doHead(), doDelete(), doPut() etc.

In HTTP Servlet there is no requirement to override the service() method as this method dispatches the Http Requests to the correct method handler. Let’s check how it works and what is the hierarchy of the HTTP servlet class in the below sections.

Hierarchy of Http Servlet in Servlet

Here is the hierarchy of the httpservlet class in servlet:

java.lang.Object
    |_extended byjavax.servlet.GenericServlet
       |_extended byjavax.servlet.http.HttpServlet

How Http Servlet class works?

As you can see the working of the HTTP servlet class from the below-illustrated image:

working of http servlet class in servlet

Do Refer:

Methods of HttpServlet Class

We have compiled the most important methods of the HttpServlet class below. Check out them thoroughly and make use of these methods in your further practice examples:

1. public void doGet(HttpServletRequest req, HttpServletResponse res): throws ServletException, IOException This method is called the servlet service() method. It is used to handle HTTP Get requests from the client browser.

2. public void doPost(HttpServletRequest req, HttpServletResponse res): throws ServletException, IOException. This method is called the Servlet service() method. It is used to handle HTTP Post requests from the client browser.

3. public void doDelete(HttpServletRequest req, HttpServletResponse res) throws ServletException IOException. This method is called the Servlet service() method. It is used to handle HTTP delete requests from the client browser.

4. public void doHead(HttpServletRequest req, HttpServletResponse res) throws ServletException, IOException. This method is called the Servlet service() method. It is used to handle HTTP head requests from the client browser.

5. public void doPut(HttpServletRequest req, HttpServletResponse res) throws ServletException, IOException. This method is called the Servlet service() method. It is used to handle HTTP Put requests from the client browser. This method is used to send the file to the server.

6. public void doTrace(HttpServletRequest req, HttpServletResponse res) throws ServletException, IOException. This method is called the Servlet service() method. It is used to handle HTTP trace requests from the client browser. It is used for debugging purposes.

7. public void doOption(HttpServletRequest req, HttpServletResponse res) throws ServletException, IOException. This method is called the Servlet service() method. It is used to handle the HTTP option request from the client browser.

8. public long getLastModified(HttpServlerRequest req): It returns the time(in milliseconds since midnight, January 1, 1970, GMT) when the requested resource was last modified.

9. public void Service (HttpServletRequest req, HttpServletResponse res) throws ServletException, IOException. It is called by the server when an HTTP request arrives for this servlet. The arguments provide access to the HTTP request and response, respectively.

HttpServlet class Example:

In this instance, we are creating a HttpServlet by extending the HttpServlet Class.

HttpServletExample.java file:

HttpServlet Class in Servlet explained with example 1

Web.xml file

HttpServlet Class in Servlet explained with example 2

Output:

HttpServlet Class in Servlet explained with example 3

Session Management Using Hidden Form Field in Servlet with Example – Syntax, Advantages, Disadvantages

Session Management Using Hidden Form Field in Servlet with Example

Learn about the Session Management Technique in Servlet i.e Hidden Form Field. Before discussing this technique in detail let’s first understand about Hidden Form Field. In this tutorial, you will get acquainted with details such as Syntax for Hidden Form Field, its Advantages, Disadvantages, and Example Program Using Hidden Form Field in Servlet.

What is a Hidden Form Field?

Hidden Form Field is a technique used to support Session Tracking. The name itself implies, these are fields added to an HTML form and are not displayed in the client browser. They are sent back to the server when the form that contains them is submitted. You include Hidden Form Fields like this.

<input name="username" type="hidden" value="btechgeeks" />

In other words, hidden form defines constant variables for a form. To a servlet receiving a submitted form, there is no difference between a hidden field and a visible field. Using hidden fields, we can rewrite our shopping cart servlets so that users can shop anonymously until checkout time.

Advantages of Hidden Form Field

Hidden fields are supported in all popular browsers, they demand no special server requirement, and they can be used with the client that hasn’t registered or logged in.

Disadvantages of the Hidden Form Field

One drawback of this technique, is that the session persists only through a sequence of dynamically generated forms. The session cannot be maintained with the static document, emailed documents, bookmarked documents, or browser shutdown.

Read More Techniques of Session Management in Servlet

Hidden Form Field Example

In this example, we are storing username and password in a hidden text field and getting this information in another servlet.

index.html file:

Session Management Using Hidden Form Field in Servlet with Example 1

HiddenFormField1.java file:

Session Management Using Hidden Form Field in Servlet with Example 2

HiddenFormField2.java file:

Session Management Using Hidden Form Field in Servlet with Example 3

Web.xml file:

Session Management Using Hidden Form Field in Servlet with Example 4

Session Management Using Hidden Form Field in Servlet with Example 5

Session Management Using Hidden Form Field in Servlet with Example 6

Session Management Using Hidden Form Field in Servlet with Example 7

GenericServlet class in Servlet with Example | Definition, Hierarchy, Methods & Sample Code of Generic Servlet

GenericServlet class in Servlet with Example

In this tutorial, we will discover what is GenericServlet class and its important methods? Also, we will explain all GenericServelt class methods’ purposes with an example. Let’s start with the understanding of GenericServlet class definition first and then move forward to know about methods of GenericServlet class in Servlet with Example.

What is the GenericServlet class?

GenericServlet class provides implementations of the basic life cycle method for a servlet and is typically subclassed by the servlet developers. GenericServlet implements servlet and ServletConfig interfaces. It is a protocol-independent servlet as it can handle any type of request. GenericServlet class is used to create a generic servlet and providing the implementation of the service() method.

How Generic Servlet works?

working of genericservlet class

java.lang.Object
              |_extended byjavax.servlet.GenericServlet

Also Read:

Methods of GenericServlet class

The methods illustrated by the GenericServlet class are provided below:

1. public void init(ServletConfig sc) throws ServletException: It is called when the servlet initialized. Initialization parameter for the servlet can be obtained from sc. An UnavailableException should be thrown if the servlet cannot be initialized.

2. public void service(ServletRequest req, ServletResponse res) throws ServletException, IOException: The Service() method is called to process a request from a client. The request from a client can be read from req. The response to the client can be written to res. An Exception is generated if some IO and Servlet problems occur.

3. public void destroy(): The server calls the destroy() method after the servlet has been taken out of service and all pending requests to the servlet have completed or time out.

4. public String getServletInfo(): This method returns a string describing the servlet.

5. public ServletConfig getServletConfig(): This method returns a ServletConfig object that contains any initialization parameters.

6. public ServletContext getServletContext(): It returns the context for this servlet.

7. public void log(String str): It is used to writes str to the servlet log.

8. public void log(String str, Object obj): It sets the attribute specified by str to the value passed in obj.

9. public String getServletName(): This method is used to returns the name of the invoking servlet.

10. public String getInitParameter(String param): It returns the value of the initialization parameter named param.

11. public Enumeration getInitParameterNames(): It returns an enumeration of all initialization parameter names.

Servlet Example by inheriting the GenericServlet class

In this example, we have built a servlet that inherited the GenericServlet class. If you don’t know what is inherited.

import java.io.*; 
import javax.servlet.*; 

public class First extends GenericServlet{ 
public void service(ServletRequest req,ServletResponse res) 
throws IOException,ServletException{ 

res.setContentType("text/html"); 

PrintWriter out=res.getWriter(); 
out.print("<html><body>"); 
out.print("<b>hello generic servlet</b>"); 
out.print("</body></html>"); 

} 
}

Session Management Using URL Rewriting in Servlet | URL Rewriting Session Tracking in Servlet

Session Management Using URL Rewriting in Servlet

Let us learn in detail about Servlet Session Management using URL Rewriting. You can go with this technique URL Rewriting to manage the session. Before discussing this technique in detail let’s first understand what URL Rewriting means exactly in the further modules. You will get acquainted with Syntax, Advantages, Disadvantages, URL Rewriting for Session Tracking in Servlet Examples.

Also, See:

What is meant by URL Rewriting?

URL Rewriting is another way to maintain session tracking.URL Rewriting technique can be used if the client has disabled the cookies in the browser. You can send textual information from one resource to another resource by utilizing a URL. In URL we can send the parameter name and value and this value we can get using the getParameter() method. In this technique, the session id will be added to the URL of the next resource or request.

Syntax of URL Rewriting:

url?paramname1=paramvalue1&paramname2=paramvalue2...

Advantages of URL Rewriting

There are quite a few advantages that come with the URL Rewriting Tracking Mechanism in Servlet. They are in the below fashion

  1. You can avail this technique if the client disables the cookies in the browser.
  2. URL Writing supports all browsers.

Disadvantages of URL Rewriting

There are certain drawbacks of using the URL Rewriting Method and they are as such

  1. The Drawback with this is technique is it sends only textual information.
  2. It can be tedious.
  3. URL Rewriting works with links.

URL Rewriting Example

In this example, we will show you how to manage the session using URL Rewriting Techniques. Here we have created a login page and validate the username and password. If the user enters the right credential it will show the user profile otherwise it will redirect to the login page and give you a message wrong username and password. Let’s understand this with the example given below.

index.html file:

Session Management Using URL Rewriting in Servlet 1

UrlRewritingServlet1.java file:

Session Management Using URL Rewriting in Servlet 2

UrlRewritingServlet2.java file:

Session Management Using URL Rewriting in Servlet 3

Web.xml file:

Session Management Using URL Rewriting in Servlet 4

Session Management Using URL Rewriting in Servlet 5

Session Management Using URL Rewriting in Servlet 6

Session Management Using URL Rewriting in Servlet 7

Session Management in Servlet Using HttpSession | Session Tracking using HttpSession

Session Management in Servlet Using HttpSession

Among different techniques for session management in servlet, we will learn about one of them i.e. HTTPSession to manage the session. In the previous technique, we have learned session management using URL Rewriting Here we will learn the Fourth and last techniques HttpSession to manage the session. Before discussing this technique in detail let’s first understand about HttpSession.

What is HttpSession?

The HttpSession interface is implemented by the server. The servlet container uses this interface to create a session between the Http client and Http server. It allows the servlet to read and write the state information that is involved with an HttpSession.

How to get a HttpSession Object?

There are 2 different methods to obtain the HttpSession Object
1. public HttpSession getSession(): This method returns the current session associated with this request or if the request doesn’t have any session it creates a new session,

2. public HttpSession getSession(boolean create): This method returns the HttpSession object. It returns the HttpSession object if a request has a session otherwise it returns null.

How HttpSession Work?

On the left side, there are two clients and in the center, there is a container (webserver). The first client sends the request to the web server, the web server creates the SessionId for the first client and this Session Id send back to the first client. If the first client makes a further request for the second request, the session id will be a part of this request so that the container can identify the particular user using the session id.

Session Management in Servlet Using HttpSession 1

If the second client sends the request to a web server, the web server creates the session for the second client and this Session Id sends it back to the second client. if the second client makes a further request for the second request the session id will be part of this request so the container can identify the particular user using the session id.

Do Read:

Methods of HttpSession Interface

1. public long getCreationTime(): It returns the time(in milliseconds since midnight, January 1, 1970, GMT) when the session was created.

2. public String getId(): It returns the session Id.

3. public void invalidate(): Invalidates this session and removes it from the context.

4. public boolean isNew(): It Returns true if the server created the session and is not yet accessed by the client.

5. public void setAttribute(String str, object obj): Associated the value passed in obj with the attribute name passed in str.

6. public long getLastAccessedTime(): It returns the time(in milliseconds since midnight, January 1, 1970, GMT)when the client last made a request for this session.

HttpSession Example

index.html file:

Session Management in Servlet Using HttpSession 2

HttpSessionServlet1.java file:

Session Management in Servlet Using HttpSession 3

HttpSessionServlet2.java file:

Session Management in Servlet Using HttpSession 4

web.xml file:

Session Management in Servlet Using HttpSession 5

Session Management in Servlet Using HttpSession 6

Session Management in Servlet Using HttpSession 7

Session Management in Servlet Using HttpSession 8

Java if-else-if ladder with Example | Definition, Syntax, Flowchart & Example Program of If-Else-If Statement in Java

Java if-else-if ladder with Example

A programming language utilizes control statements to control the flow of execution of a program. In Java programming, we can control the flow of execution of a program based on some conditions. Java control statements can be put into the following three categories: selection, iteration, and jump. In this tutorial, you will learn completely about the java if-else-if ladder statement with an example.

Java if-else-if ladder Statement

Java if-else-if ladder is applied to work on multiple conditions. The if statements are executed from the top down. When one of the conditions controlling the if and it is true, the statement associated with that if is executed, and the rest of the ladder is bypassed.

If none of the conditions is true, then the final else statement will be executed. The final else acts as a default condition; that is, if all other conditional tests fail, then the last else statement is performed. If there is no final else and all other conditions are false, then no action will take place.

Syntax of if-else-if:

if(condition1){
//statement1;
}
else if(condition2){
//statement2;
}
else if(condition3){
//statement3;
}
.........
.........
.........
else{
//default statement;
}

Do Check:

How the if…else…if ladder works?

  1. Control falls into the if block.
  2. The flow jumps to Condition 1.
  3. Condition is tested.
    • If Condition yields true, go to Step 4.
    • If Condition yields false, go to Step 5.
  4. The present block is executed. Go to Step 7.
  5. The flow jumps to Condition 2.
    • If Condition yields true, go to step 4.
    • If Condition yields false, go to Step 6.
  6. The flow jumps to Condition 3.
    • If Condition yields true, go to step 4.
    • If Condition yields false, execute else block. Go to Step 7.
  7. Exit the if-else-if ladder.

Look at the following image format of Working of the if-else-if ladder:

Working of the if-else-if ladder image

Flowchart if-else-if ladder:

Java if-else-if ladder with Example 1

Java if-else-if ladder Example:

class IfElseLadder {
public static void main(String[] args) {

int examscore = 75;
char grade;

if(examscore >= 90) {
grade = 'A';
} else if (examscore >= 80) {
grade = 'B';
} else if(examscore >= 70) {
grade = 'C';
} else if(examscore >= 60) {
grade = 'D';
} else {
grade = 'F';
}
System.out.println("Grade is = " + grade);
}
}

Output:

Grade is = C

Polymorphism in Java | Types of Polymorphism in Java with Examples | Method Overloading vs Overriding in Java

Polymorphism in Java

In this tutorial, we will be discussing the most important concept of Java ie., Polymorphism. Knowing each and every bit about the polymorphism in java is very crucial for beginners & experienced coders. So, check out this page without missing any of the links available below. Let’s start with understand what is java polymorphism?

Java Polymorphism

Polymorphism in Java is a concept which enables you to do a single action in various ways. It is the ability of an object or method to take many forms according to requirements. One of the most important features of object-oriented programming (OOPs) is Polymorphism. It is a combination of 2 Greek words: poly and morph. The poly word signifies many and morphs words mean forms. Therefore, when one thing has many forms it is called Java Polymorphism.

Let’s consider a scenario where Car is a class that has a method speed(). Yet, the speed of the car may change according to cars. For instance, the Maruti car has a speed of 60 Km/h, the Alto car has a speed of 70 km/h, and the Brezza car has a speed of 80 km/h. So here is a single method called speed() but their behavior is different according to cars. This is known as polymorphism in Java.

Polymorphism in Java 1

Types of Polymorphism in Java

There are two types of polymorphism in Java:

  1. Static Polymorphism.
  2. Dynamic Polymorphism.

Compile-time polymorphism is also recognized as static polymorphism. Method Overloading is a way to implement compile-time polymorphism.

Runtime Polymorphism is also called Dynamic Polymorphism. Method Overriding is a method to perform the run-time polymorphism.

Polymorphism in Java 2

Also Check:

1. Static or Compile-time Polymorphism in Java:

This compile-time type of polymorphism is also known as static polymorphism. It is achieved by function overloading or operator overloading. But, Operator Overloading is not supported by java.

Method Overloading in Java:

Methods are said to be overloaded when many methods in a class having the same name but different parameter lists. It is similar to Constructor Overloading in Java, which allows a class to have more than one constructor having the same name but having different parameter lists. It increases the readability of the program.

Suppose we have a class Addition and you want to perform the addition of the given number, but there can be any number of parameters. If you write a method such as add2(int x, int y) for two parameters, and add3(int x, int y, int z) for three parameters, then it may be difficult for you and others to understand the behavior of the methods because of its name differs.

Ways to overload a method:

There are three ways to overload a method in Java.

  1. By changing the number of parameters.
  2. By changing the data type.
  3. By changing the sequence of the data type.

Example of Method Overloading: changing the number of parameters.

In this instance, we are going to show you how we can overload a method by changing the number of parameters. In this example, we have created two methods named as add(), first, add() method performs the addition of two numbers, and the second add() method performs the addition of three numbers.

class Addition{
public int add(int x, int y){
return x+y;
}
public int add(int x, int y, int z){
return x+y+z;
}
}
class Person{
public static void main(String args[]){
Addition obj = new Addition();
System.out.println("The Addition of two numbers is : " +obj.add(10,20));
System.out.println("The Addition of three numbers is : " +obj.add(10,20,30));
}
}

Output:

Polymorphism in Java 3

Example of Method Overloading: changing the data type of a parameter.

In this example, we are going to show you how we can overload a method by changing the data type of arguments. In this example, we have created two methods named as add(), But that method differs in data type. The first method calculates the addition of two integer value and the second method calculate the addition of two double value.

class Addition{
public int add(int x, int y){
return x+y;
}
public double add(double x, double y, double z){
return x+y+z;
}
}
class Person{
public static void main(String args[]){
Addition obj = new Addition();
System.out.println("The Addition of two numbers is : " +obj.add(10,20));
System.out.println("The Addition of three numbers is : " +obj.add(10.01, 20.02, 30.04));
}
}

Output:

Polymorphism in Java 4

Example of Method Overloading: changing the sequence data type.

In this example, we are going to show you how we can overload a method by changing the sequence of a data type. In this example, we have created two methods named as a display() with a different sequence of the data type of arguments list. The first method having the arguments (int, double), and the second method having the arguments (double, int).

class Addition{
public void display(int x, double y){
System.out.println("Defination of first method");
}
public void display(double x, int y){
System.out.println("Defination of second method");
}
}
class Person{
public static void main(String args[]){
Addition obj = new Addition();
obj.display(5, 4.5);
obj.display(2.5, 5);
}
}

Output:

Polymorphism in Java 5

Note: Method Overloading in Java is not possible by changing the return type of the method only because of the ambiguity problem. Let’s see how ambiguity may occur.

class Addition{
public int add(int x, int y){
return x+y;
}
public double add(int x, int y){
return x+y;
}
}
class Person{
public static void main(String args[]){
Addition obj = new Addition();
System.out.println(obj.add(4,5)); //Ambiguity may occur
}
}

In this example, we have created two methods named add(), But having a different return type. When we call this method Java compiler show compile-time error, because how can the Java compiler determine which add() method should be called?

2. Dynamic or Runtime Polymorphism in Java

Dynamic polymorphism is also known as runtime polymorphism. Method Overriding is a way to implement runtime polymorphism in Java.

Method Overriding in Java:

Method Overriding is a feature that allows you to redefine the parent class method in the child class based on its requirement.

In other words, whatever methods parent has by default available to the child through inheritance. Sometimes a child may not satisfy with parent methods implementation. Then the child is allowed to redefine that method based on its requirements, this process is called method overriding.

  • The parent class method which is overridden is known as an overridden method.
  • The child class method which is overriding is known as an overriding method.

The main purpose of method overriding is that the class gives its own implementation to an inherited method without even modifying the parent class code.

Rules for Method Overriding in Java:

  • The method of the parent class and the method of child class must have the same name.
  • The method of the parent class and the method of child class must have the same parameter.
  • Method Overriding in Java is possible through inheritance only.

Therefore to understand the concept of method overriding you should have the basic knowledge of Inheritance in Java

Example of Java Method Overriding:

Let’s take a simple example to understand the concept of method overriding.
We have two classes: A parent class Animal and a child class Dog. The Dog class extends the Animal class. Both the class have a common method eat(). The Dog class is giving its own implementation to the eat() method. It is an overriding eat() method.

The child class gives its own implementation so that when it calls this method, it prints Dog is eating instead of Animal is eating.

class Animal{
public void eat(){
System.out.println("Animal is eating");
}
}
class Dog extends Animal{
public void eat(){
System.out.println("Dog is eating");
}
}
class Person{
public static void main(String args []){
Dog obj = new Dog();
obj.eat();
}
}

Output:

Dog is eating

Overloading vs Overriding in Java:

  1. Overloading is also known as compile-time polymorphism or static polymorphism or early binding while overriding is also called runtime polymorphism or dynamic polymorphism or late binding.
  2. The main purpose of overloading is to enhance the readability of the program while overriding the class gives its own implementation to an inherited method without even modifying the parent class code.
  3. Overloading occurs at compile-time whereas Overriding occurs at runtime.
  4. Overloading is made in the same class whereas Overriding inheritance is required.
  5. In overloading, the parameter needs to be different while in overriding the parameter must be the same.
  6. Private, static, and final methods can be overloaded but cannot be overridden.
  7. The return type can be the same or different in overloading while the return type must be the same or covariant return type in the overriding.

Statement Interface in Java – JDBC | Definition, Syntax, and Methods of Statement Interface with Example

Statement Interface in Java

In this tutorial, you will learn Statement Interface in Java-JDBC. With the help of the Statement object, we can send our SQL Query to Database. Furthermore, you will also read Statement interface methods with an example.

What is Statement Interface in JDBC?

In JDBC Statement is an Interface. By using the Statement object, we can send our SQL Query to Database. At the time of creating a Statement object, we don’t need to provide any Query. Statement object can work only for the static query.

Whenever we are applying an execute() method, every time Query will be compiled and executed. As Query will be compiled every time, its performance is low. Best choice for Statement object, if you want to work with multiple queries.

Syntax:

Statement stmt=conn.createStatement();

Commonly used Methods of Statement Interface

The important methods of Statement Interface are given below:

1. public boolean execute(String url): This method is used for all types of SQL statements (eg. Select, Insert, Update, etc.). This method returns a boolean value. If you don’t know which method is used (executeQuery() or executeUpdate()) then you should go for execute() method.

2. public ResultSet executeQuery(String url): This method is used for the Select a statement which retrieves some data from the database. This method returns a ResultSet object.

3. public int executeUpdate(String url): If you want to modify in your database, then you should go for the executeUpdate() method. This method returns an int value which indicates the number of rows affected.

4. public int[] executeBatch(): This method is used the execute the batch of commands. This method returns an integer array.

Also Refer:

Here is my empty database:

Statement Interface in Java 1

JDBC Statement Interface Example:

import java.sql.*;
import java.util.*;
class InsertMultipleRows{
public static void main(String args[])throws Exception{
class.forName("com.mysql.jdbc.Driver");
Connection con = DriverManager.getConnection("jdbc:mysql://localhost:3306/emp_record","root"," ");
Statement st = con.createStatement();
Scanner sc = new Scanner(System.in);

while(true){
System.out.println("Enter employee number: ")
int eno = sc.nextInt();
System.out.println("Enter employee name: ")
String ename = sc.next();
System.out.println("Enter employee salary: ")
double esal = sc.nextDouble();
System.out.println("Enter employee address: ")
String eaadr = sc.next();

String sqlquery = String.format("insert into insert_rows values(%d,%s,%f.%s)", eno,ename,esal,eaddr);
st.excecuteUpdate(sqlquery);
System.out.println("Record inserted succesfully ");
System.out.println("Do you want to insert more records[yes/no]");
String option = sc.next();
if(option.equalsIgnoreCase("no")){
break;
}
}
}
}

Output:

Statement Interface in Java 2

Statement Interface in Java 3