MySQL row count – MySQL select row count [Everything around count()]

MySQL row count: In this article we are going to discuss MySQL select row count or Count() function.

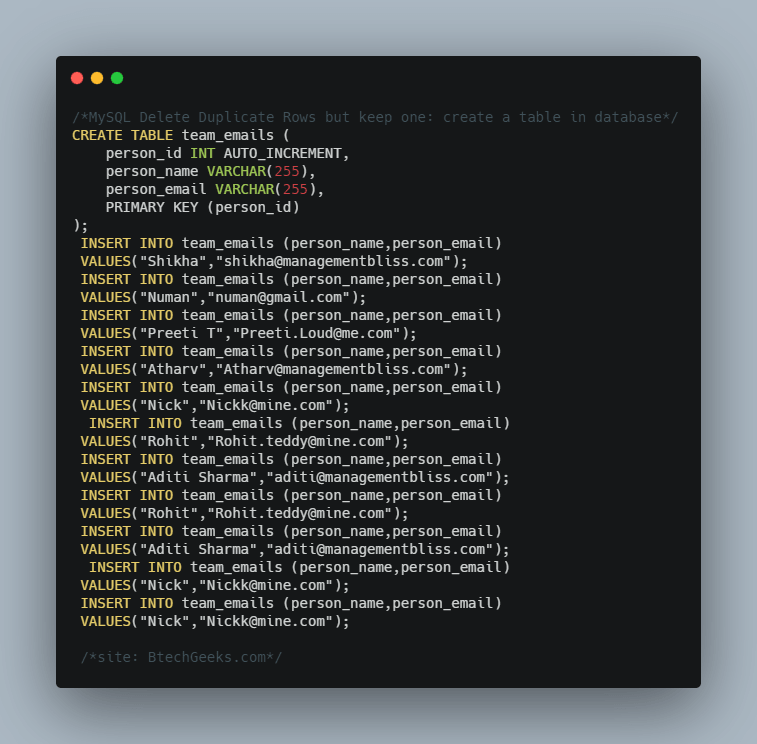
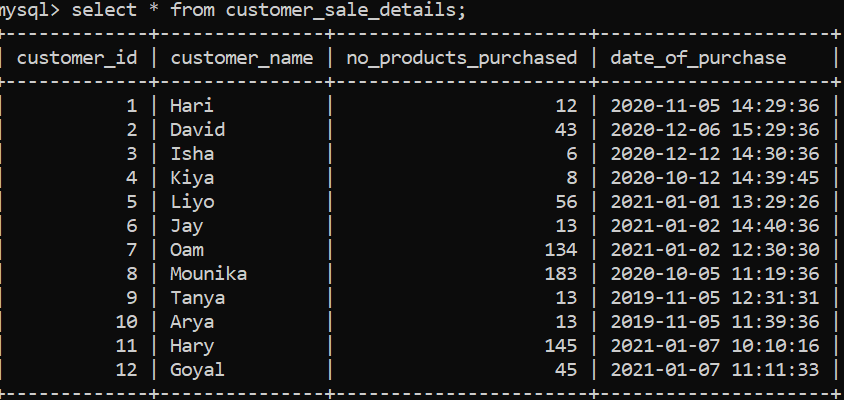
Now we are going to create a table ‘customer_sale_details’ which we will be using in our article to show row count() function.

CREATE TABLE customer_sale_details (
    customer_id INT auto_increment,
    customer_name VARCHAR(255),
    no_products_purchased INT,
    date_of_purchase DATETIME,
    primary key (customer_id)
);

Now we will insert value in it,

INSERT INTO customer_sale_details (customer_name,no_products_purchased,date_of_purchase) 
 VALUES
 ("Hari",12,'2020-11-05 14:29:36'),
 ("David",43,'2020-12-06 15:29:36'), 
 ("Isha",6,'2020-12-12 14:30:36'),
 ("Kiya",8,'2020-10-12 14:39:45'),
 ("Liyo",56,'2021-01-01 13:29:26'),
 ("Jay",13, '2021-01-02 14:40:36'),
 ("Oam",134,'2021-01-02 12:30:30'),
 ("Mounika",183,'2020-10-05 11:19:36'),
 ("Tanya",13,'2019-11-05 12:31:31'),
 ("Arya",13,'2019-11-05 11:39:36'),
 ("Hary",145,'2021-01-07 10:10:16'),
 ("Goyal",45,'2021-01-07 11:11:33');

Output:

MySql row count

Count table rows

Here we will discuss how to count number of rows in MySQL table.Below is the query for it,

SELECT COUNT(*) FROM customer_sale_details ;

Output:

+———-+
| COUNT(*) |
+———-+
| 12 |
+———-+

Here in above output you can see that there is 12 rows in our table.

Select row count of a query

Here we are give a condition based on that it will return row number.See the below query,

SELECT count(*) FROM (SELECT * FROM customer_sale_details WHERE customer_name="George") AS count_of_query;

Output:

+———-+
| count(*) |
+———-+
| 1 |
+———-+

Select row count(distinct)

Here we are going to get distinct customer name from the table.See below query,

SELECT COUNT(DISTINCT customer_name) AS Customer_Names FROM customer_sale_details;

Output:

+—————-+
| Customer_Names |
+—————-+
| 12 |
+—————-+

Let’s take some other condition to show distinct customer_name from the table.

SELECT COUNT(customer_name) FROM (
    SELECT DISTINCT customer_name FROM customer_sale_details  WHERE no_products_purchased  < 100
) AS customer_count;

Output:

———————-+
| COUNT(customer_name) |
+———————-+
| 9 |
+———————-+

Select row count GROUP BY

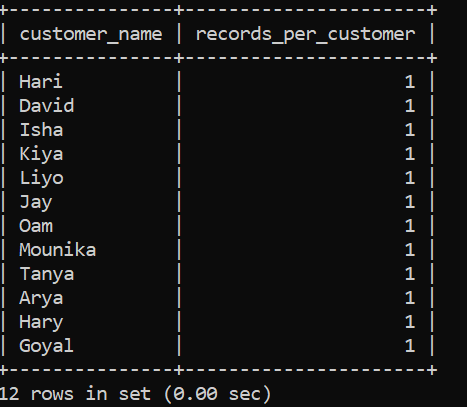
Here we are going to show working of GROUP BY using COUNT() function in it.Now we will get number of records GROUPED BY customer_name,

SELECT 
    customer_name, COUNT(customer_name) AS records_per_customer
FROM
    customer_sale_details
GROUP BY customer_name

Output:

MySql row count1

MySQL select row count from all tables

In this we are going to discuss different ways to get row count of all table present in database schema.

Syntax:

SELECT 
    TABLE_NAME, SUM(TABLE_ROWS) AS COUNT_OF_ROWS
FROM
    INFORMATION_SCHEMA.TABLES
WHERE
    TABLE_SCHEMA = 'Name of your schema'
GROUP BY TABLE_NAME;

Example:

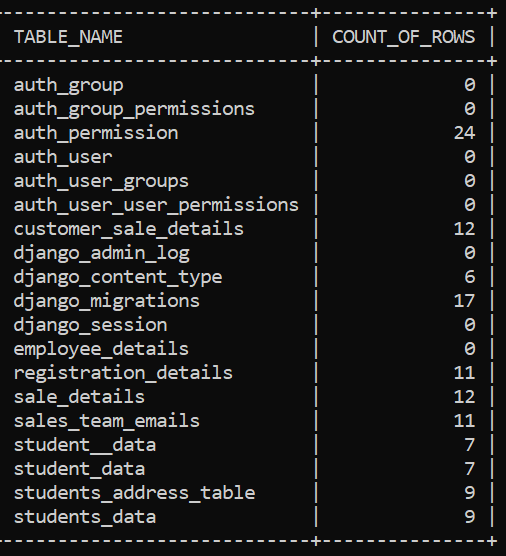
Here we are going to get the count of all the tables which are present in the schema ‘abc’.

SELECT 
    TABLE_NAME, SUM(TABLE_ROWS) AS COUNT_OF_ROWS
FROM
    INFORMATION_SCHEMA.TABLES
WHERE
    TABLE_SCHEMA = 'abc'
GROUP BY TABLE_NAME;

Output:

MySql row count2


You can also see status by using below query;

SHOW TABLE STATUS;

How to get the number of rows that a MySQL query returned

Here we are going to use SELECT FOUND_ROWS() which will return previous query rows.

SELECT * FROM customer_sale_details WHERE no_products_purchased < 50;

Output:

MySql row count3

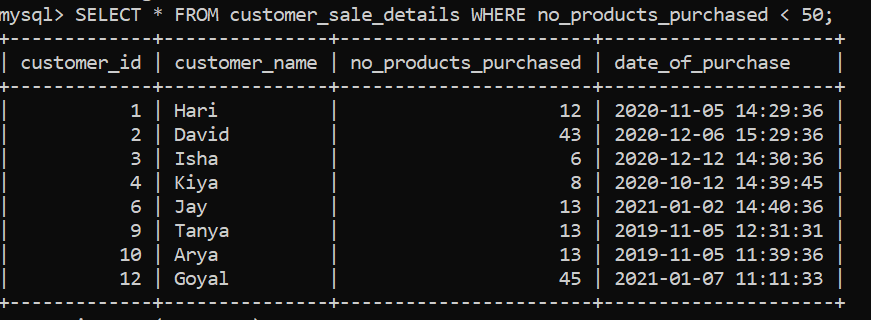
You can see that in output  we have got 8 rows.If you want to see the returned rows from last query you can get by using below query,

SELECT FOUND_ROWS();

Output:

+————–+
| FOUND_ROWS() |
+————–+
| 8 |
+————–+

Conclusion:

In this article we have discussed in deep MySQL select row count or Count() function.Thank You!

Lambda if else – Python : How to use if, else and elif in Lambda Functions

Lambda if else: Lambda function is the function that is anonymous. This anonymous functions are defined using a lambda keyword.

In this article we are going to  discuss about how to use if , else and elif in a lambda functions.

Syntax of Lambda function:

lambda arguments: expression

Python lambda if: So this function can have any number of parameter but have only one expression.That expression should return.

Here is an example how we are using Lambda function:

# lambda.py

cube = lambda x: x * x * x

print(cube(11))

Output:

lambda.py

1331

How to use if-else in Lambda function:

Lambda if else python: Here we are going to use if-else in Lambda function.

lambda <arguments> : <Return Value if condition is True> if <condition> else <Return Value if condition is False>

Let’s take an example, Create  lambda function to check if the given value is between 11 to 22.

# lamda.py

verify = lambda x: True if (x > 9 and x < 18) else False
print(verify(5))
print(verify(17))
print(verify(21))

Output:

RESTART: C:/Users/HP/Desktop/lambda.py
False
True
False

 Conditional lambda function without if-else in python:

If else in lambda python: Without using if and else keyword we can still get our result using conditional lambda function.For example,

# lambda.py

verify = lambda x : x > 9 and x < 18
print(verify(5))
print(verify(17))
print(verify(21))

Output:

RESTART: C:/Users/HP/Desktop/lambda.py

False
True
False

So we have seen that we can get our result without using if-else statement.

Using filter() function with the conditional lambda function:

Python lambda with if: This function get a callback() function and a list of elements. It repeats over each and every elements in list and calls the callback() function on every element. If callback() returns True then it will add in new list .In the end, returns the list of items.

# lambda.py

listA = [12, 28, 23, 17, 9, 29, 50]

listOutput = list(filter(lambda x: x > 9 and x < 20, listA))
print(listOutput)

Output:

RESTART: C:/Users/HP/Desktop/lambda.py
[12, 17]

Here we have used lambda function to filter elements and in the end returns list of elements that lies between 9 to 20.

Using if, elif & else in a lambda function:

If in lambda python: We can not always depend on if else in a lambda function,sometime there are some possibilities when we need to check on multiple conditions.We can’t directly use else if in a lambda function. But we can fo the same by using if else & brackets .

Syntax:

lambda <args> : <return Value> if <condition > ( <return value > if <condition> else <return value>)

Lets take an example:

lambda.py

converter = lambda x : x*2 if x < 11 else (x*3 if x < 22 else x)
print(converter(5))
print(converter(24))

Output:

lambda.py

10
24

So, in the above example, 5 * 2 = 10, which is less than 11. So, it gives10 because given condition is true. In the case of 24, condition is false; that is why it returns 24 as .

Conclusion:

So in this article we have seen how to use if , else and elif in a lambda functions.We have also seen how to use conditional statement and use of filter  in lambda function.

MySQL Delete Duplicate Rows but keep one | Delete duplicate rows in mysql except one with Example

MySQL Delete Duplicate Rows but keep one

MySQL Delete Duplicate Rows But Keep One: If you want to remove duplicate records where id not in select from the table then you can use the MySQL delete function and delete duplicate records in MySQL. In this tutorial, we are going to learn how to delete duplicate rows from a MySQL table and keep only one with the example.

Duplicate records can create a serious issue. With duplicate data it is possible for orders can be created many times, It can give inaccurate results.

So here is the number of ways to perform the task of MySQL delete duplicate rows but keep one.

For Example, let’s take a look at the instance of this first by creating a table in a database:

MySQL Delete Duplicate Rows but keep one

CREATE TABLE team_emails (
    person_id INT AUTO_INCREMENT,
    person_name VARCHAR(255),
    person_email VARCHAR(255),
    PRIMARY KEY (person_id)
);

 INSERT INTO team_emails (person_name,person_email) 
 VALUES("Shikha","shikha@managementbliss.com");
 INSERT INTO team_emails (person_name,person_email) 
 VALUES("Numan","numan@gmail.com"); 
 INSERT INTO team_emails (person_name,person_email) 
 VALUES("Preeti T","Preeti.Loud@me.com");
 INSERT INTO team_emails (person_name,person_email) 
 VALUES("Atharv","Atharv@managementbliss.com"); 
 INSERT INTO team_emails (person_name,person_email) 
 VALUES("Nick","Nickk@mine.com"); 
  INSERT INTO team_emails (person_name,person_email) 
 VALUES("Rohit","Rohit.teddy@mine.com"); 
 INSERT INTO team_emails (person_name,person_email) 
 VALUES("Aditi Sharma","aditi@managementbliss.com");
 INSERT INTO team_emails (person_name,person_email) 
 VALUES("Rohit","Rohit.teddy@mine.com"); 
 INSERT INTO team_emails (person_name,person_email) 
 VALUES("Aditi Sharma","aditi@managementbliss.com");
  INSERT INTO team_emails (person_name,person_email) 
 VALUES("Nick","Nickk@mine.com"); 
 INSERT INTO team_emails (person_name,person_email) 
 VALUES("Nick","Nickk@mine.com");

Now from the table, let us see by doing select  * and keeping the rows ordered by person_email .

SELECT * FROM team_emails ORDER BY person_email;

Output:

id     person_name	person_email
7	Aditi Sharma	aditi@managementbliss.com
9	Aditi Sharma	aditi@managementbliss.com
4	Atharv	        Atharv@managementbliss.com
5	Nick	        Nickk@mine.com
10	Nick	        Nickk@mine.com
11	Nick	        Nickk@mine.com
2	Numan	        numan@gmail.com
3	Preeti T	Preeti.Loud@me.com
6	Rohit	        Rohit.teddy@mine.com
8	Rohit	        Rohit.teddy@mine.com
1	Shikha	        shikha@managementbliss.com

So in the above table, the output you can see some duplicates value.

Also Check:

Delete duplicate rows but keep latest: using GROUP BY and MAX

Delete dups mysql: This is the one way to delete duplicate values from the table. After creating the MySQL table we will write the below query and execute it.

delete duplicate records from mysql using GROUP BY and MAX

DELETE FROM team_emails
 WHERE person_id NOT IN (
   SELECT * FROM (
     SELECT MAX(person_id) FROM team_emails 
       GROUP BY person_email
   )  AS s_alias
 );

After executing the above query we will see output using select *,

Select * From team_emails ;

Output:

id	person_name	person_email
1	Shikha	        shikha@managementbliss.com
2	Numan	        numan@gmail.com
3	Preeti T	Preeti.Loud@me.com
4	Atharv	        Atharv@managementbliss.com
8	Rohit	        Rohit.teddy@mine.com
9	Aditi Sharma	aditi@managementbliss.com
11	Nick	        Nickk@mine.com

So in the above output, you can see that all the duplicates row were deleted.

Delete duplicate rows but keep latest: using JOINS

mysql deleting duplicate rows: In this, we will use joins to delete the old value and keep the latest one. So for doing this we will execute the below query,

Delete duplicate rows but keep latest using JOINS

DELETE s1 FROM team_emails s1,
    team_emails s2 
WHERE
    s1.person_id < s2.person_id
    AND s1.person_email = s2.person_email;

Now Select * From team_emails ;

Output:

id	person_name	person_email
1	Shikha	        shikha@managementbliss.com
2	Numan	        numan@gmail.com
3	Preeti T	Preeti.Loud@me.com
4	Atharv	        Atharv@managementbliss.com
8	Rohit	        Rohit.teddy@mine.com
9	Aditi Sharma	aditi@managementbliss.com
11	Nick	        Nickk@mine.com

As we can see in the above output, we have successfully deleted the duplicate rows, and the ones with higher person_id are retained. Here we are doing a self join on the same table, which is deleting duplicate records by keeping one copy, the one with a higher value of person_id.

Delete duplicate rows but keep oldest: using JOINS

MYSQI delete duplicate rows: In this, by using joins we will keep the oldest rows value and delete duplicate rows of the one which is new. It is the same as the above one only some changes in the where clause.

Delete duplicate rows but keep oldest using JOINS

DELETE s1 FROM team_emails s1,
    team_emails s2 
WHERE
    s1.person_id > s2.person_id
    AND s1.person_email = s2.person_email;

Now Select * From team_emails ;

Output:

id	person_name	person_email
1	Shikha	        shikha@managementbliss.com
2	Numan	        numan@gmail.com
3	Preeti T	Preeti.Loud@me.com
4	Atharv	        Atharv@managementbliss.com
5	Nick	        Nickk@mine.com
6	Rohit	        Rohit.teddy@mine.com
7	Aditi Sharma	aditi@managementbliss.com

The output shows the oldest rows preserved but the latest duplicate rows deleted. The only change is in the WHERE condition “WHERE s1.person_id > s2.person_id”

Delete the duplicate row but keep oldest: using ROW_NUMBER()

Delete duplicate records in mysql: This is another way to delete the duplicate rows retaining the oldest entries in the table is using ROW_NUMBER () function and PARTITION BY clause.

MySQL Delete the duplicate row but keep oldest using ROW_NUMBER()

DELETE FROM team_emails 
WHERE 
    person_id IN (
    SELECT 
        person_id 
    FROM (
        SELECT                         
            person_id,
            ROW_NUMBER() OVER (
                PARTITION BY person_email
                ORDER BY person_email) AS row_num
        FROM 
            team_emails
    ) s_alias
    WHERE row_num > 1
);

Output:

id	person_name	person_email
1	Shikha	        shikha@managementbliss.com
2	Numan	        numan@gmail.com
3	Preeti T	Preeti.Loud@me.com
4	Atharv	        Atharv@managementbliss.com
5	Nick	        Nickk@mine.com
6	Rohit	        Rohit.teddy@mine.com
7	Aditi Sharma	aditi@managementbliss.com

As we can see in the output, the latest duplicate rows got deleted. Here we are using inner queries and ROW_NUMBER() function.

Conclusion on How to delete duplicate records in the table

In the above tutorial, you have seen how to delete the duplicate rows in a MySQL table and keep only one. For example, you can check one of the id value of the row to delete in MySQL table with the help of the following above process. Thank you!

Numpy 2d to 1d – Python: Convert Matrix / 2D Numpy Array to a 1D Numpy Array | How to make a 2d Array into a 1d Array in Python?

Python Convert Matrix or 2D Numpy Array to a 1D Numpy Array

Numpy 2d to 1d: This article is all about converting 2D Numpy Array to a 1D Numpy Array. Changing a 2D NumPy array into a 1D array returns in an array containing the same elements as the original, but with only one row. Want to learn how to convert 2d Array into 1d Array using Python? Then, stay tuned to this tutorial and jump into the main heads via the available links shown below:

Convert 2D Numpy array / Matrix to a 1D Numpy array using flatten()

How to convert a 2d array into a 1d array: Python Numpy provides a function flatten() to convert an array of any shape to a flat 1D array.

Firstly, it is required to import the numpy module,

import numpy as np

Syntax:

ndarray.flatten(order='C')
ndarray.flatten(order='F')
ndarray.flatten(order='A')

Order: In which items from the array will be read

Order=’C’: It will read items from array row-wise

Order=’F’: It will read items from array row-wise

Order=’A’: It will read items from array-based on memory order

Suppose we have a 2D Numpy array or matrix,

[7 4 2]
[5 3 6]
[2 9 5]

Which we have to convert in a 1D array. Let’s use this to convert a 2D numpy array or matrix to a new flat 1D numpy array,

import numpy as np
# Create a 2D numpy array from list of lists
arr = np.array([[7, 4, 2],
                [5, 3, 6],
                [2, 9, 5]])
# get a flatten 1D copy of 2D Numpy array
flat_array = arr.flatten()
print('1D Numpy Array:')
print(flat_array)

Output:

1D Numpy Array:
[7 4 2 5 3 6 2 9 5]

If we made any changes in our 1D array it will not affect our original 2D array.

import numpy as np
# Create a 2D numpy array from list of lists
arr = np.array([[7, 4, 2],
                [5, 3, 6],
                [2, 9, 5]])
# get a flatten 1D copy of 2D Numpy array
flat_array = arr.flatten()
print('1D Numpy Array:')
print(flat_array)
# Modify the flat 1D array
flat_array[0] = 50
print('Modified Flat Array: ')
print(flat_array)
print('Original Input Array: ')
print(arr)

Output:

1D Numpy Array:
[7 4 2 5 3 6 2 9 5]

Modified Flat Array:
[50 4 2 5 3 6 2 9 5]

Original Input Array:
[[7 4 2]
[5 3 6]
[2 9 5]]

Also Check:

Convert 2D Numpy array to 1D Numpy array using numpy.ravel()

Numpy have  a built-in function ‘numpy.ravel()’ that accepts an array element as parameter and returns a flatten 1D array.

Syntax:

numpy.ravel(input_arr, order='C')

Let’s make use of this syntax to convert 2D array to 1D array,

import numpy as np
# Create a 2D numpy array from list of lists
arr = np.array([[7, 4, 2],
                [5, 3, 6],
                [2, 9, 5]])
# Get a flattened view of 2D Numpy array
flat_array = np.ravel(arr)
print('Flattened 1D Numpy array:')
print(flat_array)

Output:

Flattened 1D Numpy array:
[7 4 2 5 3 6 2 9 5]

If we made any changes in our 1D array using numpy.ravel() it will also affect our original 2D array.

import numpy as np
# Create a 2D numpy array from list of lists
arr = np.array([[7, 4, 2],
                [5, 3, 6],
                [2, 9, 5]])
# Get a flattened view of 2D Numpy array
flat_array = np.ravel(arr)
print('Flattened 1D Numpy array:')
print(flat_array)
# Modify the 2nd element  in flat array
flat_array[1] = 12
# Changes will be reflected in both flat array and original 2D array
print('Modified Flattened 1D Numpy array:')
print(flat_array)
print('2D Numpy Array:')
print(arr)

Output:

Flattened 1D Numpy array:
[7 4 2 5 3 6 2 9 5]
Modified Flattened 1D Numpy array:
[ 7 12 2 5 3 6 2 9 5]
2D Numpy Array:
[[ 7 12 2]
[ 5 3 6]
[ 2 9 5]]

Convert a 2D Numpy array to a 1D array using numpy.reshape()

Numpy provides a built-in function reshape() to convert the shape of a numpy array,

It accepts three arguments-

  • a: Array which we have to be reshaped
  • newshape: Newshape can be a tuple or integer
  • order: The order in which items from the input array will be used
import numpy as np
# Create a 2D numpy array from list of lists
arr = np.array([[7, 4, 2],
                [5, 3, 6],
                [2, 9, 5]])

# convert 2D array to a 1D array of size 9
flat_arr = np.reshape(arr, 9)
print('1D Numpy Array:')
print(flat_arr)

Output:

1D Numpy Array:
[7 4 2 5 3 6 2 9 5]

In the above example, we have pass 9 as an argument because there were a total of 9 elements (3X3) in the 2D input array.

numpy.reshape() and -1 size

This function can be used when the input array is too big and multidimensional or we just don’t know the total elements in the array. In such scenarios, we can pass the size as -1.

import numpy as np
# Create a 2D numpy array from list of lists
arr = np.array([[7, 4, 2],
                [5, 3, 6],
                [2, 9, 5]])

# convert 2D array to a 1D array without mentioning the actual size
flat_arr = np.reshape(arr, -1)
print('1D Numpy Array:')
print(flat_arr)

Output:

1D Numpy Array:
[7 4 2 5 3 6 2 9 5]

numpy.reshape() returns a new view object if possible

With the help of reshape() function, we can view the input array and any modification done in the view object will be reflected in the original input too.

import numpy as np
# Create a 2D numpy array from list of lists
arr = np.array([[7, 4, 2],
[5, 3, 6],
[2, 9, 5]])
flat_arr = np.reshape(arr,-1)
print('1D Numpy Array:')
print(flat_arr)
# Modify the element at the first row and first column in the 1D array
arr[0][0] = 11
print('1D Numpy Array:')
print(flat_arr)
print('2D Numpy Array:')
print(arr)

Output:

1D Numpy Array:
[7 4 2 5 3 6 2 9 5]

1D Numpy Array:
[11 4 2 5 3 6 2 9 5]

2D Numpy Array:

[[11 4 2]
[ 5 3 6]
[ 2 9 5]]

Convert 2D Numpy array to 1D array but Column Wise

If we pass the order parameter in reshape() function as “F” then it will read 2D input array column-wise. As we will show below-

import numpy as np
# Create a 2D numpy array from list of lists
arr = np.array([[7, 4, 2],
                [5, 3, 6],
                [2, 9, 5]])
# Read 2D array column by column and create 1D array from it
flat_arr = np.reshape(arr, -1, order='F')
print('1D Numpy Array:')
print(flat_arr)

Output:

1D Numpy Array:
[7 5 2 4 3 9 2 6 5]

MySQL loop example – MySQL For Loop Example

MySQL loop example: In this article we will discuss about For Loop in MySQL with examples.

Loops in MySQL

Loop is a order of instructions that is continually replicated until a given condition is reached. MySQL also provides loop functionality like other languages.

Syntax:

label_for_loop: LOOP
IF <condition> THEN
LEAVE label_for_loop;
END IF;
<statements to be executed - separated by ';' >
ITERATE label_for_loop;
END LOOP;

Parameters:

1.labelname:It is an non-mandatory label at the start and end.

2.loop:For start and end loop.

3.statements:Condition which you give for execution

Flow of executions in For Loop:

MySQL for loop_images

MySQL For Loop Examples

Let’s understand it by example,

Example 1: Loop through and display the ‘%’ five times

DROP PROCEDURE IF EXISTS for_loop_star;
DELIMITER $$
CREATE procedure for_loop_star()
BEGIN
  DECLARE x INT;
  DECLARE percentage VARCHAR(50);
  DECLARE f_output VARCHAR(50);
  SET x = 1;
  SET star= "%";
  SET f_output ="";
  forloop: LOOP
    IF x > 5 THEN
    LEAVE forloop;
    END IF;
   SET x = x + 1;
   set f_output = CONCAT(f_output, percentage);
  END LOOP;
SELECT f_output;
END $$
DELIMITER ;
CALL for_loop_percentage();

In above code you can see that we have created a strategy for_loop_percentage() to run for loop to print the ‘%’ five times .Initial x value is 1,after every loop it increment by 1.Percentage concatenates with f_output in every iteration,after that checks the value of x, and if it is greater than five the loop will terminate.

Using SELECT f_output statement we will get our output.

Output:

f_output-
%%%%%

Example2:CREATE TABLE Mytable (value VARCHAR(50) NULL DEFAULT NULL);

DELIMITER $$ 
CREATE PROCEDURE ADD()
 BEGIN
  DECLARE a INT Default 1 ;
  simple_loop: LOOP     
    insert into table1 values(a);
    SET a=a+1;
    IF a=11 THEN
      LEAVE simple_loop;
    END IF;
 END LOOP simple_loop;
END $$

Queries to check the output –

CALL ADD();
Select value 
from Mytable;

Output:

1
2
3
4
5
6
7
8
9
10

Example3:

DELIMITER $$
CREATE FUNCTION Mydemo (value1 INT)
RETURNS INT
BEGIN
 DECLARE value2 INT;
 SET value2 = 0;
 label: LOOP
  SET income = value2 + value1 ;
  IF value2 < 4000 THEN
    ITERATE label;
  END IF;
  LEAVE label;
 END LOOP label;
 RETURN value2 ;
END $$
DELIMITER ;

Queries to check the output :

CALL Mydemo();

Input –

value1: 3500

Output –

value2: 3500

Conclusion:

In this article we have discussed about For Loop in MySQL with different examples.Thank you!

Numpy select rows – Python Numpy : Select rows / columns by index from a 2D Numpy Array | Multi Dimension

Working with Numpy Arrays: Indexing

Numpy array select multiple columns: You have to be familiar with indexing if you want to work with Numpy arrays and matrices. You will use them Numpy select rows when you would like to work with a subset of the array.

About 2d numpy array:

Numpy select column: These dimentionals arrays are also known as matrices which can be shown as collection of rows and columns. In this article, we are going to show  2D array in Numpy in Python. NumPy is a very important library in python. We used NumPy for adding support for large multidimensional arrays & matrices .

Importing numpy module in your project:

import numpy as np

Indexing a Two-dimensional Array

import numpy as np
array1 = np.arange(12).reshape(4,3)
print(array1)

Output:

RESTART: C:/Users/HP/Desktop/article2.py
[[ 0 1 2]
[ 3 4 5]
[ 6 7 8]
[ 9 10 11]]

Here we use two indices,one we use for rows and one for column.Both the column and the row indices start from 0.

So in above all example we are going to use same matrices.

Select a single element from 2D Numpy Array by index

Numpy get row: We can use [][] tese brackets to select an element from Numpy Array .

array1[row_index][column_index]

So if i want to access the element ‘10,’ we use the index ‘3’ for the row and index ‘1’ for the column.

import numpy as np
array1 = np.arange(12).reshape(4,3)
array1= array1[3][1]
print(array1)

Output:

RESTART: C:/Users/HP/Desktop/article2.py

10

Select Rows by Index from a 2D Numpy Array

Numpy get rows of matrix: We can use [] this bracket to select a single or multiple row. For single row use-

array1[row_index]

Let’s take an example,

import numpy as np
array1 = np.arange(12).reshape(4,3)
row = array1[1]
print(row)

Output:

RESTART: C:/Users/HP/Desktop/article2.py
[3 4 5]

For multiple rows use,

array1[start_index: end_index , :]

Let’s take an example,

import numpy as np
array1 = np.arange(12).reshape(4,3)
rows = array1[1:3, :]
print(rows)

Output:

RESTART: C:/Users/HP/Desktop/article2.py
[[3 4 5]
[6 7 8]]

Select Columns by Index from a 2D Numpy Array

Syntax for single column use,

array1[ : , column_index]

Lets take an example,

import numpy as np
array1 = np.arange(12).reshape(4,3)
column = array1[:, 1]
print(column)

Output:

RESTART: C:/Users/HP/Desktop/article2.py
[ 1 4 7 10]

Syntax to select multiple columns,

ndArray[ : , start_index: end_index]

Lets take an example,

import numpy as np
array1 = np.arange(12).reshape(4,3)
columns = array1[: , 1:3]
print(columns)

Output:

RESTART: C:/Users/HP/Desktop/article2.py
[[ 1 2]
[ 4 5]
[ 7 8]
[10 11]]

Select a Sub Matrix or 2d Numpy Array from another 2D Numpy Array

For sub 2d Numpy Array we pass the row & column index range in [] .

Syntax for this is,

ndArray[start_row_index : end_row_index , start_column_index : end_column_index]

lets take an example,

import numpy as np
array1 = np.arange(12).reshape(4,3)
sub2DArr = array1[1:3, 1:3]
print(sub2DArr)

Output:

RESTART: C:/Users/HP/Desktop/article2.py
[[4 5]
[7 8]]

Selected Row or Column or Sub Array is View only

This is for view only i.e. if there is  any modification in returned sub array will be reflected in original Numpy Array .

We are going to take same array which we have created in start of this article.

import numpy as np
array1 = np.arange(12).reshape(4,3)
row = array1[1]
print(row)

Output:

RESTART: C:/Users/HP/Desktop/article2.py
[3 4 5]

Now for any modification in the same row,

import numpy as np
array1 = np.arange(12).reshape(4,3)
row = array1[1]
row[:] = 20
print(row)

Output:

RESTART: C:/Users/HP/Desktop/article2.py
[20 20 20]

Modification in sub array will be shown in main Numpy Array too. Updated \ 2D Numpy Array array1 are,

[[ 0     1      2]
[20    20     20]
[ 6     7      8]
[ 9    10   11]]

Get a copy of 2D Sub Array from 2D Numpy Array using ndarray.copy()

Create a 2D Numpy array1 with3 rows & columns | Matrix

import numpy as np
array1 = np.array(([12, 22, 13], [21, 25, 30], [33, 17, 19]))
print(array1)

Output:

RESTART: C:/Users/HP/Desktop/article2.py
[[12 22 13]
[21 25 30]
[33 17 19]]

Select a copy of row at index 1 from 2D array and set all the elements in selected sub array to 20.

array1 = np.array(([12, 22, 13], [21, 25, 30], [33, 17, 19]))
row=array1[1].copy()
row[:] = 20
print(row)

Output:

RESTART: C:/Users/HP/Desktop/article2.py
[20 20 20]

Conclusion:

So in this article we have seen how to work with NumPy arrays.Hope you have understood everything.

How to use pthread_create – POSIX : How to create a thread | pthread_create() example & Tutorial

What is thread Posix thread?

How to use pthread_create: Posix threads, referred as pthreads,  it is an execution model that lies independently from a language, as well as a from a execution model. It allows a program to control various different flows of work .

In this article we are going to discuss how to create a thread in C or C++ using POSIX Thread Library on Linux.

Thread operations can able to do  thread creation, termination,scheduling, synchronization, process interaction and data management .Each of thread shares the process address space and can access heap, global and static variables.A thread not able to manage a list of creadted threads,it also not able to know when the thread is creaded.

Create thread using pthread_create():

Pthread_create example c++: Every function is a thread,main is also a thread. If we have a function that we want to execute in parallel to main function.

void * threadFunc(void * arg)
{
    std::cout << "Thread Function :: Start" << std::endl;
    // Sleep for 2 seconds
    sleep(2);
    std::cout << "Thread Function :: End" << std::endl;
    return NULL;
}

Here we are using  pthread_create() API to create a thread provided by POSIX.

#include <pthread.h>
int pthread_create(pthread_t *thread, const pthread_attr_t *attr,
    void *(*start_routine) (void *), void *arg);

pthread_create() function is used to create or generate a new thread, with attributes mentioned as attr, in a process.

If there is no ant attt or attr is NULL, the default one is used. If the attributes specified by attr are modified later, the thread’s attributes are not affected. Upon successful completion, pthread_create() stores the ID of the created thread in the location referenced by thread.Pointer of the Thread ID, it will update the value in it.

So, now we are going to call pthread_create() by passing function pointer and other arguments .

// Thread id
pthread_t threadId;
// Create a thread that will function threadFunc()
int err = pthread_create(&threadId, NULL, &threadFunc, NULL);
// Check if thread is created sucessfuly

We can use strerror() to get the detail of error.pthread_create() returns the error code . If thread is created  then it will return 0.And if  creation is failed it will return error code .

if (err)
    std::cout << "Thread creation failed : " << strerror(err);
else
    std::cout << "Thread Created with ID : " << threadId << std::endl;

Both the function, main function and other  threads runs  parallelly. But when main function ends it tasks, complete process exits and all the other thread will also  terminated. So  before main function ends we should wait for other threads to exit.Wait for other thread to complete POSIX Library provides a function for it i.e. pthread_join().

// Wait for thread to exit
err = pthread_join(threadId, NULL);
// check if joining is sucessful
if (err)
    std::cout << "Failed to join Thread : " << strerror(err) << std::endl;

It accepts a thread ID and pointer to store the return value from thread.

Below is complete example,

#include <iostream>
#include <stdlib.h>
#include <stdio.h>
#include <string.h>
#include <pthread.h>
#include <unistd.h>
void * threadFunc(void * arg)
{
    std::cout << "Thread Function :: Start" << std::endl;
    // Sleep for 2 seconds
    sleep(2);
    std::cout << "Thread Function :: End" << std::endl;
    return NULL;
}
int main()
{
    // Thread id
    pthread_t threadId;
    // Create a thread that will function threadFunc()
    int err = pthread_create(&threadId, NULL, &threadFunc, NULL);
    // Check if thread is created sucessfuly
    if (err)
    {
        std::cout << "Thread creation failed : " << strerror(err);
        return err;
    }
    else
        std::cout << "Thread Created with ID : " << threadId << std::endl;
    // Do some stuff in Main Thread
    std::cout << "Waiting for thread to exit" << std::endl;
    // Wait for thread to exit
    err = pthread_join(threadId, NULL);
    // check if joining is sucessful
    if (err)
    {
        std::cout << "Failed to join Thread : " << strerror(err) << std::endl;
        return err;
    }
    std::cout << "Exiting Main" << std::endl;
    return 0;
}

Output:

Thread Created with ID : 140054125654592
Waiting for thread to exit
Thread Function :: Start
Thread Function :: End
Exiting Main

Conclusion:

So in this article we have seen all about threads.We have also seen how to use pthread_create() and pthread_join().

RSS feed scraper – Building an RSS feed Scraper with Python

What is RSS?

RSS feed scraper: RSS stands for Really Simple Syndication or Rich Site Summary. It is a type of web feed that allows users and applications to receive regular updates from a website or blog of their choice. Various website use their RSS feed to publish the frequently updated information like blog entries, news headlines etc, So this is where RSS feeds are mainly used.

So we can use that RSS feed to extract some important information from a particular website. In this article I will be showing how you will extract RSS feeds of any website.

Installing packages

RSS scraper: You can install all packages using pip like the example below.

 pip install requests
 pip install bs4

Importing  libraries:

RSS feed python: Now our project setup is ready, we can start writing the code.

Within our rssScrapy.py we’ll import the packages we’ve installed using pip.

import requests

from bs4 import BeautifulSoup

The above package will allow us to use the functions given to us by the Requests and BeautifulSoup libraries.

I am going to use the RSS feeds of a news website called Times of India.

Link-"https://timesofindia.indiatimes.com/rssfeeds/1221656.cms"

This is basically an XML file.

Building-an-RSS-feed-scraper-with-Python_xml-file

So now I am going to show you how this particular xml file will scrape.

import requests
from bs4 import BeautifulSoup
url="https://timesofindia.indiatimes.com/rssfeeds/1221656.cms"
resp=requests.get(url)
soup=BeautifulSoup(resp.content,features="xml")
print(soup.prettify())

I have imported all necessary libraries.I have also defined url which give me link for news website RSS feed after that for get request I made resp object where I have pass that url.

Now we have response object and we have also a beautiful soup object with me.Bydefault beautiful soup parse html file but we want xml file so we used features=”xml”.So now let me just show you the xml file we have parsed.

Building-an-RSS-feed-scraper-with-Python_output

We dont nedd all the data having in it.We want news description,title,publish date right.So for this we are going to create a list which contains all the content inside item tags.For this we have used   items=soup.findAll('item') 

You can also check the length of items using this len(items)

So now I am writing whole code for scrapping the news RSS feed-

import requests
from bs4 import BeautifulSoup
url="https://timesofindia.indiatimes.com/rssfeeds/1221656.cms"
resp=requests.get(url)
soup=BeautifulSoup(resp.content,features="xml")
items=soup.findAll('item')
item=items[0]
news_items=[]
for item in items:
    news_item={}
    news_item['title']=item.title.text
    news_item['description']=item.description.text
    news_item['link']=item.link.text
    news_item['guid']=item.guid.text
    news_item['pubDate']=item.pubDate.text
    news_items.append(news_item)
print(news_items[2])

So we can see that I have used item.title.textfor scrapping title because item is parent class and title is child class similarly we do for rest.

Each of the articles available on the RSS feed  containing all information within item tags <item>...</item>.
and follows the below structure-

<item>
    <title>...</title>
    <link>...</link>
    <pubDate>...</pubDate>
    <comments>...</comments>
    <description>...</description>
</item>

We’ll be taking advantage of the consistent item tags to parse our information.

I have also make an empty list news_items which append all in it.

So this is how we can parse particularly news item.

Building-an-RSS-feed-scraper-with-Python_final-output

Conclusion:

We have successfully created an RSS feed scraping tool using Python, Requests, and BeautifulSoup. This allows us to parse XML information into a suitable format for us to work with in the future.

Pandas read csv skip row – Pandas: skip rows while reading csv file to a Dataframe using read_csv() in Python

Pandas skip rows while reading csv file to a Dataframe using read_csv() in Python

Pandas read csv skip row: In this tutorial, we will discuss how to skip rows while reading a csv file to a Dataframe using aread_csv()method of Pandas library in Python. If you want you can learn more about the read_csv() method along with syntax, parameters, and various methods to skip rows while reading specific rows from csv in python pandas

How to skip rows while reading CSV file using Pandas?

Pandas skiprows: Python is a very useful language in today’s time, its also very useful for data analysis because of the different python packages. Python panda’s library implements a function to read a csv file and load data to dataframe quickly and also skip specified lines from csv file. Here we will use theread_csv()method of Pandas to skip n rows. i.e.,

pandas.read_csv(filepath_or_buffer, skiprows=N, ....)

Parameters:

Parameter Use
filepath_or_buffer URL or Dir location of file
sep Stands for separator, default is ‘, ‘ as in csv(comma separated values)
index_col This parameter is used to make the passed column as index instead of 0, 1, 2, 3…r
header This parameter is use to make passed row/s[int/int list] as header
use_cols This parameter is only used the passed col[string list] to make a data frame
squeeze If True and only one column is passed then returns pandas series
skiprows This parameter is used to skip passed rows in a new data frame
skipfooter This parameter is used to skip the Number of lines at bottom of the file

Let’s, import the pandas’ module in python first:

Import pandas as pd

Let’s see the examples mentioned below and learn the process of Pandas: skip rows while reading csv file to a Dataframe using read_csv() in Python. Now, create one simple CSV file instru.csv

Name,Age,City
Tara,34,Agra
Rekha,31,Delhi
Aavi,16,Varanasi
Sarita,32,Lucknow
Mira,33,Punjab
Suri,35,Patna

Also Check:

Let’s load this csv file to a dataframe using read_csv() and skip rows in various ways,

Method 1: Skipping N rows from the starting while reading a csv file

Read specific rows from csv in python pandas: When we pass skiprows=2 it means it will skip those rows while reading csv file. For example, if we want to skip 2 lines from the top while readingusers.csvfile and initializing a dataframe.

import pandas as pd
# Skip 2 rows from top in csv and initialize a dataframe
usersDf = pd.read_csv("C:\\Users\HP\Desktop\instru.csv", skiprows=2)
print('Contents of the Dataframe created by skipping top 2 lines from csv file ')
print(usersDf)

Skipping N rows from the starting while reading a csv file

Output:

Contents of the Dataframe created by skipping top 2 lines from csv file
  Rekha 31 Delhi
0 Aavi   16 Varanasi
1 Sarita 32 Lucknow
2 Mira   33 Punjab
3 Suri    35 Patna

Method 2: Skipping rows at specific index positions while reading a csv file to Dataframe

Pandas skip rows: For skipping rows at specific index positions we have to give index positions like if we want to skip lines at index 0, 2, and 5 in dataframe ‘skiprows=[0,2,5]’.

import pandas as pd

# Skip  rows at specific index
usersDf = pd.read_csv("C:\\Users\HP\Desktop\instru.csv", skiprows=[0,2,5])
print('Contents of the Dataframe created by skipping specifying lines from csv file ')
print(usersDf)

Output:

Contents of the Dataframe created by skipping specifying lines from csv file
   Tara    34    Agra
0 Aavi   16     Varanasi
1 Sarita 32    Lucknow
2 Suri    35    Patna

It skipped all the lines at index positions 0, 2 & 5 from csv and loaded the remaining rows from csv.

Skipping N rows from top except header while reading a csv file to Dataframe

Pandas skip first row: In the earlier example, we have seen that it removes the header also. In this, we want to remove 2 rows from starting but not the header one.

import pandas as pd
# Skip 2 rows from top except header
usersDf = pd.read_csv("C:\\Users\HP\Desktop\instru.csv", skiprows=[i for i in range(1,3)])
print('Contents of the Dataframe created by skipping 2 rows after header row from csv file ')
print(usersDf)

Output:

Contents of the Dataframe created by skipping 2 rows after header row from csv file
     Name Age City
0   Aavi    16   Varanasi
1  Sarita   32   Lucknow
2  Mira     33   Punjab
3  Suri      35   Patna

Skip rows from based on condition while reading a csv file to Dataframe

Pd read csv skip rows: Here we will give some specific conditions using the lambda function for skipping rows in the dataframe.

Skip rows from based on condition while reading a csv file to Dataframe

import pandas as pd

def logic(index):
    if index % 3 == 0:
       return True
    return False
# Skip rows from based on condition like skip every 3rd line
usersDf = pd.read_csv("C:\\Users\HP\Desktop\instru.csv", skiprows= lambda x: logic(x) )
print('Contents of the Dataframe created by skipping every 3rd row from csv file ')
print(usersDf)

Output:

Contents of the Dataframe created by skipping every 3rd row from csv file
      Tara    34 Agra
0    Rekha 31 Delhi
1    Sarita 32 Lucknow
2    Mira   33 Punjab

Skip N rows from bottom/footer while reading a csv file to Dataframe

Skiprows: So here we use skipfooter & engine argument in pd.read_csv() to skip n rows from the bottom.

import pandas as pd

# Skip 2 rows from bottom
usersDf = pd.read_csv("C:\\Users\HP\Desktop\instru.csv", skipfooter=2, engine='python')
print('Contents of the Dataframe created by skipping bottom 2 rows from csv file ')
print(usersDf)

Output:

Contents of the Dataframe created by skipping bottom 2 rows from csv file
   Name Age City
0 Tara    34 Agra
1 Rekha 31 Delhi
2 Aavi    16 Varanasi
3 Sarita  32 Lucknow

Conclusion

In this article, you have learned different ways of how to skip rows while reading csv file to a Dataframe using the Python pandas read_csv() function.

Want to expert in the python programming language? Exploring Python Data Analysis using Pandas tutorial changes your knowledge from basic to advance level in python concepts.

Similar Tutorials:

Mysql select first row – MySQL select first row in each group

Mysql select first row: In this article we are going to discuss how to get first record or select first row in each group in MySQL.

Let’s assume we have a table sales_details(sale_person_name,no_products_sold,sales_department) that contains sales data for multiple products.

# create the table sale_details
CREATE TABLE sale_details (
    id INT auto_increment,
    sale_person_name VARCHAR(255),
    no_products_sold INT,
    sales_department VARCHAR(255),
    primary key (id)
);
#insert rows into sale_details
INSERT INTO sale_details (sale_person_name,no_products_sold,sales_department) 
  VALUES
 ("Rekha",1200,"Kichten Essentials"),
 ("Rekha",5000,"Apperals"),
 ("Rekha",59,"Medicines"),
 ("Vivek",1300,"Kichten Essentials"),
 ("Vivek",600,"Apperals"),
 ("Vivek",570,"Medicines"),
 ("Dev",300,"Kichten Essentials"),
 ("Dev",450,"Apperals"),
 ("Varun",900,"Medicines"),
 ("varun",500,"Kichten Essentials"),
 ("Git",1000,"Apperals"),
 ("Git",2000,"Medicines");

Output:

select * from sale_details;


Mysql select first row_1
Here we will discuss three methods for doing this,

Select First Row in Each Group Using Min() Function

Using min() function we will get minimum value of every group and let us see its usage to get the first row of the each group.

SELECT *
  FROM sale_details 
 WHERE id IN (
               SELECT min(id) 
                 FROM sale_details 
                GROUP BY sale_person_name
             );

In above code you can see that we have used min() function which gave us min value of every column and with help of it we will get first record of each group in table.Here we have used groub_by to get first record of each .Which you can see in our output.

Output:

Mysql select first row_2

Select First Row in Each Group Using Join

Here self join is use to get the first record of each group.We have used left join to join table itself.

SELECT
    sd1.*
FROM
    sale_details AS sd1
    LEFT JOIN sale_details AS sd2 ON (
        sd2.sale_person_name = sd1.sale_person_name
        AND
        sd2.id < sd1.id
    )
WHERE
    sd2.sale_person_name IS NULL;

Output:

Mysql select first row_2

Select First Row in Each Group Using Not Exists

Here we will use NOT EXISTS to get first row of each group.If subquery returns any rows it means Exits subquery is True and Not Exits subquery is False.

SELECT * FROM sale_details sd1
WHERE NOT EXISTS (
   SELECT 1 FROM sale_details sd2 
   WHERE sd2.sale_person_name = sd1.sale_person_name 
   AND sd2.ID < sd1.ID 
);

Output:
Mysql select first row_2
Conclusion:
In this article we have discussed how to get first record or select first row in each group using different methods in MySQL.Thank You