Python numpy.flatten() Function Tutorial with Examples | How to Use Function Numpy Flatten in Python?

Python numpy.flatten() Function Tutorial with Examples

Python flatten 2d array: In this tutorial, Beginners and Experience python developers will learn about function numpy.flatten(), how to use it, and how it works. Kindly, hit on the available links and understand how numpy.ndarray.flatten() function in Python gonna help you while programming.

numpy.ndarray.flatten() in Python

A numpy array has a member function to flatten its contents or convert an array of any shape to a 1D numpy array,

Syntax:

ndarray.flatten(order='C')

Parameters:

Here we can pass the following parameters-

Order: In this, we give an order in which items from the numpy array will be used,

C: Read items from array row-wise

F: Read items from array column-wise

A: Read items from array-based on memory order

Returns:

It returns a copy of the input array but in a 1D array.

Also Check:

Let’s learn the concept by viewing the below practical examples,

Flatten a matrix or a 2D array to a 1D array using ndarray.flatten()

First of all, import the numpy module,

import numpy as np

Let’s suppose, we have a 2D Numpy array,

import numpy as np

# Create a 2D Numpy array from list of list
arr_2d = np.array([[7, 4, 2],
                  [5, 4, 3],
                  [9, 7, 1]])
print(arr_2d)

Output:

[7 4 2]
[5 4 3]
[9 7 1]]

Now we are going to use the above 2D Numpy array to convert the 1D Numpy array.

import numpy as np

# Create a 2D Numpy array from list of list
arr_2d = np.array([[7, 4, 2],
                  [5, 4, 3],
                  [9, 7, 1]])
print(arr_2d)
# Convert the 2D array to 1D array
flat_array = arr_2d.flatten()
print('Flattened 1D Numpy Array:')
print(flat_array)

Output:

[[7 4 2]
[5 4 3]
[9 7 1]]

Flattened 1D Numpy Array:
[7 4 2 5 4 3 9 7 1]

So in the above example, you have seen how we converted the 2D array into a 1D array.

ndarray.flatten() returns a copy of the input array

flatten() function always returns a copy of the given array means if we make any changes in the returned array will not edit anything in the original one.

import numpy as np

# Create a 2D Numpy array from list of list
arr_2d = np.array([[7, 4, 2],
                  [5, 4, 3],
                  [9, 7, 1]])
print(arr_2d)
flat_array = arr_2d.flatten()
flat_array[2] = 50
print('Flattened 1D Numpy Array:')
print(flat_array)
print('Original 2D Numpy Array')
print(arr_2d)

output:

[[7 4 2]
[5 4 3]
[9 7 1]]

Flattened 1D Numpy Array:
[ 7 4 50 5 4 3 9 7 1]

Original 2D Numpy Array
[[7 4 2]
[5 4 3]
[9 7 1]]

Thus in the above example, you can see that it has not affected the original array.

Flatten a 2D Numpy Array along Different Axis using flatten()

It accepts different parameter orders. It can be ‘C’ or ‘F’ or ‘A’, but the default value is ‘C’.
It tells the order.

  • C’: Read items from array row-wise i.e. using C-like index order.
  • ‘F’: Read items from array column-wise i.e. using Fortran-like index order.
  • ‘A’: Read items from an array on the basis of memory order of items.

In the below example, we are going to use the same 2D array which we used in the above example-

Flatten 2D array row-wise

In this, if we will not pass any parameter in function then it will take ‘C’ as a default value

import numpy as np

# Create a 2D Numpy array from list of list
arr_2d = np.array([[7, 4, 2],
                  [5, 4, 3],
                  [9, 7, 1]])
flat_array = arr_2d.flatten(order='C')
print('Flattened 1D Numpy Array:')
print(flat_array)

Output:

Flattened 1D Numpy Array:
[7 4 2 5 4 3 9 7 1]

Flatten 2D array column-wise

If we pass ‘F’ as the order parameter in  function then it means elements from a 2D array will be read column wise

import numpy as np

# Create a 2D Numpy array from list of list
arr_2d = np.array([[7, 4, 2],
                  [5, 4, 3],
                  [9, 7, 1]])
flat_array = arr_2d.flatten(order='F')
print('Flattened 1D Numpy Array:')
print(flat_array)

Output:

Flattened 1D Numpy Array:
[7 5 9 4 4 7 2 3 1]

Flatten 2D array based on memory layout

Let’s create a transparent view of the given 2D array

import numpy as np

# Create a 2D Numpy array from list of list
arr_2d = np.array([[7, 4, 2],
                  [5, 4, 3],
                  [9, 7, 1]])
# Create a transpose view of array
trans_arr = arr_2d.T
print('Transpose view of array:')
print(trans_arr)

Output:

Transpose view of array:
[[7 5 9]
[4 4 7]
[2 3 1]]

Now flatten this view was Row Wise,

import numpy as np

# Create a 2D Numpy array from list of list
arr_2d = np.array([[7, 4, 2],
                  [5, 4, 3],
                  [9, 7, 1]])
# Create a transpose view of array
trans_arr = arr_2d.T
flat_array = trans_arr.flatten(order='C')
print(flat_array )

Output:

[7 5 9 4 4 7 2 3 1]

Flatten a 3D array to a 1D numpy array using ndarray.flatten()

Let’s create a 3D numpy array,

import numpy as np

# Create a 3D Numpy array
arr = np.arange(12).reshape((2,3,2))
print('3D Numpy array:')
print(arr)

Output:

3D Numpy array:
[[[ 0 1]
[ 2 3]
[ 4 5]]

[[ 6 7]
[ 8 9]
[10 11]]]

Now we are going to flatten this 3D numpy array,

import numpy as np

# Create a 3D Numpy array
arr = np.arange(12).reshape((2,3,2))
# Convert 3D array to 1D
flat_array = arr.flatten()
print('Flattened 1D Numpy Array:')
print(flat_array)

Output:

Flattened 1D Numpy Array:
[ 0 1 2 3 4 5 6 7 8 9 10 11]

Flatten a list of arrays using numpy.ndarray.flatten()

Now, we have to create a list of arrays,

# Create a list of numpy arrays
arr = np.arange(5)
list_of_arr = [arr] * 5
print('Iterate over the list of a numpy array')
for elem in list_of_arr:
    print(elem)

Output:

Iterate over the list of a numpy array
[0 1 2 3 4]
[0 1 2 3 4]
[0 1 2 3 4]
[0 1 2 3 4]
[0 1 2 3 4]

Now, its time to convert the above list of numpy arrays to a flat 1D numpy array,

# Convert a list of numpy arrays to a flat array
flat_array = np.array(list_of_arr).flatten()
print('Flattened 1D Numpy Array:')
print(flat_array)

Output:

Flattened 1D Numpy Array:
[0 1 2 3 4 0 1 2 3 4 0 1 2 3 4 0 1 2 3 4 0 1 2 3 4]

Flatten a list of lists using ndarray.flatten()

To perform this process, first, we have to create a 2D numpy array from a list of list and then convert that to a flat 1D Numpy array,

# Create a list of list
list_of_lists = [[1, 2, 3, 4, 5],
                 [1, 2, 3, 4, 5],
                 [1, 2, 3, 4, 5],
                 [1, 2, 3, 4, 5]]
# Create a 2D numpy array from a list of list and flatten that array
flat_array = np.array(list_of_lists).flatten()
print('Flattened 1D Numpy Array:')
print(flat_array)
# Convert the array to list
print('Flat List:')
print(list(flat_array))

Output:

Flattened 1D Numpy Array:
[1 2 3 4 5 1 2 3 4 5 1 2 3 4 5 1 2 3 4 5]
Flat List:
[1, 2, 3, 4, 5, 1, 2, 3, 4, 5, 1, 2, 3, 4, 5, 1, 2, 3, 4, 5]

Hence, this is how we can use flatten() function in numpy.

Conclusion:

We hope this python tutorial, you have seen how to use function numpy.flatten() assist you all in needy times. Thank you! keep visiting our site frequently for updated concepts of python.

Python string to int conversion – How to Convert a Python String to int

Convert Python String to Int:

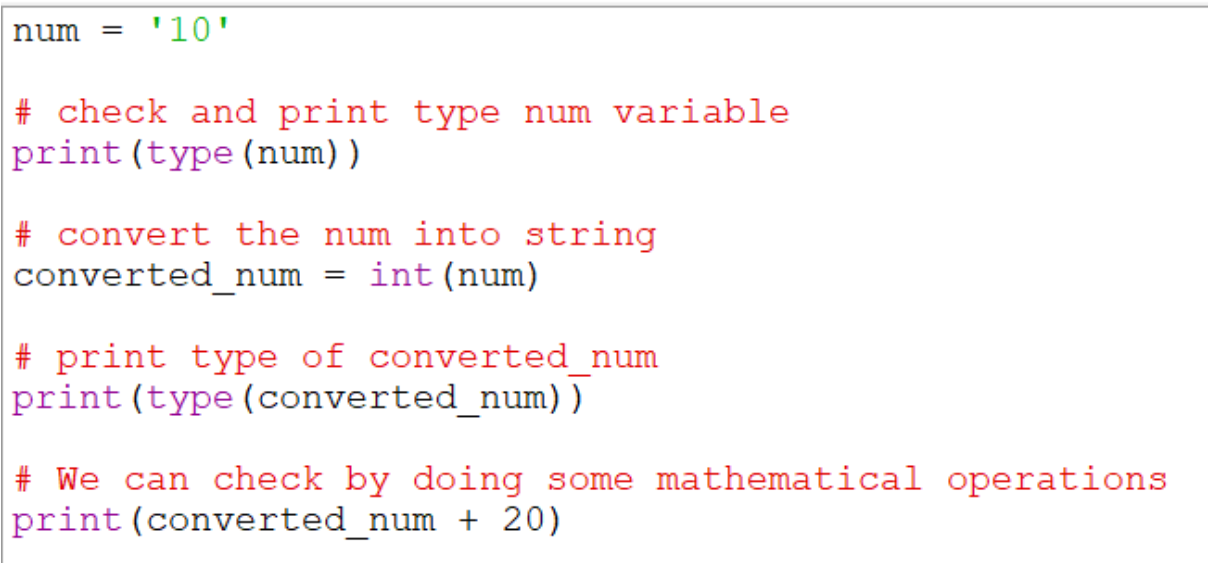
Python string to int conversion: To convert a string to integer in Python, use the int() function. This function takes two parameters: the initial string and the optional base to represent the data. In Python an strings can be converted into a integer using the built-in int() function. The int() function takes in any python data type and converts it into a integer.But use of the int() function is not the only way to do so. This type of conversion can also be done using thefloat() keyword, as a float value can be used to compute with integers.

Below is the list of possible ways to convert an integer to string in python:

1. Using int() function:

Syntaxint(string)

Example:

Using int() function

Output:

Using int() function output
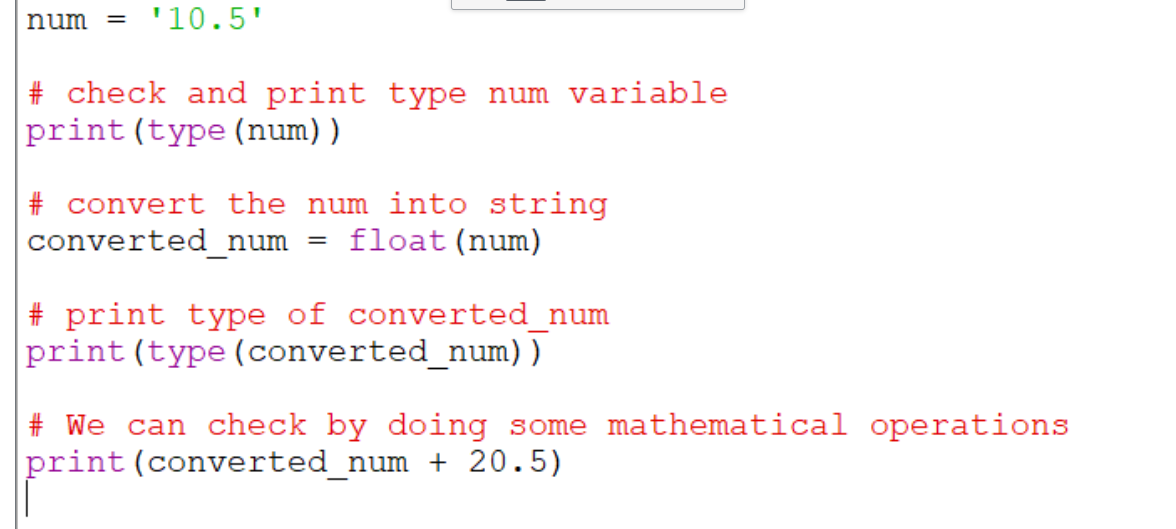
As a side note, to convert to float, we can use float() in python:

Example:

use float() in python

Output:

use float() in python output
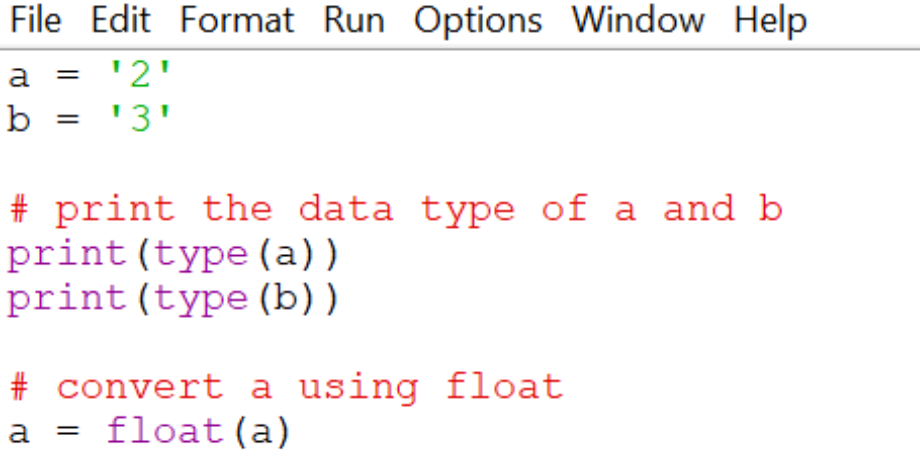
2. Using float() function:

We first convert to float, then convert float to integer. Obviously the above method is better (directly convert to integer).

Syntax: float(string)

Example:

Using-float-function

Output:

Using float() function output

If you have a decimal integer represented as a string and you want to convert the Python string to an int, then you just follow the above method (pass the string to int()), which returns a decimal integer.But By default, int() assumes that the string argument represents a decimal integer. If, however, you pass a hexadecimal string to int(), then you’ll see a ValueError

For value error

The error message says that the string is not a valid decimal integer.

When you pass a string to int(), you can specify the number system that you’re using to represent the integer. The way to specify the number system is to use base:

Now, int() understands you are passing a hexadecimal string and expecting a decimal integer.

Conclusion:

This article is all about how to convert python string to int.All methods are clearly explained here. Now I hope you’re comfortable with the ins and outs of converting a Python string to an int.

Using std::find & std::find_if with User Defined Classes | CPP std::find_if with lambda | std::find & std::find_if Examples

Using stdfind & stdfind if with User Defined Classes

std find_if: In this article, we will be going to discuss how to use std::find and std::find_if algorithm with User Defined Classes.

Using std::find & std::find_if with User Defined Classes

std list find_if: Generally for built-in datatypes like int,string etc ‘std::find’ algorithm uses “==” operator for comparisons but for user defined data types i.e classes & structure we need to define “==” operator.

Now we will take some example,

Let’s take a list of class Item objects. Each of them has properties like Id, price, and availability count.

Now we want to search for an item object with a specific ID from this vector. So let’s see how we will do it,

With std::find

stl find_if: We will do it using the ‘std::find’ algorithm.

class Item
{
private:
    std::string  m_ItemId;
    int m_Price;
    int m_Count;
public:
    Item(std::string id, int price, int count):
        m_ItemId(id), m_Count(count), m_Price(price)
    {}
    int getCount() const {
        return m_Count;
    }
    std::string getItemId() const {
        return m_ItemId;
    }
    int getPrice() const {
        return m_Price;
    }
    bool operator==(const Item & obj2) const
    {
        if(this->getItemId().compare(obj2.getItemId()) == 0)
            return true;
        else
            return false;
    }
};
std::vector<Item> getItemList()
{
    std::vector<Item> vecOfItems ;
    vecOfItems.push_back(Item("D121",100,2));
    vecOfItems.push_back(Item("D122",12,5));
    vecOfItems.push_back(Item("D123",28,6));
    vecOfItems.push_back(Item("D124",8,10));
    vecOfItems.push_back(Item("D125",99,3));
    return vecOfItems;
}

Above we see that ‘std::find’ uses the ‘==’ operator for comparison, therefore we have to define operator == in the Item class.

Let’s search for the Item object with Id “126”,

std::vector<Item> vecOfItems = getItemList();
std::vector<Item>::iterator it;
it = std::find(vecOfItems.begin(), vecOfItems.end(), Item("D123",99,0));
if(it != vecOfItems.end())
    std::cout<<"Found with Price ::"<<it->getPrice()<<" Count :: "<<it->getCount()<<std::endl;
else
    std::cout<<"Item with ID :: D126 not Found"<<std::endl;

So in the above algorithm, you can see that we tried to find ‘id=126’ but we were not able to found because there is no id like that.

Above you have seen how to use ‘std::find ‘ now if we need to search for the Item object with a specific price, we can not use the == operator for it. Hence, we will use the ‘std::find_if’ algorithm.

Also Check:

Create a Comparator Function

Find_if c 11: Let’s first create a comparator function, because ‘std::find_if’ finds the first element in the given range based on the custom comparator passed.

bool priceComparision(Item & obj, int y)
{
    if(obj.getPrice() == y)
        return true;
    else
        return false;
}

With std::find_if

Now we will use this comparator with std::find_if algorithm,

std::vector<Item> vecOfItems = getItemList();
std::vector<Item>::iterator it;
it = std::find_if(vecOfItems.begin(), vecOfItems.end(), std::bind(priceComparision,  std::placeholders::_1 , 28) );
if(it != vecOfItems.end())
    std::cout<<"Item Price ::"<<it->getPrice()<<" Count :: "<<it->getCount()<<std::endl;
else
    std::cout<<"Item not Found"<<std::endl;

So, if we want to search Item objects based on count we use the below algorithm.

Creation of Generic Comparator Function

std find: Let’s create a Generic Comparator function for searching based on any property of a class,

template <typename T>
struct GenericComparator
{
    typedef  int (T::*GETTER)() const;
    GETTER m_getterFunc;
    int m_data;
    GenericComparator(GETTER getterFunc, int data)
    {
        m_getterFunc = getterFunc;
        m_data = data;
    }
    bool operator()(const T  & obj)
    {
        if((obj.*m_getterFunc)() == m_data)
            return true;
        else
            return false;
    }
};

Lets use ‘std::find_if with this generic comparator function,

std::vector<Item> vecOfItems = getItemList();
std::vector<Item>::iterator it;
it = std::find_if(vecOfItems.begin(), vecOfItems.end(),  GenericComparator<Item>(&Item::getPrice, 99)   );
if(it != vecOfItems.end())
    std::cout<<"Item Price ::"<<it->getPrice()<<" Count :: "<<it->getCount()<<std::endl;
else
    std::cout<<"Item not Found"<<std::endl;

std: :find_if with lambda

If you want to make some improvement in the above coding like if we don’t want to define this Generic Comparator function then, we will use lambda functions,

std::vector<Item> vecOfItems = getItemList();
std::vector<Item>::iterator it;
it = std::find_if(vecOfItems.begin(), vecOfItems.end(), [](Item const& obj){
        return obj.getPrice() == 28;
    } );
if(it != vecOfItems.end())
    std::cout<<"Item Price ::"<<it->getPrice()<<" Count :: "<<it->getCount()<<std::endl;
else
    std::cout<<"Item not Found"<<std::endl;

Now we are going to show the complete code in one go, so you can see how it is working.

#include <iostream>
#include <vector>
#include <memory>
#include <string>
#include <algorithm>
#include <functional>

class Item
{
private:
std::string m_ItemId;
int m_Price;
int m_Count;
public:
Item(std::string id, int price, int count):
m_ItemId(id), m_Count(count), m_Price(price)
{}
int getCount() const {
return m_Count;
}
std::string getItemId() const {
return m_ItemId;
}
int getPrice() const {
return m_Price;
}
bool operator==(const Item & obj2) const
{
if(this->getItemId().compare(obj2.getItemId()) == 0)
return true;
else
return false;
}
};

std::vector<Item> getItemList()
{
std::vector<Item> vecOfItems ;
vecOfItems.push_back(Item("D121",100,2));
vecOfItems.push_back(Item("D122",12,5));
vecOfItems.push_back(Item("D123",28,6));
vecOfItems.push_back(Item("D124",8,10));
vecOfItems.push_back(Item("D125",99,3));
return vecOfItems;
}

bool priceComparision(Item & obj, int y)
{
if(obj.getPrice() == y)
return true;
else
return false;
}

template <typename T>
struct GenericComparator
{
typedef int (T::*GETTER)() const;
GETTER m_getterFunc;
int m_data;
GenericComparator(GETTER getterFunc, int data)
{
m_getterFunc = getterFunc;
m_data = data;
}
bool operator()(const Item & obj)
{
if((obj.*m_getterFunc)() == m_data)
return true;
else
return false;
}
};

bool IsLesser10 (int i) {
return (i < 10);
}

int main()
{

std::vector<int> vecData{1,2,3,4,5};

std::vector<int>::iterator it1;
it1 = std::find(vecData.begin(), vecData.end(), 2);
if(it1 != vecData.end())
std::cout<<*it1<<std::endl;
it1 = std::find_if(vecData.begin(), vecData.end(), IsLesser10 );
if(it1 != vecData.end())
std::cout<<*it1<<std::endl;

std::vector<Item> vecOfItems = getItemList();
std::vector<Item>::iterator it = std::find(vecOfItems.begin(), vecOfItems.end(), Item("D126",99,0));

if(it != vecOfItems.end())
std::cout<<"Found with ID :: "<<it->getItemId()<< " Price ::"<<it->getPrice()<<" Count :: "<<it->getCount()<<std::endl;
else
std::cout<<"Item with ID :: D126 not Found"<<std::endl;

it = std::find(vecOfItems.begin(), vecOfItems.end(), Item("D124",99,0));
if(it != vecOfItems.end())
std::cout<<"Found with ID :: "<<it->getItemId()<< " Price ::"<<it->getPrice()<<" Count :: "<<it->getCount()<<std::endl;
else
std::cout<<"Item with ID :: D124 not Found"<<std::endl;

it = std::find_if(vecOfItems.begin(), vecOfItems.end(), [](Item const& obj){
return obj.getPrice() == 28;
} );

if(it != vecOfItems.end())
std::cout<<"Found with ID :: "<<it->getItemId()<< " Price ::"<<it->getPrice()<<" Count :: "<<it->getCount()<<std::endl;
else
std::cout<<"Item not Found"<<std::endl;

it = std::find_if(vecOfItems.begin(), vecOfItems.end(), std::bind(priceComparision, std::placeholders::_1 , 28) );
if(it != vecOfItems.end())
std::cout<<"Found with ID :: "<<it->getItemId()<< " Price ::"<<it->getPrice()<<" Count :: "<<it->getCount()<<std::endl;
else
std::cout<<"Item not Found"<<std::endl;

it = std::find_if(vecOfItems.begin(), vecOfItems.end(), GenericComparator<Item>(&Item::getPrice, 99) );
if(it != vecOfItems.end())
std::cout<<"Found with ID :: "<<it->getItemId()<< " Price ::"<<it->getPrice()<<" Count :: "<<it->getCount()<<std::endl;
else
std::cout<<"Item not Found"<<std::endl;

return 0;
}

Output:

Item with ID :: D126 not Found
Found with ID :: D124 Price ::8 Count :: 10
Found with ID :: D123 Price ::28 Count :: 6
Found with ID :: D125 Price ::99 Count :: 3

Conclusion:

In this article, you have seen how to use the ‘std::find’ and ‘std::find_if’ algorithms with User Defined Classes. Thank you!

MYSQL insert select – MYSQL INSERT WITH SELECT

mysql insert select: In this article we are going to discuss how to insert data into a table using select method in MYSQL.

MYSQL INSERT WITH SELECT: SINGLE TABLE

Select method copies data from one table and inserts into another table.

Syntax:

INSERT INTO table_name(column_name)
SELECT tbl_name.col_name
FROM some_table tbl_name
WHERE condition;

Lets take an example,here we will create a table employees_regist ,which will then select some data from an already existing table emplyees_details in our database.

emplyees_details table has columns emloyee_no, first_name, last_name and designation_post. To see all the rows in employees_details table we will do a SELECT * query on it.

SELECT * FROM employee_details;

After this query you will get this result,

Output:

+-------------+------------+-----------+------------+
| employee_no | first_name | last_name | desig_post |
+-------------+------------+-----------+------------+
|                    1 | Shikha       | Mishra       | Developer |
|                    2 | Ritika         | Mathur      | Designer   |
|                    3 | Rohan        | Rathour     | Developer |
|                    4 | Aarush       | Rathour     | Developer |
|                    5 | Aadhya      | Roopam    | Techwriter |
+-------------+------------+-----------+------------+

So you can see that we already have one table(employee_details), now we are going to create our new table ’employee_regist’.

CREATE TABLE employee_regist(
    employee_exp INT AUTO_INCREMENT,
    first_name VARCHAR(255),
    last_name VARCHAR(255),
    employee_post VARCHAR(255),
    employee_salary INT,
    PRIMARY KEY (employee_exp)
);

So you can see that we have created a table but there is no value because our table is empty at this time,if you want to see table you can write select query,

SELECT * FROM employee_regist;

Output:

Empty set (0.05 sec)

Now we are going to add values in employee_regist.For this we are going to write INSERT query.

INSERT INTOemployee_regist(emploee_exp,first_name,last_name ) 
 SELECT employee_no,first_name,last_name FROM employee_details 
 WHERE desig_post = 'Developer' ;

Now to show output we will execute our SELECT query ,

SELECT * FROM registration_details;

Output:

+-------------+------------+-----------+------------+
| employee_no | first_name | last_name | desig_post |
+-------------+------------+-----------+------------+
|                    1 | Shikha       | Mishra       | Developer |
|                    3 | Rohan        | Rathour     | Developer |
|                    4 | Aarush       | Rathour     | Developer ||
+-------------+------------+-----------+------------+

So in above table you have seen that all table not added only those satisfying the given condition were addaed.

MYSQL INSERT WITH SELECT: MULTIPLE TABLES

In above table you have seen that we have added rows and column from single table but you can also do the same with multiple table.Let’s see it by an example,

We have employee_regist,emplyee_details and eregistered_employee already present in our database,

Now we are going to execute SELECT query to see the data in these table one by one,

’employee_regist’

SELECT * FROM employee_regist;

Output:

+-------------+------------+-----------+------------+
| employee_no | first_name | last_name | confirm     |
+-------------+------------+-----------+------------+
|                      |                    |                  |                   |
|                      |                    |                  |                   |
|                      |                    |                  |                   |
+-------------+------------+-----------+------------+

’employee_details’

SELECT * FROM employee_details;

output:

+-------------+------------+-----------+------------+
| employee_no | first_name | last_name | desig_post |
+-------------+------------+-----------+------------+
|                    1 | Shikha       |  Mishra      | Developer |
|                    2 | Ritika         | Mathur      | Designer   |
|                    3 | Rohan        | Rathour     | Developer |
|                    4 | Aarush       | Rathour     | Developer |
|                    5 | Aadhya      | Roopam    | Techwriter |
+-------------+------------+-----------+------------+

’employee_status’

SELECT * FROM registered_employee;

Output:

+-------------+------------+-----------+------------+
|  first_name | last_name | confirm                            |
+-------------+------------+-----------+------------+
|         Shikha | Mishra     | yes                                    |
|           Ritika | Mathur    | yes                                    |
|          Rohan | Rathour   | No                                    |
|          Aarush| Rathour   |yes                                     |
|        Aadhya | Roopam  | No                                     |
+-------------+------------+-----------+------------+

Now we are going to write a query in MySQL to get the data into employee_regist from  employee_details and registered_employee.

Selecting first_name and last_name from employee_details and confirm from employee_registered of only those students who have ‘Developer‘ stream.

INSERT INTO employee_regist(employee_no,first_name,last_name, employee_confirm) 
SELECT em.employee_no,em.first_name,em.last_name ,re.confirm
FROM  employee_details em , confirm re
WHERE em.first_name = re.first_name 
AND em.last_name = re.last_name
AND em.stream_name = 'Developer'  ;

Above in our query we have used em and re as alias,So now we are going to see output It will add data from multiple table.

Output:

+————-+————+———–+————+
| employee_no | first_name | last_name | confirm |
+————-+————+———–+————+
| 1                    | Shikha       | Mishra      |yes          |
| 3                    | Rohan       | Rathour     |No          |
| 4                    | Aarush      | Rathour     |yes          |

+————-+————+———–+————+

Conclusion:

In this article we have discussed how to insert data into a single and multiple table using select method in MYSQL.

Thanks to all!

Pandas select rows by multiple conditions – Python Pandas : Select Rows in DataFrame by conditions on multiple columns

About Pandas DataFrame

Pandas select rows by multiple conditions: It  is a 2 dimensional data structure, like a 2 dimensional array, or a table with rows and columns.

This article is all about showing different ways to select rows in DataFrame based on condition on single or multiple columns.

import pandas as pd
students = [ ('Shyam', 'books' , 24) ,
             ('ankur', 'pencil' , 28) ,
             ('Rekha', 'pen' , 30) ,
             ('Sarika', 'books', 62) ,
             ('Lata', 'file' , 33) ,
             ('Mayank', 'pencil' , 30) ] 
dataframeobj = pd.DataFrame(students, columns = ['Name' , 'Product', 'Sale'])
print(dataframeobj)

Output will be:

RESTART: C:/Users/HP/Desktop/dataframe.py
Name    Product    Sale
0   Shyam   books       24
1   Ankur    pencil       28
2   Rekha    pen          30
3   Sarika    books      62
4   Lata       file           33
5   Mayank  pencil     30

Select Rows based on value in column

Pandas select rows multiple conditions: Let’s see how to Select rows based on some conditions in  DataFrame.

Select rows in above example for which ‘Product’ column contains the value ‘books’,

import pandas as pd
students = [ ('Shyam', 'books' , 24) ,
             ('ankur', 'pencil' , 28) ,
             ('Rekha', 'pen' , 30) ,
             ('Sarika', 'books', 62) ,
             ('Lata', 'file' , 33) ,
             ('Mayank', 'pencil' , 30) ] 
dataframeobj = pd.DataFrame(students, columns = ['Name' , 'Product', 'Sale'])
subsetDataFrame = dataframeobj[dataframeobj['Product'] == 'books']
print(subsetDataFrame)

Output:

RESTART: C:/Users/HP/Desktop/dataframe.py
Name     Product   Sale
0     Shyam    books      24
3     Sarika     books      62

In above example we have seen that subsetDataFrame = dataframeobj[dataframeobj['Product'] == 'books']

using this it will return column which have ‘Product’ contains ‘Books’ only.

So,if we want to see whole functionality?See below.

When we apply [dataframeobj['Product'] == 'books']this condition,it will give output in true & false form.

0 True
1 False
2 False
3 True
4 False
5 False
Name: Product, dtype: bool

It will give true when the condition matches otherwise false.

If we pass this series object to [] operator of DataFrame, then it will be return a new DataFrame with only those rows that has True in the passed Series object i.e.

RESTART: C:/Users/HP/Desktop/dataframe.py

Name     Product   Sale

0     Shyam    books      24

3     Sarika     books      62

If we select any other product name it will return value accordingly.

Select Rows based on any of the multiple values in column

Python dataframe select rows by condition: Select rows from above example for which ‘Product‘ column contains either ‘Pen‘ or ‘Pencil‘ i.e

import pandas as pd
students = [ ('Shyam', 'books' , 24) ,
             ('ankur', 'pencil' , 28) ,
             ('Rekha', 'pen' , 30) ,
             ('Sarika', 'books', 62) ,
             ('Lata', 'file' , 33) ,
             ('Mayank', 'pencil' , 30) ] 
dataframeobj = pd.DataFrame(students, columns = ['Name' , 'Product', 'Sale'])
subsetDataFrame = dataframeobj[dataframeobj['Product'].isin(['pen', 'pencil']) ]
print(subsetDataFrame)

We have given product name list by isin() function and it will return true if condition will match otherwise false.

Therefore, it will return a DataFrame in which Column ‘Product‘ contains either ‘Pen‘ or ‘Pencil‘ only i.e.

Output:

RESTART: C:/Users/HP/Desktop/dataframe.py
Name Product Sale
1 ankur     pencil  28
2 Rekha    pen      30
5 Mayank pencil   30

Select DataFrame Rows Based on multiple conditions on columns

In this method we are going to select rows in above example for which ‘Sale’ column contains value greater than 20 & less than 33.So for this we are going to give some condition.

import pandas as pd
students = [ ('Shyam', 'books' , 24) ,
             ('ankur', 'pencil' , 28) ,
             ('Rekha', 'pen' , 30) ,
             ('Sarika', 'books', 62) ,
             ('Lata', 'file' , 33) ,
             ('Mayank', 'pencil' , 30) ] 
dataframeobj = pd.DataFrame(students, columns = ['Name' , 'Product', 'Sale'])
filterinfDataframe = dataframeobj[(dataframeobj['Sale'] > 20) & (dataframeobj['Sale'] < 33) ]
print(filterinfDataframe)

It will return following DataFrame object in which Sales column  contains value between 20 to 33,

RESTART: C:/Users/HP/Desktop/dataframe.py
    Name      Product Sale
0 Shyam      books    24
1 ankur        pencil    28
2 Rekha       pen       30
5 Mayank    pencil    30

Conclusion:

In this article we have seen diferent methods to select rows in dataframe by giving some condition.Hope you find this informative.

Numpy amin – numpy.amin() | Find minimum value in Numpy Array and it’s index | Python Numpy amin() Function

numpy.amin() Find minimum value in Numpy Array and it’s index

Numpy amin: In this tutorial, we have shared the numpy.amin() statistical function of the Numpy library with its syntax, parameters, and returned values along with a few code examples to aid you in understanding how this function works. Also, you can easily find the minimum value in Numpy Array and its index using Numpy.amin() with sample programs.

numpy.amin()

np.amin: The numpy.amin() function returns minimum value of an array. Also, it is a statistical function of the NumPy library that is utilized to return the minimum element of an array or minimum element along an axis.

Syntax:

The syntax needed to use this function is as follows:

numpy.amin(a, axis=None, out=None, keepdims=<no value>, initial=<no value>)

In this, we will pass two arguments-

where

  • a: It is the array from where we have to find min value
  • axis: It is optional and if not provided then it will pass the NumPy array and returns the min value.
    • If it’s given then it will return for an array of min values along the axis i.e.
    • In the case of axis=0 then it returns an array containing min value for each column.
    • In the case of axis=1 then it returns an array containing min value for each row.

Parameters:

Numpy minimum: Now it’s time to explain the parameters of this method:

  • a: This parameter shows the input data that is in the form of an array.
  • axis: It is an optional parameter registering the Axis or axes along which to operate. The value of this parameter can be int or a tuple of int values and also has a default value as None.
  • out: This optional parameter is applied to show an alternative output array in which the result becomes stored. The value of this parameter is in the form of an ndarray.
  • keepdims: By this optional parameter(having boolean value), the result will broadcast perfectly against the input array. If this option is set to True, the axes which are overcome are left in the result as dimensions with size one.
  • initial: This is a scalar and optional parameter used to show the maximum value of an output element.
  • where: This is an optional parameter used to indicate the elements to compare for the value.

Return Value:

Numpy array min: The minimum of an array – arr[ndarray or scalar], scalar if the axis is None; the result is an array of dimension a.ndim – 1 if the axis is mentioned.

Also Refer:

Example on NumPy amin() Function

a = np.arange(9).reshape((3,3))

print("The Array is :")
print(a)

print("Minimum element in the array is:",np.amin(a))         

print("Minimum element along the first axis of array is:",np.amin(a, axis=0))  

print("Minimum element along the second axis of array is:",np.amin(a, axis=1))

Output:

The Array is : [[0 1 2] [3 4 5] [6 7 8]]

Minimum element in the array is: 0

Minimum element along the first axis of array is: [0 1 2]

Minimum element along the second axis of array is: [0 3 6]

Find the minimum value in a 1D Numpy Array

Numpy minimum of array: So now we are going to use numpy.amin() to find out the minimum element from a 1D array.

import numpy
arr = numpy.array([11, 12, 13, 14, 15, 16, 17, 15, 11, 12, 14, 15, 16, 17])
# Get the minimum element from a Numpy array
minElement = numpy.amin(arr)
print('Minimum element from Numpy Array : ', minElement)

Output:

Minimum element from Numpy Array : 11

Find minimum value & its index in a 2D Numpy Array

Python index of minimum: So here we are going to find out the min value in the 2D array.

import numpy
arr2D = numpy.array([[11, 12, 13],
                     [14, 15, 16],
                     [17, 15, 11],
                     [12, 14, 15]])# Get the minimum element from a Numpy array
minElement = numpy.amin(arr2D)
print('Minimum element from Numpy Array : ', minElement)

Output:

Minimum element from Numpy Array : 11

Find min values along the axis in 2D numpy array | min in rows or columns:

Numpy min: If we pass axis=0 then it gives an array containing min of every column,

import numpy
arr2D = numpy.array([[11, 12, 13],
                     [14, 15, 16],
                     [17, 15, 11],
                     [12, 14, 15]])
# Get the minimum values of each column i.e. along axis 0
minInColumns = numpy.amin(arr2D, axis=0)
print('min value of every column: ', minInColumns)

Output:

min value of every column: [11 12 11]

If we pass axis=1 then it gives an array containing min of every row,

import numpy 
arr2D = numpy.array([[11, 12, 13],
                     [14, 15, 16], 
                      [17, 15, 11], 
                     [12, 14, 15]]) 
# Get the minimum values of each row i.e. along axis 1 
minInColumns = numpy.amin(arr2D, axis=1) 
print('min value of every column: ', minInColumns)

Output:

min value of every column: [11 14 11 12]

Find the index of minimum value from the 2D numpy array

So here we are going to discuss how to find out the axis and coordinate of the min value in the array.

import numpy
arr2D = numpy.array([[11, 12, 13],
                     [14, 15, 16],
                     [17, 15, 11],
                     [12, 14, 15]])
result = numpy.where(arr2D == numpy.amin(arr2D))
print('Tuple of arrays returned : ', result)
print('List of coordinates of minimum value in Numpy array : ')
# zip the 2 arrays to get the exact coordinates
listOfCordinates = list(zip(result[0], result[1]))
# travese over the list of cordinates
for cord in listOfCordinates:
    print(cord)

Output:

Tuple of arrays returned : (array([0, 2], dtype=int32), array([0, 2], dtype=int32))
List of coordinates of minimum value in Numpy array :
(0, 0)
(2, 2)

numpy.amin() & NaN

if there is a NaN in the given numpy array then numpy.amin() will return NaN as minimum value.

import numpy
arr = numpy.array([11, 12, 13, 14, 15], dtype=float)
arr[3] = numpy.NaN
print('min element from Numpy Array : ', numpy.amin(arr))

Output:

min element from Numpy Array : nan

Count occurrences of a value in NumPy array in Python | numpy.count() in Python

Count occurrences of a value in NumPy array in Python

Count Occurences of a Value in Numpy Array in Python: In this article, we have seen different methods to count the number of occurrences of a value in a NumPy array in Python. Check out the below given direct links and gain the information about Count occurrences of a value in a NumPy array in Python.

Python numpy.count() Function

Numpy value counts: The function of numpy.count()in python aid in the counts for the non-overlapping occurrence of sub-string in the specified range. The syntax for phyton numpy.count() function is as follows:

Syntax:

numpy.core.defchararray.count(arr, substring, start=0, end=None)

Parameters:

  • arr: array-like or string to be searched.
  • substring: substring to search for.
  • start, end: [int, optional] Range to search in.

Returns:

np count: An integer array with the number of non-overlapping occurrences of the substring.

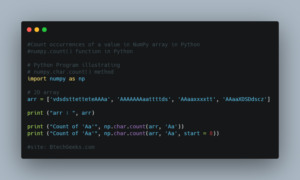
Example Code for numpy.count() Function in Python

numpy.count() function in python

# Python Program illustrating 
# numpy.char.count() method 
import numpy as np 
  
# 2D array 
arr = ['vdsdsttetteteAAAa', 'AAAAAAAaattttds', 'AAaaxxxxtt', 'AAaaXDSDdscz']
  
print ("arr : ", arr)
  
print ("Count of 'Aa'", np.char.count(arr, 'Aa'))
print ("Count of 'Aa'", np.char.count(arr, 'Aa', start = 8))

Output:

arr : ['vdsdsttetteteAAAa', 'AAAAAAAaattttds', 'AAaaxxxxtt', 'AAaaXDSDdscz']

Count of 'Aa' [1 1 1 1]
Count of 'Aa' [1 0 0 0]

Also Check:

How to count the occurrences of a value in a NumPy array in Python

Numpy array value counts: Counting the occurrences of a value in a NumPy array means returns the frequency of the value in the array. Here are the various methods used to count the occurrences of a value in a python numpy array.

Use count_nonzero()

Array count python: We use the count_nonzero()function to count occurrences of a value in a NumPy array, which returns the count of values in a given numpy array. If the value of the axis argument is None, then it returns the count.

Let’s take an example, count all occurrences of value ‘6’ in an array,

import numpy as np
arr = np.array([9, 6, 7, 5, 6, 4, 5, 6, 5, 4, 7, 8, 6, 6, 7])
print('Numpy Array:')
print(arr)
# Count occurrence of element '3' in numpy array
count = np.count_nonzero(arr == 6)
print('Total occurences of "6" in array: ', count)

Output:

RESTART: C:/Users/HP/Desktop/article3.py
Numpy Array:
[9 6 7 5 6 4 5 6 5 4 7 8 6 6 7]
Total occurences of "6" in array: 5

In the above example, you have seen that we applied a condition to the numpy array ie., arr==6, then it applies the condition on each element of the array and stores the result as a bool value in a new array.

Use sum()

Count python array: In this, we are using thesum()function to count occurrences of a value in an array.

import numpy as np
arr = np.array([9, 6, 7, 5, 6, 4, 5, 6, 5, 4, 7, 8, 6, 6, 7])
print('Numpy Array:')
print(arr)
# Count occurrence of element '6' in numpy array
count = (arr == 6).sum()

print('Total occurences of "6" in array: ', count)

Output:

RESTART: C:/Users/HP/Desktop/article3.py
Numpy Array: [9 6 7 5 6 4 5 6 5 4 7 8 6 6 7]
Total occurences of "6" in array: 5

In the above example, we have seen if the given condition is true then it is equivalent to one in python so we can add the True values in the array to get the sum of values in the array.

Use bincount()

Python count array: We usebincount()function to count occurrences of a value in an array.

import numpy as np
arr = np.array([9, 6, 7, 5, 6, 4, 5, 6, 5, 4, 7, 8, 6, 6, 7])
count_arr = np.bincount(arr)
# Count occurrence of element '6' in numpy array
print('Total occurences of "6" in array: ', count_arr[6])
# Count occurrence of element '5' in numpy array
print('Total occurences of "5" in array: ', count_arr[5])

Output:

RESTART: C:/Users/HP/Desktop/article3.py
Total occurences of "6" in array: 5
Total occurences of "5" in array: 3

Convert numpy array to list and count occurrences of a value in an array

Numpy count values: In this method, first we convert the array to a list and then we applycount()function on the list to get the count of occurrences of an element.

import numpy as np
arr = np.array([9, 6, 7, 5, 6, 4, 5, 6, 5, 4, 7, 8, 6, 6, 7])
# Count occurrence of element '6' in numpy array
count = arr.tolist().count(6)
print('Total occurences of "6" in array: ', count)

Output:

RESTART: C:/Users/HP/Desktop/article3.py
Total occurences of "6" in array:

Select elements from the array that matches the value and count them

Numpy.count: We can choose only those elements from the numpy array that is similar to a presented value and then we can attain the length of this new array. It will furnish the count of occurrences of the value in the original array. For instance,

import numpy as np
# Create a 2D Numpy Array from list of lists
matrix = np.array( [[2, 3, 4],
                    [5, 3, 4],
                    [5, 3, 5],
                    [4, 7, 8],
                    [3, 6, 2]] )
# Count occurrence of element '3' in each column
count = np.count_nonzero(matrix == 3, axis=0)
print('Total occurrences  of "3" in each column of 2D array: ', count)

Output: 

Total occurrences of "3" in each column of 2D array: [1 3 0]

Count occurrences of a value in 2D NumPy Array

Python count instances in list: We can use the count_nonzero() function to count the occurrences of a value in a 2D array or matrix.

import numpy as np
# Create a 2D Numpy Array from list of lists
matrix = np.array( [[2, 3, 4],
                    [5, 3, 4],
                    [5, 6, 5],
                    [6, 7, 6],
                    [3, 6, 2]] )
# Count occurrence of element '6' in complete 2D Numpy Array
count = np.count_nonzero(matrix == 6)
print('Total occurrences of "6" in 2D array:')
print(count)

Output:

Total occurrences of "6" in 2D array: 4

Count occurrences of a value in each row of 2D NumPy Array

To count the occurrences of a value in each row of the 2D  array we will pass the axis value as 1 in the count_nonzero() function.

It will return an array containing the count of occurrences of a value in each row.

import numpy as np
# Create a 2D Numpy Array from list of lists
matrix = np.array( [[2, 3, 4],
                    [5, 3, 4],
                    [6, 6, 5],
                    [4, 7, 6],
                    [3, 6, 2]] )
# Count occurrence of element '6' in each row
count = np.count_nonzero(matrix == 6, axis=1)
print('Total occurrences  of "6" in each row of 2D array: ', count)

Output:

Total occurrences of "6" in each row of 2D array: [0 0 2 1 1]

Count occurrences of a value in each column of 2D NumPy Array

In order to count the occurrences of a value in each column of the 2D NumPy array transfer the axis value as 0 in thecount_nonzero()function. After that, it will result in an array including the count of occurrences of a value in each column. For instance,

import numpy as np
# Create a 2D Numpy Array from list of lists
matrix = np.array( [[2, 3, 4],
                    [5, 3, 4],
                    [5, 3, 5],
                    [4, 7, 8],
                    [3, 6, 2]] )
# Count occurrence of element '3' in each column
count = np.count_nonzero(matrix == 3, axis=0)
print('Total occurrences  of "3" in each column of 2D array: ', count)

Output:

Total occurrences of "3" in each column of 2D array: [1 3 0]

Remove element from set c++ – Different ways to Erase / Delete an element from a Set in C++ | set::erase() Function in C++

Different ways to Erase or Delete an element from a Set in C++

Remove element from set c++: In this article, we will be going to discuss various ways to erase an element from a Set in C++.

erase() function is used to remove elements from a set from the specified range.

Here, std::set gives 3 overloaded version of erase() member function. So, we will learn them one by one clearly in this tutorial.

First, let’s take a string which we will use as an example,

#include <iostream>
#include <set>
#include <iterator>
#include <string>
#include <vector>

int main() {
   //Set Of Strings 
   std::set<std::string> setOfStrs = {"Good", "Morning", "say", "hello", "at", "Hi", "is", "from", "to"};
    // Printing Contents of Set
    std::copy (setOfStrs.begin(), setOfStrs.end(), std::ostream_iterator<std::string>(std::cout, ", "));
    std::cout<<std::endl;
    return 0;
}

Output:

Good, Hi, Morning, at, from, hello, is, say, to

Now we will remove elements from it in three different ways:

Let’s start with the first way of erase/ delete an element from a set in C++

Removing Element from set By Iterator

Set erase c++: An element that has to be erased will be given in the iterator. Iterator is accepted by the overloaded version of erase() function which provided by ‘std::set’.

Syntax:

iterator erase (const_iterator position);

It renders the element close to the last deleted element. Let’s apply this to remove an element from the above set of strings i.e.,

#include <iostream>
#include <set>
#include <iterator>
#include <string>
#include <vector>

int main() {
  
   //Set Of Strings 
   std::set<std::string> setOfStrs = {"Good", "Morning", "say", "hello", "at", "Hi", "is", "from", "to"};
    
    // Search for element "is"
    std::set<std::string>::iterator it = setOfStrs.find("is");
    // Check if Iterator is valid
    if(it != setOfStrs.end())
    {
        // Deletes the element pointing by iterator it
        setOfStrs.erase(it);
    }
    // Printing Contents of Set
    std::copy (setOfStrs.begin(), setOfStrs.end(), std::ostream_iterator<std::string>(std::cout, ", "));
    std::cout<<std::endl;
    return 0;
}

Output:

Good, Hi, Morning, at, from, hello, say, to

So you have seen this is how we erase elements from the given string. You can see that above we have erased “is” from our given string.

Read More:

Removing Element from set By Value

“std::set” presents an overloaded version of an erase() function that allows a value and delete that from the set.

Syntax:

size_type erase (const value_type& val);

Let’s view the following example code on removing an element from the above set of strings i.e.,

#include <iostream>
#include <set>
#include <iterator> 
#include <string>
#include <vector>
int main() {
    //Set Of Strings 
    std::set<std::string> setOfStrs = {"Good", "Morning", "say", "hello", "at", "Hi", "is", "from", "to"};
    // Erase element "that" from set
    setOfStrs.erase("that");
    // Printing Contents of Set
    std::copy (setOfStrs.begin(), setOfStrs.end(), std::ostream_iterator<std::string>(std::cout, ", "));
    std::cout<<std::endl;
    return 0;
}

Output:

Good, Hi, Morning, at, from, hello, is, say, to

So above you can see that we remove ‘that’ from our string.

Removing Element from set By Iterator Range

In this approach, ‘std::set’ gives an overloaded version of erase() function that takes two iterators representing a range from (start) to (end -1).

Syntax:

iterator erase (const_iterator first, const_iterator last);

Now, we will use this to remove elements from the above set of strings i.e.,

#include <iostream>
#include <set>
#include <iterator> 
#include <string>
#include <vector>
int main() {
    //Set Of Strings 
    std::set<std::string> setOfStrs = {"Good", "Morning", "say", "hello", "at", "Hi", "is", "from", "to"};
    // Iterator pointing to "Hello" in Set
std::set<std::string>::iterator start = setOfStrs.find("Hello");
// Iterator pointing to "from" in Set
std::set<std::string>::iterator last = setOfStrs.find("from");
// Check if both start and last iterators are valid
if(start != setOfStrs.end() && last != setOfStrs.end())
{
    // Erase all elements from "Hello" to "from"
    setOfStrs.erase(start, last);
}

    return 0;
}

Output:

Good, Morning, say, to

So you can see that it has remove all the elements in the given range and returns the element next to the last deleted element.

Conclusion:

In this article, you have seen different ways to erase/delete an element from a Set in C++. Keep browsing our C++, CSS, HTML, Python articles on BtechGeeks and improve your coding skills more and more. Thank you!

MySQL remove column – MySQL- Drop/ Delete column from table

MySQL delete column: In this article we are going to discuss how to delete or drop a column from a table in MYSQL.

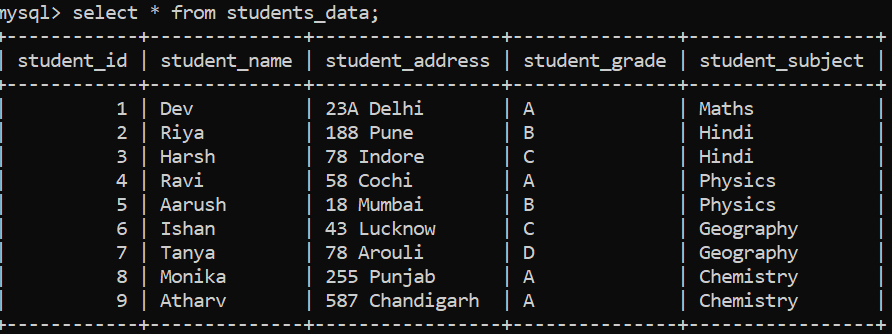
Now first we are going to create a table students_data which we will be using in our article to show how to delete or drop a column from a table in MYSQL,

CREATE TABLE students_data (
student_id INT AUTO_INCREMENT,
student_name VARCHAR(255),
student_address VARCHAR(255),
student_grade VARCHAR(50),
student_subject VARCHAR(255),
 PRIMARY KEY (student_id)
);

Insert values in it by using below query,

INSERT INTO students_data (student_name, student_address, student_grade, student_subject) 
VALUES("Dev","23A Delhi","A","Maths"),
("Riya","188 Pune","B","Hindi"),
("Harsh","78 Indore","C","Hindi"),
("Ravi","58 Cochi","A","Physics"),    
("Aarush","18 Mumbai","B","Physics"),
("Ishan","43 Lucknow","C","Geography"),
("Tanya","78 Arouli","D","Geography"),
("Monika","255 Punjab","A","Chemistry"),
("Atharv","587 Chandigarh","A","Chemistry");

Output:

MySql delete or drop column

MySQL delete column from a table -syntax

Delete column from table MySQL: MySQL allows  ALTER TABLE command to add a new column to an table and we can also drop/delete column using this. The following are the syntax to do this:

Syntax:

ALTER TABLE table_reference DROP COLUMN column_name;

Explaination:

1.ALTER TABLE: This is Alter Command

2.table_reference – table from which we have to delete column

3.column_name – the name of the column which will get deleted.

MySQL delete column from a table – example

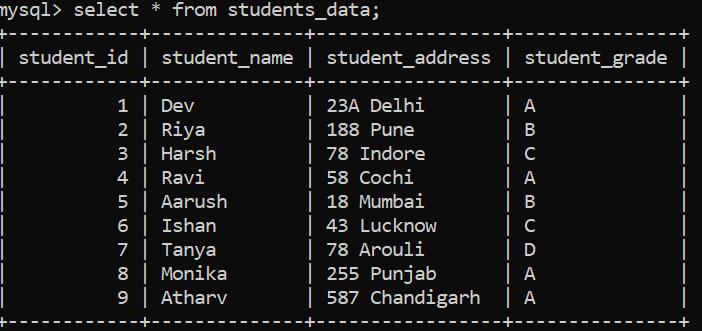
Drop column mysql: Here we are going to take an example to understand Alter Table Command,now we are going to delete column ‘student_subject’ from ‘student_data’ table using below query,

ALTER TABLE students_data DROP COLUMN student_subject;

Output:

MySql-delete-column2

You can see that in above output ‘student_subject’ column has deleted.

If we want other sessions to read and write the table while we delete a column we can put LOCK value is none which you can see in below query,

ALTER TABLE students_data DROP COLUMN student_subject, ALGORITHM= INPLACE , LOCK=NONE;

MySQL drop a column with foreign key

MySQL remove column: Here we are going to use another method to drop/delete column in MySQL.Let first create a table where we will also create a foreign key constraint,

Let’s create,

CREATE TABLE students_address_table (
student_address_id INT AUTO_INCREMENT,
student_id INT NOT NULL,
student_address VARCHAR(255),
FOREIGN KEY (student_id) REFERENCES students_data(student_id),
PRIMARY KEY(student_address_id)
);

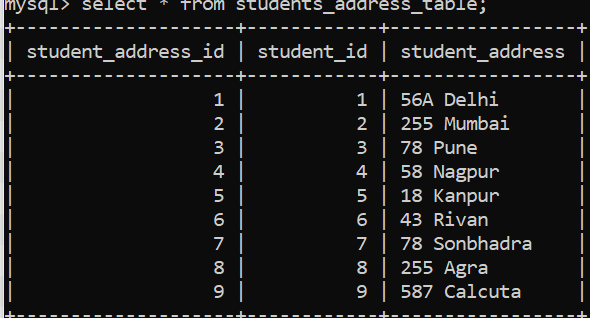
Insert values in the table “students_address_table”,

INSERT INTO students_address_table (student_id,student_address) 
VALUES(1,"56A Delhi"),
(2,"255 Mumbai"),
(3,"78 Pune"),
(4,"58 Nagpur"),    
(5,"18 Kanpur"),
(6,"43 Rivan"),
(7,"78 Sonbhadra"),
(8,"255 Agra"),
(9,"587 Calcuta");

Output:

MySQL-delete-column-using-foreign

In above output you can see that ‘student_address_id’ is primary key and for this ‘student_id’ is foreign key,

Now we are going to write query for drop/delete column in table ‘students_address_table’,

ALTER TABLE students_address_table DROP COLUMN student_id;

Output:

ERROR 1828 (HY000): Cannot drop column 'student_id': needed in a foreign key 
constraint 'students_address_table_ibfk_1'

In above output you can see that we got an error because we have tried to delete column using same query which we have used for delete column using alter command,

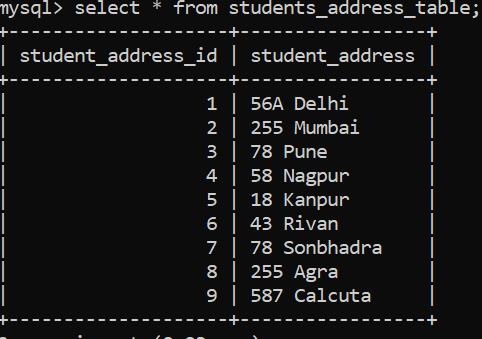
Now we are going to make some changes in it first we will delete foreign key constraint,

ALTER TABLE students_address_table DROP FOREIGN key students_address_table_ibfk_1;

ALTER TABLE students_address_table DROP COLUMN student_id;

Output:


Mysql-drop-column

So you can see that in above output column ‘student_id’ deleted.

Conclusion:

In this article we have discussed how to delete or drop a column from a table in MYSQL.Thank you

Pandas iterate over rows and update – Pandas: 6 Different ways to iterate over rows in a Dataframe & Update while iterating row by row

Pandas- 6 Different ways to iterate over rows in a Dataframe & Update while iterating row by row

Pandas iterate over rows and update: In this tutorial, we will review & make you understand six different techniques to iterate over rows. Later we will also explain how to update the contents of a Dataframe while iterating over it row by row.

Let’s first create a dataframe which we will use in our example,

import pandas as pd
empoyees = [('Shikha', 34, 'Mumbai', 5) ,
           ('Rekha', 31, 'Delhi' , 7) ,
           ('Shishir', 16, 'Punjab', 11)
            ]
# Create a DataFrame object
empDfObj = pd.DataFrame(empoyees, columns=['Name', 'Age', 'City', 'Experience'], index=['a', 'b', 'c'])
print(empDfObj)

Output:

Name  Age    City        Experience
a  Shikha 34     Mumbai  5
b Rekha   31     Delhi      7
c Shishir  16     Punjab   11

Iterate over rows of a dataframe using DataFrame.iterrows()

Pandas foreach row: Dataframe class implements a member function iterrows() i.e. DataFrame.iterrows(). Now, we will use this function to iterate over rows of a dataframe.

DataFrame.iterrows()

Python dataframe iterate rows: DataFrame.iterrows() returns an iterator that iterator iterate over all the rows of a dataframe.

For each row, it returns a tuple containing the index label and row contents as series.

Let’s use it in an example,

import pandas as pd
empoyees = [('Shikha', 34, 'Mumbai', 5) ,
           ('Rekha', 31, 'Delhi' , 7) ,
           ('Shishir', 16, 'Punjab', 11)
            ]
# Create a DataFrame object
empDfObj = pd.DataFrame(empoyees, columns=['Name', 'Age', 'City', 'Experience'], index=['a', 'b', 'c'])

for (index_label, row_series) in empDfObj.iterrows():
   print('Row Index label : ', index_label)
   print('Row Content as Series : ', row_series.values)

Output:

Row Index label : a
Row Content as Series : ['Shikha' 34 'Mumbai' 5]
Row Index label : b
Row Content as Series : ['Rekha' 31 'Delhi' 7]
Row Index label : c
Row Content as Series : ['Shishir' 16 'Punjab' 11]

Note:

  • Do Not Preserve the data types as iterrows() returns each row contents as series however it doesn’t preserve datatypes of values in the rows.
  • We can not able to do any modification while iterating over the rows by iterrows(). If we do some changes to it then our original dataframe would not be affected.

Iterate over rows of a dataframe using DataFrame.itertuples()

DataFrame.itertuples()

Iterating through pandas dataframe: DataFrame.itertuples() yields a named tuple for each row containing all the column names and their value for that row.

Let’s use it,

import pandas as pd
empoyees = [('Shikha', 34, 'Mumbai', 5) ,
           ('Rekha', 31, 'Delhi' , 7) ,
           ('Shishir', 16, 'Punjab', 11)
            ]
# Create a DataFrame object
empDfObj = pd.DataFrame(empoyees, columns=['Name', 'Age', 'City', 'Experience'], index=['a', 'b', 'c'])

# Iterate over the Dataframe rows as named tuples
for namedTuple in empDfObj.itertuples():
   #Print row contents inside the named tuple
   print(namedTuple)

Output:

Pandas(Index='a', Name='Shikha', Age=34, City='Mumbai', Experience=5)
Pandas(Index='b', Name='Rekha', Age=31, City='Delhi', Experience=7)
Pandas(Index='c', Name='Shishir', Age=16, City='Punjab', Experience=11)

So we can see that for every row it returned a named tuple. we can access the individual value by indexing..like,

For the first value,

namedTuple[0]

For the second value,

namedTuple[1]

Do Read:

Named Tuples without index

Pandas iterate through rows: If we pass argument ‘index=False’ then it only shows the named tuple not the index column.

import pandas as pd
empoyees = [('Shikha', 34, 'Mumbai', 5) ,
           ('Rekha', 31, 'Delhi' , 7) ,
           ('Shishir', 16, 'Punjab', 11)
            ]
# Create a DataFrame object
empDfObj = pd.DataFrame(empoyees, columns=['Name', 'Age', 'City', 'Experience'], index=['a', 'b', 'c'])

# Iterate over the Dataframe rows as named tuples without index
for namedTuple in empDfObj.itertuples(index=False):
   # Print row contents inside the named tuple
   print(namedTuple)

Output:

Pandas(Name='Shikha', Age=34, City='Mumbai', Experience=5)
Pandas(Name='Rekha', Age=31, City='Delhi', Experience=7)
Pandas(Name='Shishir', Age=16, City='Punjab', Experience=11)

Named Tuples with custom names

Pandas dataframe loop through rows: If we don’t want to show Pandas name every time, we can pass custom names too:

import pandas as pd
empoyees = [('Shikha', 34, 'Mumbai', 5) ,
           ('Rekha', 31, 'Delhi' , 7) ,
           ('Shishir', 16, 'Punjab', 11)
            ]
# Create a DataFrame object
empDfObj = pd.DataFrame(empoyees, columns=['Name', 'Age', 'City', 'Experience'], index=['a', 'b', 'c'])

# Give Custom Name to the tuple while Iterating over the Dataframe rows
for row in empDfObj.itertuples(name='Employee'):
   # Print row contents inside the named tuple
   print(row)

Output:

Employee(Index='a', Name='Shikha', Age=34, City='Mumbai', Experience=5)
Employee(Index='b', Name='Rekha', Age=31, City='Delhi', Experience=7)
Employee(Index='c', Name='Shishir', Age=16, City='Punjab', Experience=11)

Iterate over rows in dataframe as Dictionary

Loop through rows in dataframe: Using this method we can iterate over the rows of the dataframe and convert them to the dictionary for accessing by column label using the same itertuples().

import pandas as pd
employees = [('Shikha', 34, 'Mumbai', 5) ,
           ('Rekha', 31, 'Delhi' , 7) ,
           ('Shishir', 16, 'Punjab', 11)
            ]
# Create a DataFrame object
empDfObj = pd.DataFrame(employees, columns=['Name', 'Age', 'City', 'Experience'], index=['a', 'b', 'c'])

# itertuples() yields an iterate to named tuple
for row in empDfObj.itertuples(name='Employee'):
   # Convert named tuple to dictionary
   dictRow = row._asdict()
   # Print dictionary
   print(dictRow)
   # Access elements from dict i.e. row contents
   print(dictRow['Name'] , ' is from ' , dictRow['City'])

Output:

{'Index': 'a', 'Name': 'Shikha', 'Age': 34, 'City': 'Mumbai', 'Experience': 5}
Shikha is from Mumbai
{'Index': 'b', 'Name': 'Rekha', 'Age': 31, 'City': 'Delhi', 'Experience': 7}
Rekha is from Delhi
{'Index': 'c', 'Name': 'Shishir', 'Age': 16, 'City': 'Punjab', 'Experience': 11}
Shishir is from Punjab

Iterate over rows in dataframe using index position and iloc

Iterate rows in dataframe: We will loop through the 0th index to the last row and access each row by index position using iloc[].

import pandas as pd
employees = [('Shikha', 34, 'Mumbai', 5) ,
           ('Rekha', 31, 'Delhi' , 7) ,
           ('Shishir', 16, 'Punjab', 11)
            ]
# Create a DataFrame object
empDfObj = pd.DataFrame(employees, columns=['Name', 'Age', 'City', 'Experience'], index=['a', 'b', 'c'])

# Loop through rows of dataframe by index i.e. from 0 to number of rows
for i in range(0, empDfObj.shape[0]):
   # get row contents as series using iloc{] and index position of row
   rowSeries = empDfObj.iloc[i]
   # print row contents
   print(rowSeries.values)

Output:

['Shikha' 34 'Mumbai' 5]
['Rekha' 31 'Delhi' 7]
['Shishir' 16 'Punjab' 11]

Iterate over rows in dataframe in reverse using index position and iloc

Iterate through rows in dataframe: Using this we will loop through the last index to the 0th index and access each row by index position using iloc[].

import pandas as pd
employees = [('Shikha', 34, 'Mumbai', 5) ,
           ('Rekha', 31, 'Delhi' , 7) ,
           ('Shishir', 16, 'Punjab', 11)
            ]
# Create a DataFrame object
empDfObj = pd.DataFrame(employees, columns=['Name', 'Age', 'City', 'Experience'], index=['a', 'b', 'c'])

# Loop through rows of dataframe by index in reverse i.e. from last row to row at 0th index.
for i in range(empDfObj.shape[0] - 1, -1, -1):
   # get row contents as series using iloc{] and index position of row
   rowSeries = empDfObj.iloc[i]
   # print row contents
   print(rowSeries.values)

Output:

['Shishir' 16 'Punjab' 11]
['Rekha' 31 'Delhi' 7]
['Shikha' 34 'Mumbai' 5]

Iterate over rows in dataframe using index labels and loc[]

import pandas as pd
employees = [('Shikha', 34, 'Mumbai', 5) ,
           ('Rekha', 31, 'Delhi' , 7) ,
           ('Shishir', 16, 'Punjab', 11)
            ]
# Create a DataFrame object
empDfObj = pd.DataFrame(employees, columns=['Name', 'Age', 'City', 'Experience'], index=['a', 'b', 'c'])

# loop through all the names in index label sequence of dataframe
for index in empDfObj.index:
   # For each index label, access the row contents as series
   rowSeries = empDfObj.loc[index]
   # print row contents
   print(rowSeries.values)

Output:

['Shikha' 34 'Mumbai' 5]
['Rekha' 31 'Delhi' 7]
['Shishir' 16 'Punjab' 11]

Update contents a dataframe While iterating row by row

Dataframe iterate: As Dataframe.iterrows() returns a copy of the dataframe contents in a tuple, so updating it will have no effect on the actual dataframe. So, to update the contents of the dataframe we need to iterate over the rows of the dataframe using iterrows() and then access each row using at() to update its contents.

Let’s see an example,

Suppose we have a dataframe i.e

import pandas as pd


# List of Tuples
salaries = [(11, 5, 70000, 1000) ,
           (12, 7, 72200, 1100) ,
           (13, 11, 84999, 1000)
           ]
# Create a DataFrame object
salaryDfObj = pd.DataFrame(salaries, columns=['ID', 'Experience' , 'Salary', 'Bonus'])

Output:

   ID Experience Salary Bonus
0 11    5             70000 1000
1 12    7             72200 1100
2 13   11            84999 1000

Now we will update each value in column ‘Bonus’ by multiplying it with 2 while iterating over the dataframe row by row.

import pandas as pd


# List of Tuples
salaries = [(11, 5, 70000, 1000) ,
           (12, 7, 72200, 1100) ,
           (13, 11, 84999, 1000)
           ]
# iterate over the dataframe row by row
salaryDfObj = pd.DataFrame(salaries, columns=['ID', 'Experience' , 'Salary', 'Bonus'])
for index_label, row_series in salaryDfObj.iterrows():
   # For each row update the 'Bonus' value to it's double
   salaryDfObj.at[index_label , 'Bonus'] = row_series['Bonus'] * 2
print(salaryDfObj)

Output:

    ID    Experience Salary Bonus
0 11          5           70000 2000
1 12          7           72200 2200
2 13        11           84999 2000

Want to expert in the python programming language? Exploring Python Data Analysis using Pandas tutorial changes your knowledge from basic to advance level in python concepts.

Read more Articles on Python Data Analysis Using Padas

Conclusion:

So in this article, you have seen different ways to iterate over rows in a dataframe & update while iterating row by row. Keep following our BtechGeeks for more concepts of python and various programming languages too.