Pandas select rows by multiple conditions – Python Pandas : Select Rows in DataFrame by conditions on multiple columns

About Pandas DataFrame

Pandas select rows by multiple conditions: It  is a 2 dimensional data structure, like a 2 dimensional array, or a table with rows and columns.

This article is all about showing different ways to select rows in DataFrame based on condition on single or multiple columns.

import pandas as pd
students = [ ('Shyam', 'books' , 24) ,
             ('ankur', 'pencil' , 28) ,
             ('Rekha', 'pen' , 30) ,
             ('Sarika', 'books', 62) ,
             ('Lata', 'file' , 33) ,
             ('Mayank', 'pencil' , 30) ] 
dataframeobj = pd.DataFrame(students, columns = ['Name' , 'Product', 'Sale'])
print(dataframeobj)

Output will be:

RESTART: C:/Users/HP/Desktop/dataframe.py
Name    Product    Sale
0   Shyam   books       24
1   Ankur    pencil       28
2   Rekha    pen          30
3   Sarika    books      62
4   Lata       file           33
5   Mayank  pencil     30

Select Rows based on value in column

Pandas select rows multiple conditions: Let’s see how to Select rows based on some conditions in  DataFrame.

Select rows in above example for which ‘Product’ column contains the value ‘books’,

import pandas as pd
students = [ ('Shyam', 'books' , 24) ,
             ('ankur', 'pencil' , 28) ,
             ('Rekha', 'pen' , 30) ,
             ('Sarika', 'books', 62) ,
             ('Lata', 'file' , 33) ,
             ('Mayank', 'pencil' , 30) ] 
dataframeobj = pd.DataFrame(students, columns = ['Name' , 'Product', 'Sale'])
subsetDataFrame = dataframeobj[dataframeobj['Product'] == 'books']
print(subsetDataFrame)

Output:

RESTART: C:/Users/HP/Desktop/dataframe.py
Name     Product   Sale
0     Shyam    books      24
3     Sarika     books      62

In above example we have seen that subsetDataFrame = dataframeobj[dataframeobj['Product'] == 'books']

using this it will return column which have ‘Product’ contains ‘Books’ only.

So,if we want to see whole functionality?See below.

When we apply [dataframeobj['Product'] == 'books']this condition,it will give output in true & false form.

0 True
1 False
2 False
3 True
4 False
5 False
Name: Product, dtype: bool

It will give true when the condition matches otherwise false.

If we pass this series object to [] operator of DataFrame, then it will be return a new DataFrame with only those rows that has True in the passed Series object i.e.

RESTART: C:/Users/HP/Desktop/dataframe.py

Name     Product   Sale

0     Shyam    books      24

3     Sarika     books      62

If we select any other product name it will return value accordingly.

Select Rows based on any of the multiple values in column

Python dataframe select rows by condition: Select rows from above example for which ‘Product‘ column contains either ‘Pen‘ or ‘Pencil‘ i.e

import pandas as pd
students = [ ('Shyam', 'books' , 24) ,
             ('ankur', 'pencil' , 28) ,
             ('Rekha', 'pen' , 30) ,
             ('Sarika', 'books', 62) ,
             ('Lata', 'file' , 33) ,
             ('Mayank', 'pencil' , 30) ] 
dataframeobj = pd.DataFrame(students, columns = ['Name' , 'Product', 'Sale'])
subsetDataFrame = dataframeobj[dataframeobj['Product'].isin(['pen', 'pencil']) ]
print(subsetDataFrame)

We have given product name list by isin() function and it will return true if condition will match otherwise false.

Therefore, it will return a DataFrame in which Column ‘Product‘ contains either ‘Pen‘ or ‘Pencil‘ only i.e.

Output:

RESTART: C:/Users/HP/Desktop/dataframe.py
Name Product Sale
1 ankur     pencil  28
2 Rekha    pen      30
5 Mayank pencil   30

Select DataFrame Rows Based on multiple conditions on columns

In this method we are going to select rows in above example for which ‘Sale’ column contains value greater than 20 & less than 33.So for this we are going to give some condition.

import pandas as pd
students = [ ('Shyam', 'books' , 24) ,
             ('ankur', 'pencil' , 28) ,
             ('Rekha', 'pen' , 30) ,
             ('Sarika', 'books', 62) ,
             ('Lata', 'file' , 33) ,
             ('Mayank', 'pencil' , 30) ] 
dataframeobj = pd.DataFrame(students, columns = ['Name' , 'Product', 'Sale'])
filterinfDataframe = dataframeobj[(dataframeobj['Sale'] > 20) & (dataframeobj['Sale'] < 33) ]
print(filterinfDataframe)

It will return following DataFrame object in which Sales column  contains value between 20 to 33,

RESTART: C:/Users/HP/Desktop/dataframe.py
    Name      Product Sale
0 Shyam      books    24
1 ankur        pencil    28
2 Rekha       pen       30
5 Mayank    pencil    30

Conclusion:

In this article we have seen diferent methods to select rows in dataframe by giving some condition.Hope you find this informative.

How to check if two lists are equal in python – Python: Check if Two Lists are Equal | How do you Check if a List is the Same as Another List Python?

Python Check if Two Lists are Equal

How to check if two lists are equal in python: In Order to check if two lists or identical or not we need to check if two unordered lists have similar elements in the exact similar position.  You might need this in your day-to-day programming. Go through the tutorial over here and determine if two lists are equal or not in Python easily.

We have mentioned the various techniques for finding if a list is the same as the Another or Not along with sample programs. Use them as a guide for resolving your doubts if any on Comparing Two Lists and finding whether they are identical or not. You can also find difference between two lists python by going through our other tutorials.

List – Definition

Check if lists are equal python: Multiple items may be stored in a single variable using lists. Square brackets[] are used to create a list. Lists are one of four built-in Python storage types for storing sets of data; the other three are Tuple, Set, and Dictionary, all of which have different qualities and applications.

Examples for Checking if Two Lists are Equal or Not

Comparing lists irrespective of the order of lists:

Input:

firstlist = ['hello', 'this', 'is', 'BTechGeeks'] 

secondlist = ['this', 'is', 'BTechGeeks','hello']

Output:

Both lists are equal

Input:

firstlist = ['hello', 'this', 'is', 'BTechGeeks','is'] 

secondlist = ['this', 'is', 'BTechGeeks','hello','the']

Output:

Both lists are not equal

Comparing list based on the order of lists:

Input:

firstlist = ['this' ,'is','BTechGeeks']
secondlist = ['this' ,'is','BTechGeeks']

Output:

Both lists are equal

Input:

firstlist = ['hello', 'this' ,'is','BTechGeeks']
secondlist = ['this' ,'is','BTechGeeks']

Output:

Both lists are not equal

How to Compare if Two Lists are Identical or Not?

Check if two lists are equal python: There are several ways to check if two lists are equal or not. We have outlined some of them so that you can choose the method that you are comfortable with and determine if the two lists are equal or not. They are explained in the following way

  • Using sorting()
  • Using Counter() function
  • Using np.array_equal()
  • Using ‘=’ Operator
  • Using reduce() +map()

Check lists irrespective of order of elements

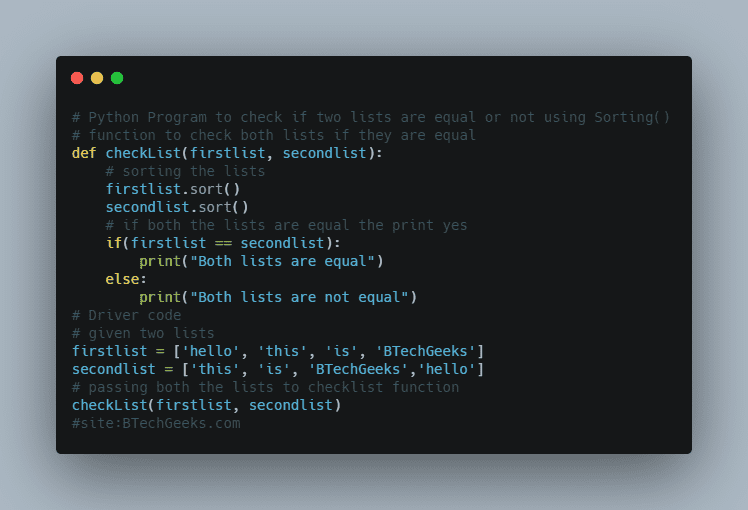
Method #1: Using sorting()

Python check if two lists have common elements: We start by sorting the list so that if both lists are similar, the elements are in the same place. However, this ignores the order of the elements in the list. So, by comparing sorting versions of lists, we can determine whether or not they are equal.

Below is the implementation:

# function to check both lists if they are equal
def checkList(firstlist, secondlist):
    # sorting the lists
    firstlist.sort()
    secondlist.sort()
    # if both the lists are equal the print yes
    if(firstlist == secondlist):
        print("Both lists are equal")
    else:
        print("Both lists are not equal")


# Driver code
# given two lists
firstlist = ['hello', 'this', 'is', 'BTechGeeks']
secondlist = ['this', 'is', 'BTechGeeks','hello']
# passing both the lists to checklist function
checkList(firstlist, secondlist)

Python Program to check if two lists are equal or not using Sorting()

Output:

Both lists are not equal

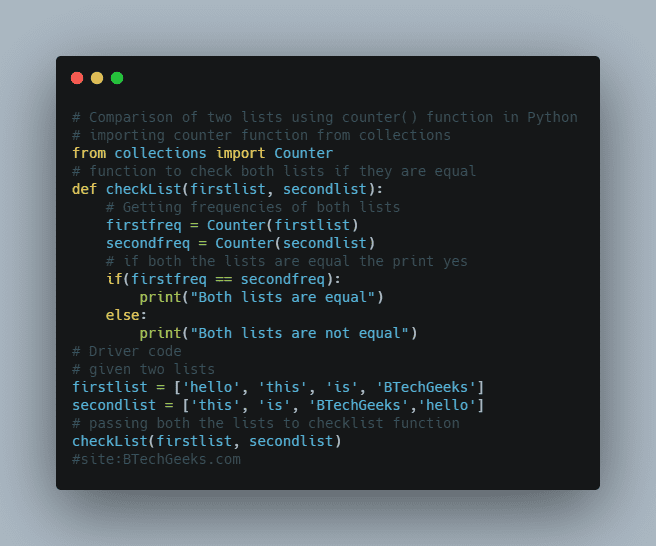
Method #2: Using Counter() function

Compare lists python: We can normally get the frequency of each variable in a list using Counter(), and we can search for it in both lists to see whether they are similar or not. However, this approach disregards the order of the elements in the list and only considers the frequency of the elements.

Below is the implementation:

# importing counter function from collections
from collections import Counter

# function to check both lists if they are equal
def checkList(firstlist, secondlist):
    # Getting frequencies of both lists
    firstfreq = Counter(firstlist)
    secondfreq = Counter(secondlist)
    # if both the lists are equal the print yes
    if(firstfreq == secondfreq):
        print("Both lists are equal")
    else:
        print("Both lists are not equal")


# Driver code
# given two lists
firstlist = ['hello', 'this', 'is', 'BTechGeeks'] 
secondlist = ['this', 'is', 'BTechGeeks','hello']
# passing both the lists to checklist function
checkList(firstlist, secondlist)

Comparison of two lists using counter() function in Python

Output:

Both lists are not equal

Method #3: Using np.array_equal()

Comparing lists python: From our lists, we can generate two sorted numpy arrays, which we can compare using numpy.array equal() to see if they contain the same elements.

Below is the implementation:

# importing numpy
import numpy
# function to check both lists if they are equal
def checkList(firstlist, secondlist):
    # Convert both lists to sorted numpy arrays and compare them to see if they're equal.
    if(numpy.array_equal(numpy.array(firstlist).sort(), numpy.array(secondlist).sort())):
        print("Both lists are equal")
    else:
        print("Both lists are not equal")


# Driver code
# given two lists
firstlist = ['hello', 'this', 'is', 'BTechGeeks'] 
secondlist = ['this', 'is', 'BTechGeeks','hello']
# passing both the lists to checklist function
checkList(firstlist, secondlist)

Output:

Both lists are not equal

Checking lists based on of order of elements

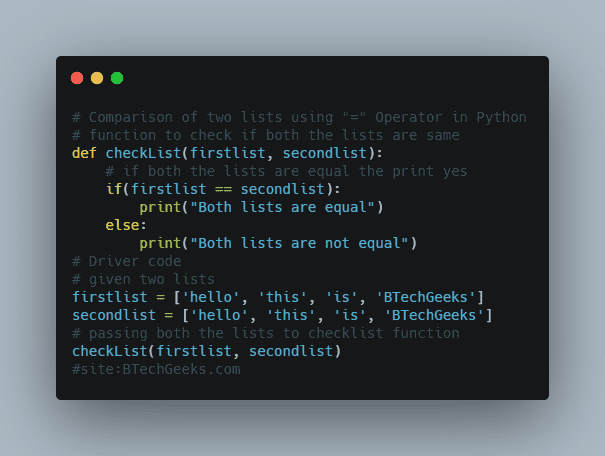
Method #4: Using ‘=’ Operator

The == operator can be used to compare two lists directly. If both lists are exactly identical, it will return True; otherwise, it will return False.

Below is the implementation:

# function to check if both the lists are same
def checkList(firstlist, secondlist):
    # if both the lists are equal the print yes
    if(firstlist == secondlist):
        print("Both lists are equal")
    else:
        print("Both lists are not equal")


# Driver code
# given two lists
firstlist = ['hello', 'this', 'is', 'BTechGeeks']
secondlist = ['hello', 'this', 'is', 'BTechGeeks']
# passing both the lists to checklist function
checkList(firstlist, secondlist)

Comparison of two lists using = Operator in Python

Output:

Both lists are not equal

Method #5: Using reduce() +map()

We can accomplish this task of checking for the equality of two lists by carefully coupling the power of map() to hash values and the utility of reduce(). This also takes into account the list’s order.

Below is the implementation:

# importing reduce from functools
from functools import reduce
# function to check if both the lists are same
def checkList(firstlist, secondlist):
    # if both the lists are equal the print yes
    if(reduce(lambda a, b: a and b, map(lambda x, y: x == y, firstlist, secondlist))):
        print("Both lists are equal")
    else:
        print("Both lists are not equal")


# Driver code
# given two lists
firstlist = ['hello', 'this', 'is', 'BTechGeeks']
secondlist = ['hello', 'this', 'is', 'BTechGeeks']
# passing both the lists to checklist function
checkList(firstlist, secondlist)

Output:

Both lists are not equal

Union of sets python – Python Program to Union of Set of Tuples

Python Program to Union of Set of Tuples

Union of sets python: In this tutorial, we will learn how to calculate the union of sets of tuples in Python. Let us begin by defining the union in set theory.
The set of every element in the collection of sets is the set of the union of sets. In the case of duplicate elements in different sets, the final union will only contain the specific element once. The letter ‘U’ represents the union.
This problem is centered on finding the union of sets of tuples, which indicates that the set is made up of tuple elements.

Examples:

Example1:

Input:

first = {('hello', 5), ('this', 100)}
second = {('this', 100), ('is', 200)}
third = {('hello', 5), ('btechgeeks', 461), ('python', 234)}

Output:

first Union Second =  {('is', 200), ('this', 100), ('hello', 5)}
Second Union third =  {('python', 234), ('is', 200), ('this', 100), ('hello', 5), ('btechgeeks', 461)}
first Union Second Union third =  {('python', 234), ('is', 200), ('this', 100), ('hello', 5), ('btechgeeks', 461)}

Program to Union of Set of Tuples in Python

Below are the ways to find the union of the set of tuples in Python.

Are you new to the java programming language? We recommend you to ace up your practice session with these Basic Java Programs Examples

Method #1: Using  or( | ) operator

Approach:

  • Give the set of tuples as static input and store them in Separate Variables.
  • In Python, we may retrieve the union of a set of tuples by using the OR operator (|). In order to acquire the union of two variables, use the OR operator directly between them.
  • Calculate the union using | operator and store it in a variable.
  • Print the union.
  • The Exit of the Program.

Below is the implementation:

# Give the set of tuples as static input and store them in Separate Variables.
first = {('hello', 5), ('this', 100)}
second = {('this', 100), ('is', 200)}
third = {('hello', 5), ('btechgeeks', 461), ('python', 234)}

# In Python, we may retrieve the union of a set of tuples
# by using the OR operator (|). In order to acquire the union of two variables,
# use the OR operator directly between them.
# Calculate the union using | operator and store it in a variable.

reslt1 = second | third
reslt2 = first | second
reslt3 = first | second | third
# Print the union of first and second
print("first Union Second = ", reslt2)
# print the union of second and third
print("Second Union third = ", reslt1)
# print the union of first second and third.
print("first Union Second Union third = ", reslt3)

Output:

first Union Second =  {('this', 100), ('is', 200), ('hello', 5)}
Second Union third =  {('this', 100), ('hello', 5), ('btechgeeks', 461), ('python', 234), ('is', 200)}
first Union Second Union third =  {('this', 100), ('hello', 5), ('btechgeeks', 461), ('python', 234), ('is', 200)}

Method #2: Using union() method

Approach:

  • Give the set of tuples as static input and store them in Separate Variables.
  • The set union() method returns the union of the set variables supplied as parameters. The first set uses the dot operator (.) to call the union() method, and the other set variables are given as arguments.
  • Calculate the union using the union() method and store it in a variable.
  • Print the union.
  • The Exit of the Program.

Below is the implementation:

# Give the set of tuples as static input and store them in Separate Variables.
first = {('hello', 5), ('this', 100)}
second = {('this', 100), ('is', 200)}
third = {('hello', 5), ('btechgeeks', 461), ('python', 234)}

'''The set union() method returns the union of the set variables supplied as parameters.
The first set uses the dot operator (.) to call the union() method, and 
the other set variables are given as arguments.
Calculate the union using the union() method and store it in a variable.'''
reslt1 = second.union(third)
reslt2 = first.union(second)
reslt3 = first.union(second, third)
# Print the union of first and second
print("first Union Second = ", reslt2)
# print the union of second and third
print("Second Union third = ", reslt1)
# print the union of first second and third.
print("first Union Second Union third = ", reslt3)

Output:

first Union Second =  {('is', 200), ('this', 100), ('hello', 5)}
Second Union third =  {('python', 234), ('is', 200), ('this', 100), ('hello', 5), ('btechgeeks', 461)}
first Union Second Union third =  {('python', 234), ('is', 200), ('this', 100), ('hello', 5), ('btechgeeks', 461)}

Related Programs:

Remove tuple from list python – Python Program to Remove Elements from a Tuple

Program to Remove Elements from a Tuple

Remove tuple from list python: In the previous article, we have discussed Python Program to Check if all Characters of String are Alphanumeric or Not
Tuple in Python:

A tuple is an immutable list of objects. That means the elements of a tuple cannot be modified or changed while the program is running.

The elements from any tuple can be removed by slicing the tuple.

Slicing:

Slicing is a Python feature that allows you to access chunks of sequences such as strings, tuples, and lists. You may also use them to change or remove elements from changeable sequences like lists. Slices can also be used on third-party objects such as NumPy arrays, Pandas series, and data frames.

Slicing allows for the creation of code that is clear, concise, and readable.

Given a tuple, the task is to remove elements from a given tuple.

Examples:

Example 1:

Input:

Given Tuple = (14, 32, 16, 85, 47, 65)

Output:

The above given tuple after removal of { 3 } Element =  (14, 32, 16, 47, 65)

Example 2:

Input:

Given Tuple = (12, 3, 48, 98, 23, 64, 75, 10, 56)

Output:

The above given tuple after removal of { 5 } Element =  (12, 3, 48, 98, 23, 75, 10, 56)

Program to Remove Elements from a Tuple

Below are the ways to remove Elements from a Given Tuple

Method: Using Slicing Operator (Static input)

Approach:

  • Give the tuple as static input and store it in a variable.
  • Give the number as static input and store it in another variable.
  • Do out the Slicing from ‘0 ‘ to given ‘n-1’ and store it in a variable.
  • Again do out the Slicing from ‘n+1’ to the given length of the tuple (till the end) and store it in another variable.
  • Add the above two slicing parts using the ‘+’ operator and store them in a variable.
  • Print the final tuple after removal of given elements from the above-given tuple.
  • The Exit of the program.

Below is the implementation:

# Give the tuple as static input and store it in a variable.
gven_tup = (14, 32, 16, 85, 47, 65)
# Give the number as static input and store it in another variable.
num = 3
# Do out the Slicing from '0 ' to given 'n-1' and store it in a variable.
fst_part = gven_tup[:num]
# Again do out the Slicing from 'n+1' to given length of tuple (till end) and
# store it in another variable.
secnd_part = gven_tup[num+1:]
# Add the above two slicing parts using '+' operator and store it in a variable.
gven_tup = fst_part + secnd_part
# Print the final tuple after removal of given elements from the above given tuple.
print(
    "The above given tuple after removal of {", num, "} Element = ", gven_tup)

Output:

The above given tuple after removal of { 3 } Element =  (14, 32, 16, 47, 65)

Explore more instances related to python concepts from Python Programming Examples Guide and get promoted from beginner to professional programmer level in Python Programming Language.

Abundant numbers between 1 and 25 – Python Program to Check Abundant Number or Not

Program to Check Abundant Number or Not

In the previous article, we have discussed Python Program to Reverse the Order of Palindrome Words in a Sentence
Abundant Number:

Abundant numbers between 1 and 25: An abundant number is one in which the sum of the number’s proper divisors is greater than the number itself.

To check for an Abundant number, find and add the number’s proper divisors, then compare the sum to the number; if the sum is greater than the number, the number is an Abundant number; otherwise, the number is not an Abundant number. The difference between the sum and the number is referred to as abundant.

For example :

Let Number = 18

The proper divisors are:

1*18

6*3

9*2

The sum=1+6+9+3+2= 21 >18

Therefore 18 is an Abundant Number.

Some of the examples of Abundant Numbers are:

12, 18, 20, 24, 30, 36, 40, 42, 48, 54, 56, 60, 66…..and so on.

Examples:

Example1:

Input:

Given Number = 24

Output:

The given Number { 24 } is an Abundant Number

Example2:

Input:

Given Number = 25

Output:

The given Number { 25 } is Not an Abundant Number

Program to Check Abundant Number or Not in Python

Below are the ways to check whether the given number is an Abundant Number or not in Python

Method #1: Using For Loop (Static Input)

Approach:

  • Give the number as static input and store it in a variable.
  • Take a variable say “divisrs_sum” and initialize it with 1.
  • Iterate from 2 to the given number using the for loop.
  • Check if the given number modulus iterator value is equal to 0 or not using the if conditional statement.
  • If the statement is true, then add the iterator with the sum of divisors “divisrs_sum” and store it in the same variable “divisrs_sum”.
  • Check if the sum of divisors (divisrs_sum) is greater than the given number using the if conditional statement.
  • If the statement is true, then print “The given Number is an Abundant Number”.
  • If it is false, then print “The given Number is Not an Abundant Number”.
  • The Exit of the Program.

Below is the implementation:

# Give the number as static input and store it in a variable.
gvn_numb = 24
# Take a variable say "divisrs_sum" and initialize it with 1.
divisrs_sum = 1
# Iterate from 2 to the given number using the for loop.
for itr in range(2, gvn_numb):
  # Check if the given number modulus iterator value is equal to 0 or not using the
    # if conditional statement.
    if(gvn_numb % itr == 0):
        # If the statement is true, then add the iterator with the sum of divisors "divisrs_sum"
        # and store it in the same variable "divisrs_sum".
        divisrs_sum = divisrs_sum + itr
# Check if the sum of divisors (divisrs_sum) is greater than the given number using the
# if conditional statement.
if(divisrs_sum > gvn_numb):
  # If the statement is true, then print "The given Number is an Abundant Number".
    print("The given Number {", gvn_numb, "} is an Abundant Number")
else:
  # If it is false, then print "The given Number is Not an Abundant Number".
    print("The given Number {", gvn_numb, "} is Not an Abundant Number")

Output:

The given Number { 24 } is an Abundant Number

Method #2: Using For loop (User Input)

Approach:

  • Give the number as user input using the int(input()) function and store it in a variable.
  • Take a variable say “divisrs_sum” and initialize it with 1.
  • Iterate from 2 to the given number using the for loop.
  • Check if the given number modulus iterator value is equal to 0 or not using the if conditional statement.
  • If the statement is true, then add the iterator with the sum of divisors “divisrs_sum” and store it in the same variable “divisrs_sum”.
  • Check if the sum of divisors (divisrs_sum) is greater than the given number using the if conditional statement.
  • If the statement is true, then print “The given Number is an Abundant Number”.
  • If it is false, then print “The given Number is Not an Abundant Number”.
  • The Exit of the Program.

Below is the implementation:

# Give the number as user input using the int(input()) function and
# store it in a variable.
gvn_numb = int(input("Enter some random Number = "))
# Take a variable say "divisrs_sum" and initialize it with 1.
divisrs_sum = 1
# Iterate from 2 to the given number using the for loop.
for itr in range(2, gvn_numb):
  # Check if the given number modulus iterator value is equal to 0 or not using the
    # if conditional statement.
    if(gvn_numb % itr == 0):
        # If the statement is true, then add the iterator with the sum of divisors "divisrs_sum"
        # and store it in the same variable "divisrs_sum".
        divisrs_sum = divisrs_sum + itr
# Check if the sum of divisors (divisrs_sum) is greater than the given number using the
# if conditional statement.
if(divisrs_sum > gvn_numb):
  # If the statement is true, then print "The given Number is an Abundant Number".
    print("The given Number {", gvn_numb, "} is an Abundant Number")
else:
  # If it is false, then print "The given Number is Not an Abundant Number".
    print("The given Number {", gvn_numb, "} is Not an Abundant Number")

Output:

Enter some random Number = 48
The given Number { 48 } is an Abundant Number

Explore more instances related to python concepts from Python Programming Examples Guide and get promoted from beginner to professional programmer level in Python Programming Language.

Replace word in file python – Python Program to find and replace a word in a Text File

Program to find and replace a word in a Text File

Files in Python:

Replace word in file python: Python file handling is a way of saving program output to a file or reading data from a file. File handling is a crucial concept in the programming world. File management is used in almost every form of project. Assume you are constructing an inventory management system. You have data in the inventory management system related to sales and purchases, thus you must save that data somewhere. Using Python’s file management, you can save that data to a file. You must be given data in the form of a comma-separated file or a Microsoft Excel file if you wish to conduct data analysis. Using file handling, you can read data from a file and write output back into it.

Given a file, the task is to find and replace a word in the given file in Python.

Program to find and replace a word in a Text File in Python

Below is the full approach for finding and replacing a word in the given file in Python.

Approach:

  • Give some random word that you want to replace as user input using the input() function and store it in a variable.
  • Give some random word with which you want to replace as user input using the input() function and store it in another variable.
  • Make a single variable to store the path of the file. This is a constant value. This value must be replaced with the file path from your own system in the example below.
  • Open the file in read-only mode. In this case, we’re simply reading the contents of the file.
  • Read the above lines of the file using the read() function(get the content) and store it in a variable.
  • Pass the word, and the word with which you want to replace as arguments to the replace() function and store it in the same variable.
  • Open the file in write mode. In this case, we’re writing the contents to the file.
  • Write the above file text content to the given file using the write() function.
  • The Exit of Program

Below is the implementation:

# Give some random word that you want to replace as user input using the input() function
# and store it in a variable.
gvn_wrd = input("Type some random word you want to replace:")
# Give some random word with which you want to replace as user input using the input() function
# and store it in another variable.
rplce_word = input("Type some random word with which you want to replace:")

# Make a single variable to store the path of the file. This is a constant value. 
# This value must be replaced with the file path from your own system in the example below.
givenFilename = "samplefile.txt"
# Open the file in read-only mode. In this case, we're simply reading the contents of the file.
with open(givenFilename, 'r') as givenfilecontent:
    # Read the above lines of the file using the read() function(get the content) and store it in a variable
    filetext = givenfilecontent.read()
    # Pass the word, and the word with which you want to replace as arguments to the replace()
    # function and store it in the same variable.
    filetext = filetext.replace(gvn_wrd,rplce_word)
   
# Open the file in write mode. In this case, we're writing the contents to the file.  
with open(givenFilename,"w") as givenfilecontent:
    # write the above file text content to the given file using the write() function
    givenfilecontent.write(filetext)

Output:

Type some random word you want to replace:hello 
Type some random word with which you want to replace:goodmorning

goodmorning 123 this is 567 btechgeeks

File Content before replacing:

hello 123 this is 567 btechgeeks

File Content after replacing:

goodmorning 123 this is 567 btechgeeks

Explanation:

  • The file path is stored in the variable ‘file name.’ Change the value of this variable to the path of your own file.
  • Dragging and dropping a file onto the terminal will show its path. The code will not run unless you change the value of this variable.
  • The file will be opened in reading mode. Use the open() function to open a file. The path to the file is the method’s first parameter, and the mode to open the file is the method’s second parameter.
  • When we open the file, we use the character ‘r’ to signify read-mode.
  • We traverse each line of the file using the For loop and replace the given word with the word to be replaced using replace() function.

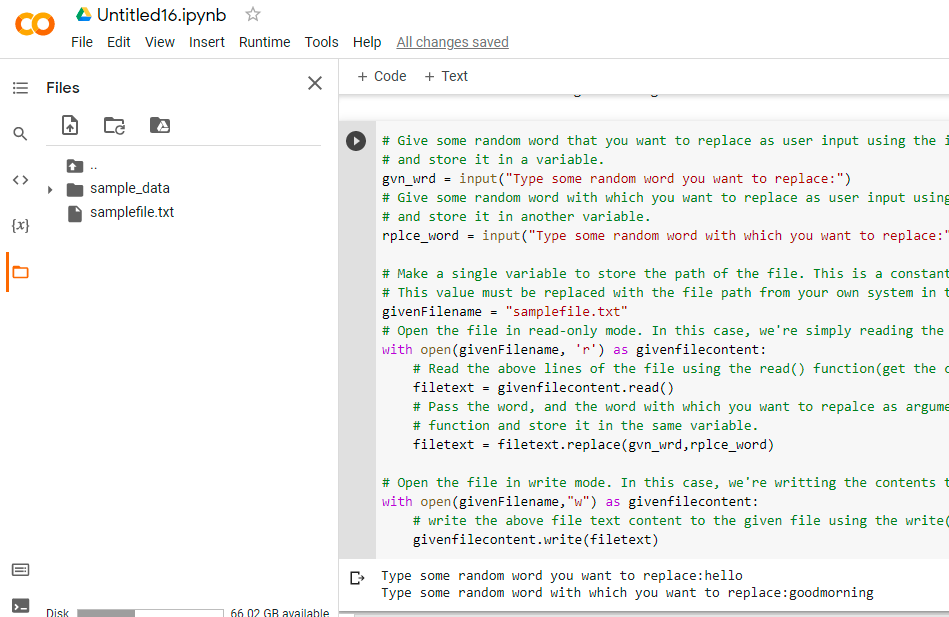
Google Colab Images:

Files and Code:

numpy.count_nonzero() – Python

Using numpy.count_nonzero() Function

np.count_nonzero: In this article we will discuss about how to count values based on conditions in 1D or 2D Numpy Arrays using numpy.count_nonzero() function in python. So let’s explore the topic.

numpy.count_nonzero() :

A function numpy.count_nonzero() is provided by Numpy module in python to count the non-zero values in array,

Syntax- numpy.count_nonzero(arr, axis=None, keepdims=False)

Where,

  • arr : It represents the array like object in which we want to count the non zero values.
  • axis : It represents along which we want to count the values. If the value is 1 then then it will count non zero values in rows  and if the value is 0 then it will count non zero values in columns and if the value is None then it will count non zero values by flattening the arrays.
  • kepdims : It takes the bool value and if the value is True, then the axes that are counted are left in the result as dimensions with size one.

Which returns int or array of int containing count of non zero values in numpy array and if the Axis is provided then it returns the array of count of values along the axis.

Counting non zero values in a Numpy Array :

Suppose we have a numpy array with some zeros and non zero values. Now we will count the non zero values using numpy.count_nonzero() function.

So let’s see the program to understand how it actually works.

# Program :

import numpy as np
# numpy array from list created
arr = np.array([2, 3, 0, 5, 0, 0, 5, 0, 5])
# Counting non zero elements in numpy array
count = np.count_nonzero(arr)
print('Total count of non-zero values in NumPy Array: ', count)
Output :
Total count of non-zero values in NumPy Array: 5

Counting True values in a numpy Array :

As we know in python True is equivalent to 1 and False is equivalent to 0 then we can use the numpy.count_nonzero() function to count the True values in a bool numpy array.

# Program :

import numpy as np
# Numpy Array of bool values created
arr = np.array([False, True, True, True, False, False, False, True, True])
# Counting True elements in numpy array
count = np.count_nonzero(arr)
print('Total count of True values in NumPy Array: ', count)
Output :
Total count of True values in NumPy Array: 5

Counting Values in Numpy Array that satisfy a condition :

It is very simple to count the non-zero values as we did in previous example we only passed the complete numpy array , here we will pass the condition.

So lets see the example to understand it clearly.

# Program :

import numpy as np
# A Numpy array of numbers is created
arr = np.array([2, 3, 1, 5, 4, 2, 5, 6, 5])
# Count even number of even elements in array
count = np.count_nonzero(arr % 2 == 0)
print('Total count of Even Numbers in Numpy Array: ', count)
Output :
Total count of Even Numbers in Numpy Array: 4

In the above example which element will satisfy the condition the value will be True and which will not satisfy the value will be false. And it will count the True values.

Counting Non-Zero Values in 2D Numpy Array :

By using the same numpy.count_nonzero() function we can count the non-zero values in a 2D array where the default axis value is None.

So lets see the example to understand it clearly.

# Program :

import numpy as np
# 2D Numpy Array created 
arr_2d = np.array( [[20, 30, 0],
                    [50, 0, 0],
                    [50, 0, 50]])
# counting of non zero values in complete 2D array
count = np.count_nonzero(arr_2d)
print('Total count of non zero values in complete 2D array: ', count)
Output :
Total count of non zero values in complete 2D array:  5

Counting Non-Zero Values in each row of 2D Numpy Array :

To count the non-zero values in each row of 2D numpy array just pass value of axis as 1.

So lets see the example to understand it clearly.

# Program :

import numpy as np
# Create 2D Numpy ARray
arr = np.array( [[20, 30, 0],
                    [50, 0, 0],
                    [50, 0, 50]])
# Get count of non zero values in each row of 2D array
count = np.count_nonzero(arr, axis=1)
print('Total count of non zero values in each row of 2D array: ', count)
Output :
Total count of non zero values in each row of 2D array: [2 1 2]

Counting Non-Zero Values in each column of 2D Numpy Array :

To count the non-zero values in each columnof 2D numpy array just pass value of axis as 0.

So lets see the example to understand it clearly.

# Program :

import numpy as np
# 2D Numpy Array created
arr = np.array( [[20, 30, 0],
                    [50, 0, 0],
                    [50, 0, 50]])
# counting of non zero values in each column of 2D array
count = np.count_nonzero(arr, axis=0)
print('Total count of non zero values in each column of 2D array: ', count)
Output :
Total count of non zero values in each column of 2D array: [3 1 1]


Numpy floor() function – Python NumPy floor() Function

Python NumPy floor() Function

NumPy floor() Function:

Numpy floor() function: The floor() function of the NumPy module returns the floor value of the given input array/data. The floor of the scalar x is the largest integer “i”, such that i <= x.

Syntax:

numpy.floor(x, out=None)

Parameters

x: This is required. It is an array (array-like) having elements for which the floor values are calculated.

out: This is optional. It is the location where the result will be saved. It must have a shape that the inputs broadcast to if it is provided. If None or not given, a newly allocated array is returned.

Return Value: 

The floor value of each element of x is returned.

NumPy floor() Function in Python

Example1

Approach:

  • Import numpy module using the import keyword.
  • Pass some random list as an argument to the array() function to create an array.
  • Store it in a variable.
  • Print the above-given array.
  • Pass the above-given array as an argument to the floor() function of the numpy module to get the floor values of the given array elements
  • Store it in another variable.
  • Print the floor values of the given array elements.
  • The Exit of the Program.

Below is the implementation:

# Import numpy module using the import keyword
import numpy as np
# Pass some random list as an argument to the array() function to
# create an array. 
# Store it in a variable.
gvn_arry = np.array([20.3, 5.5, 8.8, 30.076, 12.123])           
# Print the above given array.
print("The above given array is:")
print(gvn_arry)
# Pass the above given array as an argument to the floor() function of the 
# numpy module to get the floor values of the given array elements
# Store it in another variable.
floor_vals = np.floor(gvn_arry)
# Print the floor values of the given array elements
print("The floor values of the given array elements:")
print(floor_vals)

Output:

The above given array is:
[20.3 5.5 8.8 30.076 12.123]
The floor values of the given array elements:
[20. 5. 8. 30. 12.]

Example2

np floor: Here, we give the array which includes the elements with negative values.

For example, Let the number given = -1.7

The floor value for -1.7 = -2

When we calculate the floor value for a given negative number, like -1.7, will be -2.

Because -1 is a higher number than -1.7, and -2 is a smaller number than -1.7

Approach:

  • Import numpy module using the import keyword.
  • Pass some random list of negative values as an argument to the array() function to create an array.
  • Store it in a variable.
  • Print the above-given array.
  • Pass the above-given array as an argument to the ceil() function of the numpy module to get the ceiling values of the given array elements with negative values.
  • Store it in another variable.
  • Print the ceiling values of the given array elements.
  • The Exit of the Program.

Below is the implementation:

# Import numpy module using the import keyword
import numpy as np
# Pass some random list of negative values as an argument to the array() function to
# create an array. 
# Store it in a variable.
gvn_arry = np.array([-20.3, -1.5, -2.8, -3, -12.6])           
# Print the above given array.
print("The above given array is:")
print(gvn_arry)
# Pass the above given array as an argument to the floor() function of the 
# numpy module to get the floor values of the given array elements
# Store it in another variable.
floor_vals = np.floor(gvn_arry)
# Print the floor values of the given array elements
print("The floor values of the given array elements:")
print(floor_vals)

Output:

The above given array is:
[-20.3 -1.5 -2.8 -3. -12.6]
The floor values of the given array elements:
[-21. -2. -3. -3. -13.]

Python imread()- Different ways to Load an Image Using the OpenCV.imread() Method

imread()- Different ways to Load an Image Using the OpenCV.imread() Method

imread() Method:

Imread python: imread() is one of the OpenCV-Python library’s most useful and often used methods. It is used to load an image from the given file into the Python program. After successfully importing the picture, it returns a numpy.ndarray (NumPy N-dimensional array). When a colorful image is loaded, this numpy.ndarray is a 3-Dimensional array; when a grayscale image is loaded, this numpy.ndarray is a 2-Dimensional array.

OpenCV-Python is a Python binding library for solving computer vision problems.

The cv2 module of the opencv-python library is required to use the Python imread() method.

Before we start with the code, first we should install the opencv-python library into our environment as shown below:

pip install  opencv-python
# Import cv2 module using the import keyword
import cv2

Syntax:

cv2.imread(filename/path, flag)

Parameters

filepath: It is a string that represents the image’s path to be read.

flag: This is optional parameter. It normally accepts one of three values: cv2.IMREAD COLOR, cv2.IMREAD GRAYSCALE, and cv2.IMREAD UNCHANGED. This option, in fact, specifies the mode in which the picture should be read.

Note: The value of this flag parameter is cv2.IMREAD COLOR or 1 by default.

Return Value:

  • If the picture is successfully loaded, the cv2.imread() method returns a numpy.ndarray
  • If the image cannot be read for whatever reason, it returns an empty matrix (Mat::data==NULL) (like missing file, improper permissions, unsupported or invalid format).

Python’s imread() function supports the below image formats:

  • Portable Network Graphics : *.png
  • Portable image format: *.pbm, *.pgm, *.ppm *.pxm, *.pnm
  • JPEG files: *.jpeg, *.jpg, *.jpe
  • Windows bitmaps: *.bmp
  • JPEG 2000 files: *.jp2
  • WebP: *.webp
  • Sun rasters: *.sr, *.ras
  • PFM files: *.pfm
  • OpenEXR Image files: *.exr
  • TIFF files: *.tiff, *.tif
  • Radiance HDR: *.hdr, *.pic

Reading images in.JPEG format is dependent on the version of the OpenCV library present on the system, platform, or environment (such as x86/ARM), and so on. The most important thing to remember is that the kind of picture is decided by the content of the numpy.ndarray returned by the cv2.imread() method, not by the image file extension.

Let us take the below sample image:

Sample Image for Implementation purpose

1)Load an image using cv2.IMREAD_COLOR

cv2.IMREAD_COLOR: This specifies that a color image should be loaded. Any image transparency will be ignored. It is the default setting. We can also pass the integer value 1 for this flag.

When the flag cv2.IMREAD COLOR is set, the picture is converted to a three-channel BGR color image with no transparency channel before being imported into the program.

Example

Approach:

  • Import cv2 module using the import keyword.
  • Pass the image file path, in cv2.IMREAD_COLOR mode as arguments to the imread() function to load the given image.
  • Store it in a variable.
  • Print the shape(dimensions) of the given image using the shape attribute
  • The Exit of the Program.

Below is the implementation:

# Import cv2 module using the import keyword
import cv2
# Pass the image file path,in cv2.IMREAD_COLOR mode as arguments to the imread() function
# to load the given image.
# Store it in a variable.
gvn_imag = cv2.imread('dhoni.jpg', cv2.IMREAD_COLOR) 
# Print the shape of given image using the shape attribute
print("The shape of the given image = ", gvn_imag.shape)

Output:

The shape of the given image = (194, 259, 3)

Explanation:

Imread python: There are three values in the output tuple. In the given sample image, 194 is the number of rows (height of the image), 259 is the number of columns (width of the image), and 3 is the number of channels.

Because the flag value is cv2.IMREAD COLOR, the loaded image only includes three channels: blue, green, and red.

2)Load an image using cv2.IMREAD_GRAYSCALE

cv2.IMREAD_GRAYSCALE: It instructs the system to load an image in grayscale mode. We can also pass the integer value 0 for this flag.

Example

Approach:

  • Import cv2 module using the import keyword.
  • Pass the image file path, in cv2.IMREAD_GRAYSCALE mode as arguments to the imread() function to load the given image.
  • Store it in a variable.
  • Print the shape(dimensions) of the given image using the shape attribute
  • The Exit of the Program.

Below is the implementation:

# Import cv2 module using the import keyword
import cv2
# Pass the image file path,in cv2.IMREAD_GRAYSCALE mode as arguments to the imread() function
# to load the given image.
# Store it in a variable.
gvn_imag = cv2.imread('dhoni.jpg', cv2.IMREAD_GRAYSCALE) 
# Print the shape of given image using the shape attribute
print("The shape of the given image = ", gvn_imag.shape)

Output:

The shape of the given image = (194, 259)

Explanation:

There are just two values in the output tuple. The number of rows in the sample image is 194, and the number of columns is 259. When the flag value is either 0 or cv2.IMREAD GRAYSCALE, the image will be loaded as a grayscale image regardless of the input sample image given to the cv2.imread() method.

3)Load an image using cv2.IMREAD_UNCHANGED

cv2.IMREAD_UNCHANGED: It specifies that an image with an alpha channel is loaded. Alternatively, we can set this flag to the integer value -1.

Example

Approach:

  • Import cv2 module using the import keyword.
  • Pass the image file path, in cv2.IMREAD_UNCHANGED mode as arguments to the imread() function to load the given image.
  • Store it in a variable.
  • Print the shape(dimensions) of the given image using the shape attribute
  • The Exit of the Program.

Below is the implementation:

# Import cv2 module using the import keyword
import cv2
# Pass the image file path,in cv2.IMREAD_UNCHANGED mode as arguments to the imread() function
# to load the given image.
# Store it in a variable.
gvn_imag = cv2.imread('dhoni.jpg', cv2.IMREAD_UNCHANGED) 
# Print the shape of given image using the shape attribute
print("The shape of the given image = ", gvn_imag.shape)

Output:

The shape of the given image = (194, 259, 3)

Explanation:

There are three values in the output tuple. In the given sample image, 194 is the number of rows (height of the image), 259 is the number of columns (width of the image), and 3 is the number of channels i.e, blue, green, and red.

Note: For some Images, as the flag value is cv2.IMREAD UNCHANGED, the loaded picture has four channels: blue, green, red, and transparency.

Python Pandas : Replace or change Column & Row index names in DataFrame

Replacing or changing Column & Row index names in DataFrame

In this article we will discuss

  • How to change column names or
  • Row Index names in the DataFrame object.

First, create an object with a database name for student records i.e.

import pandas as pd
students_record = [ ('Amit', 27, 'Kolkata') ,
                    ('Mini', 24, 'Chennai' ) ,
                    ('Nira', 34, 'Mumbai') ]
# By creating a DataFrame object
do = pd.DataFrame(students_record, columns = ['Name' , 'Age', 'City'], index=['x', 'y', 'z']) 
print(do)
Output :
   Name   Age     City
x  Amit     27    Kolkata
y  Mini     24    Chennai
z  Nira     34     Mumbai

Change Column Names in DataFrame :

Change index name pandas: The DataFrame item contains Attribute columns which is the Index item and contain the Data Labels in the Dataframe column. We can find column name detection in this Index item i.e.

import pandas as pd
students_record = [ ('Amit', 27, 'Kolkata') ,
                    ('Mini', 24, 'Chennai' ) ,
                    ('Nira', 34, 'Mumbai') ]
# By creating a DataFrame object
do = pd.DataFrame(students_record, columns = ['Name' , 'Age', 'City'], index=['x', 'y', 'z']) 


# By getting ndArray of all column names 
column_Name_Arr = do.columns.values
print(column_Name_Arr)
Output :
['Name' 'Age' 'City']

Any modifications to this ndArray (df.column.values) will change the actual DataFrame. For example let’s change the column name to index 0 i.e.

import pandas as pd
students_record = [ ('Amit', 27, 'Kolkata') ,
                    ('Mini', 24, 'Chennai' ) ,
                    ('Nira', 34, 'Mumbai') ]
# By creating a DataFrame object
do = pd.DataFrame(students_record, columns = ['Name' , 'Age', 'City'], index=['x', 'y', 'z']) 


# By getting ndArray of all column names 
column_Name_Arr = do.columns.values
# By Modifying a Column Name
column_Name_Arr[0] = 'Name_Vr'
print(column_Name_Arr)
Output :
['Name_Vr' 'Age' 'City']

Change Row Index in DataFrame

The content of the data items is as follows,

To get a list of all the line references names from the dataFrame object, there use the attribute index instead of columns i.e. df.index.values

It returns the ndarray of all line references to the data file. Any modifications to this ndArray (df.index.values) will modify the actual DataFrame. For example let’s change the name of the line indicator to 0 i.e.replace with ‘j’.

This change will be reflected in the linked DataFrame object again. Now the content of the DataFrame object is,

But if we change it to the list before changing the changes it will not be visible in the original DataFrame object. For example create a list of copies of Row Index Names of DataFrame i.e.

The whole activities of the program is given below.

import pandas as pd
students_record = [ ('Amit', 27, 'Kolkata') ,
                    ('Mini', 24, 'Chennai' ) ,
                    ('Nira', 34, 'Mumbai') ]
# By creating a DataFrame object
do = pd.DataFrame(students_record, columns = ['Name' , 'Age', 'City'], index=['x', 'y', 'z']) 


# For getting a list of all the column names 
index_Name_Arr = do.index.values
print(index_Name_Arr)


#For Modifying a Row Index Name
index_Name_Arr[0] = 'j'
print(index_Name_Arr)


#For getting a copy list of all the column names 
index_Names = list(do.index.values)
print(index_Names)
print(do)
Output :
['x' 'y' 'z']
['j' 'y' 'z']
['j', 'y', 'z']
  Name  Age     City
j  Amit   27  Kolkata
y  Mini   24  Chennai
z  Nira   34   Mumbai

Want to expert in the python programming language? Exploring Python Data Analysis using Pandas tutorial changes your knowledge from basic to advance level in python concepts.

Read more Articles on Python Data Analysis Using Padas – Modify a Dataframe