
What exactly do we mean when we say Arithmetic Operations on Images?
Image arithmetic refers to arithmetic operations performed on images. Any arithmetic operation performed on an image is performed on individual pixel values.
The input images can be subjected to arithmetic operations such as addition, subtraction, and bitwise operations. These operations can help to improve the properties of the input photos. Image arithmetic is necessary for analyzing the attributes of the input image. The operated images can then be utilized as an upgraded input image, and many more operations can be applied to the image for clarification, thresholding, dilating, and so on.
Example
If the image is colored, the addition is done as follows:
rslt_image(i, j, k) = image1(i, j, k) + image2(i, j, k)
(or)
rslt_image(i, j, k) = image1(i, j, k) + constant
If the image is grayscale, the addition is performed as follows:
rslt_image(i, j) = image1(i, j) + image2(i, j)
(or)
rslt_image(i, j) = image1(i, j) + constant
- C++ Program to Convert Decimal Number to Binary Number
- C Program to Multiply Two Numbers Without Using Arithmetic Operators
- C++ Program to Make a Simple Calculator Using Switch Case Statement
Before going to the implementation we should first install and import the libraries:
Installation & Importing:
pip install opencv-python
# Import cv2 module using the import keyword
import cv2
Because the images are loaded as a NumPy N-dimensional array, it is relatively simple to do various arithmetic operations on them.
Note: If arithmetic operations are performed on two or more images, all images must be of the same kind, such as jpeg, jpg, png, etc., **depth, and dimensions.
**depth: The number of bits used to represent each pixel, such as 8 bits per channel in a 24-bit color image (8 bits x 3 channels).
Arithmetic Operations on Images in Python
Let us take the below two samples images as an example:
Sample Image1:

Sample Image2:

1)Image Addition
We can add two images using the OpenCV method cv2.add() or a simple numpy operation
rslt_img = image1 + image2
Both images must have the same depth and type, alternatively, the second image can simply be a scalar number.
NumPy Addition: We just import the image files and use the (+) operator to add the NumPy N-d arrays returned after loading the images. It is a modulo operation, which means that if the resultant pixel value is greater than 255 after adding the pixel values of the input images, the modulo (%) of the resultant pixel value with 256 (for 8-bit image format) is calculated and assigned to the resultant pixel value to keep it below 255 or 255, as no pixel value can exceed 255.
Example:
250 + 10 = 260 –> 260 % 256 = 4
Example
Approach:
- Import cv2 module using the import keyword.
- Pass the image1 file path as an argument to the imread() function to load/open the given image and store it in a variable.
- Pass the image2 file path as an argument to the imread() function to load/open the given image and store it in another variable.
- Add both the given images using the ‘+’ operator and store it in another variable.
- Save the above result in another file using the imwrite() function by passing the filename as an argument to it.
- The Exit of the Program.
Below is the implementation:
# Import cv2 module using the import keyword
import cv2
# Pass the image1 file path as an argument to the imread() function to
# load/open the given image and store it in a variable
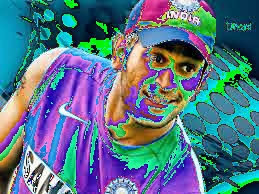
gvnimag_1 = cv2.imread('dhoni.jpg')
# Pass the image2 file path as an argument to the imread() function to
# load/open the given image and store it in another variable
gvnimag_2 = cv2.imread('dore.jpg')
# Add both the given images using the '+' operator and store it in another variable
rslt_imag = gvnimag_1 + gvnimag_1
# Save the above result in another file using the imwrite() function
# by passing the filename as an argument to it.
cv2.imwrite('rslt_image.jpg', rslt_imag)
Output:
OpenCV addition:
We just read the picture files and send the NumPy N-d arrays obtained after loading the images as arguments to the cv2.add() method. It is a saturated operation, which implies that if the final pixel value is more than 255 after adding the pixel values of the input (loaded) images, it is saturated to 255, and no pixel value can exceed 255. This is referred to as **saturation.
Example: 255 = 250 + 10 = 260
**Saturation is an image processing technique used to handle pixel overflow in which we set all overflowing pixels to the maximum possible values.
Example
# Import cv2 module using the import keyword
import cv2
# Pass the image file path as an argument to the imread() function to
# load/open the given image and store it in a variable
gvnimag_1 = cv2.imread('dhoni.jpg')
# Pass the image file path as an argument to the imread() function to
# load/open the given image and store it in another variable
gvnimag_2 = cv2.imread('second.jpg')

# Add both the given images using the cv2.add() operator and store it in another variable
rslt_imag = cv2.add(gvnimag_1, gvnimag_2)

# Save the above result in another file using the imwrite() function
# by passing the filename as an argument to it.
cv2.imwrite('rslt_image.jpg', rslt_imag)
Output:

Note:
Here we took images of the same pixels
2)Image Subtraction
Image subtraction is simple pixel subtraction, which takes two photos as input and outputs the third image with pixel values equal to the first image minus the equivalent pixel values from the second image. We can also take a single image and subtract a constant value from all of its pixel values. Instead of the obviously signed output, certain implementations of the operator will report the absolute difference between pixel values.
Image subtraction implementations differ in what they do if the output pixel values are negative. If the picture formats permit negative pixel values, then the negative values are acceptable. If the image format does not support negative pixel values, such pixels are frequently set to zero (i.e. black typically). Or
If the image subtraction calculates the absolute differences between two input images that utilise the same pixel value type, the output pixel values cannot be outside the specified range that may be represented by the input image’s pixel type, and so this problem is avoided. That is why absolute differences are useful. Again, we have two options for performing image subtraction:
NumPy Subtraction & OpenCV Subtraction:
Only the OpenCV subtraction will be utilized because it gives better results and is commonly used. For image subtraction, use the cv2.subtract() method, and the result will be
result_image = image1 - image2,
where image1 and image12are images of the same depth and type.
Image subtraction is employed as both an intermediate step in more complex image processing techniques and as a standalone operation. One of the most popular applications of picture subtraction is to remove background lighting changes from a scene so that the items in the foreground can be evaluated more easily and clearly.
Example1
Below is the implementation:
# Import cv2 module using the import keyword
import cv2
# Pass the image file path as an argument to the imread() function to
# load/open the given image and store it in a variable
gvnimag_1 = cv2.imread('dhoni.jpg')
# Pass the image file path as an argument to the imread() function to
# load/open the given image and store it in another variable
gvnimag_2 = cv2.imread('second.jpg')

# Subtract both the given images using the '-' operator and store it in another variable
rslt_imag = gvnimag_1 - gvnimag_1

# Save the above result in another file using the imwrite() function
# by passing the filename as an argument to it.
cv2.imwrite('rslt_image.jpg', rslt_imag)
Output:

Example2
Below is the implementation:
# Import cv2 module using the import keyword
import cv2
# Pass the image file path as an argument to the imread() function to
# load/open the given image and store it in a variable
gvnimag_1 = cv2.imread('dhoni.jpg')
# Pass the image file path as an argument to the imread() function to
# load/open the given image and store it in another variable
gvnimag_2 = cv2.imread('second.jpg')

# Subtract both the given images using the cv2.subtract() method and store it in another variable
rslt_imag = cv2.subtract(gvnimag_1, gvnimag_2)

# Save the above result in another file using the imwrite() function
# by passing the filename as an argument to it.
cv2.imwrite('rslt_image.jpg', rslt_imag)
Output:

3)Image Multiplication
Image multiplication, like other mathematical operations on images, can be implemented in forms. The first type of image multiplication takes two input images and produces an output image with pixel values that are the product of the input images’ corresponding pixel values.
The second variant takes a single input image and generates output in which each pixel value is the product of the input image’s corresponding pixel values plus a constant (scaling factor). This second type of image multiplication is more commonly utilized and is known as scaling.
There are various applications for image scaling, but in general, a scaling factor greater than unity brightens the image, while a scale factor smaller than unity darkens the image.
Because it preserves the relative contrast of the image, scaling produces a much more natural brightening or darkening impact in the image than just adding an offset to the pixel values.
The constant value is frequently a floating-point number that can be used to raise or reduce the image intensity. It can be negative if the image format supports it. If the estimated output values are greater than the maximum allowable pixel value, the output is truncated at that value.
Example1
Below is the implementation:
# Import cv2 module using the import keyword
import cv2
# Pass the image file path as an argument to the imread() function to
# load/open the given image and store it in a variable
gvnimag_1 = cv2.imread('dhoni.jpg')

# Multiply the given image with some random number using the '*' operator
# and store it in another variable
rslt_imag = gvnimag_1 *2.3

# Save the above result in another file using the imwrite() function
# by passing the filename as an argument to it.
cv2.imwrite('mult_image.jpg', rslt_imag)
Output:

Example2
Below is the implementation:
# Import cv2 module using the import keyword
import cv2
# Pass the image file path as an argument to the imread() function to
# load/open the given image and store it in a variable
gvnimag_1 = cv2.imread('dhoni.jpg')

# Multiply the given image with some random number using the cv2.multiply() function
# and store it in another variable
rslt_imag = cv2.multiply(gvnimag_1, 0.9)

# Save the above result in another file using the imwrite() function
# by passing the filename as an argument to it.
cv2.imwrite('mult_image.jpg', rslt_imag)
Output:

4)Image Division
The image division procedure generally takes two images as input and outputs a third image whose pixel values are the first image’s pixel values divided by the second image’s corresponding pixel values.
It can also be used with a single input image, in which case each pixel value is split by a constant.
Image division can be used for change detection in the same way that subtraction can, but instead of providing the absolute change for each pixel value from one image to the next, the division provides the fractional change or ratio between matching pixel values.
Hence it is referred to as rationing.
Example1
The image division is used to reduce the brightness of the above sample image, using the cv2.divide() method, which typically accepts two image arrays or one image array and one specified constant.
Below is the implementation:
# Import cv2 module using the import keyword
import cv2
# Pass the image file path as an argument to the imread() function to
# load/open the given image and store it in a variable
gvnimag_1 = cv2.imread('dhoni.jpg')

# Divide the given image with some random number using the cv2.divide() function
# and store it in another variable
rslt_imag = cv2.divide(gvnimag_1, 3)

# Save the above result in another file using the imwrite() function
# by passing the filename as an argument to it.
cv2.imwrite('div_image.jpg', rslt_imag)
Output:

Example2
Alternatively, we may use the NumPy division to reduce the brightness of the image.
Below is the implementation:
# Import cv2 module using the import keyword
import cv2
# Pass the image file path as an argument to the imread() function to
# load/open the given image and store it in a variable
gvnimag_1 = cv2.imread('dhoni.jpg')

# Divide the given image with some random number using the (/) operator
# and store it in another variable
rslt_imag = gvnimag_1 /1.5

# Save the above result in another file using the imwrite() function
# by passing the filename as an argument to it.
cv2.imwrite('div_image.jpg', rslt_imag)
Output: