Pandas drop last column – Pandas: Delete last column of dataframe in python | How to Remove last column from Dataframe in Python?

Pandas-Delete last column of dataframe in python

Pandas drop last column: In this article, we will discuss different ways to delete the last column of a pandas dataframe in python or how to drop the last columns in Pandas Dataframe. Along with that, you may also study what is Dataframe and How to Remove a Column From a Python Dataframe? Also, you can find all these methods of a pandas dataframe to remove last column of a dataframe in the form of images for quick reference & easy sharing with friends and others learners.

What is Dataframe?

Delete column python: A Data structure provided by the Python Pandas module is known as a DataFrame. It stores values in the form of rows and columns. So, we can have the data in the form of a matrix outlining the entities as rows and columns. A DataFrame relates an Excel or CSV file to the real world.

Different Methods to Drop last columns in Pandas Dataframe

Drop column in python: Here are few methods that are used to remove the last columns of DataFrame in Python.

  1. Use iloc()
  2. Use drop()
  3. Use del()
  4. Use pop()

Use iloc to drop last column of pandas dataframe

Python dataframe delete column: In this method, we are going to use iloc to drop the last column of the pandas dataframe. In python, pandas have an attribute iloc to select the specific column using indexing.

Syntax:

df.iloc[row_start:row_end , col_start, col_end]

So we will be using the above syntax which will give rows from row_star to row_end and columns from col_start to col_end1.
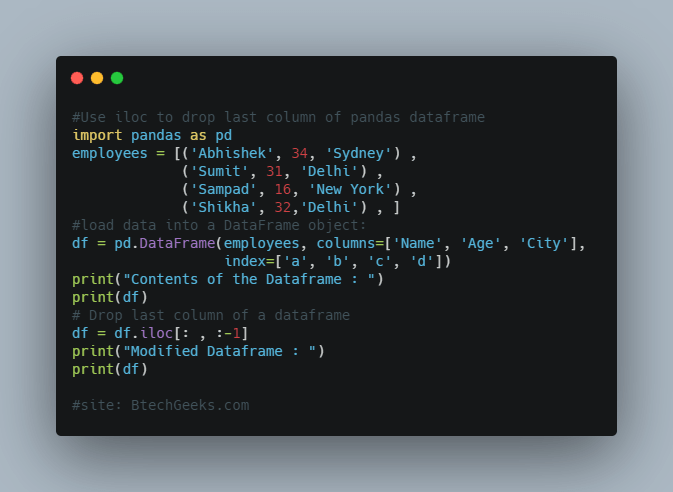
Use iloc to drop last column of pandas dataframe

import pandas as pd
employees = [('Abhishek', 34, 'Sydney') ,
             ('Sumit', 31, 'Delhi') ,
             ('Sampad', 16, 'New York') ,
             ('Shikha', 32,'Delhi') , ]
#load data into a DataFrame object:
df = pd.DataFrame(employees, columns=['Name', 'Age', 'City'], index=['a', 'b', 'c', 'd'])
print("Contents of the Dataframe : ")
print(df)
# Drop last column of a dataframe
df = df.iloc[: , :-1]
print("Modified Dataframe : ")
print(df)

Output:

Contents of the Dataframe :
        Name       Age   City
a     Abhishek   34     Sydney
b     Sumit        31     Delhi
c     Sampad     16     New York
d    Shikha        32     Delhi

Modified Dataframe :
        Name     Age
a     Abhishek 34
b     Sumit      31
c     Sampad  16
d     Shikha    32

So in the above example, we have to remove last column from dataframe which is ‘city’, so we just selected the column from position 0 till one before the last one…means from column 0 to -2 we selected 0 to -1, this deleted last column.

Must Check:

Python drop() function to remove a column

Python delete column: In this, we are going to use drop() to remove the last column of the pandas dataframe.

This function accepts a sequence of column names that need to delete from the dataframe. Here we ‘axis=1’ for delete column only and ‘inplace=True’ we use to pass arguments.
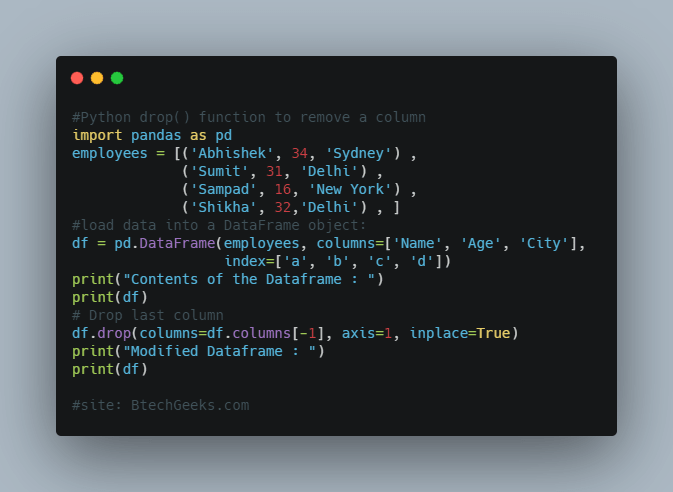
Python drop() function to remove a column

import pandas as pd
employees = [('Abhishek', 34, 'Sydney') ,
             ('Sumit', 31, 'Delhi') ,
             ('Sampad', 16, 'New York') ,
             ('Shikha', 32,'Delhi') , ]
#load data into a DataFrame object:
df = pd.DataFrame(employees, columns=['Name', 'Age', 'City'], index=['a', 'b', 'c', 'd'])
print("Contents of the Dataframe : ")
print(df)
# Drop last column
df.drop(columns=df.columns[-1], axis=1, inplace=True)
print("Modified Dataframe : ")
print(df)

Output:

Contents of the Dataframe :

       Name        Age   City
a     Abhishek   34     Sydney
b     Sumit        31     Delhi
c     Sampad     16     New York
d    Shikha        32     Delhi

Modified Dataframe :

       Name      Age
a     Abhishek   34
b     Sumit        31
c     Sampad    16
d     Shikha      32

Python del keyword to remove the column

Delete column from pandas dataframe: Here we are going to use a del() keyword to drop last column of pandas dataframe.

So in this method, we are going to use del df[df.columns[-1]]for deleting the last column. We will use -1 because we are selecting from last.
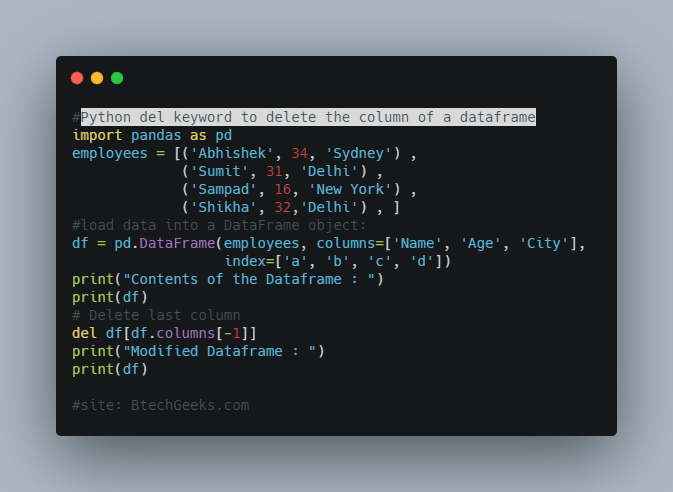
Python del keyword to delete the column of a dataframe

import pandas as pd
employees = [('Abhishek', 34, 'Sydney') ,
             ('Sumit', 31, 'Delhi') ,
             ('Sampad', 16, 'New York') ,
             ('Shikha', 32,'Delhi') , ]
#load data into a DataFrame object:
df = pd.DataFrame(employees, columns=['Name', 'Age', 'City'], index=['a', 'b', 'c', 'd'])
print("Contents of the Dataframe : ")
print(df)
# Delete last column
del df[df.columns[-1]]
print("Modified Dataframe : ")
print(df)

Output:

Contents of the Dataframe :
       Name     Age   City
a     Abhishek 34    Sydney
b      Sumit     31    Delhi
c     Sampad   16    New York
d     Shikha     32    Delhi
Modified Dataframe :
     Name      Age
a Abhishek    34
b Sumit          31
c Sampad      16
d Shikha        32

Drop last columns of Pandas Dataframe Using Python dataframe.pop() method

In this, we are going to use the pop(column_name) method to drop last column of pandas dataframe. It expects a column name as an argument and deletes that column from the calling dataframe object.
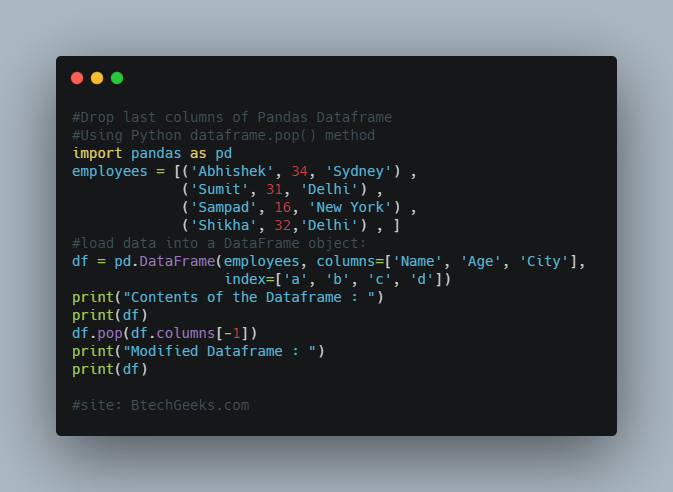
Drop last columns of Pandas Dataframe Using Python dataframe.pop() method

import pandas as pd
employees = [('Abhishek', 34, 'Sydney') ,
             ('Sumit', 31, 'Delhi') ,
             ('Sampad', 16, 'New York') ,
             ('Shikha', 32,'Delhi') , ]
#load data into a DataFrame object:
df = pd.DataFrame(employees, columns=['Name', 'Age', 'City'], index=['a', 'b', 'c', 'd'])
print("Contents of the Dataframe : ")
print(df)
df.pop(df.columns[-1])
print("Modified Dataframe : ")
print(df)

Output:

Contents of the Dataframe :

        Name    Age    City
a    Abhishek  34   Sydney
b    Sumit       31   Delhi
c    Sampad   16    New York
d   Shikha      32    Delhi

Modified Dataframe :

     Name      Age
a   Abhishek 34
b   Sumit      31
c   Sampad  16
d  Shikha     32

Conclusion to delete the last column of the dataframe

In the above tutorial, we have discussed different ways to delete last column of the dataframe in python. Also, you can learn how to drop last n rows in pandas dataframe by performing import pandas as pd. Thank you & Happy Learnings!

Sort numpy array descending – How to sort a Numpy Array in Python? | numpy.sort() in Python | Python numpy.ndarray.sort() Function

How to sort a Numpy Array in Python

Sort numpy array descending: In this article, we are going to show you sorting a NumpyArray in descending and in ascending order or sorts the elements from largest to smallest value or smallest to largest value. Stay tuned to this page and collect plenty of information about the numpy.sort() in Python and How to sort a Numpy Array in Python?

Sorting Arrays

Sort np array: Giving arrays to an ordered sequence is called sorting. An ordered sequence can be any sequence like numeric or alphabetical, ascending or descending.

Python’s Numpy module provides two different methods to sort a numpy array.

numpy.ndarray.sort() method in Python

Numpy sort descending: A member function of the ndarray class is as follows:

ndarray.sort(axis=-1, kind='quicksort', order=None)

This can be ordered through a numpy array object (ndarray) and it classifies the incorporated numpy array in place.

Do Check:

Python numpy.sort() method

Sort a numpy array: One more method is a global function in the numpy module i.e.

numpy.sort(array, axis=-1, kind='quicksort', order=None)

It allows a numpy array as an argument and results in a sorted copy of the Numpy array.

Where,

Sr.No. Parameter & Description
1 a

Array to be sorted

2 axis

The axis along which the array is to be sorted. If none, the array is flattened, sorting on the last axis

3 kind

Default is quicksort

4 order

If the array contains fields, the order of fields to be sorted

Sort a Numpy Array in Place

NP array sort: The NumPy ndarray object has a function called sort() that we will use for sorting.

import numpy as np
# Create a Numpy array from list of numbers
arr = np.array([9, 1, 3, 2, 17, 5,  2, 8, 14])
array = np.array([9, 1, 3, 2, 17, 5,  2, 8, 14])
# Sort the numpy array inplace
array.sort()
print('Original Array : ', arr)
print('Sorted Array : ', array)

Output:

RESTART: C:/Users/HP/Desktop/article3.py
Original Array : [ 9 1 3 2 17 5 2 8 14]
Sorted Array : [ 1 2 2 3 5 8 9 14 17]

So in the above example, you have seen that usingarray.sort()we have sorted our array in place.

Sort a Numpy array in Descending Order

Numpy sort array: In the above method, we have seen that by default both numpy.sort() and ndarray.sort() sorts the numpy array in ascending order. But now, you will observe how to sort an array in descending order?

import numpy as np
# Create a Numpy array from list of numbers
arr = np.array([9, 1, 3, 2, 17, 5,  2, 8, 14])
array = np.array([9, 1, 3, 2, 17, 5,  2, 8, 14])
# Sort the numpy array inplace
array = np.sort(arr)[::-1]

# Get a sorted copy of numpy array (Descending Order)
print('Original Array : ', arr)
print('Sorted Array : ', array)

Output:

RESTART: C:/Users/HP/Desktop/article3.py
Original Array : [ 9 1 3 2 17 5 2 8 14]
Sorted Array : [17 14 9 8 5 3 2 2 1]

Sorting a numpy array with different kinds of sorting algorithms

Sort array numpy: While sorting sort() function accepts a parameter ‘kind’ that tells about the sorting algorithm to be used. If not provided then the default value is quicksort. To sort numpy array with another sorting algorithm pass this ‘kind’ argument.

import numpy as np
# Create a Numpy array from list of numbers
arr = np.array([9, 1, 3, 2, 17, 5,  2, 8, 14])
array = np.array([9, 1, 3, 2, 17, 5,  2, 8, 14])
# Sort the numpy array using different algorithms

#Sort Using 'mergesort'
sortedArr1 = np.sort(arr, kind='mergesort')

# Sort Using 'heapsort'
sortedArr2 = np.sort(arr, kind='heapsort')

# Sort Using 'heapsort'
sortedArr3 = np.sort(arr, kind='stable')

# Get a sorted copy of numpy array (Descending Order)
print('Original Array : ', arr)

print('Sorted Array using mergesort: ', sortedArr1)

print('Sorted Array using heapsort : ', sortedArr2)

print('Sorted Array using stable : ', sortedArr3)

Output:

RESTART: C:/Users/HP/Desktop/article3.py
Original Array : [ 9 1 3 2 17 5 2 8 14]
Sorted Array using mergesort: [ 1 2 2 3 5 8 9 14 17]
Sorted Array using heapsort : [ 1 2 2 3 5 8 9 14 17]
Sorted Array using stable : [ 1 2 2 3 5 8 9 14 17]

Sorting a 2D numpy array along with the axis

numpy sort: numpy.sort() and numpy.ndarray.sort() provides an argument axis to sort the elements along the axis.
Let’s create a 2D Numpy Array.

import numpy as np
# Create a 2D Numpy array list of list

arr2D = np.array([[8, 7, 1, 2], [3, 2, 3, 1], [29, 32, 11, 9]])

print(arr2D)

Output:

RESTART: C:/Users/HP/Desktop/article3.py
[[ 8 7 1 2]
[ 3 2 3 1]
[29 32 11 9]]

Now sort contents of each column in 2D numpy Array,

import numpy as np
# Create a 2D Numpy array list of list

arr2D = np.array([[8, 7, 1, 2], [3, 2, 3, 1], [29, 32, 11, 9]])
arr2D.sort(axis=0)
print('Sorted Array : ')
print(arr2D)

Output:

RESTART: C:/Users/HP/Desktop/article3.py
Sorted Array :
[[ 3 2 1 1]
[ 8 7 3 2]
[29 32 11 9]]

So here is our sorted 2D numpy array.

Two sum problem python – Understanding the Two Sum Problem

Two sum problem python: The two sum problem is a  very common interview question, asked in companies.For the two sum problem we will write two algorithm that runs in O(n2) & O(n) time.

Two Sum Problem

Given an array of integer return indices of the two numbers such that they add up to the specific target.

You may assume that each input would have exactly one solution and you are not going to use same element twice.

Example:

Given numbers=[ 3 , 4 , 6 ,7 ] , target = 7,

Because num[0]+num[1] = 3 + 4 = 7,

return[0,1]

Example has given above we have to execute two sum problem for any two number in list and give us targeted value.

There are mainly two way to execute two sum problem.

  1. Using Naive Method
  2. Using hash table

Implementing Naive Method:

In this method  we would be loop through each number and then loop again through the list looking for a pair that sums and give us final value. The running time for the below solution would be O(n2).

So for this we will write an algorithm which mentioned below-

def twoSum(nums, target):
    for i in range(len(nums)):
        for j in range(i+1,len(nums)):
            if target - nums[i] == nums[j]:
                return[i,j]

    return None            

test = [2,7,11,15]
target = 9
print(twoSum(test,target))

Output:

C:\New folder\Python project(APT)>py twosum.py
[0, 1]

C:\New folder\Python project(APT)>

So you can see that it has return us those indices which has given target value.If we change the target then value and indices both will change.This is what we want to do but it increases the complexity because we run two loop.

So for increasing complexity we will use second method which is hash table.

Implementing hash table:

Below we will show use of hash table. We can write an another faster algorithm that will find pairs that sum to numbers in same time. As we pass through each element in the array, we check to see if M minus the current element exists in the hash table.

Example:

If the array is: [6, 7, 1, 8] and the sum is 8.
class Solution:
    def twoSum(nums,target):
        prevMap = {}

        for i,n in enumerate(nums):
            diff = target - n
            if diff in prevMap:
               return[prevMap[diff],i]
            prevMap[n] = i
        return    
    nums=[6, 7, 1, 8]
    target= 8
    print(twoSum(nums,target))

Output:

C:\New folder\Python project(APT)>py twosum.py [1, 2] 
C:\New folder\Python project(APT)>

So you can see that above program gives us index value of the two number which gives us our target value.

Conclusion:

Great!So in this article we have seen two methods for two sum problem in python.Naive method has complexity O(n2)and Hash metod has complexity O(n),So best approach is Hash method and worst is Naive method.

MySQL string replace – MySQL: Remove characters from string

MySQL string replace: In this article we are going to discuss how to remove characters from string in MySQL table.

MySQL: Remove characters from string

Here we are going to discuss three methods to remove characters from a database table in MySQL

Lets first make a database table in MySql,

CREATE TABLE student_data (
student_id INT,
student_name VARCHAR(50),
enroll_date DATE,
student_roll_no BIGINT,
fee_submitted DECIMAL(10,2)
);

Insert values in student_data,

INSERT INTO student__data(student_id,student_name,enroll_date,student_roll_no,fee_submitted) 
VALUES(1,"DShr-tht-ee,",'2020-12-02',1147483782,12378.90),
(2,"SShy-tht-am,",'2020-10-03',1147483788,14578.90),
(3,"RRi-tht-iky,",'2020-11-13',1147483789,22378.90),
(4,"JAb-tht-ir," ,'2020-12-04',1147483790,12378.90),
(5,"AAust-tht-gya,",'2020-11-12',1147483791,12378.90),
(6,"GPi-tht-hu,",'2020-10-10',1147483792,12788.90),
(7,"VPar-tht-nica,",'2020-02-14',1147483793,12378.90);

Output:

Remove chara from string in sql

Remove characters from string using REPLACE()

Here we are going to remove unwanted character from string using REPLACE() function.

Syntax:

UPDATE tableName SET columnName = REPLACE(columnName, 'charactersToBeReplaced', 
'charactersToBeReplacedWith');

Explanation:

tableName- Name of the given table

columnName: Column name whose value has to chnage

charactersToBeReplaced:Characters which we want to replaced

charactersToBeReplacedWith:New characters which we want to put instead of replaced one

Now we are going to remove “tht” from our string in column “student_name”,

UPDATE student_enroll_data SET student_name = REPLACE(student_name, '-tht-', '');

In above code you can see that we have given “-tht-” in place of characterToBeReplaced,which replaced the character and give us below output.

Output:

Remove char from string2

Remove characters from string using TRIM()

Here we are going to remove unwanted character from string using TRIM() function.TRIM() function are very helpful in removing char from string.It deletes special characters  or any characters given in start or end of table,

Syntax:

UPDATE tableName SET columnName = TRIM([{BOTH | LEADING | TRAILING} [charactersToBeRemoved] FROM ] columnName);

Explanation:

tableName- Name of the given table

columnName: Column name whose value has to chnage

charactersToBeRemoved:Characters which we want to replaced

BOTH,:When we want to remove char from start and end.

LEADING: Remove character from starting.

TRAILING: Remove characters from the end.

Now we are going to remove character ‘,’  from end for this will use below query;

UPDATE student_enroll_data SET student_name = TRIM(TRAILING ',' FROM student_name);

Output:

Remove char from string3png

So you can see that all “,” removed from end in Table student__data.

Remove characters from string using SUBSTRING()

Here we are going to remove unwanted character from string using SUBSTRING() function.It will remove substring from table in MySql.

Syntax:

UPDATE tableName SET columnName = SUBSTRING(columnName,pos);

Explanation:

tableName- Name of the given table

columnName: Column name whose value has to chnage

pos:position from where the substring will start.

Here I am going to remove first character of column “student_name”,

UPDATE student_enroll_data SET student_name = SUBSTRING(student_name,2);

Output:

Remove char from string4
Conclusion:

In this article we have discussed how to remove characters from string in MySQL table.Thank You!

Count rows in pandas – Pandas : count rows in a dataframe | all or those only that satisfy a condition

Count all rows or those that satisfy some condition in Pandas dataframe

Count rows in pandas: In this article we are going to show you how to count number of all rows in a DataFrame or rows that satisfy given condition in it.

First we are going to create dataframe,

import pandas as pd
students = [('Ankit', 22, 'Up', 'Geu'),
           ('Ankita', 31, 'Delhi', 'Gehu'),
           ('Rahul', 16, 'Tokyo', 'Abes'),
           ('Simran', 41, 'Delhi', 'Gehu'),
           ('Shaurya', 33, 'Delhi', 'Geu'),
           ('Harshita', 35, 'Mumbai', 'Bhu' ),
           ('Swapnil', 35, 'Mp', 'Geu'),
           ('Priya', 35, 'Uk', 'Geu'),
           ('Jeet', 35, 'Guj', 'Gehu'),
           ('Ananya', 35, 'Up', 'Bhu')
            ]
details = pd.DataFrame(students, columns =['Name', 'Age','Place', 'College'],
          index =['a', 'b', 'c', 'd', 'e','f', 'g', 'i', 'j', 'k'])

print(details)

Output:

RESTART: C:/Users/HP/Desktop/dataframe.py
Name       Age   Place      College
a   Ankit         22     Up          Geu
b   Ankita       31    Delhi       Gehu
c    Rahul       16    Tokyo      Abes
d   Simran     41     Delhi      Gehu
e   Shaurya    33     Delhi      Geu
f    Harshita   35     Mumbai Bhu
g   Swapnil    35     Mp        Geu
i    Priya         35     Uk         Geu
j    Jeet          35     Guj        Gehu
k   Ananya     35    Up         Bhu

Now lets see some other methods to count the rows in dataframe.

Count all rows in a Pandas Dataframe using Dataframe.shape

Pandas count rows in dataframe: Dataframe.shape attribute gives a sequence of index or row labels

(Number_of_index, Number_of_columns)

Number of index basically means number of rows in the dataframe.Let’s use this to count number of rows in above created dataframe.

import pandas as pd
students = [('Ankit', 22, 'Up', 'Geu'),
           ('Ankita', 31, 'Delhi', 'Gehu'),
           ('Rahul', 16, 'Tokyo', 'Abes'),
           ('Simran', 41, 'Delhi', 'Gehu'),
           ('Shaurya', 33, 'Delhi', 'Geu'),
           ('Harshita', 35, 'Mumbai', 'Bhu' ),
           ('Swapnil', 35, 'Mp', 'Geu'),
           ('Priya', 35, 'Uk', 'Geu'),
           ('Jeet', 35, 'Guj', 'Gehu'),
           ('Ananya', 35, 'Up', 'Bhu')
            ]
details = pd.DataFrame(students, columns =['Name', 'Age','Place', 'College'],
          index =['a', 'b', 'c', 'd', 'e','f', 'g', 'i', 'j', 'k'])
numOfRows = details.shape[0]

print("Number of rows :",numOfRows)

Output:

RESTART: C:/Users/HP/Desktop/dataframe.py
Number of rows : 10

Count all rows in a Pandas Dataframe using Dataframe.index

Pandas dataframe count rows: Dataframe.index attribute gives a sequence of index or row labels.We can calculate the length of that sequence to find out the number of rows in the dataframe.

import pandas as pd
students = [('Ankit', 22, 'Up', 'Geu'),
           ('Ankita', 31, 'Delhi', 'Gehu'),
           ('Rahul', 16, 'Tokyo', 'Abes'),
           ('Simran', 41, 'Delhi', 'Gehu'),
           ('Shaurya', 33, 'Delhi', 'Geu'),
           ('Harshita', 35, 'Mumbai', 'Bhu' ),
           ('Swapnil', 35, 'Mp', 'Geu'),
           ('Priya', 35, 'Uk', 'Geu'),
           ('Jeet', 35, 'Guj', 'Gehu'),
           ('Ananya', 35, 'Up', 'Bhu')
            ]
details = pd.DataFrame(students, columns =['Name', 'Age','Place', 'College'],
          index =['a', 'b', 'c', 'd', 'e','f', 'g', 'i', 'j', 'k'])
numOfRows = len(details.index)
print('Number of Rows in dataframe : ' , numOfRows)

Output:

RESTART: C:/Users/HP/Desktop/dataframe.py

Number of rows : 10

Count rows in a Pandas Dataframe that satisfies a condition using Dataframe.apply()

Count rows in pandas: This function apply  to all the rows of a dataframe to find out if elements of rows satisfies a condition or not, Based on the result it returns a bool series.

import pandas as pd
students = [('Ankit', 22, 'Up', 'Geu'),
           ('Ankita', 31, 'Delhi', 'Gehu'),
           ('Rahul', 16, 'Tokyo', 'Abes'),
           ('Simran', 41, 'Delhi', 'Gehu'),
           ('Shaurya', 33, 'Delhi', 'Geu'),
           ('Harshita', 35, 'Mumbai', 'Bhu' ),
           ('Swapnil', 35, 'Mp', 'Geu'),
           ('Priya', 35, 'Uk', 'Geu'),
           ('Jeet', 35, 'Guj', 'Gehu'),
           ('Ananya', 35, 'Up', 'Bhu')
            ]
details = pd.DataFrame(students, columns =['Name', 'Age','Place', 'College'],
          index =['a', 'b', 'c', 'd', 'e','f', 'g', 'i', 'j', 'k'])
seriesObj = details.apply(lambda x: True if x['Age'] > 30 else False , axis=1)
numOfRows = len(seriesObj[seriesObj == True].index)
print('Number of Rows in dataframe in which Age > 30 : ', numOfRows)

Output:

RESTART: C:/Users/HP/Desktop/dataframe.py
Number of Rows in dataframe in which Age > 30 : 8

Want to expert in the python programming language? Exploring Python Data Analysis using Pandas tutorial changes your knowledge from basic to advance level in python concepts.

Read more Articles on Python Data Analysis Using Padas

Conclusion:

In this article we have seen different method to count rows in a dataframe  all or those  that satisfy a condition.

Happy learning guys.

Pandas to_list – Pandas: Convert a dataframe column into a list using Series.to_list() or numpy.ndarray.tolist() in python

Get a list of a specified column of a Pandas DataFrame

Pandas to_list: This article is all about how to get a list of a specified column of a Pandas DataFrame using different methods.

Lets create a dataframe which we will use in this article.

import pandas as pd 
students = [('juli', 34, 'Sydney', 155),
           ('Ravi', 31, 'Delhi', 177.5),
           ('Aaman', 16, 'Mumbai', 81),
           ('Mohit', 31, 'Delhi', 167),
           ('Veena', 12, 'Delhi', 144),
           ('Shan', 35, 'Mumbai', 135),
           ('Sradha', 35, 'Colombo', 111)
           ]

student_df = pd.DataFrame(students, columns=['Name', 'Age', 'City', 'Score'])
print(student_df)

Output:

        Name    Age   City             Score
0      Julie      34     Sydney         155.0
1     Ravi       31      Delhi            177.5
2     Aman    16     Mumbai         81.0
3     Mohit    31     Delhi             167.0
4     Veena    12     Delhi             144.0
5      Shan     35    Mumbai         135.0
6     Sradha   35   Colombo        111.0

Now we are going to fetch a single column

There are different ways to do that.

using Series.to_list()

Numpy ndarray to dataframe: We will use the same example we use above in this article.We select the column ‘Name’ .We will use [] that gives a series object.Series.to_list()  this function we use provided by the Series class to convert the series object and return a list.

import pandas as pd 
students = [('juli', 34, 'Sydney', 155),
           ('Ravi', 31, 'Delhi', 177.5),
           ('Aaman', 16, 'Mumbai', 81),
           ('Mohit', 31, 'Delhi', 167),
           ('Veena', 12, 'Delhi', 144),
           ('Shan', 35, 'Mumbai', 135),
           ('Sradha', 35, 'Colombo', 111)
           ]

student_df = pd.DataFrame(students, columns=['Name', 'Age', 'City', 'Score'])
list_of_names = student_df['Name'].to_list()
print('List of Names: ', list_of_names)
print('Type of listOfNames: ', type(list_of_names))

Output:

RESTART: C:/Users/HP/Desktop/article2.py
List of Names: ['juli', 'Ravi', 'Aaman', 'Mohit', 'Veena', 'Shan', 'Sradha']
Type of listOfNames: <class 'list'>

So in above example you have seen its working…let me explain in brief..

We have first select the column ‘Name’ from the dataframe using [] operator,it returns a series object names, and we have confirmed that by printing its type.

We used [] operator that gives a series object.Series.to_list()  this function we use provided by the series class to convert the series object and return a list.

This is how we converted a dataframe column into a list.

using numpy.ndarray.tolist()

From the give dataframe we will select the column “Name” using a [] operator that returns a Series object and uses

Series.Values to get a NumPy array from the series object. Next, we will use the function tolist() provided by NumPy array to convert it to a list.

import pandas as pd 
students = [('juli', 34, 'Sydney', 155),
           ('Ravi', 31, 'Delhi', 177.5),
           ('Aaman', 16, 'Mumbai', 81),
           ('Mohit', 31, 'Delhi', 167),
           ('Veena', 12, 'Delhi', 144),
           ('Shan', 35, 'Mumbai', 135),
           ('Sradha', 35, 'Colombo', 111)
           ]

student_df = pd.DataFrame(students, columns=['Name', 'Age', 'City', 'Score'])
list_of_names = student_df['Name'].values.tolist()
print('List of Names: ', list_of_names)
print('Type of listOfNames: ', type(list_of_names))

Output:

RESTART: C:/Users/HP/Desktop/article2.py
List of Names: ['juli', 'Ravi', 'Aaman', 'Mohit', 'Veena', 'Shan', 'Sradha']
Type of listOfNames: <class 'list'>
>>>

So now we are going to show you its working,

We converted the column ‘Name’ into a list in a single line.Select the column ‘Name’ from the dataframe using [] operator,

From Series.Values get a Numpy array

import pandas as pd 
students = [('juli', 34, 'Sydney', 155),
           ('Ravi', 31, 'Delhi', 177.5),
           ('Aaman', 16, 'Mumbai', 81),
           ('Mohit', 31, 'Delhi', 167),
           ('Veena', 12, 'Delhi', 144),
           ('Shan', 35, 'Mumbai', 135),
           ('Sradha', 35, 'Colombo', 111)
           ]

student_df = pd.DataFrame(students, columns=['Name', 'Age', 'City', 'Score'])
names = student_df['Name'].values
print('Numpy array: ', names)
print('Type of namesAsNumpy: ', type(names))

Output:

Numpy array: ['juli' 'Ravi' 'Aaman' 'Mohit' 'Veena' 'Shan' 'Sradha']
Type of namesAsNumpy: <class 'numpy.ndarray'>

Numpy array provides a function tolist() to convert its contents to a list.

This is how we selected our column ‘Name’ from Dataframe as a Numpy array and then turned it to a list.

Conclusion:

In this article i have shown you that how to get a list of a specified column of a Pandas DataFrame using different methods.Enjoy learning guys.Thank you!

Python string to int conversion – How to Convert a Python String to int

Convert Python String to Int:

Python string to int conversion: To convert a string to integer in Python, use the int() function. This function takes two parameters: the initial string and the optional base to represent the data. In Python an strings can be converted into a integer using the built-in int() function. The int() function takes in any python data type and converts it into a integer.But use of the int() function is not the only way to do so. This type of conversion can also be done using thefloat() keyword, as a float value can be used to compute with integers.

Below is the list of possible ways to convert an integer to string in python:

1. Using int() function:

Syntaxint(string)

Example:

Using int() function

Output:

Using int() function output
As a side note, to convert to float, we can use float() in python:

Example:

use float() in python

Output:

use float() in python output
2. Using float() function:

We first convert to float, then convert float to integer. Obviously the above method is better (directly convert to integer).

Syntax: float(string)

Example:

Using-float-function

Output:

Using float() function output

If you have a decimal integer represented as a string and you want to convert the Python string to an int, then you just follow the above method (pass the string to int()), which returns a decimal integer.But By default, int() assumes that the string argument represents a decimal integer. If, however, you pass a hexadecimal string to int(), then you’ll see a ValueError

For value error

The error message says that the string is not a valid decimal integer.

When you pass a string to int(), you can specify the number system that you’re using to represent the integer. The way to specify the number system is to use base:

Now, int() understands you are passing a hexadecimal string and expecting a decimal integer.

Conclusion:

This article is all about how to convert python string to int.All methods are clearly explained here. Now I hope you’re comfortable with the ins and outs of converting a Python string to an int.

Python numpy.flatten() Function Tutorial with Examples | How to Use Function Numpy Flatten in Python?

Python numpy.flatten() Function Tutorial with Examples

Python flatten 2d array: In this tutorial, Beginners and Experience python developers will learn about function numpy.flatten(), how to use it, and how it works. Kindly, hit on the available links and understand how numpy.ndarray.flatten() function in Python gonna help you while programming.

numpy.ndarray.flatten() in Python

A numpy array has a member function to flatten its contents or convert an array of any shape to a 1D numpy array,

Syntax:

ndarray.flatten(order='C')

Parameters:

Here we can pass the following parameters-

Order: In this, we give an order in which items from the numpy array will be used,

C: Read items from array row-wise

F: Read items from array column-wise

A: Read items from array-based on memory order

Returns:

It returns a copy of the input array but in a 1D array.

Also Check:

Let’s learn the concept by viewing the below practical examples,

Flatten a matrix or a 2D array to a 1D array using ndarray.flatten()

First of all, import the numpy module,

import numpy as np

Let’s suppose, we have a 2D Numpy array,

import numpy as np

# Create a 2D Numpy array from list of list
arr_2d = np.array([[7, 4, 2],
                  [5, 4, 3],
                  [9, 7, 1]])
print(arr_2d)

Output:

[7 4 2]
[5 4 3]
[9 7 1]]

Now we are going to use the above 2D Numpy array to convert the 1D Numpy array.

import numpy as np

# Create a 2D Numpy array from list of list
arr_2d = np.array([[7, 4, 2],
                  [5, 4, 3],
                  [9, 7, 1]])
print(arr_2d)
# Convert the 2D array to 1D array
flat_array = arr_2d.flatten()
print('Flattened 1D Numpy Array:')
print(flat_array)

Output:

[[7 4 2]
[5 4 3]
[9 7 1]]

Flattened 1D Numpy Array:
[7 4 2 5 4 3 9 7 1]

So in the above example, you have seen how we converted the 2D array into a 1D array.

ndarray.flatten() returns a copy of the input array

flatten() function always returns a copy of the given array means if we make any changes in the returned array will not edit anything in the original one.

import numpy as np

# Create a 2D Numpy array from list of list
arr_2d = np.array([[7, 4, 2],
                  [5, 4, 3],
                  [9, 7, 1]])
print(arr_2d)
flat_array = arr_2d.flatten()
flat_array[2] = 50
print('Flattened 1D Numpy Array:')
print(flat_array)
print('Original 2D Numpy Array')
print(arr_2d)

output:

[[7 4 2]
[5 4 3]
[9 7 1]]

Flattened 1D Numpy Array:
[ 7 4 50 5 4 3 9 7 1]

Original 2D Numpy Array
[[7 4 2]
[5 4 3]
[9 7 1]]

Thus in the above example, you can see that it has not affected the original array.

Flatten a 2D Numpy Array along Different Axis using flatten()

It accepts different parameter orders. It can be ‘C’ or ‘F’ or ‘A’, but the default value is ‘C’.
It tells the order.

  • C’: Read items from array row-wise i.e. using C-like index order.
  • ‘F’: Read items from array column-wise i.e. using Fortran-like index order.
  • ‘A’: Read items from an array on the basis of memory order of items.

In the below example, we are going to use the same 2D array which we used in the above example-

Flatten 2D array row-wise

In this, if we will not pass any parameter in function then it will take ‘C’ as a default value

import numpy as np

# Create a 2D Numpy array from list of list
arr_2d = np.array([[7, 4, 2],
                  [5, 4, 3],
                  [9, 7, 1]])
flat_array = arr_2d.flatten(order='C')
print('Flattened 1D Numpy Array:')
print(flat_array)

Output:

Flattened 1D Numpy Array:
[7 4 2 5 4 3 9 7 1]

Flatten 2D array column-wise

If we pass ‘F’ as the order parameter in  function then it means elements from a 2D array will be read column wise

import numpy as np

# Create a 2D Numpy array from list of list
arr_2d = np.array([[7, 4, 2],
                  [5, 4, 3],
                  [9, 7, 1]])
flat_array = arr_2d.flatten(order='F')
print('Flattened 1D Numpy Array:')
print(flat_array)

Output:

Flattened 1D Numpy Array:
[7 5 9 4 4 7 2 3 1]

Flatten 2D array based on memory layout

Let’s create a transparent view of the given 2D array

import numpy as np

# Create a 2D Numpy array from list of list
arr_2d = np.array([[7, 4, 2],
                  [5, 4, 3],
                  [9, 7, 1]])
# Create a transpose view of array
trans_arr = arr_2d.T
print('Transpose view of array:')
print(trans_arr)

Output:

Transpose view of array:
[[7 5 9]
[4 4 7]
[2 3 1]]

Now flatten this view was Row Wise,

import numpy as np

# Create a 2D Numpy array from list of list
arr_2d = np.array([[7, 4, 2],
                  [5, 4, 3],
                  [9, 7, 1]])
# Create a transpose view of array
trans_arr = arr_2d.T
flat_array = trans_arr.flatten(order='C')
print(flat_array )

Output:

[7 5 9 4 4 7 2 3 1]

Flatten a 3D array to a 1D numpy array using ndarray.flatten()

Let’s create a 3D numpy array,

import numpy as np

# Create a 3D Numpy array
arr = np.arange(12).reshape((2,3,2))
print('3D Numpy array:')
print(arr)

Output:

3D Numpy array:
[[[ 0 1]
[ 2 3]
[ 4 5]]

[[ 6 7]
[ 8 9]
[10 11]]]

Now we are going to flatten this 3D numpy array,

import numpy as np

# Create a 3D Numpy array
arr = np.arange(12).reshape((2,3,2))
# Convert 3D array to 1D
flat_array = arr.flatten()
print('Flattened 1D Numpy Array:')
print(flat_array)

Output:

Flattened 1D Numpy Array:
[ 0 1 2 3 4 5 6 7 8 9 10 11]

Flatten a list of arrays using numpy.ndarray.flatten()

Now, we have to create a list of arrays,

# Create a list of numpy arrays
arr = np.arange(5)
list_of_arr = [arr] * 5
print('Iterate over the list of a numpy array')
for elem in list_of_arr:
    print(elem)

Output:

Iterate over the list of a numpy array
[0 1 2 3 4]
[0 1 2 3 4]
[0 1 2 3 4]
[0 1 2 3 4]
[0 1 2 3 4]

Now, its time to convert the above list of numpy arrays to a flat 1D numpy array,

# Convert a list of numpy arrays to a flat array
flat_array = np.array(list_of_arr).flatten()
print('Flattened 1D Numpy Array:')
print(flat_array)

Output:

Flattened 1D Numpy Array:
[0 1 2 3 4 0 1 2 3 4 0 1 2 3 4 0 1 2 3 4 0 1 2 3 4]

Flatten a list of lists using ndarray.flatten()

To perform this process, first, we have to create a 2D numpy array from a list of list and then convert that to a flat 1D Numpy array,

# Create a list of list
list_of_lists = [[1, 2, 3, 4, 5],
                 [1, 2, 3, 4, 5],
                 [1, 2, 3, 4, 5],
                 [1, 2, 3, 4, 5]]
# Create a 2D numpy array from a list of list and flatten that array
flat_array = np.array(list_of_lists).flatten()
print('Flattened 1D Numpy Array:')
print(flat_array)
# Convert the array to list
print('Flat List:')
print(list(flat_array))

Output:

Flattened 1D Numpy Array:
[1 2 3 4 5 1 2 3 4 5 1 2 3 4 5 1 2 3 4 5]
Flat List:
[1, 2, 3, 4, 5, 1, 2, 3, 4, 5, 1, 2, 3, 4, 5, 1, 2, 3, 4, 5]

Hence, this is how we can use flatten() function in numpy.

Conclusion:

We hope this python tutorial, you have seen how to use function numpy.flatten() assist you all in needy times. Thank you! keep visiting our site frequently for updated concepts of python.

Using std::find & std::find_if with User Defined Classes | CPP std::find_if with lambda | std::find & std::find_if Examples

Using stdfind & stdfind if with User Defined Classes

std find_if: In this article, we will be going to discuss how to use std::find and std::find_if algorithm with User Defined Classes.

Using std::find & std::find_if with User Defined Classes

std list find_if: Generally for built-in datatypes like int,string etc ‘std::find’ algorithm uses “==” operator for comparisons but for user defined data types i.e classes & structure we need to define “==” operator.

Now we will take some example,

Let’s take a list of class Item objects. Each of them has properties like Id, price, and availability count.

Now we want to search for an item object with a specific ID from this vector. So let’s see how we will do it,

With std::find

stl find_if: We will do it using the ‘std::find’ algorithm.

class Item
{
private:
    std::string  m_ItemId;
    int m_Price;
    int m_Count;
public:
    Item(std::string id, int price, int count):
        m_ItemId(id), m_Count(count), m_Price(price)
    {}
    int getCount() const {
        return m_Count;
    }
    std::string getItemId() const {
        return m_ItemId;
    }
    int getPrice() const {
        return m_Price;
    }
    bool operator==(const Item & obj2) const
    {
        if(this->getItemId().compare(obj2.getItemId()) == 0)
            return true;
        else
            return false;
    }
};
std::vector<Item> getItemList()
{
    std::vector<Item> vecOfItems ;
    vecOfItems.push_back(Item("D121",100,2));
    vecOfItems.push_back(Item("D122",12,5));
    vecOfItems.push_back(Item("D123",28,6));
    vecOfItems.push_back(Item("D124",8,10));
    vecOfItems.push_back(Item("D125",99,3));
    return vecOfItems;
}

Above we see that ‘std::find’ uses the ‘==’ operator for comparison, therefore we have to define operator == in the Item class.

Let’s search for the Item object with Id “126”,

std::vector<Item> vecOfItems = getItemList();
std::vector<Item>::iterator it;
it = std::find(vecOfItems.begin(), vecOfItems.end(), Item("D123",99,0));
if(it != vecOfItems.end())
    std::cout<<"Found with Price ::"<<it->getPrice()<<" Count :: "<<it->getCount()<<std::endl;
else
    std::cout<<"Item with ID :: D126 not Found"<<std::endl;

So in the above algorithm, you can see that we tried to find ‘id=126’ but we were not able to found because there is no id like that.

Above you have seen how to use ‘std::find ‘ now if we need to search for the Item object with a specific price, we can not use the == operator for it. Hence, we will use the ‘std::find_if’ algorithm.

Also Check:

Create a Comparator Function

Find_if c 11: Let’s first create a comparator function, because ‘std::find_if’ finds the first element in the given range based on the custom comparator passed.

bool priceComparision(Item & obj, int y)
{
    if(obj.getPrice() == y)
        return true;
    else
        return false;
}

With std::find_if

Now we will use this comparator with std::find_if algorithm,

std::vector<Item> vecOfItems = getItemList();
std::vector<Item>::iterator it;
it = std::find_if(vecOfItems.begin(), vecOfItems.end(), std::bind(priceComparision,  std::placeholders::_1 , 28) );
if(it != vecOfItems.end())
    std::cout<<"Item Price ::"<<it->getPrice()<<" Count :: "<<it->getCount()<<std::endl;
else
    std::cout<<"Item not Found"<<std::endl;

So, if we want to search Item objects based on count we use the below algorithm.

Creation of Generic Comparator Function

std find: Let’s create a Generic Comparator function for searching based on any property of a class,

template <typename T>
struct GenericComparator
{
    typedef  int (T::*GETTER)() const;
    GETTER m_getterFunc;
    int m_data;
    GenericComparator(GETTER getterFunc, int data)
    {
        m_getterFunc = getterFunc;
        m_data = data;
    }
    bool operator()(const T  & obj)
    {
        if((obj.*m_getterFunc)() == m_data)
            return true;
        else
            return false;
    }
};

Lets use ‘std::find_if with this generic comparator function,

std::vector<Item> vecOfItems = getItemList();
std::vector<Item>::iterator it;
it = std::find_if(vecOfItems.begin(), vecOfItems.end(),  GenericComparator<Item>(&Item::getPrice, 99)   );
if(it != vecOfItems.end())
    std::cout<<"Item Price ::"<<it->getPrice()<<" Count :: "<<it->getCount()<<std::endl;
else
    std::cout<<"Item not Found"<<std::endl;

std: :find_if with lambda

If you want to make some improvement in the above coding like if we don’t want to define this Generic Comparator function then, we will use lambda functions,

std::vector<Item> vecOfItems = getItemList();
std::vector<Item>::iterator it;
it = std::find_if(vecOfItems.begin(), vecOfItems.end(), [](Item const& obj){
        return obj.getPrice() == 28;
    } );
if(it != vecOfItems.end())
    std::cout<<"Item Price ::"<<it->getPrice()<<" Count :: "<<it->getCount()<<std::endl;
else
    std::cout<<"Item not Found"<<std::endl;

Now we are going to show the complete code in one go, so you can see how it is working.

#include <iostream>
#include <vector>
#include <memory>
#include <string>
#include <algorithm>
#include <functional>

class Item
{
private:
std::string m_ItemId;
int m_Price;
int m_Count;
public:
Item(std::string id, int price, int count):
m_ItemId(id), m_Count(count), m_Price(price)
{}
int getCount() const {
return m_Count;
}
std::string getItemId() const {
return m_ItemId;
}
int getPrice() const {
return m_Price;
}
bool operator==(const Item & obj2) const
{
if(this->getItemId().compare(obj2.getItemId()) == 0)
return true;
else
return false;
}
};

std::vector<Item> getItemList()
{
std::vector<Item> vecOfItems ;
vecOfItems.push_back(Item("D121",100,2));
vecOfItems.push_back(Item("D122",12,5));
vecOfItems.push_back(Item("D123",28,6));
vecOfItems.push_back(Item("D124",8,10));
vecOfItems.push_back(Item("D125",99,3));
return vecOfItems;
}

bool priceComparision(Item & obj, int y)
{
if(obj.getPrice() == y)
return true;
else
return false;
}

template <typename T>
struct GenericComparator
{
typedef int (T::*GETTER)() const;
GETTER m_getterFunc;
int m_data;
GenericComparator(GETTER getterFunc, int data)
{
m_getterFunc = getterFunc;
m_data = data;
}
bool operator()(const Item & obj)
{
if((obj.*m_getterFunc)() == m_data)
return true;
else
return false;
}
};

bool IsLesser10 (int i) {
return (i < 10);
}

int main()
{

std::vector<int> vecData{1,2,3,4,5};

std::vector<int>::iterator it1;
it1 = std::find(vecData.begin(), vecData.end(), 2);
if(it1 != vecData.end())
std::cout<<*it1<<std::endl;
it1 = std::find_if(vecData.begin(), vecData.end(), IsLesser10 );
if(it1 != vecData.end())
std::cout<<*it1<<std::endl;

std::vector<Item> vecOfItems = getItemList();
std::vector<Item>::iterator it = std::find(vecOfItems.begin(), vecOfItems.end(), Item("D126",99,0));

if(it != vecOfItems.end())
std::cout<<"Found with ID :: "<<it->getItemId()<< " Price ::"<<it->getPrice()<<" Count :: "<<it->getCount()<<std::endl;
else
std::cout<<"Item with ID :: D126 not Found"<<std::endl;

it = std::find(vecOfItems.begin(), vecOfItems.end(), Item("D124",99,0));
if(it != vecOfItems.end())
std::cout<<"Found with ID :: "<<it->getItemId()<< " Price ::"<<it->getPrice()<<" Count :: "<<it->getCount()<<std::endl;
else
std::cout<<"Item with ID :: D124 not Found"<<std::endl;

it = std::find_if(vecOfItems.begin(), vecOfItems.end(), [](Item const& obj){
return obj.getPrice() == 28;
} );

if(it != vecOfItems.end())
std::cout<<"Found with ID :: "<<it->getItemId()<< " Price ::"<<it->getPrice()<<" Count :: "<<it->getCount()<<std::endl;
else
std::cout<<"Item not Found"<<std::endl;

it = std::find_if(vecOfItems.begin(), vecOfItems.end(), std::bind(priceComparision, std::placeholders::_1 , 28) );
if(it != vecOfItems.end())
std::cout<<"Found with ID :: "<<it->getItemId()<< " Price ::"<<it->getPrice()<<" Count :: "<<it->getCount()<<std::endl;
else
std::cout<<"Item not Found"<<std::endl;

it = std::find_if(vecOfItems.begin(), vecOfItems.end(), GenericComparator<Item>(&Item::getPrice, 99) );
if(it != vecOfItems.end())
std::cout<<"Found with ID :: "<<it->getItemId()<< " Price ::"<<it->getPrice()<<" Count :: "<<it->getCount()<<std::endl;
else
std::cout<<"Item not Found"<<std::endl;

return 0;
}

Output:

Item with ID :: D126 not Found
Found with ID :: D124 Price ::8 Count :: 10
Found with ID :: D123 Price ::28 Count :: 6
Found with ID :: D125 Price ::99 Count :: 3

Conclusion:

In this article, you have seen how to use the ‘std::find’ and ‘std::find_if’ algorithms with User Defined Classes. Thank you!

MYSQL insert select – MYSQL INSERT WITH SELECT

mysql insert select: In this article we are going to discuss how to insert data into a table using select method in MYSQL.

MYSQL INSERT WITH SELECT: SINGLE TABLE

Select method copies data from one table and inserts into another table.

Syntax:

INSERT INTO table_name(column_name)
SELECT tbl_name.col_name
FROM some_table tbl_name
WHERE condition;

Lets take an example,here we will create a table employees_regist ,which will then select some data from an already existing table emplyees_details in our database.

emplyees_details table has columns emloyee_no, first_name, last_name and designation_post. To see all the rows in employees_details table we will do a SELECT * query on it.

SELECT * FROM employee_details;

After this query you will get this result,

Output:

+-------------+------------+-----------+------------+
| employee_no | first_name | last_name | desig_post |
+-------------+------------+-----------+------------+
|                    1 | Shikha       | Mishra       | Developer |
|                    2 | Ritika         | Mathur      | Designer   |
|                    3 | Rohan        | Rathour     | Developer |
|                    4 | Aarush       | Rathour     | Developer |
|                    5 | Aadhya      | Roopam    | Techwriter |
+-------------+------------+-----------+------------+

So you can see that we already have one table(employee_details), now we are going to create our new table ’employee_regist’.

CREATE TABLE employee_regist(
    employee_exp INT AUTO_INCREMENT,
    first_name VARCHAR(255),
    last_name VARCHAR(255),
    employee_post VARCHAR(255),
    employee_salary INT,
    PRIMARY KEY (employee_exp)
);

So you can see that we have created a table but there is no value because our table is empty at this time,if you want to see table you can write select query,

SELECT * FROM employee_regist;

Output:

Empty set (0.05 sec)

Now we are going to add values in employee_regist.For this we are going to write INSERT query.

INSERT INTOemployee_regist(emploee_exp,first_name,last_name ) 
 SELECT employee_no,first_name,last_name FROM employee_details 
 WHERE desig_post = 'Developer' ;

Now to show output we will execute our SELECT query ,

SELECT * FROM registration_details;

Output:

+-------------+------------+-----------+------------+
| employee_no | first_name | last_name | desig_post |
+-------------+------------+-----------+------------+
|                    1 | Shikha       | Mishra       | Developer |
|                    3 | Rohan        | Rathour     | Developer |
|                    4 | Aarush       | Rathour     | Developer ||
+-------------+------------+-----------+------------+

So in above table you have seen that all table not added only those satisfying the given condition were addaed.

MYSQL INSERT WITH SELECT: MULTIPLE TABLES

In above table you have seen that we have added rows and column from single table but you can also do the same with multiple table.Let’s see it by an example,

We have employee_regist,emplyee_details and eregistered_employee already present in our database,

Now we are going to execute SELECT query to see the data in these table one by one,

’employee_regist’

SELECT * FROM employee_regist;

Output:

+-------------+------------+-----------+------------+
| employee_no | first_name | last_name | confirm     |
+-------------+------------+-----------+------------+
|                      |                    |                  |                   |
|                      |                    |                  |                   |
|                      |                    |                  |                   |
+-------------+------------+-----------+------------+

’employee_details’

SELECT * FROM employee_details;

output:

+-------------+------------+-----------+------------+
| employee_no | first_name | last_name | desig_post |
+-------------+------------+-----------+------------+
|                    1 | Shikha       |  Mishra      | Developer |
|                    2 | Ritika         | Mathur      | Designer   |
|                    3 | Rohan        | Rathour     | Developer |
|                    4 | Aarush       | Rathour     | Developer |
|                    5 | Aadhya      | Roopam    | Techwriter |
+-------------+------------+-----------+------------+

’employee_status’

SELECT * FROM registered_employee;

Output:

+-------------+------------+-----------+------------+
|  first_name | last_name | confirm                            |
+-------------+------------+-----------+------------+
|         Shikha | Mishra     | yes                                    |
|           Ritika | Mathur    | yes                                    |
|          Rohan | Rathour   | No                                    |
|          Aarush| Rathour   |yes                                     |
|        Aadhya | Roopam  | No                                     |
+-------------+------------+-----------+------------+

Now we are going to write a query in MySQL to get the data into employee_regist from  employee_details and registered_employee.

Selecting first_name and last_name from employee_details and confirm from employee_registered of only those students who have ‘Developer‘ stream.

INSERT INTO employee_regist(employee_no,first_name,last_name, employee_confirm) 
SELECT em.employee_no,em.first_name,em.last_name ,re.confirm
FROM  employee_details em , confirm re
WHERE em.first_name = re.first_name 
AND em.last_name = re.last_name
AND em.stream_name = 'Developer'  ;

Above in our query we have used em and re as alias,So now we are going to see output It will add data from multiple table.

Output:

+————-+————+———–+————+
| employee_no | first_name | last_name | confirm |
+————-+————+———–+————+
| 1                    | Shikha       | Mishra      |yes          |
| 3                    | Rohan       | Rathour     |No          |
| 4                    | Aarush      | Rathour     |yes          |

+————-+————+———–+————+

Conclusion:

In this article we have discussed how to insert data into a single and multiple table using select method in MYSQL.

Thanks to all!