Adapter Design Pattern

The Adapter Pattern Convert the interface of a class into another interface clients expect. It enables a client with incompatible interface to interact with existing class using an intermediate Adapter class. An Adapter class acts like a middle man through which two classes having incompatible interfaces can interact with each other. It comes under structural design pattern as it facilitates communication between two interfaces.

Advantages of Adapter Pattern

  • Two classes having incompatible interfaces can interact with each other using an Adapter class.
  • It promotes reusability of existing system. A class can be accessed by multiple systems using different interfaces and Adapters.

When we should use Adapter pattern

  • When client wants to interact with existing system using incompatible interface.
  • When a new system wants to interact with legacy(old) system using new interface which is not compatible with interface of legacy system.
  • When you want to use a 3rd party framework or library whose interface is incompatible with your system.

Components of Adapter Pattern

  • Target Interface : This is the interface expected by the client.
  • Adapter : This is a wrapper over Adaptee class which implements the Target Interface. It receives calls from the client and translates that request to one/multiple adaptee calls using Adaptee interface.
  • Adaptee Interface : This is the existing interface which is wrapped by Adapter. Client wants to interact with Adaptee but cannot interact directly because Adaptee Interface is incompatible with Target Interface.
  • Client : Client will interact with Adapter using Target Interface.
    1. Client calls Adapter using using Target Interface.
    2. Adapter class translates this request and delegates it to adaptee using one/multiple method calls using Adaptee Interface.
    3. Adaptee returns response to Adapter class as defined in Adaptee Interface and then Adapter transforms this response before returning it to Client as defined in Target Interface.

Adapter_Pattern
We will declare two incompatible interfaces Square and Rectangle.
Adapter Design Pattern

Square.java
public interface Square {
    public void setSide(int sideLength);
    public void printAreaOfSquare();
}
Rectangle.java
public interface Rectangle {
    public void setLength(int length);
    public void setWidth(int width);
    public void printAreaOfRectangle();
}

Create Chessboard.java and Tenniscourt.java implementing Square and Rectangle interfaces respectively.
Adapter Design Pattern 1

Chessboard.java
public class Chessboard implements Square {
    int sideLength;
  
    @Override
    public void setSide(int sideLength){
        this.sideLength = sideLength;
    }
  
    @Override
    public void printAreaOfSquare(){
        System.out.println("Area of Chessbpard is " + sideLength*sideLength);
    }
}

Adapter Design Pattern 2

Tenniscourt.java
public class Tenniscourt implements Rectangle {
    int length, width;
  
    @Override
    public void setLength(int length){
        this.length = length;
    }
  
    @Override
    public void setWidth(int width){
        this.width = width;
    }
  
    @Override
    public void printAreaOfRectangle(){
        System.out.println("Area of Tennis Court is " + length*width);
    }
}

Now, we will define RectangleAdapter.java which is a wrapper over Rectangle interface. It implements Square interface over Rectangle Interface.
Adapter Design Pattern 3

RectangleAdapter.java
public class RectangleAdapter implements Square {
    Rectangle rect;
  
    public RectangleAdapter(Rectangle rect) {
        this.rect = rect;
    }
  
    // Setting length and width to same value to make it a square
    @Override
    public void setSide(int sideLength){
        rect.setLength(sideLength);
        rect.setWidth(sideLength);
    }
  
    @Override
    public void printAreaOfSquare(){
        rect.printAreaOfRectangle();
    }
}

Create AdapterPatternExample.java class to show the use of RectangleAdapter to call an Rectangle object using Square interface.
Adapter Design Pattern 4

AdapterPatternExample.java
public class AdapterPatternExample {
    public static void main(String args[]){
        Square square = new Chessboard();
        Rectangle rectangle = new Tenniscourt();
        Square adapter = new RectangleAdapter(rectangle);
  
        // Calculate Area of Square using Square Interface 
        square.setSide(5);
        square.printAreaOfSquare();
   
        // Calculate Area of Rectangle using Rectangle Interface
        rectangle.setLength(5);
        rectangle.setWidth(4);
        rectangle.printAreaOfRectangle();
   
        // Now we will call Rectangle object using Square interface 
        adapter.setSide(5);
        adapter.printAreaOfSquare(); 
    }
}

Output

Area of Chessbpard is 25
Area of Tennis Court is 20

Important Points About Adapter Pattern

  • Adapter class changes the interface of an existing object.
  • Adapter class is a good example of object composition. Adapter class “has a” instance of the adaptee class.
  • We can use an Adapter with any class Implementing Adaptee Interface.
  • Adapter wraps an object to change it’s interface whereas a decorator wraps an object to add extra functionalities.

JQUERY Interview Questions in .NET

We have compiled most frequently asked .NET Interview Questions which will help you with different expertise levels.

.NET Interview Questions on JQUERY

Question 1.
What is jQuery?
Answer:
jQuery is a reusable JavaScript library which simplifies JavaScriptcoding. So rather than writing lengthy JavaScript code as shown below you can use jQuery.

document.getElementByld(“txt1”).value = “hello”;

By jQuery the above JavaScript code is now simplified as shown below.

$(“#txt 1 ”). val(“Hello”);

Question 2.
So will jQuery replace JavaScript?
Answer:
No, jQuery is not meant to replace JavaScript. jQuery is a library while JavaScript is a language. jQuery sits on the top of JavaScript to make your development easy.

Question 3.
So how do we use these reusable jQuery libraries?
Answer:
You need to download jQuery.js file from jQuery.com and include the same in your Web pages. The jQuery files are named with version number like “jQuery-1.4.1.js” where 1.4.1 is the version of the JavaScript file. So at the top of your Web page you need to include the JavaScript as shown in the below code.

<script src-”Scripts/jQuery-1.4.1.min.js” type-”text/javascript”x/script>

Question 4.
What is CDN (Content Delivery Network)?
Answer:
In CDN multiple copies of the Website is copied on different geographical servers. When users send request for Website content which have CDN-enabled depending on their geographical location, content is served from the nearest geographical location server to the user.

JQUERY Interview Questions in . NET chapter 7 img 1

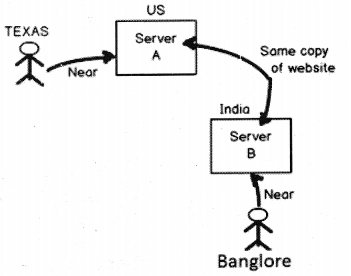
So if a user is from India, the Indian CDN server will serve request for Indian users. This leads to faster delivery of data.

Question 5.
For jQuery files which are the popular CDN’s?
Answer:
There are two popular CDN’s: Microsoft and Google.

If you want to reference Google CDN JQuery files you can use the below script.

<script type="text/javascript" .
src=''HTTP : //ajax, googleapis . com/aj ax/libs/jQuery/1.9.1/ j Query.min.j s " >
</script>

If you want to use Microsoft CDN you can use the below JavaScript.

<script type="text/javascript"
src="HTTP: //ajax.microsoft.com/ajax/jQuery/jQuery-1.9.1.min.j s">
</script>

Question 6.
How can we reference local jQuery files if CDN fails?
Answer:
Many times it is possible that Microsoft and Google servers can go down for some time. So in those situations you would like your page to reference jQuery files from local server.
So to implement a CDN fallback is a two-step process:
First reference is the CDN jQuery. In the below code you can see we have reference Microsoft CDN jQuery file.

HTTP: //ajax, microsoft. com/ajax/jQuery/jQuery-1.9.1. min.js “></script>

Now if Microsoft CDN is down then the jQuery value will be “undefined”. So you can see in the below code we are checking if the jQuery is having “undefined” value then do a document write and reference your local jQuery files.

if (typeof jQuery == 'undefined')
{
document.write(unescape("%3Cscript src='Scripts/jQuery.1.9.1.min.js' type='text/javascript'%3E%3C/script%3E"));
}

Below is the full code for the same.

<script type="text/javascript" src=" HTTP: //ajax.microsoft.com/ajax/jQuery/ jQuery-1.9.1.min.js "></script>
<script type=''text/javascript">
if (typeof jQuery == 'undefined')
{
document.write(unescape(”%3Cscript src='Scripts/jQuery.1.9.1.min.js'
type='text/javascript'%3E%3C/script%3E")); v
}
</script>

Question 7.
What is the difference between jQuery.js and jQuery.min.js file?
Answer:
First thing both the files provide the same jQuery functionalities. One is a long version and the other is compressed/minified version. The minified version is compressed to save bandwidth and space by compressing, and removing all the white spaces. Figure 7.2 shows the view of jQuery.js.

(function( window, undefined ) {

// Define a local copy of jQuery
var jQuery = function( selector, context ) {
// The jQuery object is actually just the init a return
new jQuery.fn.init( selector, context );
};
// Map over jQuery in case of overwrite
JQuery = window. jQuery,
// Map over the $ in case of overwrite
_$ = window.$,

Figure 7,3 shows the view of jQuery.min.js file (compressed and minified).

* Date: Mon 3 an 25 19:43:33 2010 -0500
*/
(function(z,vj{function la(){if(!c,isReady){try{r.dotuwentElement.doScroll e(a[0],b)multifunction 
3(){return(new Date).getTime()}function Y(){returr a.currentTarget);m=0;for(s»i.length;sjm++)for(o in x)
{j=x[o];n=i[m].elefl lljfunction qa(a,b){var d=0;b.each(function(){if(this.nodeHa«e===(a[d]&&aj c.clean
(a,b,f,d)}if(e)c.fragments[a[0]]=i?f:l;return{fragment:f,cacheable: va»false,P=[],L,$=Obj ect.prototype.toSt 
ring,a a=Obj ect.prototype.ha sOwnProf [f ]) ja=(a.cacheable?a.fragment.cloneNode(true):a.fragment).
childNodes}}el: this)},selector:"'Jquery:"1,4.1”,length:0,size:function(){return this.ler a,b)},ready:function(a)
{c.bindReady();if(c,isReady)a.call(r,c);else P&SP.f c.fn.init,prototype=c.fnj c.extend=c.fn.extend-function()
{var a=arguments[( Oa;if(a)z.JQuery=Naireturn c},isReady:false,ready:function(){if(ic.isReadj c.ready).;var
 a=false|try{a=z.fraMeEle«ent==mill}c3tch(b){}r.docu*enfElemer
Figure 7.3: Compressed and Minified

Question 8.
When should we use jQuery.js over jQuery.min.js?
Answer:
When you are doing development use “jQuery.js” file because you would like to debug the JavaScript code, etc. Use “jQuery.min.js” for production environment. In production / live environment we would like to consume less bandwidth, we would like to our pages to load faster. .

Question 9.
What is the use jQuery.vsdoc.js?
Answer:
This file you can include if you want to enable Intellisense in Visual Studio for jQuery as shown in Figure 7.4.

JQUERY Interview Questions in . NET chapter 7 img 2

Question 10.
How does the basic syntax of JQuery looks like?
Answer:
jQuery syntax structure can be broken down into four parts:

JQUERY Interview Questions in . NET chapter 7 img 3

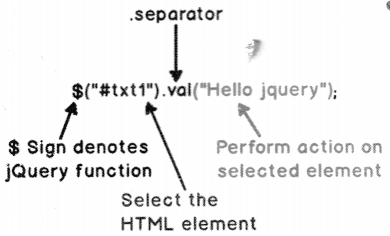
All JQuery commands start with a “$” sign as shown in Figure 7.5.

  • Followed by the selection of the FITML element. For example below is a simple image where we are selecting a HTML textbox by id “txt1 ”.

Then followed by the dot (.) separator. This operator will separate the element and the action on the element.

  • Finally what action you want to perform Figure 7.5: Basic Syntax
    on the HTML element. For instance in the below jQuery code we are setting the text value to “Hello jQuery’.

Question 11.
What is the “$” sign in jQuery?
Answer:
The “$” sign is an alias for jQuery.

Question 12.
When should we use jQuery.noConflictQ?
Answer:
There are many JavaScript frameworks like MooTools, Backbone, Sammy, Cappuccino, Knockout, etc. Some of these frameworks also use “$” sign so this can lead to conflict with jQuery framework.
So you can use the “noConflict” method and release the jQuery “$” sign as shown in the below code.

$.noConflict();
jQuery(“p”).text(“i am jQuery and I am working... ”);

You can also create your own jQuery shortcut as shown below.

var jq = $.noConflict();
jq(“p”). text(“l am invoked using jQuery shortcut... ”);

Question 13.
What are the different ways by which you can select a HTML element in jQuery?
Answer:
You can select jQuery elements in the following ways:
Select all: Below is a simple code snippet which selects all elements and hides them.

$(“*”). hide( );

Select by ID: If your HTML elements have id’s like the below HTML code andyou want to select the same by id.

<p id="p 1 ">Some Para</p>

Below is how the jQuery code by ID selection code would look like.

$(“#p1”).hide();

Select by class: If your HTML element has class names and you want to select them in jQuery then you need to use the dot operator followed by the classname as shown in the below code.

<p class=”class1 ">Some Para</p> $(“.class1”).hide()

Select by class and element: Consider the below HTML code where we have elements with “class’
names.

<p class="cl">para 1</P>
<P class="cl">para 2</p>
<P class="c2">para 2</p>

So if you wish to select by “element” and “class” in jQuery your selector code becomes something as below.

$(“p.c1”).hide();

Select using Equal method
Select using Find method
Select using Filter method

Question 14.
What is the use of document.ready in jQuery?
Answer:
“document. ready” event occurs once the complete HTML DOM is loaded. So the next question is when do we actually need this event?. Consider the below simple code where we are trying to set a text box “textl” with value “Sometext”.
Now at the point when JQuery code tries set the textbox value, at that moment that text bcx is not available in the HTML DOM (Document Object Model). So it throws an exception for the same.

<script>
$("#textl").val("Sometext"); // Throws exception as the textbox is not //accessible at‘ this moment
</script>
</head>
<body>
<input type="text" id="textl11 />
</body>

So we would like to execute the JQuery code which sets the textbox value only when all the HTML objects are loaded in DOM. So you can replace the code of setting text box value to something as shown below.

<script>
$(document).ready(function(){
$("#textl").val("Sometext");
}) ;
</script>

Question 15.
Can we have two document. ready in a Web page?
Answer:
Yes.

Question 16.
How can we attach a method to a HTML element event using jQuery?
Answer:
Below is a simple code which attaches a function to click event of a button.

$("button").click(function(){
$("p").toggle();
}) ;

Below is one more example where we have attached the function to a mouseenter event of a paragraph.

$("#pl").mouseenter(function(){
alert("You entered pi!");
}) ;

Question 17.
How can we add a style using jQuery?
Answer:

$(“li”).filter(“.middle”).addClass(“seiected”);
<style>
.selected { color: red; }
</style>

Question 18.
What is JSON?
Answer:
JSON (JavaScript Object Notation) is a simple data exchange format which helps to communicate between JavaScript and server-side technologies like Servlets, JSP (Java Servlet Pages), WCF (Windows Communication Foundation), ASP.NET or Active Server Pages .NET etc.

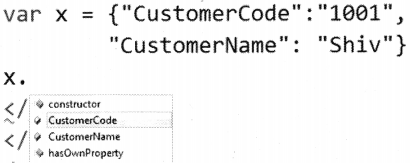
The format of JSON is as shown below. The below format represents a “Customer” object with “CustomerCode” and “CustomerName” properties as shown in Figure 7.6.

{“CustomerCode”: “1001”, “CustomerName”: “Shiv”}

Now this format can be easily consumed by JavaScript and transformed into JavaScript object. Look at the Figure 7.6 where we have provided JSON to JavaScript variable and you can see how a JavaScript object is evaluated with “CustomerCode” and “CustomerName” properties.

JQUERY Interview Questions in . NET chapter 7 img 4

If you look at the Web architecture it has two parts: browser and server. On the browser side JavaScript is the most

prominent and well established language while on server-side you have different technologies like JSP, ASP.NET, PHP (a recursive backronym; HyperText Preprocessor) etc.

JQUERY Interview Questions in . NET chapter 7 img 5

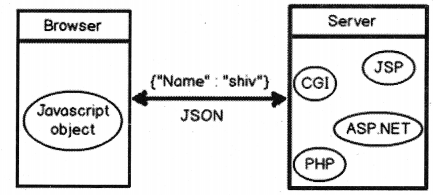
So if the server-side technologies emit out JSON format which can be easily transformed into a JavaScript object that would really ease the communication between multiple server-side technologies and JavaScript language. Figure 7.7: Web Architecture

Question 19.
How to convert string to JSON object?
Answer:
“JSON.parse” helps us to convert string to JSON object.
var str = ‘{ “Name”: “Shiv”, “Salary”: “1000”}’;
var Customer = JSON.parse(str); alert(Customer.Name);

Question 20.
Was not SOAP meant to do the same thing which JSON does?
Answer:
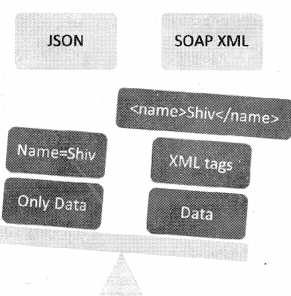
SOAP is heavy due to XML tags. For example, a SOAP message “<Name>shiv</Name>” will become short, sweet and light in JSON like “Name”: “Shiv”. Second most important it evaluates as JavaScript object. To convert the complicated SOAP XML (extensible Markup Language) as shown in Figure 7.8 in to javascript JSON object would be a tough and tedious task.

JQUERY Interview Questions in . NET chapter 7 img 6

Question 21.
Do all technologies support JSON?
Answer:
Yes, almost all technologies which deal with exchange of data support JSON. For instance if you want to that your WCF service should send JSON message rather than SOAP
you can set the “ResponseFormat ” as “WebMessageFormat. Json” on your operation contract.

[OperationContract]
[Weblnvoke(Method="GET", • UriTemplate="/
GetData",
RequestFormat=WebMessageFormat.Json,
ResponseFormat=WebMessageFormat.Json)]
string GetData();

If you want your MVC to emit out JSON data you can return ” JsonResult” as shown below. If you call the below action it will emit out Customer objects in JSON format.

public JsonResult CustomerJson()
{
List<Customer> obj1 = new List<Customer>( );
Thread.Sleep(5000);
Customer obj = new customer ( );
obj.CustomerCode = "1001";
obj1.Add(obj);
return Json(objl, JsonRequestBehavior.AllowGet);
}

If you want to emit JSON using ASP.NET we need to use the “DataContractJsonSerializer” class as shown in the below code. “myPerson” is the class.

DataContractJsonSerializer serializer = new
DataContractJsonSerializer(myPerson.GetType());
MemoryStream ms = new MemoryStream();
serializer.WriteObject(ms, myPerson);
string json = System.Text.Encoding.UTF8.GetString(ms.ToArray( ));
Response.Clear();
Response.ContentType = "application/json;charset=utf-8";
Response.Write(json);
Response.End( );

Question 22.
How can you make a JSON call using jQuery?
Answer:
Let’s assume you have a MVC controller action “getEmployee” which emits out employee JSON object as shown in the below code. Please note you can always emit JSON from any server technology like WCF, ASP.NET, MVC, etc., as discussed in the previous questions.

public JsonResult getEmployee()
{
Emp obj = new Emp();
obj.empcode = "1001";
return Json(obj, JsonRequestBehavior.AllowGet) ;
}

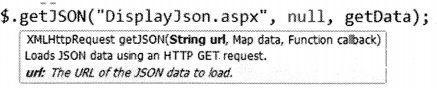
To make a call to the above MVC action using jQuery we need to use "get JSON" method. Below is the simple code for the same. It has three parameters:
1. The first parameter is the URL which emits out JSON. For instance in the below code the URL is
"/Employee/getEmployee".
2. The next parameter helps us to pass data to the resource which emits out JSON currently it’s the MVC action. The second parameter is NULL for now.
3. The last parameter is the callback function which will be invoked once the MVC action returns data. You can see how the “getData" function just displays the "empcode" property. Because the output is in JSON it automatically converts the JSON data to JavaScript object.

$.getJSON("/Employee/getEmployee", null, getData); function getData(data)
{
alert(data.empcode);
}


Question 23.
How can we post JSON to Server?
Answer:
We can use the “post” method of jQuery to send data to the server. Below is how the post method call looks like. First parameter is the URL which will accept JSON data, second is the data which we want to send and the final parameter is the callback function where we receive the response.

var mydata ={name: "Shiv", city: "Mumbai"};
$.post("/Send/Request", // URL
mydata, // Data to be sent
function(data, status){alert(data + " " + status);}); // Call back function

Question 24.
How can we post a complete HTML form in JSON format?
Answer:
To post a complete HTML form we need to call “serialize” function as shown in the below code. “form1” is a HTML form. The data given by the function can then be passed to the “post” method of jQuery. “DisplayData” is a callback function to handle the output given by the server.

var Mydata = $(“#form 1 ”). serialize( );
$.post(“/Customer/getCustomer”, JSON. stringify(MyData), DisplayData);

The above posted JSON string is received at the server side “request.inputstream”, below is a simple sample code for the same.

System.10.Stream body = Request.inputstream;
System.10.StreamReader reader = new System.10.StreamReader(body);
string s = reader.ReadToEnd() ;

Question 25.
How can we convert JSON string into C# object?
Answer:
To convert a JSON string to a C# object we need to use the ” JavascriptSerializer” class as shown in the below code.

“JsonString” is the string which has the JSON value and by using “Deserialize” we are converting the string to a C# object. Now this object which we receive is a collection of “key” and “value” pair which can be browsed and accessed in C#.

var jsonser = new JavaScriptSerializer()
var obj = jsonser.Deserialize<dynamic>(JsonString);
foreach (var x in obj)
{
String strvalue = x["value"];
}

Question 26.
What are Single Page Applications (SPA)?
Answer:
SPA means your Web page has the following features:

  • Utilize the browser client power to the maximum by executing the maximum code on the client- side by using JavaScript, HTML and CSS.
  • Rather than loading the complete page necessary HTML fragments or JSON data is loaded as the user demands.
  • JavaScript which handles DOM manipulation, binding, Ajax calls are separated into controllers thus separating views and models.
  • DOM manipulations are replaced by declarative programming.

Algorithms Interview Questions in .NET

We have compiled most frequently asked .NET Interview Questions which will help you with different expertise levels.

.NET Interview Questions on Algorithms

Question 1.
Find if a number is even or odd?
Answer:
A number is even if the remainder yields zero when divided by “2”. A number is odd when the remainder yields zero if divided by “3”. You get the remainder value by using the “%” sign.
Below is a sample code that shows how to check for even and odd numbers in C#.

Console.WriteLine("Enter your number");
int num = Convert.ToIntl6(Console.ReadLine( ));
if (num % 2 == 0) // Is the remainder zero
{
Console.WriteLine("Even number");
}
else
{
Console.WriteLine("Odd number");
}

Question 2.
Write a FizzBuzz program in C#.
Answer:
Ok first let me explain what is FizzBuzz, Fizz.

“Write a C# program that prints numbers from 1 to 100. But for multiples of 3 print “Fizz” instead of the number and for the multiples of 5 print “Buzz”. For numbers which are multiples of both 3 and 5 print “FizzBuzz”.

for (int j = 1; j <= 100; j++)
{
string Output = " ";
if (j % 3 == 0) Output = "Fizz";// Divisible by 3 —> Fizz
if (j % 5 == 0) Output += "Buzz"; // Divisible by 5 —> Buzz
if (Output == "") Output = j.ToString(); // If none then —> number
Console.WriteLine(Output); // Finally print the complete output
}

Question 3.
Can you write a simple C# code to display the Fibonacci series?
Answer:
Let’s first understand what exactly is Fibonacci series is. Fibonacci series is nothing but series of numbers 0, 1, 1,2, 3, 5, and so on.

The specialty of this series is that next number is addition of previous two numbers. Figure 21.1 explains how Fibonacci series works. We first start with 0 and 1. The next number is addition of “0 + 1” which will give us “1”. The next number will be again addition of previous value which is “1” and the current value which is “1 ” which will give us “2” and so on.

Implementing Fibonacci series in C# is a four-step process. Figure 21.2 shows the same in a pictorial format.

Algorithms Interview Questions in . NET chapter 21 img 1

Step 1: Define 3 variables “Prev”, “Next” and “Sum and “Sum=0”.
Step 2: Add “Prev” and “Next” variable to get the Sum. Display the “Sum” variable.
Step 3: Swap “Prev” value to “Next” and “Sum” to “Previous”.
Step 4: Execute “Step 2” and “Step 3” again to get the next Fibonacci value. Below is how the code will look like. Do follow the steps in comment.

//Step 1 Three variables Prev, Next and Sum
// initialized with 1 and -1 values
int Prev = 1;
int Next = -1;
int Sum = 0;
// How many fibonacci numbers you want to print
Console .WriteLine ("How many fibonacci numbers you want to print?'');
int numbers = Convert.ToIntl6(Console.ReadLine());
for (int i = 0; i < numbers; i++)
{
// Step 2: Add the previous and next numbers
Sum = Prev + Next;
Console.WriteLine(Sum);
// Step 3: Swap Prev to next and Sum to Prev
Next = Prev;
Prev = Sum;
// Step 4: Run Step 2 and Step 3 again
}

Question 4.
Can you write a logic for bubble sort in C#?
Answer:
Bubble sort is a sorting algorithm which steps through a collection repeatedly, comparing and,swapping until the collection gets sorted. Figure 21.3 a simple pictorial representation of how bubble sort works. We have a simple number collection of values 5, 1, 3 and 4 and we would like to sort them in an ascending manner.

Step 1: So we first start with number 5. The adjacent number to 5 is 1. So we compare 5 with 1. Now 5 is greater than 1 so we swap position of 1 with 5 and 5 with 1. Look at Step 2 for the final image after swapping.

Step 2: Now we compare 5 with 3. 5 is greater than 3 so we swap position of 5 with 3 and 3 with 5. This continues until 5 has been compared with all numbers in the list. Step 4 is the final position for number 5. .
Now we take the second number, i.e., 1 and we compare and swap 1 with all other numbers until it reaches its final position. This is done with all numbers in the collection.

Algorithms Interview Questions in . NET chapter 21 img 2

Below is thecode for bubble sort in C#.

static public List<int> bubblesort(List<int> unsorted)
{
int temp;
for (int i = 1; i <= unsorted.Count; i++)
for (int j = 0; j < unsorted.Count - i; j++)
if (unsorted[j] > unsorted[j + 1])
{
temp = unsorted[j];
unsorted[j] = unsorted[j + 1];
unsorted[j +1] = temp;
}
return unsorted;
}

Question 5.
What is inserted sort algorithm?
Answer:
In inserted sorted algorithm we compare the current element value with the previous element value. If the current value is smaller than the previous value we swap. This continues until the complete list is sorted.
Let us try to understand the same by using the below diagram, in the Figure 21.4 you can see we have an unsorted list with values 6,1, 3, 2.

Algorithms Interview Questions in . NET chapter 21 img 3

Step 1: So we start with the first element i.e. “6”.There is no element before 6, so we leave it and we start from 1. We compare “6” and “1”. “1” is smaller than “6”, so we swap.

Step 2: Now we move to the next element “3”. Is “3” smaller than “6”, yes. So we again swap.

Step 3: Now we compare “6” with the next element “2”. “2” is smaller so we swap again. There are no more further elements which can be compared with “6”. So the “6” value iteration stops here.

Step 4: Now we take the next element “1”. There is no element before “1” so we move ahead. We move to the next element “3”. Is “3” smaller than “1”, no, so things are left where they are. So the iteration for “1” is done.We then move to the next element “3”. We compare “3” with “2”. “2” is smaller than “3” so we swap. Now “3” is compared with the next element “6”. “3” is smaller than “6” so the elements .are left where they are.

Step 5: Now we take the last element “2”. “2” element is larger is than “1”, so “2” and “1” stay where they are. The complete collection is now sorted.
Below is a simple C# inserted algorithm code.

ClassProgram
{
// array of integers which holds unsorted value.
Privatestaticint[ ] UnSortedArray = newint[4]{6, 1, 3, 2};
// Insertion Sort Algorithm
Staticvoid Main(string[ ] args)
{
sortArray( );
foreach (int i in UnSortedArray)
{
Console.WriteLine(i);
}
Console.ReadLine( ) ;
}
publicstaticvoid sortArray( )
{
int MainLoop; // This variable will helps us loop through all the elements
int InnerLoop; // This variable will help us loop through all elements for every value int CurrentValue;
for (MainLoop = 1; MainLoop < UnSortedArray.Count(); MainLoop++) // loop through all the elements in the array.
{
CurrentValue = UnSortedArray[MainLoop]; // Take the current value
InnerLoop = MainLoop;
// Loop through all elements for that value . while ((InnerLoop > 0) && (UnSortedArray[InnerLoop - 1]
> CurrentValue))
{
//if the previous value is greater than currentvalue swap UnSortedArray[InnerLoop] = UnSortedArray[InnerLoop - 1] ; InnerLoop = InnerLoop - 1;
}
// If previous value is not greater then just keep the value where they are.
UnSortedArray[InnerLoop] = Currentvalue; ’
}
}

Question 6.
How does selection sort algorithm work?
Answer:
Selection sort is the most simples sorting algorithm. It finds the lowest value from the collection and moves it to the left. This is repeated until the complete collection is sorted.
Figure 21.5 shows a pictorial representation of how selection sort works. We have simple collection down below which has 5, 7,1, and 0 values.

Step 1: Find the smallest value from the collection. In the current collection the smallest value is “0”. Move this smallest value to the left hand side.

Step 2: Iterate again to find the next smallest value.

Algorithms Interview Questions in . NET chapter 21 img 4

The next smallest value is “1”. Move this value to the left hand side before the first smallest value.
In this manner continue with all elements in a collection and your list is sorted.
Below is a simple C# code for selection algorithm.

// array of integers to hold values privatestaticint[] a = newint[4]{2, 8,0, 3};
staticvoid Main(string[] args)
{
Sort();
foreach (int temp in a)
{
Console.WriteLine(temp);
}
Console.ReadLine( );
}
publicstaticvoid Sort( )
{
int i, j ;
int min, temp;
for (i = 0; i < a.Count( ) - 1; i++) // Loop through each element
{
min = i; // Assume that he is the smallest
for (j = i + 1; j < a.Count(); j++) // Loop through the remaining element
{
if (a[j] < a[min]) // If the current value smaller than the min
{
min = j; // Swap the values
}
}
temp = a[i]; // Store the current value in temp variuable
a[i] = a[min]; // Swap the minimum value to the current position
a[min] = temp; // Swap the current value to the minimum value
position
}
}


Python Data Persistence – Writing to File

Python Data Persistence – Writing to File

The file object needs write permission to be able to save data to a file – which is done by setting the mode parameter to ‘w’.Let us store a famous quote by top computer scientist Alan Kay in the ‘top-quotes.txt’ file.

To begin with, declaring a file object referring to the desired file with ‘w’ mode enabled.

>>> file=open ( ' top-quotes . txt' , ' w' )

The write( ) method sends a string to the file object and stores it in the underlying disk file.

Example

>>> quote=" ' The best way to predict the future is to invent it. ' - Alan Kay"
>>> file .write (quote)
64
>>> file.close ( )

Note that the interactive model shows a number of bytes written. Be sure to close the file and go ahead and view the created file using your favorite text editor software (like Notepad) to confirm that the above quote is stored in it. So, now that we have successfully created a file, let us try to add a few more quotes in it as follows:

Example

>>> file=open (' top-quotes . txt' , ' w')
>>> quote=' ' ' ' There are only two kinds of programming languages: those people
 always bitch about and those nobody uses.' - Bjarne Stroustrup 
'The only way to learn a new programming language is by writing programs in it.' -Dennis Ritchie
 'A computer would deserve to be called intelligent if it could deceive a human into 
believing that it was human.' - Alan Turing' ' '
>>> file. write (quote)
352
>>> file. close ( )

Note the use of triple quotes to form a multi-line string. Open the file again using the editor. To your surprise, the earlier string is not visible now. Why?
The reason is the behavior of ‘w’ mode. It opens a file for writing purposes, erasing its earlier contents if it already exists. Here we want to add few more lines to an existing file. For that, we need to use ‘a’ as a mode parameter to let new data added to an existing file. Following table 5.1 lists other valid mode parameters and their purpose:

Mode parameter

Purpose

R allows the file to be read, (default)
W Opens a file for writing only, erases contents if existing
A appends new data to an existing file.
T stores data in text format (default)
B stores data in binary format.
+ allows simultaneous reading and writing in a file.
x opens the file for exclusive creation.

Going back to our attempt to add new quotes in top-quotes.txt, change the mode parameter to ‘a’.

Example

>>> file=open ( ' top-quotes . txt' , 'a ')
>>> quote=''''There are only two kinds of programming languages: 
those people always bitch about and those nobody uses.' - Bjarne Stroustrup 
'The only way to learn a new programming language is by writing programs in it.' -Dennis Ritchie 
'A computer would deserve to be called intelligent if it could deceive a human into believing that it was human.' 
- Alan Turing'''
>>> file .write (quote).
352
>>> file . close ( )

The file should have earlier text intact and new quotes added after it. File object also possesses writelines ( ) method to write strings in a list object. Each item in the list is treated as one line. Note that the method doesn’t insert ‘\n’ by itself, hence it must be explicitly provided as a part of each string.

Example

>>> file=open ( ' top-quotes . txt' , ' a ' )
>>> quotes= [
'programming languages have a devious influence. They shape our thinking habits - Edsger W. Dijkstra\n',
'programmers do programming not because they expect to get paid or get adulation by the public, 
but because it is fun to program - Linus Torvalds\n',
'A computer would deserve to be called intelligent if it could deceive a human into believing that it was human 
- Alan Turing\n']
>>> file .writelines (quotes) 
>>> file . close ()

Python Data Persistence – Object Serialization

Python Data Persistence – Object Serialization

Python’s built-in File object and its methods of performing read/write operations are undoubtedly invaluable, as the ability to store data in a persistent medium is as important as processing it. However, the File object returned by Python’s built-in open ( ) function has one important shortcoming, as you must have noted in the previous chapter.

When opened with ‘w’ mode, the write ( ) method accepts only the string object. That means, if you have data represented in any non-string form, the object of either in built-in classes (numbers, dictionary, lists, or tuples) or other user-defined classes, it cannot be written to file directly.

Example

>>> numbers= [10,20,30,40]
>>> file=open ('numbers . txt' , 'w' )
>>> file .write (numbers)
Traceback (most recent call last) :
  File "<pyshell#10>", line 1, in <module>
     file .write (numbers)
TypeError: write( ) argument must be str, not list
>>> p1=person( )
>>> class person:
      def__init__(self):
        self . name='Anil'
>>> p1=person( )
>>> file=open ('persons . txt' , 'w' )
>>> file . write (p1)
Traceback (most recent call last):
  File "<pyshell#20>", line 1, in <module>
     file . write (p1)
TypeError: write() argument must be str, not person
>>>

Before writing, you need to convert it in its string representation.

Example

>>> numbers=[10,20,30,40]
>>> file=open (' numbers . txt' , ' w' )
>>> file .write (str (numbers) )
>>> file . close ( )

In case of a user-defined class:

Example

>>> class person:
          def__init__(self):
                    self.name='Anil'
>>> p1=person()
>>> file=open ('persons . txt ' , 'w' )
>>> file . write (p1.__str__( ) )
>>> file.close ( )

To read back data from the file in the respective data type, reverse conversion needs to be done.

Example

>>> data=file . read ( )
>>> list(data)
[10, 20, 30, 40]

File object with ‘wb’ mode requires bytes object to be provided, as an argument to write () method. In above case, the list of integers is converted to bytes by bytearray () function and then written to file as below:

Example

>>> numbers=[10,20,30,40]
>>> data=bytearray(numbers)
>>> file=open ( ' numbers . txt' , ' wb' )
>>> file . write (data)
>>> file . close ( )

In case of user-defined class, attributes of its objects will have to be converted to byte objects before writing to a disk file:

Example

>>> file=open (' persons . txt1 , ' wb' )
>>> file .write (pi .name . encode () )

This type of manual conversion of objects in the string or byte format (and vice versa) is very cumbersome and appears rather clunky. Python has better solutions for this requirement. Several built-in modules are there to store and retrieve a Python object directly to/from a file or byte string. A Python object is said to be serialized when it is translated in a format from which it can be reconstructed later when required. The serialized format can be stored in a disk file, byte string or can be transmitted via network sockets. When serialized data is brought back in a form identical to the original, the mechanism is called de-serialization.

Serialization formats, used by some built-in modules, are Python-specific, whereas other modules use standard serialization protocols such as JSON, XML, and so on. Pythonic term for serialization is pickling while de-serialization is often referred to as unpickling in Python documentation. Python-specific serialization/de-serialization is achieved by the built-in pickle and shelve modules. Even though Python’s marshal module offers similar functionality, it is primarily meant for internal use while reading and writing pseudo-compiled versions of Python modules with .pyc extension and is not recommended as a general persistence tool.

The serialized byte stream can optionally be written to a disk file. This is called object persistence. The File API discussed in the previous chapter stores data persistently, but it is not in a serialized format. Python serialization libraries, that we are going to explore in this chapter, are useful for storing serialized object data to disk files.

React Native Vs Xamarin. What to choose for cross-platform app development?

INTRODUCTION

React Native and Xamarin are two of the top cross-platform frameworks for mobile app development. Cross-platform app development by itself is relevant in the industry because of how it allows businesses to build the same app for different OS platforms simultaneously. To help you make a better choice, I’ve compared React Native vs Xamarin in terms of how they fare in cross-platform application development services.

Businesses often get confused between the choice for cross-platform tools, as some are better for android app developers, while others are often preferred by iOS app developers. However, React Native and Xamarin are two of the best frameworks suited to both the categories, so long as businesses can hire expert iOS developers or those in the domain of android development.


Why do we need to compare React Native Vs Xamarin?

We need to compare React Native Vs Xamarin because making one choice out of either makes a significant difference in how your cross-platform app mobile application will be developed and deployed.

Your project may have specific requirements for which the only one of these frameworks might be suitable. Or perhaps your desired mobile app would need some specific functionalities that could only be delivered by either of the two.

About React Native

React Native is a cross-platform mobile app development framework based on the React library supported by Facebook. React Native uses the same fundamental UI blocks used in Android and iOS apps. So an app built with React Native would be way better than just a hybrid app or a mobile web app. Apps built using React Native uses a JavaScript codebase, but closely resemble native apps built with Swift (for iOS) and Java/Kotlin (for Android).


About Xamarin

Xamarin is a cross-platform mobile app development framework launched way back in 2011 by the company Xamarin. It was later acquired by Microsoft in 2013. Since then, Microsoft integrated Xamarin into its Visual Studio development interface. Xamarin uses the C# language as a base for app development and contains the underlying platform SDKs for both Android & iOS.


Comparison between React Native Vs Xamarin

So let’s get right into the comparison between React Native vs Xamarin. By the time you finish reading this, you’d have a clear idea which reaches among these would be perfect for your cross-platform mobile app!


React Native vs Xamarin: Availability

React Native: React Native is undoubtedly the winner here since it’s an open-source JavaScript-based framework and available for both iOS and Android platforms.

Xamarin: Xamarin too, like React native is open-source, but it wasn’t always so. Additionally, React native’s developer community is much larger compared to the former, so it gets outmatched here.

Winner- React Native

React Native vs Xamarin: Technology used

React Native is a JavaScript-based framework, so it leverages one of the most popular, the most commonly used languages in web development. This also means that developers with hands-on experience in JavaScript can easily get into mobile app development with React Native. For business, most importantly- it means a huge amount of developer applications to choose from, and no shortage of skilled coders.

The Xamarin platform uses C# programming language along with the .NET framework. Having support from Microsoft also means that it can be used within the Visual Studio environment. That offers developers some nifty tools such as a rich editor, native platform integration and a decent set of debugging tools.

Winner- Let’s call a draw on this one

React Native vs Xamarin: Popularity

Since we are in the digital world, the best metric for measuring popularity would be online search trends.

According to the statistical data and research on google, developers are looking to learn, or wanting to know about. They clearly tell me that people seem more interested in React Native as compared to Xamarin.

Winner- React Native

React Native vs Xamarin: Market Support

React Native: In a survey of over 90,000 developers by StackOverflow, React Native came to be the 6th most popular framework claiming 10.5% of the votes. It was also voted as 8th most loved cross-platform application development frameworks with a share of 62.5% of votes. Additionally, React Native was also voted as the 3rd most wanted framework with 13.1% of votes, and surprisingly also chosen as 11th most dreaded framework by 37.5% of developers.

Xamarin: Xamarin fares much terribly as compared to React Native in the above-mentioned Stack OverFlow survey. It was the 10th most popular cross-platform application development framework with 6.5% of votes, 4 ranks behind React Native. Xamarin was voted to be the 15th most loved framework with 48.3% of votes, once again 9 ranks behind its competitor here. With 4.9% votes, Xamarin secured the 11th position for the most wanted framework, yet again 8 positions behind React Native.

Most surprisingly though, Xamarin was considered the 5th most dreaded programming language by 51.7% developers. This time, it was 6 positions higher than React Native, but not exactly for a metric where one would want to rank at the top.

Winner- React Native

React Native vs Xamarin: Code Compilation

React Native: React native uses JIT (Just-in-time) compilation for Android app development. But for iOS apps, it has to directly interpret the JS code as Apple restricts execution of dynamically generated codes on its devices.

Xamarin: Things are a bit different in the case of Xamarin. The C# codebase of the framework makes use of JIT for android apps and has an even better alternative for iOS app development in the form of the AOT (Ahead-of-time) compiler for compiling managed codes. Since the AOT compiler is significantly better than JIT, Xamarin development is the preferred choice for both iOS app developers as well as android developers as far as code compilation is concerned.

Winner- Xamarin

React Native vs Xamarin: Available Components

React Native: It offers a diverse range of available components with adequate documentation to help developers utilize them. These tools include those useful for testing, user interface, type checking, networking, forms among other needs.

Xamarin: Xamarin, too has a broad range of components available at the Xamarin component store. The store, in my view, is better than what React Native offers, albeit with scope for improvement in documentation.

Winner- A Draw

React Native vs Xamarin: Development Environment

React Native: It is highly flexible in this regard and allows developers to use the text editor & IDE of their choice. The best feature by far is the Live Reload feature which lets developers see the effects of changes made to the code in real-time.

Xamarin: Xamarin has the friendlier development environment as it lets developers write code on Windows and even on an iPhone app. Eventually, the code can be compiled on a Mac as Apple doesn’t let developers do so any other way. Xamarin also leverages Microsoft’s Visual Studio and Apple’s XCode for application development.

Winner- Xamarin

React Native vs Xamarin: Cost

React Native: Since React Native is an open-source project, developers and businesses can use the framework and its libraries at absolutely no cost.

Xamarin: Through the Xamarin platform itself is open-source and available for free, but using the Visual Studio comes at a cost for enterprise users.

Winner- React Native

That’s it for the comparison. This comparison between React native vs Xamarin makes it clear that overall, React Native is a much better framework for cross-platform application development.

So let’s sum it up with a list of advantages of React Native vs Xamarin.

Advantages of React native For Cross-Platform App Development

1. Code-Reusability

React Native allows developers to use almost the same code for building both Android & iOS apps. A study estimates that over 80% of the code for a react native app can be reused for both Android & iOS. For a business, code reusability means less time taken for app development, which consequently saves money and resources.

2. The “Live Reload” feature

React Native has a distinguishing feature called “Live Reload”. It basically allows developers to view the changes made by code to the application in real-time! Take, for example- if a developer is using two monitors while working on react-native, they can make changes to the code on one screen and the other screen would instantly display the changes in the output.

Live Reload makes building an app much faster, fun, and enables developers to fix bugs at an unmatched pace.

3. Supportive developer Community

Being an open-source JavaScript framework built to meet a specific need, React Native enjoys incredible support from the developer community. Besides that, React Native also has complete support from Facebook, which makes things even better for the long run.

Advantages of Xamarin for cross-platform app development

1. Leveraging C#

C# is a modern-day, simple, object-oriented, type-safe programming language that is void of verbose or boilerplate type annotations. When combined with the .NET framework, c# provides an asynchronous development environment in the Visual Studio.

2. The Xamarin Component Store

The Xamarin Component store hosts tons of components, ranging from UI CONTROLS, third-party services, libraries to small apps for integration. It is built right into the Xamarin Studio, and available as Visual Studio extension.

React Native is the best choice for cross-platform app development

With its amazing market support from both developers and businesses, availability, popularity and cost-effectiveness, React native is undoubtedly a better choice for cross-platform app development in this comparison between React Native vs Xamarin.

However, Xamarin by itself is no slouch and has the C# language along with better code compilation and development environment that helps make a case for it as a great cross-platform app development framework.

Python Programming – File Handling

In this Page, We are Providing Python Programming – File Handling. Students can visit for more Detail and Explanation of Python Handwritten Notes Pdf.

Python Programming – File Handling

File Handling

There are several ways to present the output of a program; data can be printed on computer monitor in a human-readable form, or written to a file (for example, image.jpg, notes.txt, etc.) for future use. A computer file (or simply “file”) is a resource for storing information, which is available to a computer program, and is usually based on some kind of durable electronic storage. A file is durable in the sense that it remains available for programs to use after the current program has finished. Computer file can be considered as the modern counterpart of paper document which traditionally are kept in office files, library files, etc., and this is the source of the term.

File opening

A common operation needed during program execution is to load data from an existing file or to create a new file to store data. To accomplish this, the program first needs to open a file, which is executed using open () function. The open () returns a file object, and is most commonly used with two arguments, filename and mode.

The first argument is a string containing the filename. The second argument is another string containing a few characters describing the way in which the file will be used, mode can be ‘ r ‘ when the file will only be read, ‘ w’ for only writing (an existing file with the same name will be erased), and ‘ a ‘ opens the file for appending, any data written to the file is automatically added to the end. The mode argument is optional,with ‘r’ as default. Modes ‘r+’, ‘w+’ and ‘a+’ opens the file for both for updating (note that ‘w+’ truncates the file).

Windows operating system makes a distinction between text and binary files, so in Windows, ‘b’ appended to the mode opens the file in binary mode, therefore, there are also modes like ‘ rb\ ‘wb’, and ‘r+b’.

To understand the various methods which are helpful in reading information from the file, a text file is manually created (having empty line after every text line) having filename list.txt, and kept at path C:/test. The content of the file is:

This is first line.

This is second-line.

This is third line.

This is fourth and last line.

Now, open the file using open ( ) function in read mode.

>>> f=open ( ' C : / test / list . txt ' , ' r ' )

Writing to a file

Apart from only reading information from a file, there can be a scenario where some data need to be written to a file. To carry out such operation, write (string) method is used, where string argument should be of string data type. Upon success, write ( ) method returns None. Open “list.txt” and add some text at the end of the file.

>>> f=open ( ' C : / test / list . txt ' , ' a+ ' ) 
>>> f . write ( ' \ n \ n This is the new last line . ' )
>>> f . seek ( 0 , 0 )
>>> f . read ( )
' This is first line . \ n \ n This is second line . \ n \ n This is third line . \ n \ n This is fourth and last line . \ n \ n This is the new last line . ' 
>>> f . close ( )

File renaming and deletion

Python’s os module provide methods for renaming and deleting files. To rename a file, use rename (src, dst) method, where src argument is source ilename, while dst is destination filename.

>>> import os
>>> os . rename ( ' C : / test / list . txt ' , ' C : / test / newlist . txt ' )

To delete a file, use remove ( ) method.

>>> os . remove ( ' C : / test / newlist . txt ' )

Python Programming – Reading File

In this Page, We are Providing Python Programming – Reading File. Students can visit for more Detail and Explanation of Python Handwritten Notes Pdf.

Python Programming – Reading File

Reading file

To read a file’s contents, call read (size) method, which read size bytes of data and returns it as a string, size is an optional numeric argument. When size is omitted or negative, the entire contents of the file will be read and returned; otherwise, at most size bytes are read and returned. If the end of the file has been reached, read () will return an empty string (‘ ‘).

>>> f.read ( 19 )
' This is first line .'

There is a tell () method, which returns an integer giving the file object’s current position in the file, measured in bytes from the beginning of the file.

>>> f.tell ( )
19L

To change the file object’s position, use seek (off set, from_what) method. The position is computed from adding offset to a reference point; the reference point is selected by the f rom_what argument. A f rom_what value of 0 measures from the beginning of the file, 1 uses the current file position, and 2 uses the end of the file as the reference point, f rom_what can be omitted and defaults to 0, using the beginning of the file as the reference point.

>>> f.seek ( -52 , 2 )
>>> f . read ( )
' This is third line . \ n \ nThis is fourth and last line . '
>>> f . tell ( )
99L
>>> f . seek ( 0 , 0 )
>>> f . tell ( ) 
0L
>>> f . read ( )
'This is first line.\n\nThis is second line.\n\nThis is third line.\n\nThis is fourth and last line.'

When relevant operations on a file are finished, use close () method to close the file and free-up any system resources taken up by the open file. After calling close (), attempt to use the file object will automatically fail.

>>> f . close ( ) 
>>> f . read ( )
Traceback ( most recent call last ) :
File "<stdin>", line 1, in ?
ValueError: I/O operation on closed file

There is also a readlirie ( ) method that read a single line from the file; a newline character (\n) is left at the end of the string, and is only omitted on the last line of the file, if the file does not end in a newline. If readline ( ) returns an empty string, the end of the file has been reached, while a blank line is represented by ‘ \n ‘.

>>> f=open ( ' C : / test / list . txt ' , ' r ' )
>>> f . readline ( )
' This is first line . \ n '
>>> f . readline ( )
' \ n '
>>> f . readline ( )
' This is second line . \ n '
>>> f . readline ( )
' \ n '
>>> f . readline ( )
' This is third line . \ n '
>>> f.readline ( )
' \ n '
>>> f,readline ( )
' This is fourth and last line . '
>>> f . readline ( )
' ' 
>>> f . close ( )

For reading lines from a file, one can also loop over the file object. This is memory efficient, fast, and leads to simple code:

>>> f=open ( ' C : / test / list . txt ' , ' r ' )
>>> for line in f :
. . . print line ,
This is first line.

This . is second line .

This is third line .

This is fourth and last line.
>>> f . close ( )

If there is a requirement to read all lines of a file in a list, one can do list (f) or f .readlines ( )

>>> f=open ( ' C : / test / list . txt ' , ' r ' )
>>> list ( f ) 
[ ' This is first line . \ n ' , ' \ n ' , ' This is second line . \ n ' , ' \ n ' , ' This is third line . ' \ n ' , ' \ n ' , ' This is fourth and last line . ' ]
>>> f.close ( )
>>>
>>> f=open ( ' C : / test / list . txt ' , ' r ' )
>>> f . readlines ( )
[ ' This is first line . ' \ n ' , ' \ n ' , ' This is second line . ' \ n ' , ' \ n ' , ' This is third-line. ' \ n ' ' \ n ' , ' This is fourth and last line . ' ]
>>> f . close ( )

Python Programming – Copying Array

In this Page, We are Providing Python Programming – Copying Array. Students can visit for more Detail and Explanation of Python Handwritten Notes Pdf.

Python Programming – Copying Array

Copying array

When operating and manipulating arrays, their elements sometimes needs to be copied into a new array, and sometimes not. This is often a source of confusion for beginners. Simple assignment does not make copy of array data.

>>> a=np . arange ( 12 )
>>> b=a 
>>> id ( a )
85660040
>>> id ( b )
85660040
>>> b is a                    # a and b are two names for the same ndarray object
True

Python passes mutable objects as references, so function calls make no copy.

>>> def F ( x ) :
. . .             print id ( x )
. . .
>>> id ( a )
85660040 
>>> F ( a )
85660040

The copy method makes a complete copy of the array data.

>>> c=a . copy ( )
>>> c 
array ( [ 0 , 1 , 2 , 3 , 4 , 5 , 6 , 7 , 8 , 9 , 10 , 11 ] )
>>> c is a 
False
>>> c [ 0 ]=999 
>>> c
array ( [ 999 , 1 , 2 , 3 , 4 , 5 , 6 , 7 , 8 , 9 , 10 , 11 ] )
>>> a
array ( [ 0 , 1 , 2 , 3 , 4 , 5 , 6 , 7 , 8 , 9 , 10 , 11 ] )

Python Programming – NumPy Installation

In this Page, We are Providing Python Programming – Numpy Installation. Students can visit for more Detail and Explanation of Python Handwritten Notes Pdf.

Python Programming – NumPy Installation

Numpy installation

This section discusses the simple installation approaches of NumPy in different operating system.

Windows

By default, NumPy is not shipped with official Python installer. But one can download (from website link: http://sourceforge.net/projects/numpy/files/NumPy/) the executable file of NumPy (recent version 1.8.1) followed by installing it. Before installing NumPy, please make sure that Python is already installed. NumPy is already included in Python(x,y) package, so one does not have to install NumPy separately, if the programmer is using Python(x,y).

Linux

One can install NumPy in Ubuntu (Linux) operating system by executing the following commands in the terminal (as shown in figure 6-1).

sudo apt-get install python-numpy

Python Handwritten Notes Chapter 7 img 1

Data types

Some of the data types supported by NumPy are given in table 6-1.

Data type

Description

bool_ Boolean (True or False) stored as a byte.
intS Byte (ranging from -128 to 127).
intl6 Integer (ranging from -32768 to 32767).
int32 Integer (ranging from -2147483648 to 2147483647).
int64 Integer (ranging from -9223372036854775808 to 9223372036854775807).
uint8 Unsigned integer (ranging from 0 to 255).
uintl6 Unsigned integer (ranging from 0 to 65535).
uint32 Unsigned integer (ranging from 0 to 4294967295).
uint64 Unsigned integer (ranging from 0 to 18446744073709551615).
float_ Shorthand for float64.
floatl6 Half precision float: sign bit, 5 bits exponent, 10 bits mantissa.
float32 Single precision float: sign bit, 8 bits exponent, 23 bits mantissa.
float64 Double precision float: sign bit, 11 bits exponent, 52 bits mantissa.
complex_ Shorthand for complexl28.
complex64 Complex number, represented by two 32-bit floats (real and imaginary components).
complexl28 Complex number, represented by two 64-bit floats (real and imaginary components).