
Wpf interview questions and answers for experienced pdf: We have compiled most frequently asked .NET Interview Questions which will help you with different expertise levels.
.NET Interview Questions on WPF
Question 1.
What is WPF?
Answer:
WPF (Windows Presentation Foundation) is a graphical subsystem for displaying user interfaces, documents, images, movies, etc., in windows applications.
Question 2.
What is the need for WPF when we had Windows forms?
Answer:
Remember: ABCDEFG
A – Anywhere execution (Windows or Web)
B – Bindings (less coding)
C – Common look and feel (resource and styles)
D – Declarative programming (XAMLor Extensible Application Markup Language) E – Expression blend animation (Animation ease)
F – Fast execution ( Hardware acceleration)
G – Graphic hardware-independent (resolution independent)
Question 3.
What is XAML in WPF and why do we need it?
Answer:
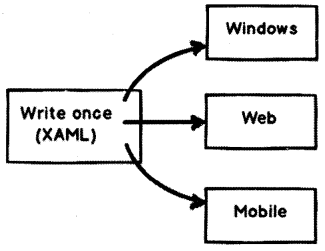
XAML is an XML file that represents your WPF Ul. The whole point of creating the Ul representation in XML was to write once and run it anywhere. So the same XAML Ul can be rendered as a windows application with WPF and the same Ul can be displayed on the browser using the WPF browser or Silverlight application.
Question 4.
What is xmlns in XAML file?
Answer:
“xmlns” stands for XML namespaces. It helps us to avoid name conflicts and confusion in XML documents. For example, consider the below two XML which have table elements, one table is a HTML table and the other represents a restaurant table. Now if both these elements name conflicts and confusion.
<table>
<trxtd>Rowl</tdx/tr>
<tr><td>Row2</td></tr>
</table>
<table>
<cloth>red</cloth>
<serve>Tea</serve>
</table>
So to avoid the same we can use XML namespaces. You can see in the below XML we have qualified the HTML table with “<h: table>” and the restaurant table element qualified with “<r: table>”.
<h: tablexmlns : h="HTTP: //www.w-3 . org/TR/html4/">
<tr><td>Rowl</td></tr>
<trxtd>Row2</tdx/tr>
</h: table>

<r: tablexmlns: h="HTTP: //www.questpond.com/restaurant/table/def"> <cloth>red</cloth>
<serve>Tea</serve>
</r: table>
Question 5.
What is the difference between xmlns and xmlns: x in WPF?
Answer:
Bothe namespaces help to define/resolved XAML Ul elements.
The first namespace is the default namespace and helps to resolve overall WPF elements.
xmlns="HTTP: //schemas, microsoft. com/winfx/2006/xaml/presentation ”
The second namespace is prefixed by “x: ” and helps to resolve XAML language definition.
xmlns: x=”HTTP: //schemas.microsoft.com/winfx/2006/xam!”
For instance for the below XAML snippet, we have two things one is the “StackPanel” and the other is “x: name”. “StackPanel” is resolved by the default namespace and the “x: name” is resolved by using “xmlns: x” namespace. ,
<StackPanelx: Name-’myStack”/>
Question 6.
Provide some instances where you have “xmlns: x” namespace in XAML?
Answer:
There are two common scenarios where we use “xmlns: x” namespace:
To define behind code for the XAML file using “x: class” attribute.
<Page
          xmlns="HTTP: //schemas.microsoft.com/winfx/2006/xaml/presentation"
          xmlns: x="HTTP: //schemas.microsoft.com/winfx/2006/xaml"
          x: Class="MyNamespace.MyCanvasCodelnline"
>
Second to provide name to an element.
<StackPanel x: Name=”myStack” />
Question 7.
When should we use “x: name” and “name”?
Answer:
There is no difference between “x: name” and “name”, “name” is shorthand of “x: name”. But in classes where you do not find “name” property (this is a rare situation), we need to use “x: name” property.
Question 8.
What are the different kinds of controls in WPF?
Answer:
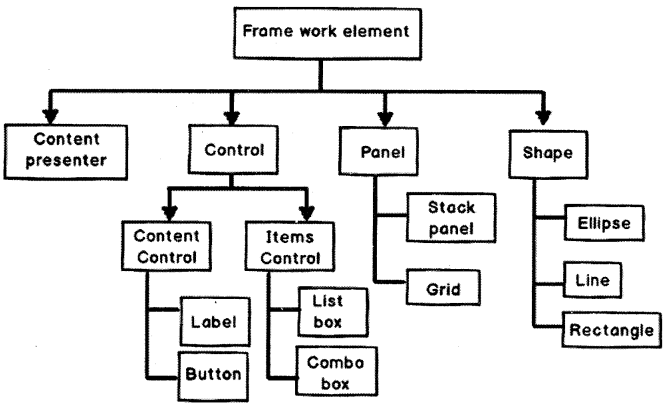
WPF controls can be categorized into four categories:
• Control: This is the basic control with which you will work most of the time. For example textbox, buttons, etc. Now controls that are standalone control like buttons, text box, labels, etc., are termed as content control. Now there are other controls that can hold other controls, for instance, items controls. Itemscontroi can have multiple textbox controls, label controls, etc.
• Shape: These controls help us to create simple graphic controls like Ellipse, Line, rectangle, etc.
• Panel: These controls help to align and position the controls. For instance, the grid helps us to align in a table manner, stack panel helps for horizontal and vertical alignment.
• Content presenter: This control helps to place any XAML content inside it. Used when we want to add dynamic controls on a WPF screen.
All the above four types of WPF controls finally inherit from the framework element class of WPF as shown in Figure 12.2.
Can you explain the complete WPF object hierarchy?
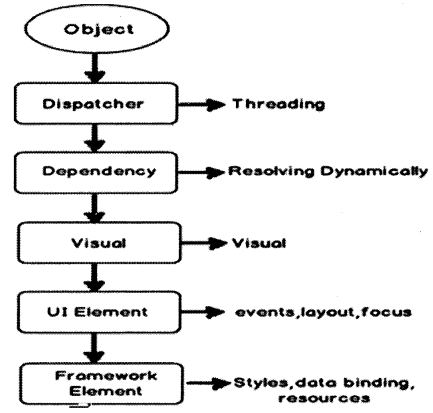
Figure 12.3 shows the hierarchy of WPF objects as shown in Figure 12.3.
Object: As WPF is created using .NET so the first class from which WPF Ul classes inherits is the .NET object class.
Dispatcher: This class ensures that all WPF Ul objects can be accessed directly only by the thread who owns him. Other threads who do not own him have to go via the dispatcher object.
Dependency: WPF Ul elements are represented by using XAML which is XML format. At any given moment of time a WPF element is surrounded by other WPF elements and the surrounded elements can influence this element and this is possible because of this dependency class. For example, if a textbox is surrounded by a panel, it’s very much possible that the panel background color can be inherited by the textbox.
Visual: This is the class that helps WPF Ul to have their visual representation.
Ul Element: This class helps to implement features like events, input, layouting, etc.
Framework element: This class supports templating, styles, binding, resources, etc.
And finally, all WPF controls textbox, buttons, grids, and whatever you can think about from the WPF toolbox inherits from the framework element class.
Question 9.
Does that mean WPF has replaced DirectX?
Answer:
No, WPF does not replace DirectX. DirectX will still be needed to make cutting-edge games. The video performance of directX is still many times higher than WPF API (Application Programming Interface). So when it comes to game development the preference will be always DirectX and not WPF. WPF is not an optimum solution to make games, oh yes you can make a TIC-TAC-TOE game but not high-action animation games.
One point to remember WPF is a replacement for Windows form and not directX.
Question 10.
So is XAML meant only for WPF?
Answer:
No, XAML is not meant only for WPF. XAML is an XML-based language and it had various variants.
WPF XAML is used to describe WPF content, such as WPF objects, controls, and documents. In WPF XAML we also have XPS XAML which defines an XML representation of electronic documents.
Silverlight XAML is a subset of WPF XAML meant for Silverlight applications. Silverlight is a cross¬platform browser plug-in that helps us to create rich Web content with 2-dimensional graphics, animation, and audio and video.
WWF XAML helps us to describe Windows Workflow Foundation content. WWF engine then uses this XAML and invokes workflow accordingly.
Question 11.
Can you explain the overall architecture of WPF?
Answer:
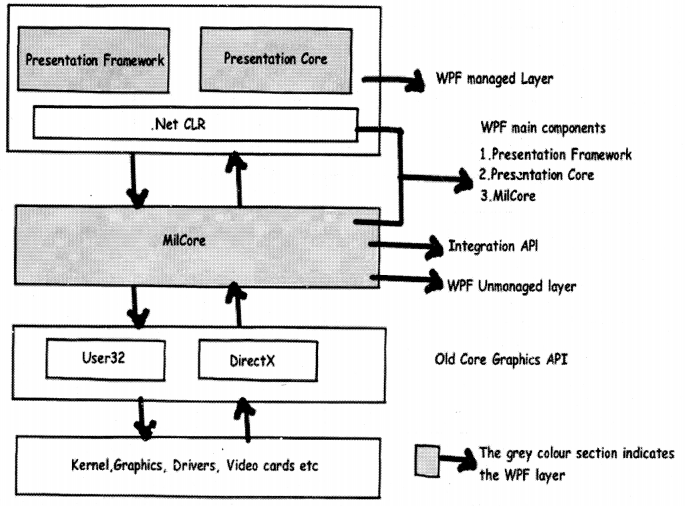
Figure 12.4 shows the overall architecture of WPF. It has three major sections presentation core, presentation framework, and mallcore. In the same diagram, we have shown how other sections like direct and operating systems interact with the system. So let’s go section by section to understand how every section works.
User32: It decides which goes where on the screen.
DirectX: As said previously WPF uses DirectX internally. DirectX talks with drivers and renders the content.
MILcore: MIL stands for media Integration library. This section is an unmanaged code because it acts like a bridge between WPF managed and DirectX / User32 unmanaged API.
Presentation core: This is a low-level API exposed by WPF providing features for 2D (two-dimensional), 3D (three-dimensional), geometry, etc.
Presentation framework: This section has high-level features like application controls, layouts. Content, etc., helps you to build up your application.
Question 12.
What is App.xaml in the WPF project?
Answer:
App.xaml is the start-up file or a bootstrapper file that triggers your first XAML page from your WPF project.
Question 14.
What are various ways of doing alignment in WPF?
Answer:
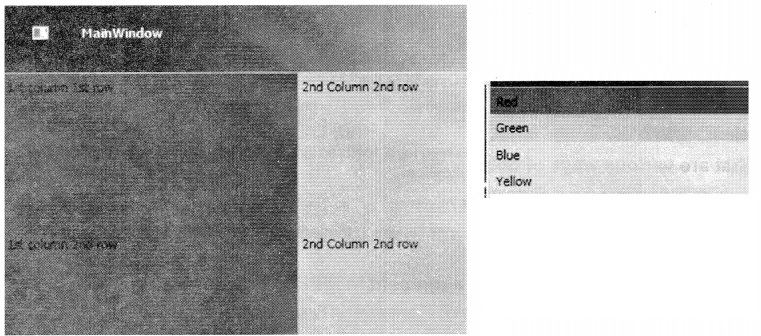
There are five ways of doing alignment in WPF as shown in Figure 12.5:
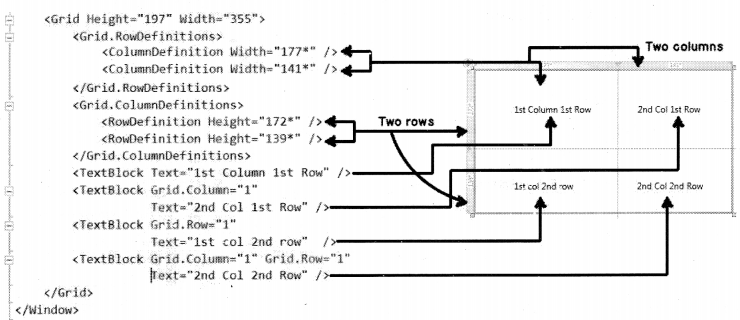
Grid: In Grid alignment we divide the screen in to static rows and columns like HTML tables and position elements in those rows and column area.
<Grid>
<Grid.ColumnDefinitions>
<ColumnDefinition />
<ColumnDefinition />
</Grid.ColumnDefinitions>
<Grid.RowDefinitions>
<RowDefinition />
<RowDefinition />
</Grid.RowDefinitions>
<Label Grid.Column="0" Grid.Row="0" Background="Red">lst column 1st row </Label>
<Label Grid.Column="l" Grid.Row="0" Background="LightGreen">2nd Column 2nd row</Label>
<Label Grid.Column="0" Grid.Row="1" Background="Red">lst column 2nd row</ Label>
<Label Grid.Column=''l" Grid.Row="l" Background= "LightGreen">2nd Column 2nd row</Label>
</Grid>
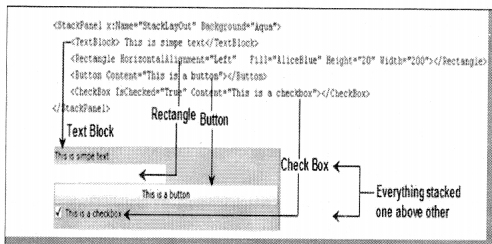
Stack panel: Arranges control in vertical or horizontal format as shown in Figure 12.6.
<StackPanel Orientation="Vertical">
<Label Background="Red">Red </Label>
<Label Background="LightGreen">Green </Label>
<Label Background="LightBlue">Blue </Label>
<Label Background="Yellow">Yellow </Label>
</StackPanel>
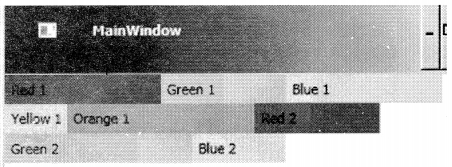
Wrap panel: Aligns elements in a line until the border is hit, then wraps into the next line as shown in Figure 12.7.
<WrapPanel Orientation="Horizontal">
<Label Width="125" Background="Red">Red 1</Label>
cLabel Width="100" Background="LightGreen">Green 1</Label>
<Label Width="125" Background="LightBlue">Blue 1</Label>
<Label Width="50" Background="Yellow">Yellow 1</Label>
<Label Width="150" Background="Orange">Orange 1</Label>
<LabeI Width="100" Background="Red">Red 2</Label>
<Label Width="150" Background="LightGreen">Green 2</Label>
<Label Width="75" Background="LightBlue">Blue 2</Label>
</WrapPanel>
Dock Pane1:Aligns controls in five different regions: top, bottom, left, right and center as shown in Figure 12,8.
<DockPanel>
<Label DockPanel.Dock="Top" Height="100" Background="Red">Top 1</Label>
<Label DockPanel. Dock=''Lef t" Background^"LightGreen">Lef t</Label>
<Label DockPanel.Dock="Right" Background="LightCyan">Right</Label>
<Label DockPanel.Dock="Bottom" Background="LightBlue">Bottom</Label>
<TextBlock VerticalAlignment="Center" HorizontalAlignment="Center"> Demo of Dock panel</TextBlock>
</DockPanel>
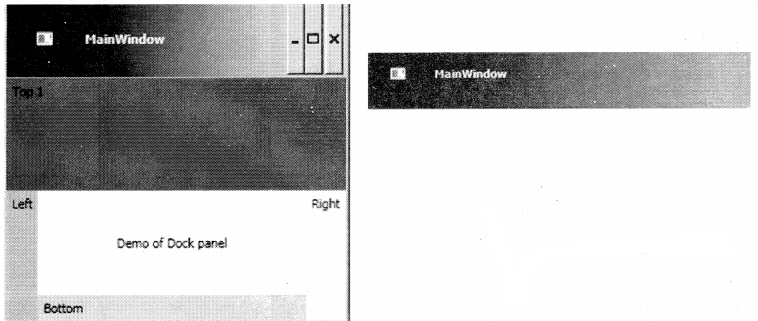
Canvas: Positions elements absolutely use co-ordinates as shown in Figures 12,9,
<Canvas Margin="273, 130, 144, 99">
<TextBlock> Canvas position </TextBlock>
</Canvas>
Question 15.
What are resources in WPF?
Answer:
Resources are objects referred to in WPF XAML, In the C# code when we create an object, we do the following three steps as shown in Figure 12,10.
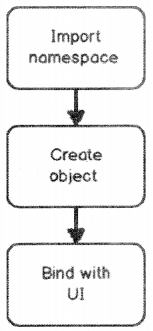
using CustomerNameSpace; // import the namespace.
Customer obj = new Customer( ); // Create object of the class
Textboxl. text = obj . CustomerCode; // Bind the object with UI elements
So even in WPF XAML to define resources that are nothing but objects we need to the above 3 steps:
- Import namespace where the class resides: To define namespace we need to use the “xmlns” attribute as shown in the below XAML code.
<Window x: Class="LearnWpfResources.MainWindow"
xmlns = "HTTP: //schemas.microsoft.com/winfx/2 006/xaml/presentation
xmlns: x="HTTP: //schemas.microsoft.com/winfx/2006/xaml"
xmlns: custns="clr-namespace: LearnWpfResources"
Title="MainWindow" Height="350" Width="525">
- Create an object of the class: To create an object of the class in XAML we need to create a resource by using the resource tag as the below code. You can the object name is ‘ custobj “.
<Window.Resources>
<custns: Customer x: Key="custobj"/>
</Window.Resources>
The above code you can map to something like this in C#.
Customer custobj = new Customer( );
- Bind the object with Ul objects: Once the object is created we can then bind them using bindings like one way, two way as explained in “Explain one way, two way, one time and one way to the source?” question explained above.
<TextBox Text=”{Binding CustomerCode, Mode=TwoWay, Source={StaticResource custobj}}”/>
Question 16.
Explain the difference between static and dynamic resources.
Answer:
Resources can be referred statically or dynamically. Static referred resources evaluate the resource only once and after that if the resources change those changes are not reflected in the binding. While dynamic referred resources are evaluated every time the resource is needed.
Consider the below “SolidColorBrush” resource which is set to “LightBlue” color.
<Window. Resources>
<SolidColorBrush Color="LightBlue" x: Key="buttonBackground" />
</Window.Resources>
The above resource is bound with the below two textboxes statically and dynamically, respectively.
<TextBox Background=”{DynamicResource buttonBackground}”/>
<TextBox Background=”{StaticResource buttonBackground}”/>
Now if we modify the resource, you see the first text box changes the background and the other textbox color stays as it is.
private void Button_Click(object sender, RoutedEventArgs e)
{
     Resources["buttonBackground" ] = Brushes.Black;
}

Figure 12.11 shows the output of the same.
Question 17.
When should we use static resources over dynamic resources?
Answer:
Dynamic resources reduce application performance because they are evaluated every time the resource is needed. So the best practice is to use Static resources until there is a specific reason to use dynamic resources. If you want resources to be evaluated again and again then only use dynamic resources.
Question 18.
Explain the need for binding and commands.
Answer:
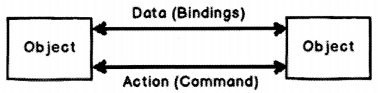
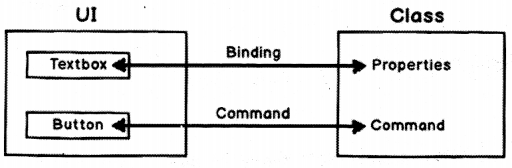
WPF bindings helps to send/receive data between WPF objects while command helps to send and receive actions as shown in Figure 12.12. The object that emits data or action is termed as the source and the object who wants to receive data or action is termed as a target.
Question 19.
Explain one way, two way, one time, and one way to the source.
Answer:
All the above four things define how data will flow between target and source objects when WPF binding is applied as shown in 12.13.
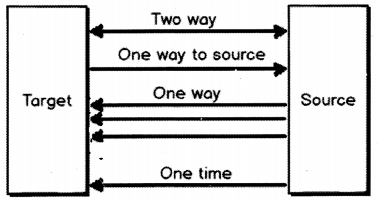
Two ways: Data can flow from both source to target and from target to source.
One way: Data flows only from source to target.
One way to source: Data flows only from target to source.
One time: Data flows only for the first time from source to target and after that, no communication happens.
The table below shows is an easy tabular representation to memorize the same.
| Bindings |
Data flow |
|
| Target to Source | Source to target | |
| Two way | Yes | Yes |
| One way to source | Yes | No |
| One way | No | Yes |
| One time | No | For first Yes |
Question 20.
Can you explain the WPF command with an example?
Answer:
When end users interact with the application they send actions like button click, right-click, Ctrl + C, Ctrl + V, etc. A command class in WPF wraps these end-user actions into a class so that they can be reused again and again.
WPF Command class idea is an implementation of a command pattern from a gang of four design patterns.
To create a command class we need to implement the “command” interface. For example below is a simple command class that increments a counter class by calling the “increment” method.

public class IncrementCounter:
System.Windows.Input.ICommand
{
      private clsCounter obj;
      public IncrementCounter
      (clsCounter o)
      {
            obj = o;
      }
      public bool CanExecute
      (object parameter)
      {
           return true;
      }
      public event EventHandler
      CanExecuteChanged;
      public void Execute(object parameter)
      {
         obj.Increment( );
      }
}
The command class needs two implement methods as shown in the above code:
What to Execute (Execute) – Command class is all about wrapping actions of end-users so that we can reuse them. At the end of Figure 12.14: Binding Direction day Action invokes methods. Mean for instance a “btnmaths_click” action will invoke the “Add” method of a class. The first thing we need to specify in the command class is which method you want to execute. In this case we want to call the “increment” method of “counter” class.
When to execute (CanExecute) – The second thing we need to specify is when the command can execute, which means validations. This validation logic is specified in the “CanExecute” function. If the validation returns true then “Execute” fires or else the action has no effect. You can see the code of “CanExecute” and “Execute” in the above code snippet.
Once you have created the “Command” class you can bind this with the button using the “Command” property as shown in the below XAML code.”CounterObj” is a resource object.
<Button Command=”{Binding IncrementClick, Source={StaticResource Counterobj}}”/>
So now that the action is wrapped in to command we do not need to write method invocation code again and again in behind code, we just need to bind the command object with the WPF Ul controls wherever necessary.
Question 21.
How does “UpdateSourceTrigger” affect bindings?
Answer:
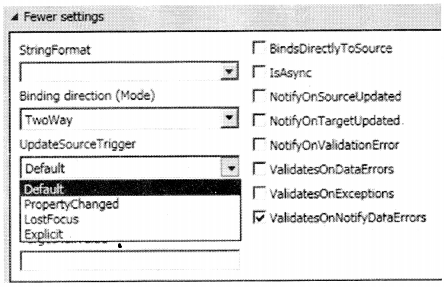
“UpdateSourceTrigger” decides when the data should get updated between WPF objects that are binded. In other words should data get updated in lost focus event, in data change event, etc
There are four modes by which “UpdateSourceTrigger” can be defined:
- Default: If it is a text property then data is updated during lost focus and for normal properties data updates in property change event.
- PropertyChanged: In this setting, data is updated as soon as the value is changed.
- LostFocus: In this setting, data is updated as soon as the lost focus event occurs.
- Explicit: In this setting, the data is updated manually. In other words, to update data between two WPF objects, you need to call the below code.
BindingExpression binding =txt1.GetBindingExpression(TextBox. TextProperty); binding. UpdateSource( );
To set “UpdateSourceTrigger” we need to use the “UpdateSourceTrigger” value which can be found in the bindings properties as shown in Figure 12.15.
Question 22.
Explain the need for the “INotifyPropertyChanged” interface.
Answer:
When we bind two WPF objects the target data is updated depending on the “UpdateSourceTrigger” events. Please refer to the previous question for “UpdateSourceTrigger” basics.
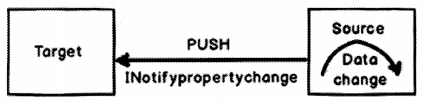
The “UpdateSourceTrigger” has events like lost focus, property change, etc. In other words, when lost focus or property change event happens on the target it makes a PULL to the source to get the latest data as shown in Figure 12.16.
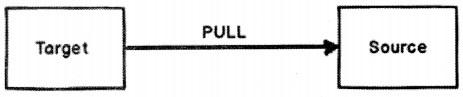
So it’s very much possible that the WPF source data has changed and because the WPF target “UpdateSourceTrigger” event did not fire it did not make a pull and the data of the source is not in sync with the target as shown in Figure 12.17. This is where the “INotifyPropertyChanged” interface comes to use.
Below is a simple “clsCounter” class that has a “Counter” property and this property is incremented by the “Increment” method.
Now if we bind WPF label or textbox to the “Counter” property and call the “increment” method the new “Counter” value will not be propagated to the target. Because invoking a method does not trigger any “UpdateSourceTrigger” event.
So after calling the “increment” method the “Counter” value of the source and the target is out of synch.
To create a push event from the source you need to first implement the “iNotifyPropertyChanged” interface as shown in Figure 12.18. Now when someone calls the “increment” method you can raise an event saying that the “Counter” property has changed by calling the “PropertyChanged” function as shown in the below code.
In simple words, the source sends a notification to the target WPF object that data has changed in the source and if should refresh itself with the fresh data.
PropertyChanged(this, new PropertyChangedEventArgs(“Counter”));
Below is full “clsCounter” class code with “INotifyPropertyChanged” implemented.
public class clsCounter: INotifyPropertyChanged
{
     private int _Counter=0;
     public int Counter
     {
          get { return _Counter; }
     }
     public void Increment( )
     {
         _Counter++;
         PropertyChanged(this, new PropertyChangedEventArgs("Counter"));
     }
public event PropertyChangedEventHandler PropertyChanged;
}
Question 23.
How are WPF observable collections different from simple .NET collections?
Answer:
Simple .NET collections do not notify the Ul automatically when elements are added or removed from them. So when we update simple .NET collection’s we need to send refresh events back to the WPF Ul for rebinding the collection.
“ObservableCollection” is a specialized collection that updates the Ul automatically and immediately when new elements are added and removed from the collection.
“ObservableCollection” implement’s “iNotifyCollectionChanged” interface. This interface exposes the “CollectionChanged” event which gets raised when elements are added or removed to the collection.
Below is a simple code which creates the “ObservableCollection” collection which is binded with a list.
ObservableCollection<Person> person = new ObservableCollection<Person>( );
IstNames.ltemsSource = person;
Question 24.
What are value converters in WPF?
Answer:
Binding is one of the big features in WPF which helps us to facilitate data flow between WPF Ul and Object (See Figure 12.18). But when data flows from source to Ul or vice-versa using these bindings we need to convert data from one format to another format. For instance, let’s say we have a “Person” object with a married string property.
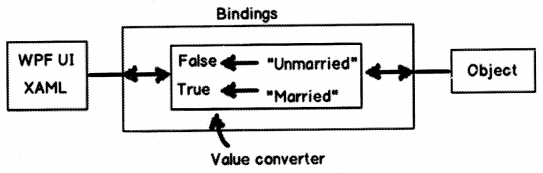
Let’s assume that this “Married” property is binded with a check box. So if the text is “Married” it should return true so that the option check box look’s checked. If the text is “UnMarried” it should return false so that the option check box looks unchecked.
In simple words, we need to do data transformation. This is possible by using “Value Converters”. In order to implement value converters we need to inherit from the “value converter” interface and implement two methods “Convert” and “ConvertBack”.
public class MaritalConverter: IValueConverter
{
        public object Convert(object value, Type targetType, object parameter,
        System.Globalization.CultureInfo culture)
        {
             string married = (string)value;
             if (married == "Married")
        {
             return true;
        }
        else
        {
            return false;
        }
}
public object ConvertBack(object value. Type targetType, object
parameter, System.Globalization.Culturelnfo culture)
{
        bool married = (bool)value;
         if (married)
        {
            return "Married";
        }
        else
        {
            return "UnMarried" ;
        }
    }
}
You can see in the “Convert” function we have written logic to transform “Married” to true and from “UnMarried” to false. In the “ConvertBack” function we have implemented the reverse logic.
Question 25.
Explain multi-binding and multivalue converters in WPF?
Answer:
“MultiBinding” helps you bind multiple sources to a target while multi-converters act like bridge – if the source and targets have different data formats or need some conversion as shown in Figure 12.19.
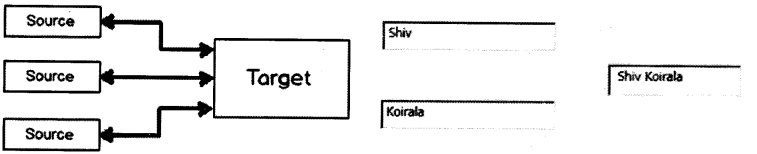
For example, let’s say you have two textboxes that have “FirstName” and “LastName”. You want ~ that as soon as users type on .these two text boxes, the other text box should get updated with ‘ “FirstName LastName” as shown in Figure 12.20. s
Also vice-versa if we type in the third text box “FirstName LastName” it should display “FirstName” … and “LastName’ in the other two textboxes, respectively.
So the first thing is to create a multivalue converter class that will join “FirstName” and “LastName” into source and split “FirstName LastName” back to the target. For the same we need to implement “multivalue converter” and implement “Convert” and “ConvertBack” methods.
“Convert” helps to do the conversion from “Target” to “Source” and “ConvertBack” helps to ^ convert from “Source” to “Target”.
public class NameMultiConverter: IMultiValueConverter
{
public object Convert(object[ ] values. Type targetType, object
parameter, System.Globalization.Culturelnfo^ culture)
{
        // Conversion logic from Target to Source
}
}
public object[ ] ConvertBack(object value, Type[] targetTypes, object
parameter, System.Globalization.Culturelnfo culture)
{
       // Conversion logic from Source to Target.
}
}
Below is the “Convert” ( Target to Source) implementation where we get the “textbox” value in a array and we have concatenated the array values and returned the same in a single string. This single string will be displayed in the third textbox.
public object Convert(object[] values. Type targetType, object
parameter, System.Globalization.Culturelnfo culture)
{
      string x = " ";
      foreach (object y in values)
     {
            x = x + " " + y.ToString( );
     }
     return x;
}
“ConvertBack” helps to implement conversion logic from “Source” to “Target”. So when someone types “Shiv Koirala” in the third text box we would like to split “Shiv” in one string and “Koirala” in another string.
So you can see in the below code we have used the “Split” function to create a string array. So the first array index (array[0]) will go to the first textbox and the second array index (array[1]) will go to the second text box.
public object[ ] ConvertBack(object value, Type[ ] target types, object
parameter, System.Globalization.Culturelnfo culture)
{
      string str = (string)value;
      string[] val = str.Split(' ');
      return val;
}
Now once we are done with the converter next thing is to apply multi-binding. Below is the XAML code where we have the three text boxes ” txtFirstName”, ” txtLastName ” and “txtFirstAndLast”.
You can see how the “txtFirstAndLast” textbox “Text” is binded using multibinding element which binds to “txtFirstName” and “txtLastName” textbox . So now if you make changes to multiple target the single source gets updated and if you update the source multiple target gets updates.
<TextBox x: Name="txtFirstName" HorizontalAlignment="Left" Height="26"
Margin="42, 67, 0, 0" TextWrapping="Wrap" Text="" VerticalAlignment="Top" Width="152"/>
<TextBox x: Name="txtLastName" HorizontalAlignment="Lef t" Height="26"
Margin="41, 135, 0, 0" TextWrapping="Wrap" Text="" VerticalAlignment="Top" Width="153”/>
<TextBox x: Name="txtFirstAndLast"- Height="28" HorizontalAlignment="Left" Margin="239, 103, 0, 0"
Name="label1" VerticalAlignment="Top" Width="117"> <TextBox.Text>
<MultiBinding Converter=”{StaticResource NameMultiConverter}">
<Binding ElementName="txtFirstName" Path="Text" />
<Binding ElementName="txtLastName" Path="Text" />
</MultiBinding>
</TextBox.Text>
</TextBox>
Question 26.
Explain WPF relative binding/relative resource.
Answer:
When we define bindings we need at least two elements target and source. But many times rather than defining binding between two elements we would like to define binding with reference to the current element, i.e., relatively.
For instance, let’s say we have a WPF border and we would like the height and width of the border to be same. So for this scenario, the target and source are the same, the WPF border itself. So we can define the binding using “RelativeSource” as shown in the below code. You can see it uses the “Self” binding mode to bind the element to itself.
<Border BorderBrush="Black" BorderThickness = "l11 Height="139"
Width="{Binding Height, RelativeSource={RelativeSource Self}}"/>
What are the different ways of binding using relative sources?
There are four ways of binding relatively in WPF:
- Self
- Ancestor
- Previous data
- Templated parent
Question 27.
Can you explain self relative source binding in WPF?
Answer:
This relative binding helps to bind one property of an element to the other property of the same element. For example, in the below XAML the border width is binded to a height of the same border element.
<Border BorderBrush-’Black” BorderThickness=”1" Height=”139"
Width=”{Binding Height, RelativeSource={RelativeSource Self}}”/>
Question 28.
Explain Ancestor relative source binding in WPF.
Answer:
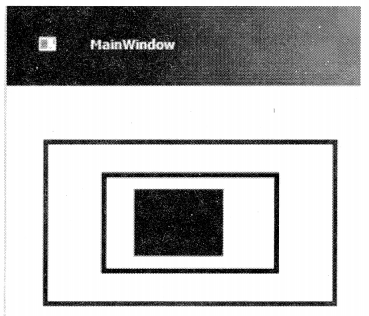
This relative binding helps to bind properties to the parent element properties. For example, in the below XAML code we have a textbox that has two borders as a parent. One border is having dark green and the other border is having dark red color as the border color.
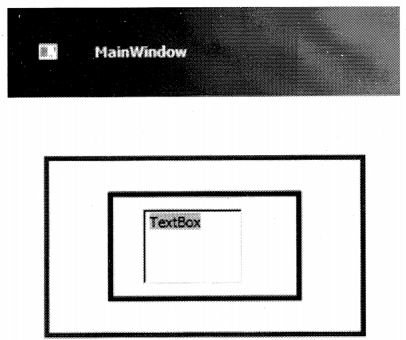
The dark green color border is the parent element followed by dark red and the textbox the child element at the end of the hierarchy.
<Border BorderBrush="DarkGreen">
<Border BorderBrush="DarkRed">
<TextBox />
</Border>
</Border>
Below is how the WPF application looks like when it runs.
Now we want the background color of the text box to be binded to one of the parent border colors. To achieve the same we can use ancestor relative binding.
Table below shows some important properties in Ancestor type binding we need to know before we writing the binding code.
Tablw
So the relative binding code with ancestor level 1, i.e., red looks as shown below. In case you are confused with any of the properties please refer to the previous table for more information.
<TextBox Background="{Binding BorderBrush, RelativeSource={RelativeSource FindAncestor, AncestorLevel = l,
AncestorType={x: Type Border}}}"/>
So now the complete XAML with parent border element looks as shown in the below code.
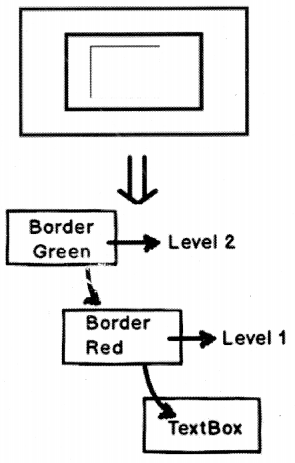
<Border BorderBrush="DarkGreen"><! —
Level 2 ->
<Border BorderBrush="DarkRed" >< i —
Level 1 ->
<TextBox Background^' {Binding BorderBrush,
RelativeSource={RelativeSource FindAncestor, AncestorLevel=l,
AncestorType=(x: Type Border}}}"/>
</Border>
</Border>
Now if you run the above XAML code the textbox is binded with the background color of the first border. If you change the ancestor level to 2 textbox background color will change to green.
Question 29.
Explain the difference between the visual and logical trees in WPF.
Answer:
WPF Ul is represented in XAML which is an XML format. In XML elements are arranged in a hierarchal fashion. For example, if you look at the below XAML (it has been downsized for simplicity) we have a Window element, the window element has a Grid control and the grid control has a button inside it.
<Window>
             <Grid>
                      <Button..>
            </Grid>
</Window>
So if you visualize the above XAML logically you can think that the button control is a child element of the Grid and the grid is the child element of the Window. This relationship between the elements which looks logical looking at the XAML is termed as “Logical Tree” as shown in Figure 12.24.
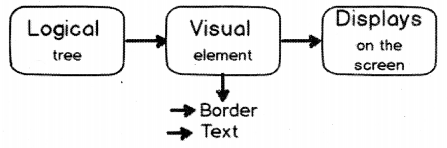
But now to display this Logical tree on to your screen you need lot of visual elements. Like border, text etc. So when you add these visual elements to the logical tree that complete structure is termed as “Visual Tree”.
Putting in simple words there is only tree in WPF but depending on how you view it these two trees are the outcome. If you use the WPF visualizer the above XAML tree looks something as shown in the below Figure 12.25 which is actually a complete visual tree.
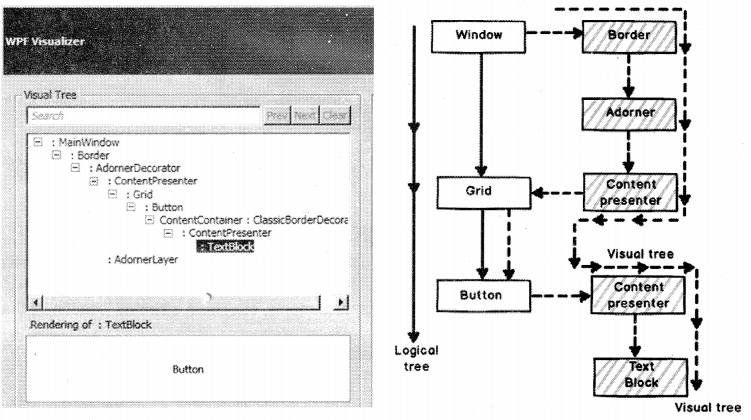
In simple words whatever you see in your XAML is a logical tree and to make it display it uses the visual tree. Figure 12.26 shows the logical and visual tree of the above XAML. Logical tree is without the shades and with shades is the visual tree.
Question 30.
Why do we need to have this perspective of visual and logical tree in WPF?
Answer:
Visual tree and Logical tree are important when you work with WPF routed events.
Question 31.
Explain routed events in WPF.
Answer:
Routed events are those events that travel up or down the visual tree hierarchy. WPF events can be classified into three types:
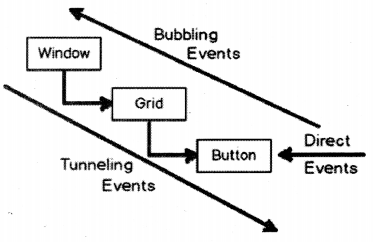
Direct events: In this case event is raised at the source and handled at the source itself like “Mous enter” events.
Bubbling events: They travel up the visual tree hierarchy. For example, “MouseDown” is a bubbling event.
Tunneling events: These events travel down the visual tree hierarchy. “PreviewKeyDown” is a tunneling event.
Question 31.
Explain WPF styles.
Answer:
Let’s say you have WPF Ul which has a lot of buttons and you want to set the background to “Aqua” color (See Figure 12.28).
So the quick way of doing this is to set the background of all the buttons to “Aqua” color as shown in the below XAML code. But now let’s say some days down the line customer wants to change the background color to “Red”. So you need to modify the background property for all buttons.
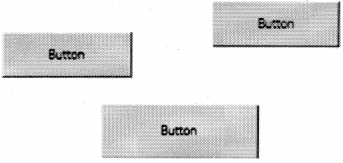
<Button Backgrounds"Aqua"/>
<Button Background="Aqua"/>
<Button Background="Aqua"/>
Won’t it be great if we can define the background color as a style from some commonplace and when we want to change the background color we just change from that central commonplace That’s what WPF style helps us to achieve
WPF style helps to define look and feel (color, fonts, alignments, etc.) from a central location so that we can have ease of maintenance.
To define a style we need to use the “Style” tag of XAML. It needs three things at least:
- X: Key: Name of Key of the style.
- TargetType: WPF Ul object on which you want to apply the style. For example, in the below code we are applying this style on the button.
- Setter: This element defines the property for which the value has to be set. For example, in our case, we are setting the “Background” color property to “Aqua”.
<Style x: Key="myStyle" TargetType="Button">
           <Setter Property="Background" Value="Aqua" />
</Style>
Once the style is defined we can attach the style resource to the style property of the button element as shown in the below code.
<Button Style="{StaticResource myStyle}"/>
<Button Style="{StaticResource myStyle}"/>
<Button Style="{StaticResource myStyle}"/>
Question 32.
What are style triggers?
Answer:
Many times we would want a style property to execute under certain conditions. Trigger’s help you to define conditions under which the style values will be set.
For example, we want to create a dynamic style where we focus on the button it should change to red color or else should be set to Aqua color as shown in Figure 12.29.
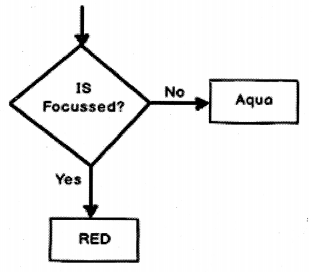
To achieve the same we can use style trigger as shown in the below XAML code.
<Style x: Key="myStyle" TargetType="Button">
           <Style.Triggers>
                     <Trigger Property="IsFocused"
                      Value="True">
<Setter Property="Background" Value="Red"/>
</Trigger>
             </Style.Triggers>
             <Setter Property="Background"
             Value="Aqua" />
</Style>
Question 33.
Explain the Multitrigger concept in WPF.
Answer:
Many times we want style triggers to be executed when multiple conditions are true. For example, let’s say we have a button we want the button background to be set to “RED” when there is focus on the button and when somebody moves the mouse on the button.
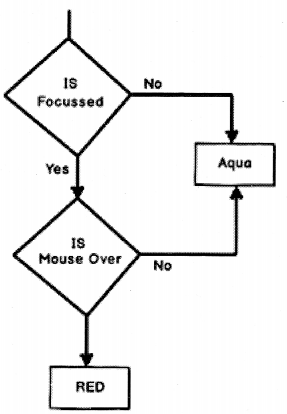
In other situations, the background color should be set to “Aqua”.
So to achieve such multiple AND conditions we can use the “MultiTrigger” XAML element as shown in the below XAML code. Multiple AND conditions need to be defined in the “MultiTrigger .Conditions” tag and the property which needs to be modified in the “MultiTrigger. Setters” tag.
<Style x: Key="myStyle" TargetType="Button">
<Style.Triggers>
<MultiTrigger>
<MultiTrigger.Conditions>
<Condition Property="IsFocused" Value="True" />
<Condition Property="IsMouseOver" Value="True" />
</MultiTrigger.Conditions>
<MultiTrigger.Setters>
<Setter Property="Background" Value="Red" />
</MultiTrigger.Setters>
</MultiTrigger>
</Style.Triggers>
<Setter Property="Background" Value="Aqua" />
</Style>
Question 34.
What is the difference between control templates and data templates?
Answer:
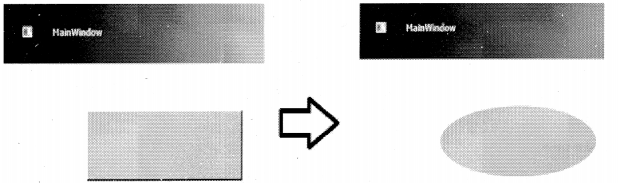
Control templates change the structure of a WPF element while data templates change the way data is displayed but maintain the structure of the WPF element.
A visual example of a control template where a rectangle-shaped button changes into an ellipse shape.
For that, we need to create a style using the “<ControlTemplate>” element. In this “<ControlTemplate>” WPF element we can define the structure which we want to apply to the element. Below is the XAML code for the same.
<Style TargetType="Button">
<!—Override all default style —>
<Setter Property="OverridesDefaultStyle" Value="True"/>
<Setter Property="Template">
<Setter.Value>
<ControlTemplate TargetType="Button">
<Grid>
<Ellipse Fill=" (TemplateBinding Background-} "/>
cContentPresenter HorizontalAlignment="Center" VerticalAlignment="Center"/ >
</Grid>
</ControlTemplate>
</Setter.Value>
</Setter>
</Style>
Later this style can be applied to the button using the style property as shown the below code.
<Button Style="{StaticResource mystyle}"/>
Data templates have no effect on the structure but they affect data. For example, Figure 12.32 shows the is list box on which data templates have been applied. You can see the structure of the list box does not change but the number of fields and the way they are placed is changed.
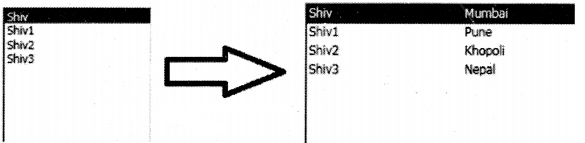
To use data templates we need to use ‘ item template” tag and within the “item template” tag we can define how we want the data to be structured.
<ListBox Margin="26, 27, 165, 51" x: Name= "lstb">
<ListBox.ItemTemplate>
<DataTemplate>
<Grid>
<Grid.ColumnDefinitions>
<ColumnDefinition Width="150"></ColumnDefinition>
<ColumnDefinition Width="*"></ColumnDefinition>
</Grid.ColumnDefinitions>
<TextBlock Grid.Column="0" Text = " {Binding Name}" FontSize="12" Height="18"/>
<TextBlock Grid.Column="l" Text="{Binding City}" FontSize="12" Height = "18"/>
</Grid>
</DataTemplate>
</ListBox.ItemTemplate>
</ListBox>
Question 35.
What is MWM?
Answer:
MVVM (Model-View-View Model) is an architecture pattern where we divide the project into three logical layers and every layer has its own responsibility (See Figure 12.33).
Below are the three logical layers with an explanation of what they do:
• View: This layer handles the responsibility of taking inputs from the end-user, positioning of controls, look and feel, design, visuals, colors, etc.
• Model: This layer represents your middle layer objects like a customer, supplier, etc. It handles business logic and interaction with the data access layer.
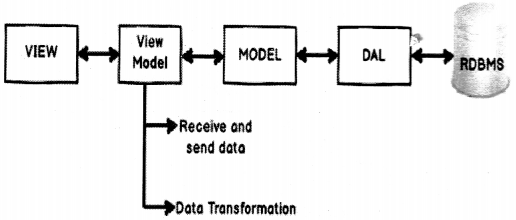
• View Model: View model as it says View plus Model represents your user interface. You can also visualize this class as the behind code. This class is the bridge between model and view. It handles connection logic, data transformation logic, and action mapping between model and view. For example, it will have the following types of logic as shown below.
- Replicating and propagating data between views and models. When someone enters data into Ul or the model gets updated this layer will ensure that the propagation of data happens between these entities.
- Handling data transformation from view to model and vice-versa. For example, you have a model which has gender property with data as “M” for males and “F” for females. But on the View or Ul, you would like to display as a check box with true and false. This transformation logic is written in the view model class.
- View model also maps Ul’s actions to methods. For example, you have “btn_Add” click event and when anyone clicks on this button you would like to invoke
“Customer. Add ( )” method from the customer class. This connection code is again a part of the view model.
Question 36.
What are the benefits of MWM?
Answer:
Below are the benefits of the MWM pattern as shown in Figure 12.34:
Separation of concern: As the project is divided into layers, every layer handles its own responsibility. This leads to better maintenance because when we change one layer the other layer does not get affected.
Increased Ul Reusability: The whole point of MWM is to remove behind, code, i.e., XAML.CS code. The problem with behind code is that it is tied up with Ul technology, for example, ASPX.CS code is tied up with the ASP page class, XAML.CS file is tied with WPF Ul technology and so on. So we cannotuseASPX.CS behind code with WPF XAML UI.
By moving the behind code to the view model class we can now use this with any Ul technology.
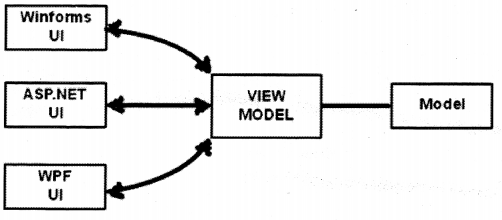
Automated Ul Unit testing: View model class represents your Ul. The properties of the class represent Ul textboxes, combo boxes and the methods of the class represent action. Now as the Ul is represented by the view model class, we can do automated Ul testing using unit testing by creating the objects of view model class and doing the necessary assets.
Question 37.
What is the importance of command and bindings in the MWM pattern?
Answer:
MWM is the most used architecture because of the command and bindings facility provided by WPF) (See Figure 12.35). WPF MWM is incomplete without command and bindings.
Command and bindings help you to connect view (WPF Ul) with view model class without writing a lot of behind code. Binding connects the Ul input elements (textbox, combo box, etc.) with the view model class properties, and the Ul actions like button click, right-click are connected to the methods of the class by commands.
Note: Please refer to previous questions to understand commands and bindings.
Question 38.
What is the difference between MWM and 3-layer architecture?
Answer:
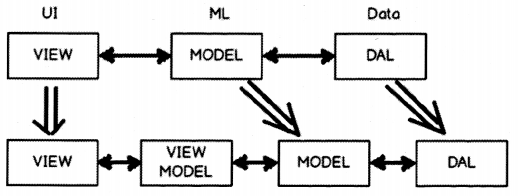
MVVM has an extra layer as compared to 3 layer architecture. In 3 layer architecture, we have Ul (view), business logic (model), and Data Access Layer (DAL) as shown in Figure 12.36. In MWM we have an extra layer in between view and model, i.e., the view model class. 3 layer architecture complements MVVM architecture.
Question 39.
Explain delegate command.
Answer:
First, let us answer in short: “Delegate command makes an MVVM command class independent of the view mode!’. Now let’s understand the long way.
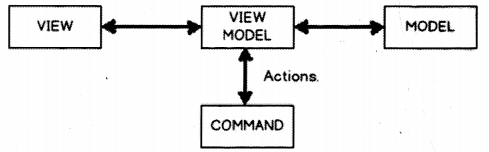
In MVVM architecture view talks with the view model and the view model talks with the model. When actions are sent from the view they are sent to WPF commands for handling the events as shown in Figure 12.37. WPF commands invoked methods of view model internally.
In other words, the command needs a reference of the view model class.
If you see a typical WPF MVVM command it looks as shown below. You can see the “CustomerViewModel” class referenced inside the ‘btnCommand” class. If you think with your eyes closed this reference of the “CustomerViewModel” class inside the command is a problem. This will lead to tight coupling between command classes and the view model.
If you visualize the command it is nothing but clicks, double click, left mouse click, drag and drop, etc. It is an ACTION created by the user. Now wouldn’t be great if we can just attach this command with any view model. So like click event gets connected with ” Cus tomervi ewMode 1″ or “SupplierViewMode1”.
This is achieved by using the delegate command.
public class btnCommand: ICommand
{
Private CustomerViewModel Viewobj = new CustomerViewModel();
public btnCommand(CustomerViewModel obj)
{
Viewobj = obj;
}
public bool CanExecute(object parameter) // When he should execute
{
return Viewobj.IsValid( );
}
public void Execute(object parameter) // What to execute
{
ViewObj.Add();
}
}
To decouple the view model class from command we can use delegates, i.e., “Action” and “Func”.lf you see the command class we need only two things “WhattoExecute” and “WhentoExecute”. So how about passing these methods as generic delegates. You can see the constructor of “btnCommand” takes two delegates one what to execute and one when to execute.
You can see in the below code the “btnCommand” class has no reference of the view model class but has references to delegates which are just abstract pointers to functions/methods. So this command class can now be attached with any view model class. This approach is termed as “Delegate command”.
public class btnCommand: ICommand // Step 1: Create command
{
      private Action WhattoExecute;
      private Func<bool> WhentoExecute;
      public btnCommand(Action What, Func<bool> When)
      {
             WhattoExecute = What;
             WhentoExecute = When;
     }
     public bool CanExecute(object parameter) // When he should execute
     {
            return WhentoExecute( );
     }
     public void Execute(object parameter) // What to execute
     {
           WhattoExecute( );
     }
}
Question 40.
What is PRISM?
Answer:
PRISM (Personal Record Information System Methodology) is a framework to develop a composite applications in WPF and Silverlight as shown in Figure 12.38. Composite applications are built using composition. In other words rather than building applications from scratch, we take prebuilt components, assemble them together and create the application.
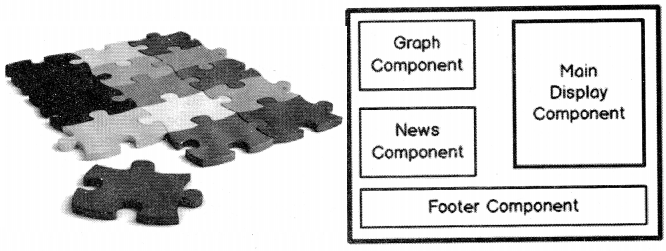
Take the example of simple WPF Ul (See Figure 12.39). You can see it has lots of sections. Now rather than building the whole Ul as one big unit, we can develop all these sections as an independent unit. Later by using PRISM we can compose WPF Ul by taking all these independent units (See Figure 12.39).
Question 41.
What are the benefits of PRISM?
Answer:
Modular development: As we are developing components as independent units we can assign these units to different developers and do modular parallel development. With parallel development projects will be delivered faster.
High reusability: As the components are developed in individual units we can plug them using PRISM and create composed Ul in an easy way.
Question 42.
How are individual units combined into a single unit?
Answer:
PRISM uses dependency injection for the same, please see the design pattern section to read about Dl (Dependency Injection). We can do Dl in two ways by using unity application block or MEF (Managed Extensibility Framework).
Question 43.
Does PRISM do MWM?
Answer:
The prime focus of PRISM (Personal Record Information System Methodology) is modular development and not MWM. But it does have ready-made classes like delegate command which can help us reduce MWM code. But please note the main goal of PRISM was not MWM.
Question 44.
Is PRISM a part of WPF?
Answer:
No, PRISM an acronym for (Personal Record information System Methodology) is a separate installation.
Question 45.
What is expression blend?
Answer:
Expression blend is a designing tool for WPF and Silverlight applications.
Question 46.
What is Silverlight?
Answer:
Silverlight is 16. Windows Presentation Framework (Vista Series) is a Web browser plug-in by which we can enable animations, graphics, and audio/video. You can compare Silverlight with Flash. We can view animations with Flash and it’s installed as a plug-in in the browser.
Question 47.
Can Silverlight run on platforms other than a window?
Answer:
Yes, animations made in Silverlight can run on platforms other than window. In whatever platform you want to be run you just need the Silverlight plug-in.
Question 48.
Come on, even WPF runs under the browser why Silverlight?
Answer:
Yes, there is something called a WPF browser application that can run WPF in the browser. For the WPF browser application, you need the .NET framework to be installed in the client location while for Silverlight you need only the plug-in. So in other words WPF browser applications are OS (Operating System) dependent while Silverlight is not. Silverlight plug-in can run in other OS other than windows while we all know .NET framework only runs in windows.
Question 49.
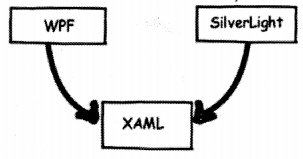
What is the relationship between Silverlight, WPF, and XAML?
Answer:
As explained previously XAML is an XML file that defines the Ul elements. This XML file can be read by WPF framework or Silverlight framework for rendering. Microsoft first developed WPF and they used XAML files to describe the Ul elements to the WPF framework. Microsoft then extended WPF and made WPF/e (Windows Presentation Foundation/Everywhere) which helped to render the Ul in the browser. WPF/e was the code name for Silverlight. Later Microsoft launched Silverlight officially.
So the XAML just defines the XML structure to represent the Ul elements. Both the frameworks, i.e., WPF and Silverlight then read the Ul elements and renders the Ul elements in the respective platform as shown in Figure 12.40.
Question 50.
What is the XAP file in Silverlight?
Answer:
XAP (Cross-Platform Audio Creation Tool Audio Projects) file is a compressed file that downloads all the necessary DLLs (Dynamic Link Library), code at the browser client so that the Silverlight application can run inside the browser.
Question 51.
Can you explain Silverlight architecture?
Answer:
Before we talk about Silverlight architecture let’s discuss what is Silverlight is really made of technically. Silverlight has borrowed a lot of things from existing Microsoft technologies. We can think of Silverlight plug-in as a combination of some technologies from the core .NET framework, vector animations, media, and JavaScript as shown in Figure 12.41.
So we can visualize the Silverlight architecture as a combination of some functionalities from the core .NET framework, Ajax, and some functionalities like animation, media, etc., provided by the core Silverlight framework.
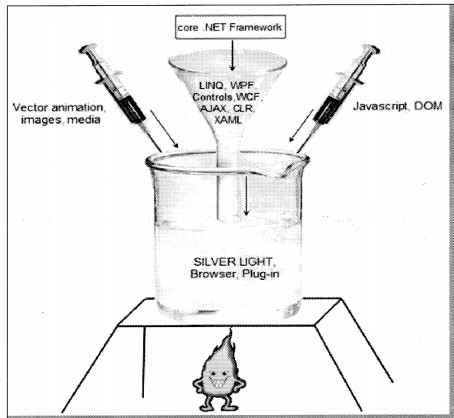
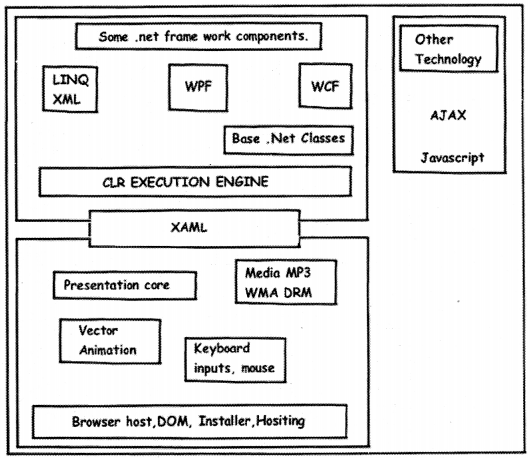
We can think of Silverlight architecture as a combination of four important blocks:
• Some .NET framework components: Silverlight uses some components from the .NET framework. One of the main components is WPF. Many of the Ul components (check box, buttons, text boxes, etc.), XAML parsing, etc., are taken from the core WPF system. It also has taken components like WCF to simplify data access, it also has CLR (Common Language Runtime) for memory management, safety checking, and garbage collection. The base class libraries of NET are used for string manipulations, algorithms, expressions, collections, and globalization.
• Presentation core: The core presentation framework has functionalities to display vector 2d animations, images, media, DRM (Digital Rights Management), and handle inputs like mouse and keyboard.
• Other technologies: Silverlight interacts with other technologies like Ajax and JavaScript. So it also borrows some functionalities from their technologies.
• Hosting: Silverlight animations finally run under the browser environment. So it has a hosting functionality that helps to host the application the browser, expose a DOM (Document Object Model) by which JavaScript can manipulate the Silverlight components and it also has an installer functionality which helps to install Silverlight application and plug-in in the browser environment.
One of the things which you can notice from the architecture diagram is that the presentation core reads from the XAML file for rendering. The XAML is a component that is a part of the .NET framework and the rendering part is done by the presentation core (See Figure 12.42).
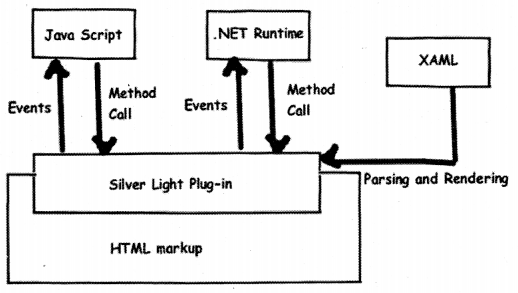
The application is a typical HTML that runs under the browser. There are markups that instantiate the Silverlight plug-in. Now when the user interacts with the Silverlight application it sends an event to the JavaScript system or the .NET system. This depends on which programming language you are using. The program code which is either in JavaScript or .NET can make calls to the Silverlight run-time and achieve the necessary functionalities (See Figure 12.43). XAML will be read and parsed by the Silverlight runtime and then rendered accordingly to the browser.
Question 51.
What are the various basic steps to make a simple Silverlight application?
Answer:
This sample we are making using VS 2008 Web express edition and .NET 3.5. It’s a six-step procedure to run our first Silverlight application. So let’s go through it step by step.
Step1: The first thing we need to do is install Siiveriight SDK (Software Development Kit) from HTTP: //www. microsoft.com/downloads/details.aspx7fami I vid = FB7900DB-4380-4B0F-BB95- 0BAEC714EE17&displavlanq=en
Step 2: Once you install the Silverlight SDK you should be able to use the Silverlight template. So when you go to create a new project you will see a ‘Siiveriight application’ template.
Step 3: Once you click ok you will see a dialog box as shown below with three options.
Add an ASP.NET Web project to the solution to host Silverlight: This option is the default option, and it will create a new Web application project that is configured to host and run your Silverlight application. If you are creating a new Silverlight application then this is the option to go.
Automatically generate Test Page To Host Siiveriight at build time: This option will create a new page at runtime every time you try to debug and test your application. If you want to only concentrate on your Silverlight application then this option is worth looking at.
Link This Siiveriight Control Into An Existing Website: If you have an existing Silverlight application then this option helps to link the Silverlight application with the existing Web application project. You will not see this option enabled for new projects, you need to have an existing Web application.
For this example, we have selected the first option. Once you click ok you should see the full IDE (Integrated Development Environment) environment for Silverlight
So let’s run through some basic points regarding the IDE view what we see. You will see there are two projects one is your Web application and the other is the Silverlight application. In the Silverlight application, we have two XAML files one is App.XAML and the other is Page.XAML.
App.XAML has global-level information.
Step 4: Now for simplicity’s sake, we just use the TextBlock tag to display a text. You can see as we type on the Page.XAML is displayed in the viewer.
Step 5: Now we need to consume the Silverlight application on an ASPX page. So in the HTML / ASPX page, we need to first refer to the Siiveriight namespace using the ‘Register’ attribute.
<%@Register Assembly=”System. Web. Siiveriight” Namespace-’System.Web.Ul.SilverlightControls” TagPrefix=’’asp” %>
We also need to refer the script manager from the Silverlight namespace. The script manager control is the functionality from AJAX. The main purpose of this control is to manage the download and referencing of JavaScript libraries.
<asp: ScriptManager ID=”ScriptManager1" runat-”server”></asp: ScriptManager>
Finally, we need to refer to the Silverlight application. You can see that in the source we have referred to the XAP file. XAP file is nothing but a compiled Silverlight application that is compressed and ZIP. It basically has all the files that are needed for the application in a compressed format. If you rename the file to ZIP extension you can open the same using WINZIP.
<asp: Siiveriight ID="Xainll" runat=" server" Source="~/ClientBin/ MyFirstSilverLightApplication.xap"
MinimumVersion="2.0.31005.0" Width="100%" Height="100%" />
So your final ASPX / HTML code consuming the Silverlight application looks something as shown below.
<%@ Page Language="C#" AutoEventWireup="true" %>
<%@ Register Assembly="System.Web.Silverlight"
Namespace="System.Web.UI.SilverlightControls"
TagPrefix="asp" %>
<!DOCTYPE html PUBLIC "-//W3C//DTD XHTML 1.0 Transitional//EN" "HTTP: //
www.w3.org/TR/xhtmll/DTD/xhtmll-transitional.dtd">
<html xmlns="HTTP: //www.w3.org/1999/xhtml" style="height: 100%;">
<head runat="server">
<title>MyFirstSilverLightApplication</title>
</head>
<body style="height: 100%,-margin: 0;">
<form id="forml" runat="server" style="height: 100%; ">
<asp: ScriptManager lD="ScriptManagerl" runat="server"x/asp: ScriptManager> <div style="height: 100%;">
<asp: Silverlight ID="Xamll" runat=”server" Source="~/ClientBin/MyFirstSilverLightApplication.xap"
MinimumVersion="2,0.31005.0" Width="100%" Height="100%" />
</div>
</form>
</body>
</html>
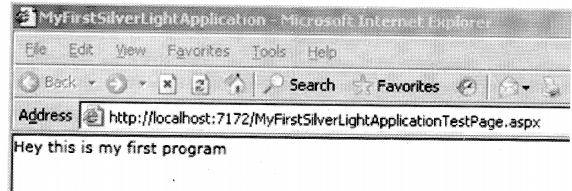
Step 6: So finally set the Web application as start-up and also set this page as start-up and run it. You should be pleased to see your first Silverlight application running as shown in Figure 12.44.
Question 52.
What are the different kinds of bindings in Silverlight?
Answer:
There is three kinds of bindings one-way, two-way, and one time-binding.
- One-way binding: data flows from object to Ul and not vice-versa.
- Two-way bindings: data flows from object to Ul and also vice-versa.
- In one time binding data flows from the object to the Ul only once. There is no tracking mechanism to update data on either side. One-time binding has marked performance improvement as compared to the previous two bindings discussed. This binding is a good choice for reports where the data is loaded only once and viewed.
In order to specify bindings, we need to use the binding path attribute on the Ul elements as shown in the below code snippet.
<TextBox x: Name="txtEnterAge" Text="{Binding Path=Age, Mode=TwoWay}" Height="30" Width="150"
VerticalAlignment="Center"
HorizontalAlignment="Center"></TextBox>
Question 53.
How does Silverlight connect with databases?
Answer:
If you remember the Silverlight architecture, it does not contain ADO.NET. In order to make insert, update, and deletes via Silverlight, we need to call WCF services, and WCF services in turn will do insert updates and deletes on SQL Server.
Question 54.
What are the two important points we noted when we call WCF service from Silverlight?
Answer:
- We can only WCF services asynchronously from Silverlight.
- We need to create a cross-domain and client access policy XML (extensible Markup Language) file where the WCF service is hosted.
Question 55.
What are the different ways of doing alignment in Silverlight and WPF?
Answer:
There are three ways provided by Silverlight for layout management Canvas, Grid, and Stack panel.
Canvas is the simplest methodology for layout management. It supports absolute positioning using ‘X’- and ‘Y’-coordinates. ‘Canvas. Left’ helps to specify the X-coordinate while ‘Canvas. Top’ helps to provide the ‘Y’-coordinates.
Below is a simple code snippet which shows how Rectangle objects are positioned using ‘ Canvas ‘ on coordinates (50, 150).
<Canvas x: Name="MyCanvas">
<Rectangle Fill = "Blue" Widt.h="100"
          Height="100"
         Canvas.Left="50"
         Canvas.Top="150"/>
</Canvas>
Grid layout helps you position your controls using rows and columns as shown in Figure 12.45. It’s very similar to table defined in HTML.
As the name so the behavior. Stack allows you to arrange your Ul elements vertically or horizontally.
Question 56.
What is expression blend?
Answer:
Expression blend is a graphic design tool that can design the look-and-feel using expression blend and give the XAML file to the developers who can write the behind code for the same.
Question 57.
How can we do multi-threading in WPF / Silverlight?
Answer:
In order to implement proper multi-threading, we need to use the dispatcher object.
Question 58.
Can’t we just use threads, why do we need the dispatcher object?
Answer:
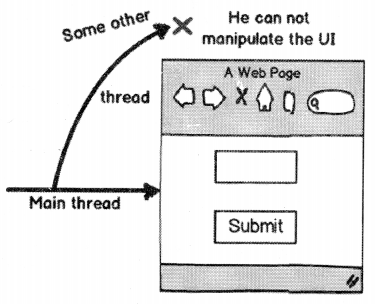
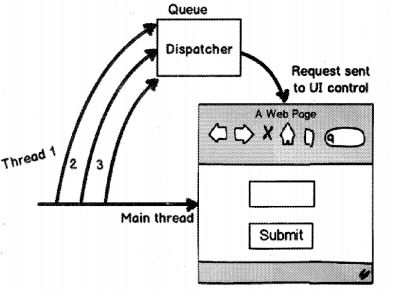
In WPF / Silverlight objects have thread affinity. In other words, the objects can be modified only by the thread that has created the object. Now when any WPF/Silverlight applications run they run on the main thread as shown in Figure 12.47. So that main thread only has the permission to modify the same.
Question 59.
But what if try to modify it?
Answer:
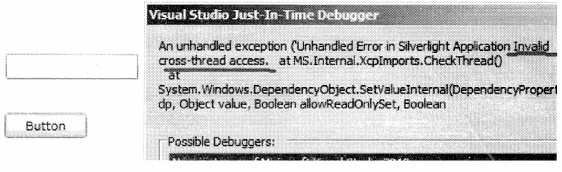
If other threads who have not created the Ul object try to modify the same it will throw an exception “invalid cross-thread access”.
For example in the below code we have a simple function called as “Set value”, this function modifies a textbox. This function is called directly by creating a “Thread” object in a button click event.
private void buttonl_Click(object sender, RoutedEventArgs e)
{
       Thread obj = new Thread(new ThreadStart(SetValue));
       obj.Start( );
}
public void Setvalue( )
{
        for (int i = 0; i < 10; i++)
        {
              textBoxl.Text = "test";
        }
}
Now the Ul object “textbox1” is not created by thread “obj”. It’s created by the main thread which runs the WPF/Silverlight Ul. So when you run the application you should get an exception as shown in the below “invalid cross-thread access” as shown in Figure 12.48.
Question 60.
So how do we make the code working?
Answer:
To make threading working in WPF and Silverlight we need to use the “Dispatcher” object. So rather than making calls directly to the Ul object, we need to route the calls via dispatcher object. The dispatcher object then prioritizes and executes the calls on the thread’s behalf to the Ul control (See Figure 12.49).
So to make the above code working we need to call the code from within the dispatcher object. We need to pass a delegate to the “Begininvoke” function (which is done by using a lambda expression ” ()=>”) of the “Dispatcher” object.
public void SetValue( )
{
       for (int i = 0; i < 10; i++)
       {
           this.Dispatcher.Beginlnvoke(( ) => {textBoxl.Text = "Test";});
       }
}
Question 61.
What is a background worker thread?
Answer:
Background worker is a simple thread that runs in the background and helps us execute processes in the background. In order to use background worker class we need to provide two things:
- The first thing we need to provide is the heavy processing method that we want to invoke in a multi-threading fashion. For instance, the below method “_bWorker_DoWork” has a heavy processing logic. This method is provided to the “DoWork” property of the “BackGroundWorker” class.
readonly BackgroundWorker _bWorker = new BackgroundWorker( );
_bWorker.DoWork += new DoWorkEventHandler(_bWorker_DoWork);
void _bWorker_DoWork(object sender, DoWorkEventArgs e)
{
    //Heavy processing logic
}
- The second thing is you need to invoke the method ” RunWorkerAsync” so that the “_bWorker_DoWork” method will be executed in the background.
_bWorker.RunWorkerAsync( );
Question 62.
Question 6: What is the difference between a background worker and a dispatcher?
Answer:
Dispatcher only queues and executes the multi-threaded request. The dispatcher does not create threads. While background worker actually spawns and executes methods in a multi-threaded manner.