This tutorial helps you to understand and learn what is CSS float property and CSS clear property with Example programs. The CSS floatproperty defines how an element should float. The CSS clearproperty defines what elements can float beside the cleared element and on which side. Also, collect more information from the direct links available below:
- The FLOAT Property
- FLOAT RIGHT Syntax
- FLOAT LEFT Syntax
- Example – Float Next To Each Other
- The CLEAR Property
- Techniques for Clearing Floats
The FLOAT Property
The float property is used for positioning and formatting content e.g. let an image float left to the text in a container.
The float property can have one of the following values:
left– The element floats to the left of its containerright– The element floats to the right of its containernone– The element does not float (will be displayed just where it occurs in the text). This is defaultinherit– The element inherits the float value of its parent
In its simplest use, thefloatproperty can be used to wrap text around images.
Also Check:
FLOAT RIGHT Syntax:
img {
  float: right;
}
Example Code (using inline styling)
<!DOCTYPE html>
<html lang="en">
  <head>
    <meta charset="UTF-8" />
    <meta http-equiv="X-UA-Compatible" content="IE=edge" />
    <meta name="viewport" content="width=device-width, initial-scale=1.0" />
    <title>Document</title>
  </head>
  <body>
    <img
      src="https://upload.wikimedia.org/wikipedia/commons/thumb/b/b6/Image_created_with_a_mobile_phone.png/1200px-Image_created_with_a_mobile_phone.png"
      alt=""
      style="float: right; height: 20%; width: 20%"
    />
    <p style="font-size: 20px">
      Lorem ipsum dolor sit amet, consectetur adipiscing elit. Phasellus
      imperdiet, nulla et dictum interdum, nisi lorem egestas odio, vitae
      scelerisque enim ligula venenatis dolor. Maecenas nisl est, ultrices nec
      congue eget, auctor vitae massa. Fusce luctus vestibulum augue ut aliquet.
      Mauris ante ligula, facilisis sed ornare eu, lobortis in odio. Praesent
      convallis urna a lacus interdum ut hendrerit risus congue. Nunc sagittis
      dictum nisi, sed ullamcorper ipsum dignissim
    </p>
  </body>
</html>
So the output would be :

FLOAT LEFT Syntax:
img{
 float:left;
}
Example program (using inline styling)
<!DOCTYPE html>
<html lang="en">
  <head>
    <meta charset="UTF-8" />
    <link rel="stylesheet" href="style.css" />
    <meta http-equiv="X-UA-Compatible" content="IE=edge" />
    <meta name="viewport" content="width=device-width, initial-scale=1.0" />
    <title>Document</title>
  </head>
  <body>
    <img
      src="https://upload.wikimedia.org/wikipedia/commons/thumb/b/b6/Image_created_with_a_mobile_phone.png/1200px-Image_created_with_a_mobile_phone.png"
      alt=""
      style="float: left; height: 20%; width: 20%"
    />
    <p style="font-size: 20px">
      Lorem ipsum dolor sit amet, consectetur adipiscing elit. Phasellus
      imperdiet, nulla et dictum interdum, nisi lorem egestas odio, vitae
      scelerisque enim ligula venenatis dolor. Maecenas nisl est, ultrices nec
      congue eget, auctor vitae massa. Fusce luctus vestibulum augue ut aliquet.
      Mauris ante ligula, facilisis sed ornare eu, lobortis in odio. Praesent
      convallis urna a lacus interdum ut hendrerit risus congue. Nunc sagittis
      dictum nisi, sed ullamcorper ipsum dignissim
    </p>
  </body>
</html>
Output:

Example – Float Next To Each Other
Usually, div elements will be presented on top of each other. But, if we use float: left we can let elements float next to each other. So, check out the below program
div {
  float: left;
  padding: 15px;
}

.div1 {
  background: red;
}

.div2 {
  background: yellow;
}

.div3 {
  background: green;
}
The CLEAR Property
The clearproperty specifies what elements can float beside the cleared element and on which side.
The clearproperty can have one of the following values:
- none – Allows floating elements on both sides. This is default
- left – No floating elements allowed on the left side
- right- No floating elements allowed on the right side
- both – No floating elements allowed on either the left or the right side
- inherit – The element inherits the clear value of its parent
The most common way to use the clear property is after you have used a float property on an element.
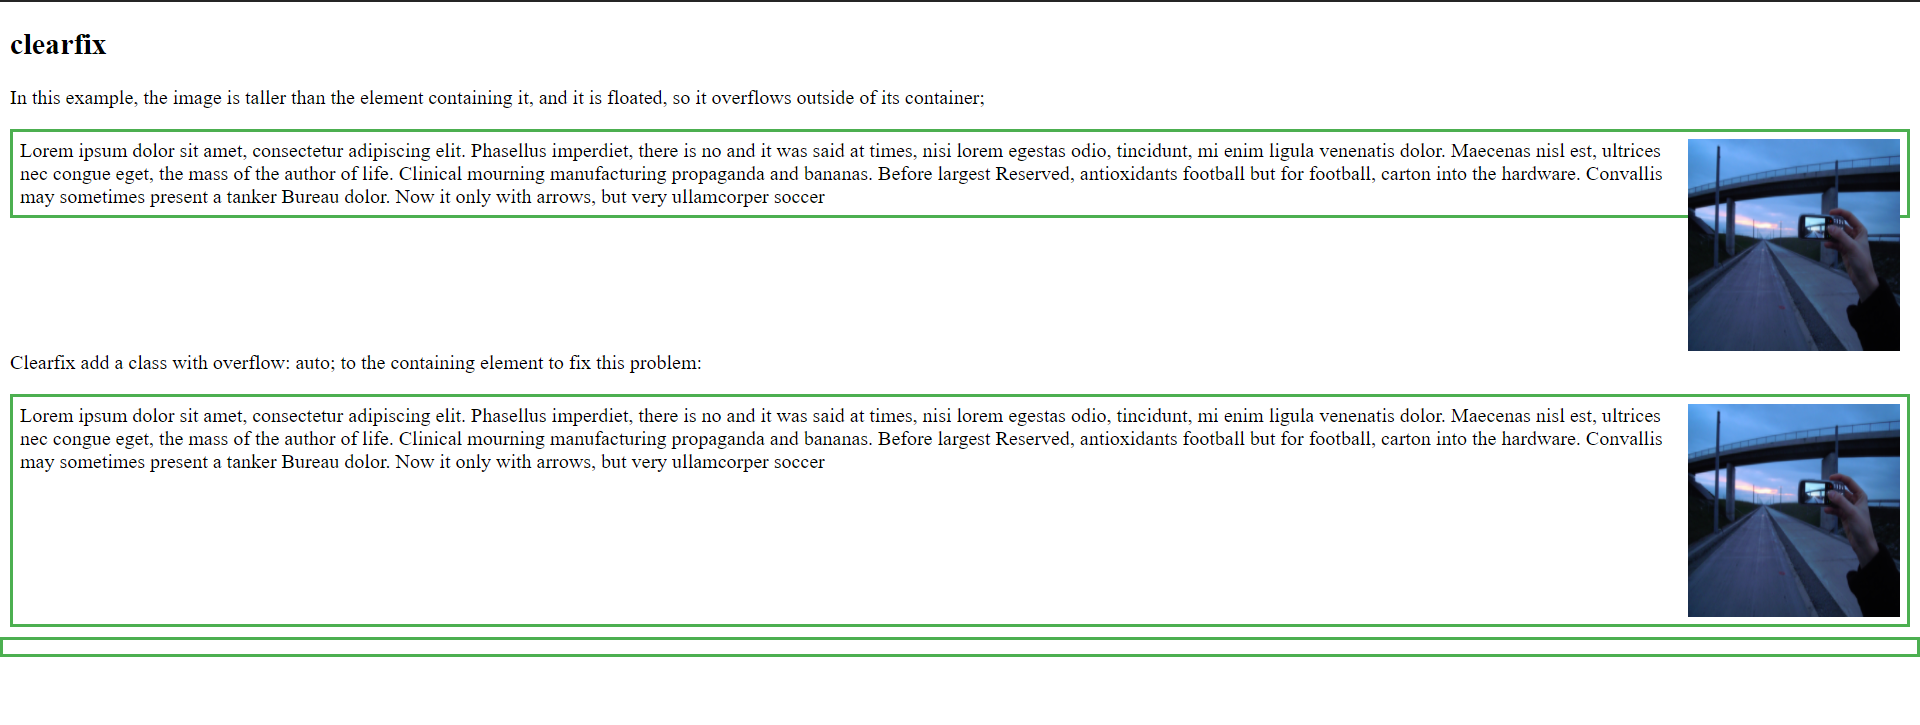
The following example clears the float to the left. This means that no floating elements are allowed on the left side (of the div):
<!DOCTYPE html>
<html>
  <head>
    <style>
      div {
        border: 3px solid #4caf50;
        padding: 5px;
      }

      .img1 {
        float: right;
      }

      .clearfix {
        overflow: auto;
      }

      .img2 {
        float: right;
      }
    </style>
  </head>
  <body>
    <h2>Clearfix</h2>

    <p>
      In this example, the image is taller than the element containing it, and
      it is floated, so it overflows outside of its container:
    </p>

    <div>
      <img
        class="img1"
        src="https://upload.wikimedia.org/wikipedia/commons/thumb/b/b6/Image_created_with_a_mobile_phone.png/1200px-Image_created_with_a_mobile_phone.png"
        alt="Pineapple"
        width="170"
        height="170"
      />
      Lorem ipsum dolor sit amet, consectetur adipiscing elit. Phasellus
      imperdiet, nulla et dictum interdum, nisi lorem egestas odio, vitae
      scelerisque enim ligula venenatis dolor. Maecenas nisl est, ultrices nec
      congue eget, auctor vitae massa. Fusce luctus vestibulum augue ut aliquet.
      Mauris ante ligula, facilisis sed ornare eu, lobortis in odio. Praesent
      convallis urna a lacus interdum ut hendrerit risus congue. Nunc sagittis
      dictum nisi, sed ullamcorper ipsum dignissim
    </div>

    <p style="clear: right">
      Add a clearfix class with overflow: auto; to the containing element, to
      fix this problem:
    </p>

    <div class="clearfix">
      <img
        class="img2"
        src="https://upload.wikimedia.org/wikipedia/commons/thumb/b/b6/Image_created_with_a_mobile_phone.png/1200px-Image_created_with_a_mobile_phone.png"
        alt="Pineapple"
        width="170"
        height="170"
      />
      Lorem ipsum dolor sit amet, consectetur adipiscing elit. Phasellus
      imperdiet, nulla et dictum interdum, nisi lorem egestas odio, vitae
      scelerisque enim ligula venenatis dolor. Maecenas nisl est, ultrices nec
      congue eget, auctor vitae massa. Fusce luctus vestibulum augue ut aliquet.
      Mauris ante ligula, facilisis sed ornare eu, lobortis in odio. Praesent
      convallis urna a lacus interdum ut hendrerit risus congue. Nunc sagittis
      dictum nisi, sed ullamcorper ipsum dignissim
    </div>
  </body>
</html>
.clearfix {
  overflow: auto;
}
Output image(s), after floating them, explained with margins.

Techniques for Clearing Floats
Below are some of the useful & helpful clearing floats techniques that we need typically at sometimes:
- The Empty Div Method
- The Overflow Method
- The Easy Clearing Method

