

Solidworks Keyboard Shortcuts: Solidworks is one of the most popularly used 3D Computer-Aided Design packages used by both students and professionals. Designed primarily by the famous Dassault Systems, Solidworks has a smooth performance on Microsoft Windows. Although it works well on Mac (Intel-based), the developers have highly recommended against it.
By using the Solidworks keyboard shortcuts, you will work way faster and have minimum wastage of time. Learning these will make your command launches quicker, and you will be wasting no time searching for these actions on the toolbar. Do you know you can also create several customized shortcuts based on those features that you use most frequently? Let us go through these shortcut keys, then! degree symbol in solidworks.
Wondering How to explore & learn Shortcut Keys for various Operating Systems, Computer Software Programs, Social media applications Keyboards? Here is the one-stop destination for all Keyboard Shortcuts, just take a look & memorize regularly for better performance in competitive exams & real-time situations.
Table Of Content
- Using The ‘S’ Shortcut
- Using The ‘D’ Shortcut
- Basic Windows Shortcut Keys
- Shortcuts for Selection
- Assembly Shortcuts
- Shortcuts for User Interface
- Shortcuts for Moving
- Shortcuts for Display
- Shortcuts for Sketching
- Shortcuts for Dimension
- Creating Customized Keyboard Shortcuts
- Changing The Keyboard Shortcuts
- Conclusion
Using The ‘S’ Shortcut
Solidworks degree symbol: This shortcut is the most frequently accessed and allows easy access and customization to various other shortcuts. You can do this with minimal movement of the mouse.
This key can be accessed by pressing the ‘S’ key, which will lead to opening a pop-up window. This pop-up window will show you four modes: assembly, sketch, part editing, and drawing. All of these modes can be easily customized with any command of your choice.
Using The ‘D’ Shortcut
Solidworks smart dimension shortcut: This key will bring options like Breadcrumbs and Confirmation Centre to your use. The Confirmation Corner has three sections, namely Command Confirmation, Assembly Confirmation, Sketch Confirmation.
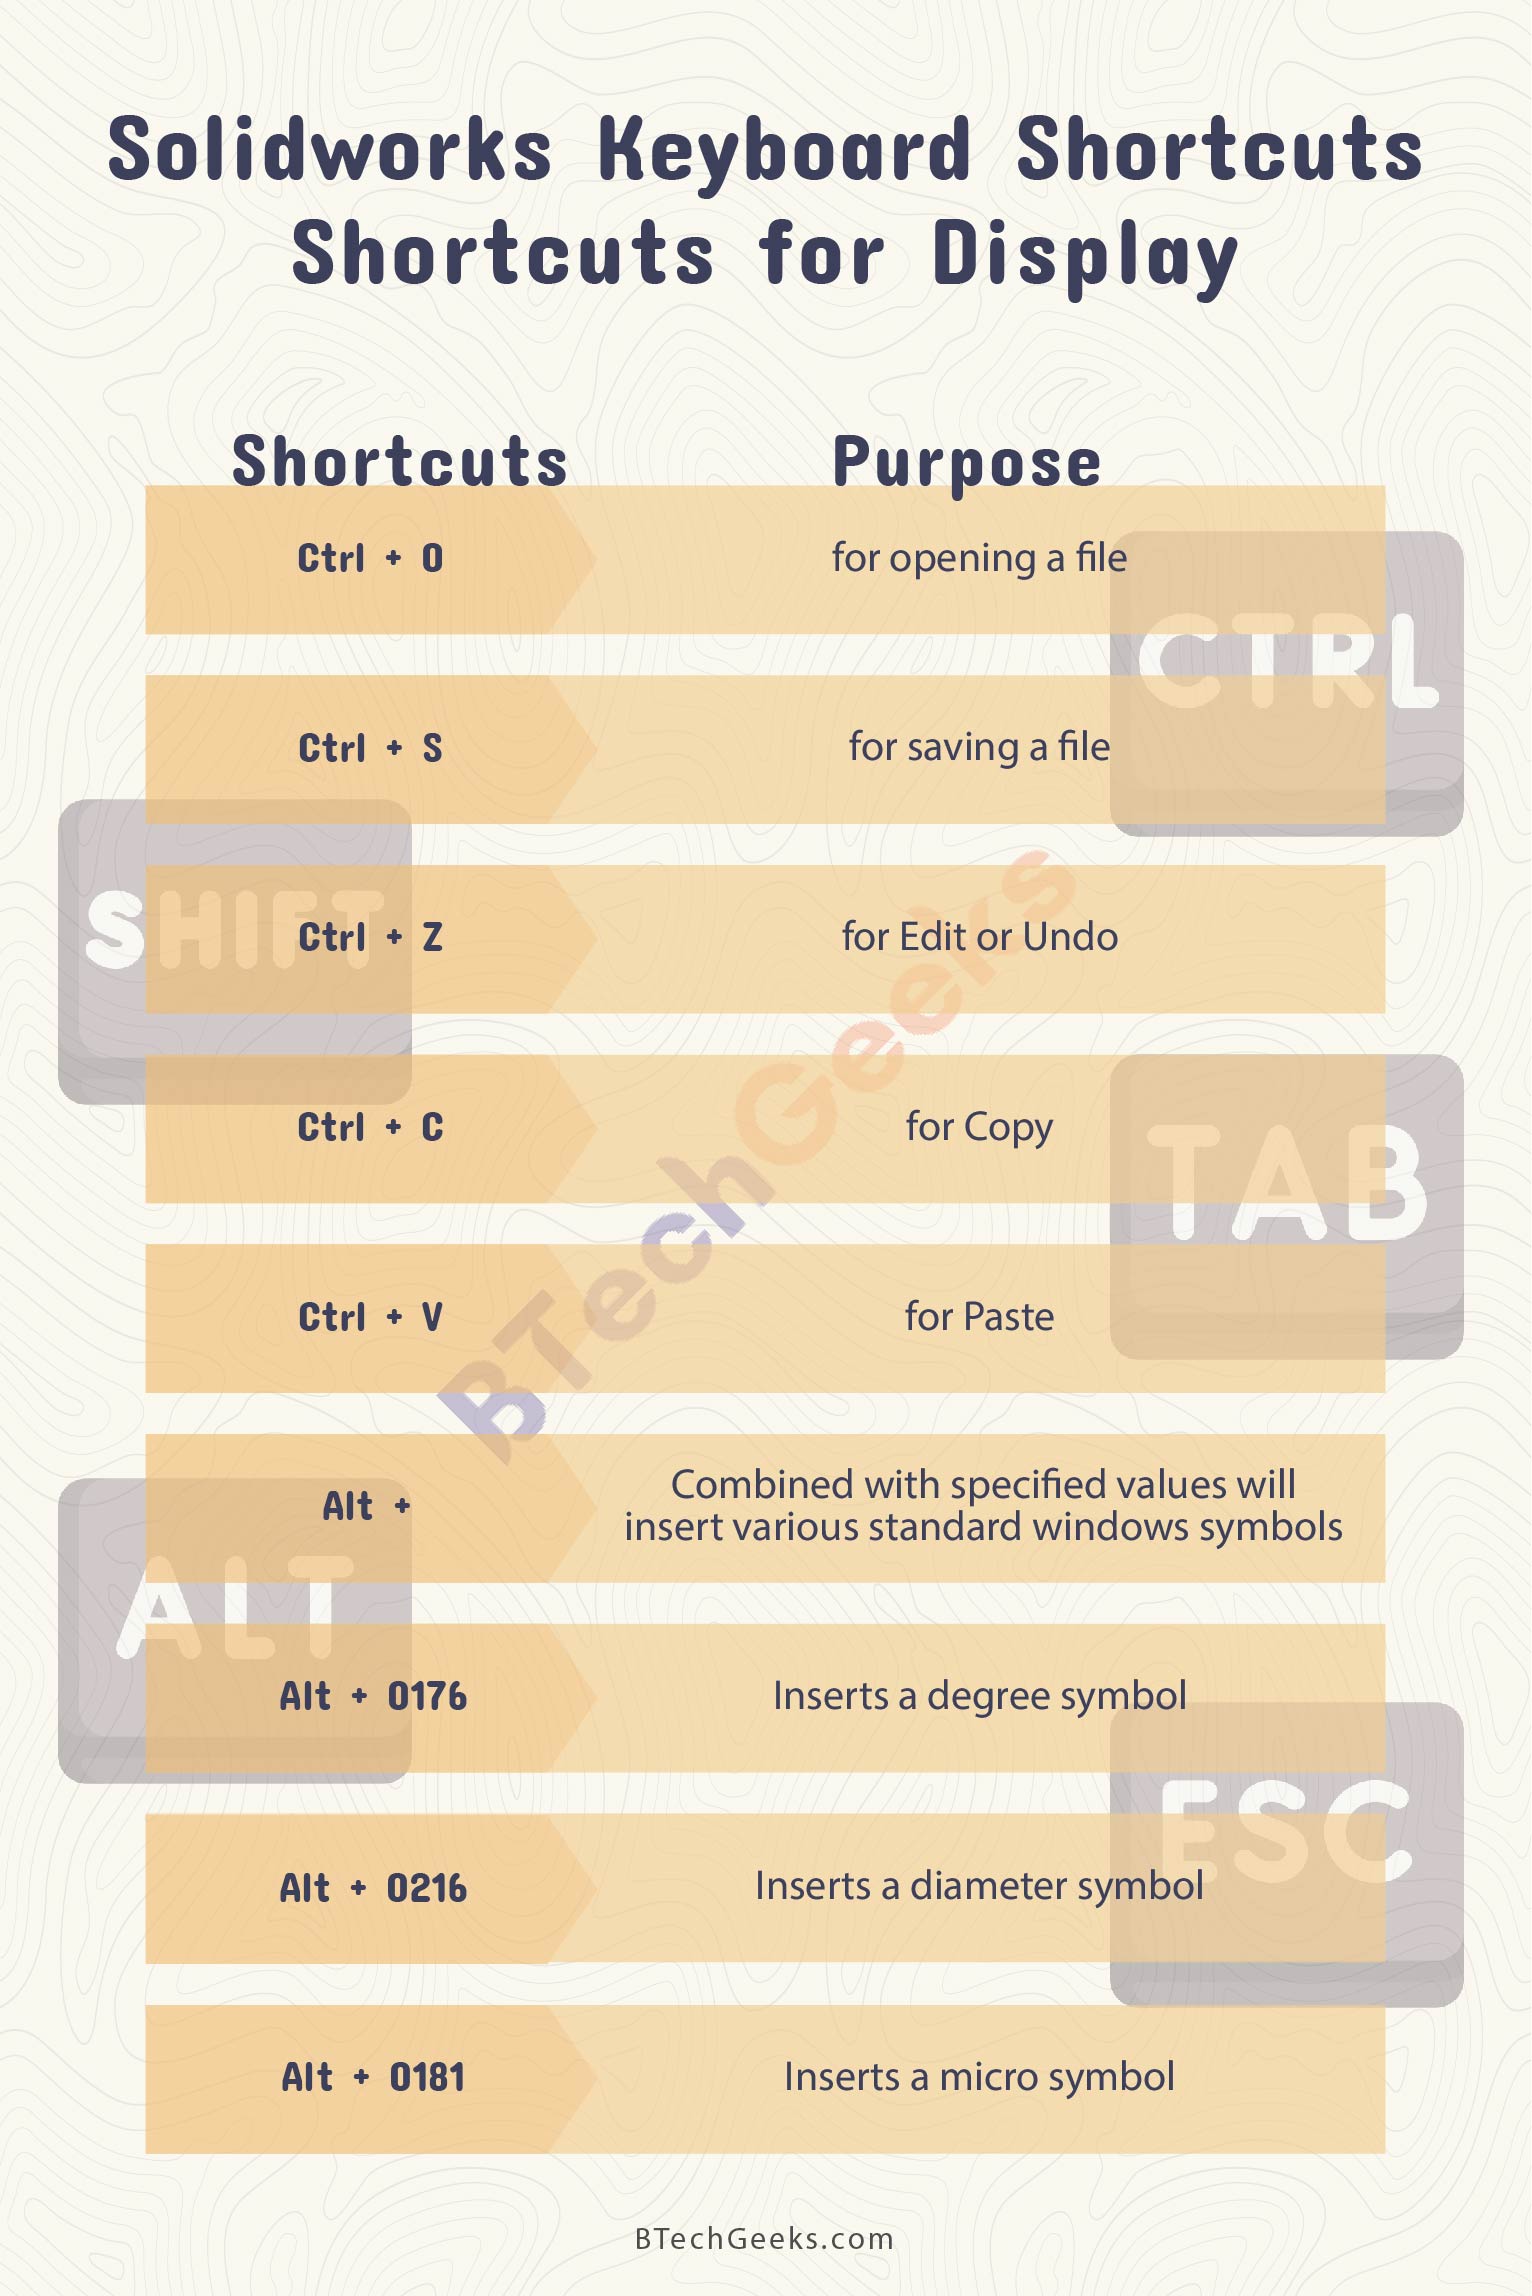
Basic Windows Shortcut Keys
| Shortcuts | Purpose |
| Ctrl + O | for opening a file |
| Ctrl + S | for saving a file |
| Ctrl + Z | for Edit or Undo |
| Ctrl + C | for Copy |
| Ctrl + V | for Paste |
| Alt + | This combined with specified values will insert various standard windows symbols |
| Alt + 0176 | Inserts a degree symbol |
| Alt + 0216 | Inserts a diameter symbol |
| Alt + 0181 | Inserts a micro symbol |
Shortcuts for Selection
| Shortcuts | Purpose |
| Ctrl + click | This shortcut will let you choose multiple entities |
| Shift | This option will let you select the transparent face on any part |
| Shift + click | This shortcut will select everything between the two items that you select in the ‘FeatureManager’ section of the design tree |
Assembly Shortcuts
| Shortcuts | Purpose |
| Alt + drag | |
| Mates | Creates a SmartMate if you Alt + drag a component |
| Reordering components | While moving any component in the FeatureManager design tree, this will ensure that the component will stay at the similar level in the tree and this will prevent it from being shifted into any other sub-assembly |
| Alt + Ctrl drag | Copies the component and creates a SmartMate |
| Ctrl + drag | Copies a component |
| Ctrl + drag: Selection | In any assembly of preselected components, this option will invert the selection if a selection box is opened |
| Toolbox. | This will create some part instead of any configuration if you drag any Toolbox component to any assembly |
| Tab | |
| Hide/Show | This will hide all the components below the one shown by the pointer |
| While you insert a component, this will rotate that component 90º. | |
| Shift + Tab | |
| Hide/Show | It will show all components below the one shown by the pointer |
| While you insert a component, this will rotate that component to -90º. | |
| Ctrl + Shift + Tab | This will temporarily show all the hidden components like transparent and it will let you select the one you wan to show |
Shortcuts for User Interface
| Shortcuts | Purpose |
| Ctrl + Q | Complete Rebuild |
| Enter | Repeats the last command |
| Ctrl + Tab | Moves among open documents |
Shortcuts for Moving
| Shortcuts | Purpose |
| Ctrl + drag the middle mouse button | Pans a model |
| Shift + drag | |
| Parts | Moves a feature. |
| Sketches | Moves a set of sketch entities. |
| Drawings | Moves the selected drawing view or any other related view, and brings them together and makes them look like a single entity. You will also be able to move a dimension to a different view. |
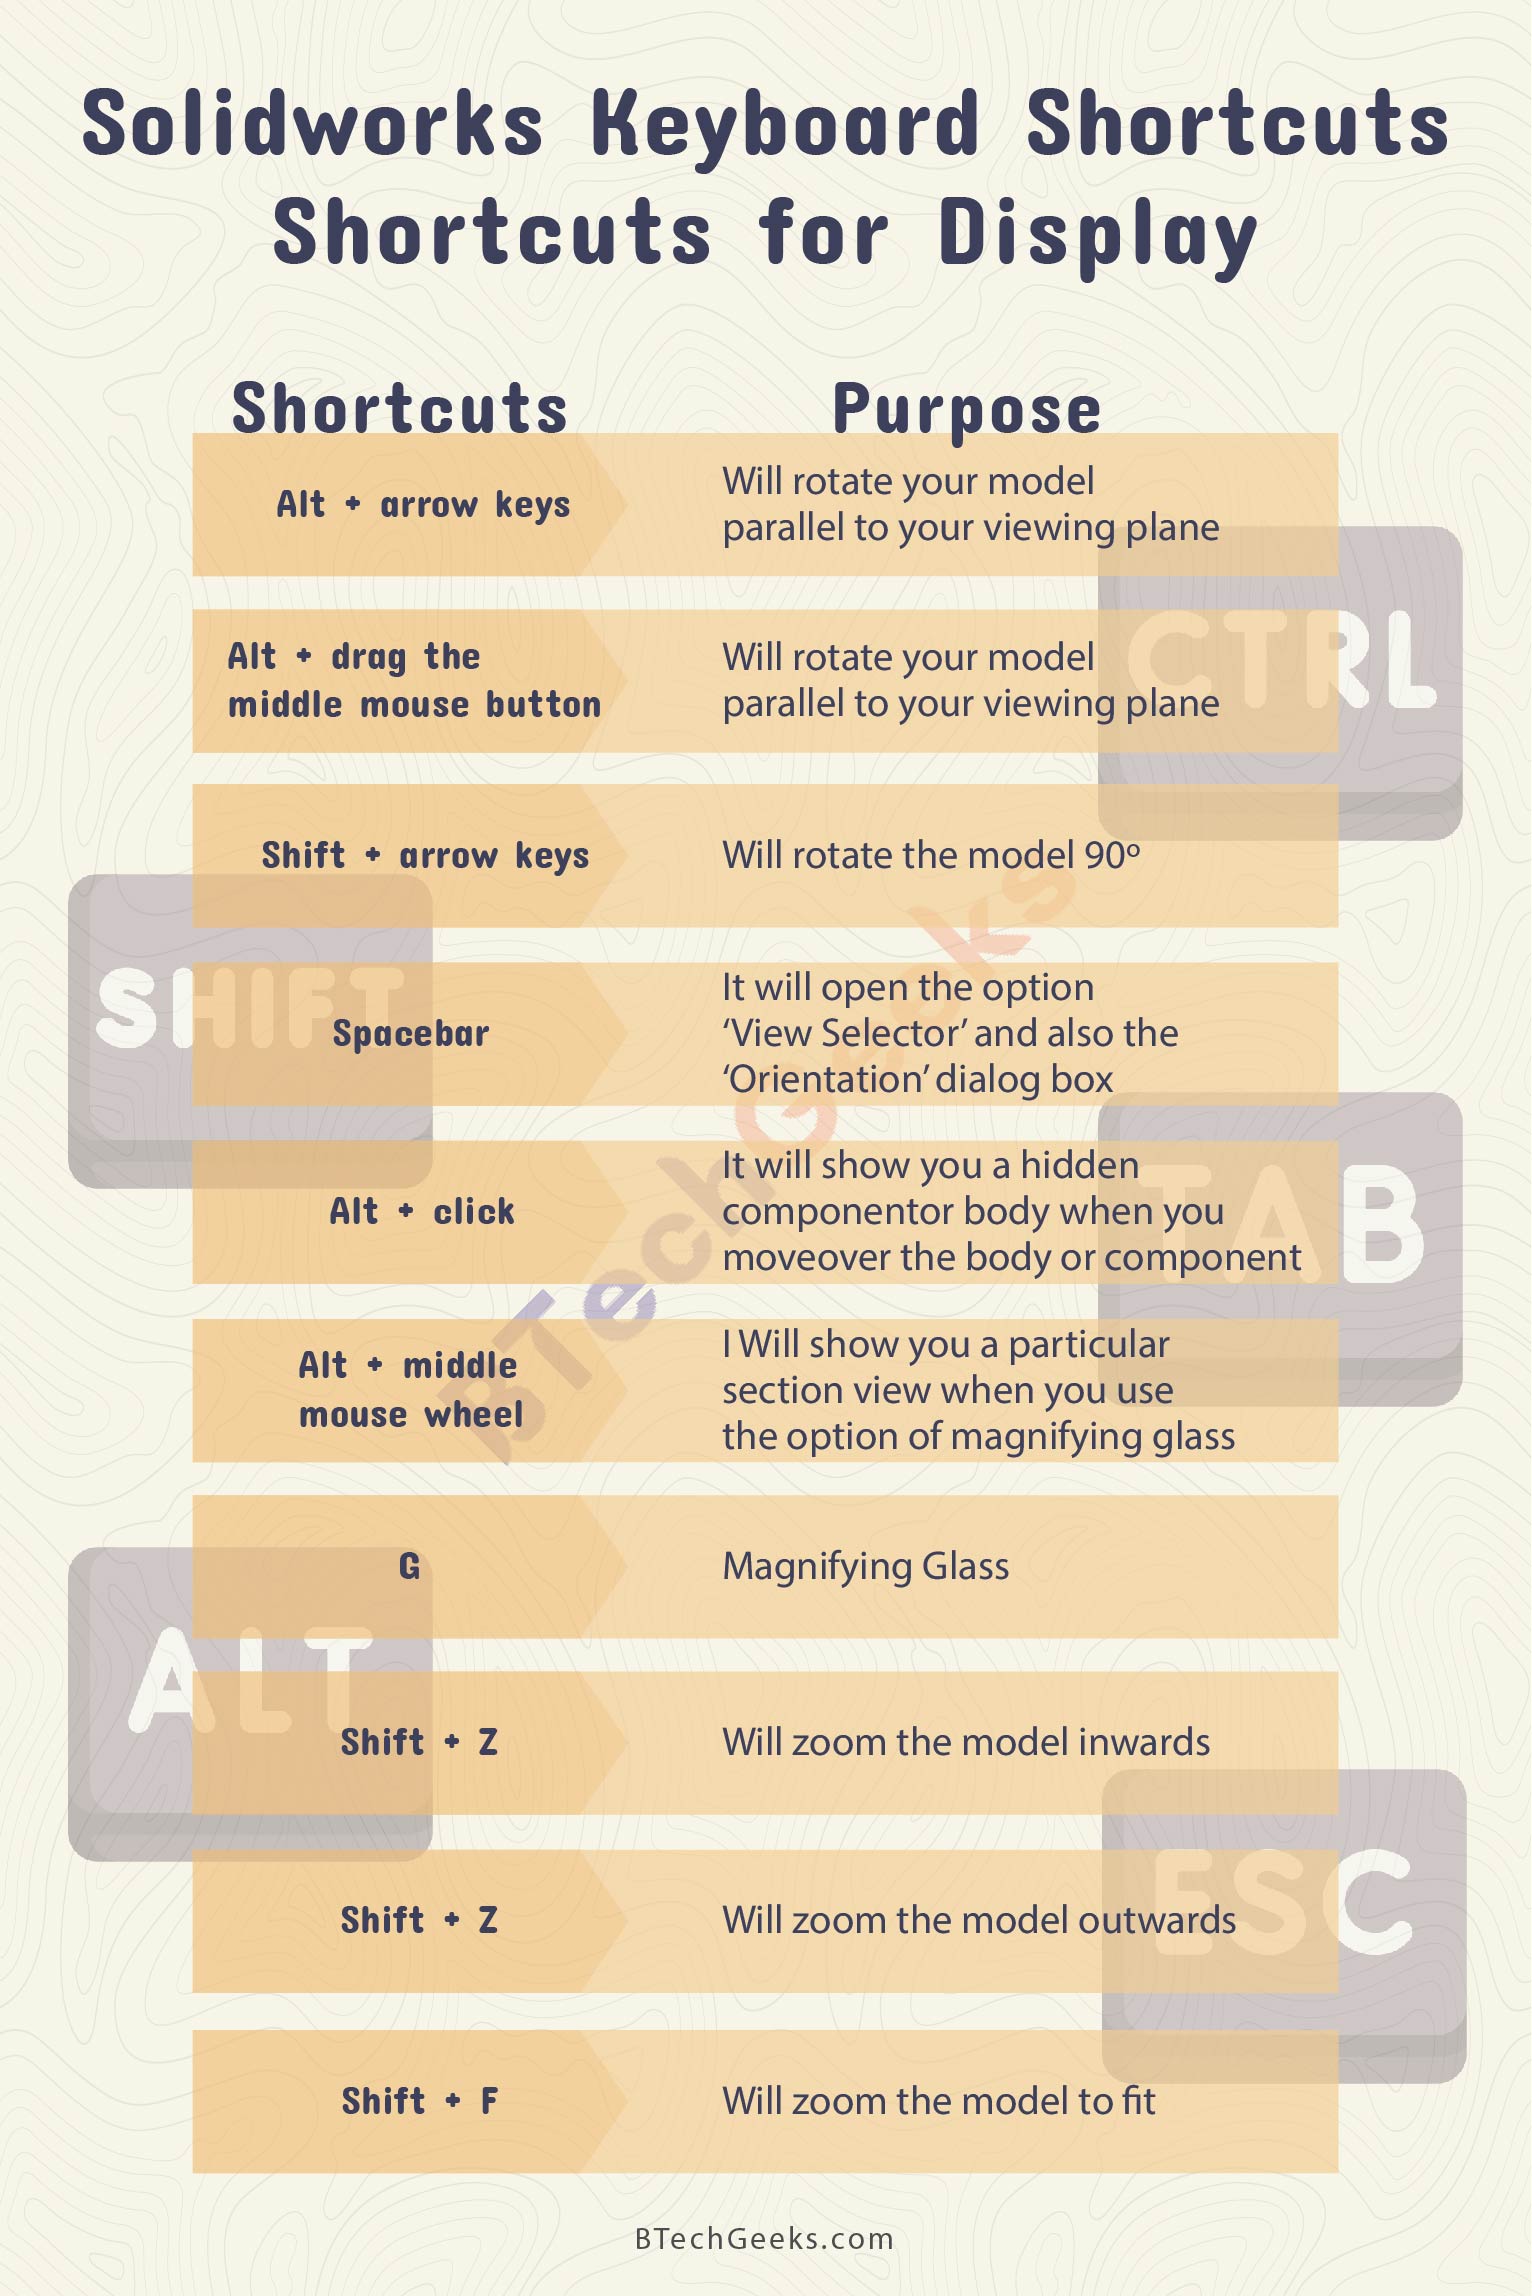
Shortcuts for Display
| Shortcuts | Purpose |
| Alt + arrow keys | Will rotate your model parallel to your viewing plane |
| Alt + drag the middle mouse button | Will rotate your model parallel to your viewing plane |
| Shift + arrow keys | Will rotate the model 90º |
| Spacebar | It will open the option ‘View Selector’ and also the ‘Orientation’ dialog box |
| Alt + click | It will show you a hidden component or body when you move over the body or component |
| Alt + middle mouse wheel | I Will show you a particular section view when you use the option of magnifying glass |
| G | Magnifying Glass |
| Shift + Z | Will zoom the model inwards. |
| Shift + Z | Will zoom the model outwards. |
| Shift + F | Will zoom the model to fit. |
Shortcuts for Sketching
| Shortcuts | Purpose |
| Ctrl + drag | It will suppress the inference lines if you drag to an endpoint |
| Shift + drag | While sketching a line, if you select this option, it will snap the line to specific lengths |
| Shift + click | It will turn on snapping |
| Pressing Ctrl | If you press ‘Control’ while sketching it will turn off the automatic sketch relations |
| Tab | It will change the XYZ plane if you are sketching in a 3D sketch |
Shortcuts for Dimension
| Shortcuts | Purpose |
| Alt + click | It will turn off the automatic alignment if you place the dimensions and annotations |
| Alt + drag | It will move an annotation independently from a particular group in which it was initially stored |
| Ctrl + drag | It will create some additional leaders on the note, if you Ctrl + drag any leader’s arrowhead |
| Shift + click | It will snap any dimension to the maximum or minimum location if the dimensioning arcs or circles with the Smart Dimension tool |
Creating Customized Keyboard Shortcuts
- After opening any document, you have to select the option ‘Tools.’
- After choosing the ‘Tools’ option, you now have to select the ‘Customize’ option.
- Now, you have to select the option named ‘Keyboard tab.’
- The next step is to click on any command you use frequently, which does not already have a shortcut.
- Now, the next step is to add a customized shortcut.
- You will receive an ‘error message’ if you have entered any shortcut that exists already. You have to overwrite this option if you want.
Changing The Keyboard Shortcuts
- When you open any document, you should select the option ‘Tools.’
- After choosing the ‘Tools’ option, you should now select the ‘Customize’ option.
- Now, you should select the option ‘Keyboard tab.’
- The next step is to click on any keyboard shortcut that you wish to alter.
- Finally, you can add a new customized shortcut to your document.
- You will receive an ‘error message’ if you have entered any shortcut that exists already. You have to overwrite this option if you want.
- Now select the OK option to finish customizing and save.
Conclusion on Solidworks Keyboard Shortcuts
So, as you can see, learning the keyboard shortcuts is quite handy. No doubt, it will save you a lot of time but will also make you tech-savvy. Being on the computer all the time has never been better as these shortcuts will save you so much time.