ImageOps Module in Python:
The ImageOps module includes several ‘ready-made’ image processing operations. This module is still in development, and most operators only function with L and RGB images.
Functions of ImageOps Module
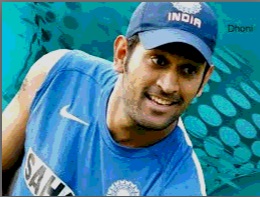
Let us take the below image as an example for observing the functions of ImageOps module:

1)Python AutoConstrast Function Using Pillow
The auto contrast feature is used to adjust the contrast of a photograph.
Image contrast should be maximized (normalized). This function generates a histogram of the input picture (or mask region), removes the cutoff percent of the brightest and darkest pixels from the histogram, and remaps the image so that the darkest pixel is black (0) and the lightest is white (255).
Syntax:
PIL.ImageOps.autocontrast(image, cutoff=0, ignore=None, mask=None, preserve_tone=False)
Parameters
image: The image that will be processed.
cutoff: The percentage to remove from the histogram’s low and high ends. For both, either a tuple of (low, high) or a single number.
ignore: The value of the background pixel (use None for no background).
mask: In contrast operations, the histogram is produced using pixels within the mask. If no mask is specified, the full image is used to compute the histogram.
- How to Download an Image from a URL in Python?
- Python NumPy log10() Function
- Python NumPy log2() Function
preserve_tone: Preserve image tone with Photoshop-style autocontrast.
(Version 8.2.0 introduces a new feature)
The cutoff value is used to normalise the picture contrast. To suppress the background pixels, use the ignore parameter.
Example
Approach:
- Import ImageOps, Image from PIL module using the import keyword.
- Pass the image path as an argument to the open() function to open the image and store it in a variable.
- Pass the above image, cutoff value as arguments to the autocontrast() function to normalize the image and store it in another variable.
- Display the above-normalized image using the show() function.
- The Exit of the Program.
Below is the implementation:
# Import ImageOps, Image from PIL module using the import keyword
from PIL import ImageOps, Image
# Pass the image path as an argument to the open() function to open the image
# and store it in a variable
gvn_image = Image.open(r'C:\Users\vicky\Downloads\dhoni.jpg')
# Pass the above image, cutoff value as arguments to the autocontrast() function to
# normalize the image and store it in another variable
normalzd_imag = ImageOps.autocontrast(gvn_image, cutoff=40)
# Display the above normalized image using the show() function
normalzd_imag.show()
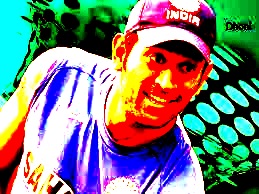
Output:
2)Python Colorize Function Using Pillow
Colorize a grayscale photograph. This function computes a color wedge that maps all black pixels in the original image to the first color and all white pixels to the second.
It necessitates the use of seven parameters in total.
- The first point to consider is the image to be colored.
- The second option is black, which only allows the input of black pixels.
Similarly, the third option is white, which accepts the input of white pixels. - For midtone input pixels, the fourth option, mid, is used. The black point, white point, and midway are the final three parameters.
For their respective mappings, these three parameters each have an integer input of [0, 255]. The colorize function generates and returns an image.
If mid is specified, three-color mapping is used. The black and white arguments should be RGB tuples or color names; if you want to use three-color mapping, specify mid as well. Mapping positions for any of the colors (e.g., blackpoint) can be defined, with these parameters being the integer value corresponding to where the associated color should be mapped. These factors must be ordered logically so that blackpoint = middle = whitepoint (if mid is specified).
Syntax:
PIL.ImageOps.colorize(image, black, white, mid=None, blackpoint=0, whitepoint=255,
midpoint=127)
Parameters
- image: The image to be colored.
- black: The color that should be used for black input pixels.
- white: The color that should be used for white input pixels.
- mid: The color that should be used for midtone input pixels.
- blackpoint: An int value between 0 and 255 that represents the black mapping.
- whitepoint: An int integer between 0 and 255 that represents the white mapping.
- midpoint: An integer number between 0 and 255 for the midtone mapping.
Example
Approach:
- Import ImageOps, Image from PIL module using the import keyword.
- Pass the image path as an argument to the open() function to open the image and store it in a variable.
- Pass the above image, black, white, and mid values as arguments to the colorize() function to colorize the grayscale image and store it in another variable.
- Display the above-colorized image using the show() function.
- The Exit of the Program.
Below is the implementation:
# Import ImageOps, Image from PIL module using the import keyword
from PIL import ImageOps, Image
# Pass the image path as an argument to the open() function to open the image
# and store it in a variable
gvn_image = Image.open('dhoni.jpg')
# Pass the above image, black, white, and mid values as arguments to the colorize() function to
# colorize the gray scale image and store it in another variable
colorize_imag = ImageOps.colorize(gvn_image, black="red", white="white", mid="yellow")
# Display the above colorized image using the show() function
colorize_imag.show()
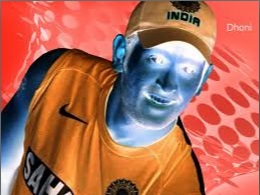
Output:

Original Image Result Image
3)Python Invert Function Using Pillow
By inverting a picture, this function can be used to negate it. For example, the invert function takes a single image input and returns an inverted image.
Example
Approach:
- Import ImageOps, Image from PIL module using the import keyword.
- Pass the image path as an argument to the open() function to open the image and store it in a variable.
- Pass the above image as an argument to the invert() function to get the negative(negated) image and store it in another variable
- Display the above negated (negative) image using the show() function.
- The Exit of the Program.
Below is the implementation:
# Import ImageOps, Image from PIL module using the import keyword
from PIL import ImageOps, Image
# Pass the image path as an argument to the open() function to open the image
# and store it in a variable
gvn_image = Image.open(r'C:\Users\vicky\Downloads\dhoni.jpg')
# Pass the above image as an argument to the invert() function to
# negate the image and store it in another variable
negtv_imag = ImageOps.invert(gvn_image)
# Display the above negated (negative) image using the show() function
negtv_imag.show()
Output:
4)Python Posterize Function
The number of bits in each color channel is reduced using this function.
Syntax:
PIL.ImageOps.posterize(image, bits)
Parameters
- image: It is the image to be posterized
- bits: The number of bits to be kept for each channel (1-8).
Example
Approach:
- Import ImageOps, Image from PIL module using the import keyword.
- Pass the image path as an argument to the open() function to open the image and store it in a variable.
- Pass the above image, and some random number of bits as an argument to the posterize() function to reduce the number of bits in each color channel and store it in another variable
- Display the above-posterized image using the show() function.
- The Exit of the Program.
Below is the implementation:
# Import ImageOps, Image from PIL module using the import keyword
from PIL import ImageOps, Image
# Pass the image path as an argument to the open() function to open the image
# and store it in a variable
gvn_image = Image.open(r'C:\Users\vicky\Downloads\dhoni.jpg')
# Pass the above image, and some random number of bits as an argument to the posterize() function to
# reduce the number of bits in each color channel and store it in another variable
postrzd_imag = ImageOps.posterize(gvn_image, 3)
# Display the above posterized image using the show() function
postrzd_imag.show()
Output: