Javascript check if object key exists – How to Check if a Key Exists in a JavaScript Object?

How to Check if a Key Exists in a JavaScript Object

Checking if a Key Exists in a JavaScript Object

Javascript check if object key exists: Checking if a key exists in a JavaScript Object can be done using the following ways

Method #1: Using ‘in’ Operator

Check if key exists javascript: Use the in operator, to check if a key exists in a JavaScript object. If the key is found in the given object or its prototype chain, the in operator returns true.

For Example:

"key" in gvn_obj

Example1:

// Create an object say Employ
const Employ = {
  EmpId: 2122,
  EmpName: 'Nick'
};

// Check if EmpId is present in the Employ object using the 
// 'in' operator. If it is present it prints true else false
// Here it prints true
console.log('EmpId' in Employ); 
// salary is NOT present in the Employ object hence it prints false
console.log('salary' in Employ); 

Output:

true
false

Explanation:

Here EmpId is present in the Employ object so it prints true
salary is NOT present in the Employ object hence it prints false

When using the in operator, the syntax is:

 str in object.

The value before the in keyword should be of the ‘string‘ or ‘symbol‘ type. Any value that is not a symbol is automatically converted to a string.

Example2:

// Create an object say Employ
const Employ = {
  1: 2122,
  EmpName: 'Nick'
};

// Here 1 is given as a string and it is present in Employ object
// so it prints true
console.log('1' in Employ); 
// Here 1 automatically gets converted to string hence it prints true
console.log(1 in Employ); 

Output:

true
true

NOTE:

In javascript, object keys can only be of the string or symbol types.
Despite the fact that our object appears to have a key of type integer, it is actually a string.

In our second console.log statement, the in operator will convert the 1 to a string.

Method #2: Using hasOwnProperty Method

Check if key is in object javascript: We can use the Object.hasOwnProperty() method to check if an object has a key,

For Example:

gvn_object.hasOwnProperty('key').

If the key exists in the object, the Object.hasOwnProperty() method returns true; otherwise, it returns false.

Example:

// Create an object say Employ
const Employ = {
  EmpId: 2122,
  EmpName: 'Nick'
};

// Check if EmpId is present in the Employ object using the 
// hasOwnProperty() method.
// If it is present it prints true else false
// Here it prints true since EmpId is present in Employ object
console.log(Employ.hasOwnProperty('EmpId'));

// salary is NOT present in the Employ object hence it prints false
console.log(Employ.hasOwnProperty('salary'));

Output:

true
false

Explanation:

Here EmpId is present in the Employ object so it prints true
salary is NOT present in the Employ object hence it prints false

NOTE:

  • The object.hasOwnProperty() method differs from the in operator.
  • The in operator checks for a key in an object and its prototype chain, but the object.hasOwnProperty() method just looks for the key directly on the object.

Method #3: Using Optional chaining

Javascript check if key exists: To check if a key exists in an object, we can use the Optional chaining (.) operator, such as :

gvn_object.key

If the key is present on the object, the Optional chaining operator returns the value of the key; otherwise, it returns undefined.

Example:

// Create an object say Employ
const Employ = {
  EmpId: 2122,
  EmpName: 'Nick'
};

// Check if EmpId is present in the Employ object using  
// Optional chaining (.) operator
// If it is present it prints value of key else undefined
// Here it prints 2122 since EmpId is present in Employ object
console.log(Employ.EmpId); 
// salary is NOT present in the Employ object hence it prints undefined
console.log(Employ.salary);

Output:

2122
undefined

Explanation:

Javascript check if key exists in object: We used the Optional chaining operator in the code sample to check if the EmpId and salary keys were present in the Employ object.

Because the EmpId key exists, Employ?.EmpId evaluates to 2122 and since the salary key does not exist, the Optional chaining operator returns undefined.

NOTE:

This conditional check would fail if an object had keys with 'undefined' values;
in such case, this approach would return a false negative.

Example:

// Create an object say Employ
const Employ = {
  EmpId: undefined,
};

console.log(Employ.EmpId); // prints undefined

if (Employ.EmpId !== undefined) {
  // The `EmpId` key exists in the Employ object,
  // but this never runs
  console.log('btechgeeks')
}

Output:

undefined

Explanation:

Even though the name key exists on the object in the code example, our conditional check does not account for the situation where its value is set to undefined.


JS get last character of a string – How to Get the Last Character of a String in JavaScript?

How to Get the Last Character of a String in JavaScript

JS get last character of a string: Given a string, the task is to print the last character of the given string using JavaScript.

Get the Last Character of a String Using JavaScript

Method #1: Using charAt() Function

To get the last character of a string, use the string’s charAt() method, passing it the last index as an argument. For example, gvn_str .charAt(str.length – 1) returns a new string with the string’s last character.

The charAt() function returns the character present at the specified index.

Here gvn_str.length is used to find the total length of the given string.

Approach:

  • Give the string as static input and store it in a variable.
  • Pass the last index of the string(length of the string – 1) to the charAt() function and apply it to the given string to get the last character of the given string.
  • Print the last character of the given string.
  • The Exit of the Program.

Below is the implementation:

// Give the string as static input and store it in a variable.
const gvn_str = 'hello btechgeeks';
// Pass the last index of the string(length of the string - 1) to the
// charAt() function and apply it on the given string to get the last
// character of the given string
const last_char = gvn_str.charAt(gvn_str.length - 1);
// Print the last character of the given string
console.log(" The last character of the given string = ",last_char); 

Output:

The last character of the given string = s

NOTE:

JavaScript indexes are zero-based. Since the first character in the string has an 
index of 0, the last character has an index of gvn_str.length - 1.

Passing index on an Empty String

The charAt method returns an empty string if an index is passed that does not exist on the string.

// Give the empty string as static input and store it in a variable.
const gvn_str = '';
// Pass the last index of the string(length of the string - 1) to the
// charAt() function and apply it on the given string to get the last
// character of the given string
const last_char = gvn_str.charAt(gvn_str.length - 1);
// Print the last character of the given string
console.log(last_char);

Output:


Method #2: Using slice() Function

Approach:

  • Give the string as static input and store it in a variable.
  • Pass the last index value using negative indexing -1 to the slice() function and apply it on the given string to get the last character of the given string.
  • Print the last character of the given string.
  • The Exit of the Program.

Below is the implementation:

// Give the string as static input and store it in a variable.
const gvn_str = 'good morning';
// Pass the last index value using negative indexing -1 to the 
// slice() function and apply it on the given string to get the 
// last character of the given string
const last_char = gvn_str.slice(-1)
// Print the last character of the given string
console.log(" The last character of the given string = ",last_char); 

Output:

The last character of the given string = g

Method #3: Using Bracket Notation to Access the Index on the String.

To get the last character of a string, use bracket notation to access the string at the last index. For example, gvn_str[gvn_str.length – 1] returns the string’s last character.

Approach:

  • Give the empty string as static input and store it in a variable.
  • Use the bracket notation to the last character of a given string and store it in another variable.
  • Here gvn_str.length – 1 represents the last index
  • Print the last character of the given string.
  • The Exit of the Program.

Below is the implementation:

// Give the empty string as static input and store it in a variable.
const gvn_str = 'hello btechgeeks';
// Use the bracket notation to the last character of a given string
// Here gvn_str.length - 1 represents the last index
const last_char = gvn_str[gvn_str.length - 1];
// Print the last character of the given string
console.log(" The last character of the given string = ",last_char);

Output:

The last character of the given string = s


Javascript string slice – The String slice() method in JavaScript | Definition, Syntax, How it works, Examples of JavaScript String slice() method

JavaScript String slice() method

Javascript string slice: In this ultimate tutorial, we have discussed complete details about the JavaScript String slice() method like definition, syntax, how to use the string slice() method to extract a substring from a string with examples.

JavaScript String slice() method – Definition

Return a new string from the part of the string included between the begin and end positions.

The original string is not mutated.

end is optional.

"This is my work".slice(5)
//"is my work"
"This is my work".slice(5,10)
//"is my"

If you set a negative first parameter, the start index starts from the end, and the second parameter must be negative as well, always counting from the end:

"This is my work".slice(-4)
//"work"
"This is my work".slice(-4,-1)
//"wor"

String.prototype.slice() Syntax

slice(beginIndex)
slice(beginIndex, endIndex)

Parameters Included in String Slice() Method

1. beginIndex: 

The zero-based index whereat to start extraction. In the case of negative, it is treated as str.length + beginIndex. (For instance, if beginIndexis -2, it is interpreted as str.length – 2.) If beginIndex is not a numeral after Number (beginIndex), it is considered as 0. In case beginIndexis greater than or equal to the str.length, an empty string is returned.

2. endIndex (Optional):

The zero-based index before which to end extraction. The character at this index wouldn’t be involved.

If endIndex is excluded or undefined, or greater than str.length, slice() extracts to the edge of the string. If negative, it is handled as str.length + endIndex. (For instance, if endIndex is -5, it is treated as str.length – 5.) If it is not undefined, and the Number(endIndex) is not positive, an empty string is returned.

If endIndex is defined, then beginIndex should be smaller than endIndex otherwise, an empty string is returned. (For example, slice(-3, 0), slice(-1, -3), or slice(3, 1) returns "".)

Return Values

It returns a part or a slice of the furnished input string.

Do Check:

Examples on String slice() method in JavaScript

In this section, you will find plenty of example programs to learn how to create and use the javascript string slice() method in various conditions:

1. Using slice() to create a new string

The following examples utilize the string slice() method to create a new string.

let str1 = 'The morning is upon us.', // the length of str1 is 23.
    str2 = str1.slice(1, 8),
    str3 = str1.slice(4, -2),
    str4 = str1.slice(12),
    str5 = str1.slice(30);
console.log(str2)  // OUTPUT: he morn
console.log(str3)  // OUTPUT: morning is upon u
console.log(str4)  // OUTPUT: is upon us.
console.log(str5)  // OUTPUT: ""

2. Using slice() with negative indexes

The following example uses slice() with negative indexes.

<script> 
var str = "Javatpoint"; 
document.writeln(str.slice(-5)); 
</script>

Output:

point

Doctype html unexpected token – How to Fix Unexpected token Error in JavaScript?

How to Fix Unexpected token Error in JavaScript

Doctype html unexpected token: The “Uncaught SyntaxError: Unexpected token” error can occur for a variety of reasons, including:

  • Using a <script /> tag that leads to an HTML file rather than a JS file.
  • Receiving an HTML response from a server where JSON is expected,
  • Having a <script /> tag that leads to the wrong path.
  • When your code is missing or contains extra brackets, parenthesis, or commas.
  • When you forgot to close the <script />tag.

Let us see some of the cases where the “Uncaught SyntaxError: Unexpected token” error Occurs

Cases where the “Uncaught SyntaxError: Unexpected token” error Occurs

Example1

Unexpected token js: Below is an example of an error: our script tag points to a html file rather than a JS file.

index.html:

<!DOCTYPE html>
<html lang="en">
  <head>
    <meta charset="UTF-8" />
  </head>

  <body>
    <!-- Here script tag is pointing to an html file instead of JS file 
    Hence Uncaught SyntaxError: Unexpected token '<' occurs-->
    <script src="index.html"></script>
  </body>
</html>

NOTE:

Check that any script tag you use lead to a valid path, and try to rename all your files
using just lowercase characters. 
If the file name contains uppercase letters or special characters, the error may occur.

Example2

Unexpected token doctype: The other common cause of the “Uncaught SyntaxError: Unexpected token” is when we forget to close a script tag.

<!DOCTYPE html>
<html lang="en">
  <head>
    <meta charset="UTF-8" />

    <!-- Here we forgot to close the script tag, hence 
    Uncaught SyntaxError: Unexpected token '<' occurs -->
    <script
      console.log("Uncaught SyntaxError: Unexpected token '<'");
    </script>
  </head>

  <body></body>
</html>
  • When attempting to parse JSON data, the error is also generated if you make an http request to a server and receive an HTML response.
  • To solve this we can use console.log. The response you receive from your server and ensure it is a proper JSON string free of HTML tags.
  • Alternatively, you can open your browser’s developer tools, navigate to the Network tab, and inspect the response.

Example3: index.js (Giving another extra curly brace)

// Create a function say multiply whict accepts two numbers
// as arguments and returns the multiplication result
function multiply(x, y) {
  // Multiply the above passed two numbers and return the result
  return x * y;
}}

Output:

}}
^

SyntaxError: Unexpected token }
at Module._compile (internal/modules/cjs/loader.js:723:23)
at Object.Module._extensions..js (internal/modules/cjs/loader.js:789:10)
at Module.load (internal/modules/cjs/loader.js:653:32)
at tryModuleLoad (internal/modules/cjs/loader.js:593:12)
at Function.Module._load (internal/modules/cjs/loader.js:585:3)
at Function.Module.runMain (internal/modules/cjs/loader.js:831:12)
at startup (internal/bootstrap/node.js:283:19)
at bootstrapNodeJSCore (internal/bootstrap/node.js:623:3)

Explanation:

Here we gave another extra curly brace, hence SyntaxError: Unexpected token } occured

These syntax errors are difficult to spot, but an useful tip is:

  • If you receive the “Uncaught SyntaxError: Unexpected token ‘<‘” (ovserve the ‘<‘) error, you are most likely attempting to read HTML code that begins with ‘<‘.
  • If your error message comprises a curly brace, parenthesis, comma, colon, etc., you most certainly have a SyntaxError, which occurs when your code has an additional or missing character.

Example4: index.js (Giving colons two times(::) instead of once(:))

// Create an object and store it in a variable
const obj = {
  // Here we gave colons two times(::) instead of once(:) to separate the key-value pairs
  // so,the SyntaxError: Unexpected token : occurs
  Website:: "Btechgeeks",
}

Output:

Website:: "Btechgeeks",
^

SyntaxError: Unexpected token :
at Module._compile (internal/modules/cjs/loader.js:723:23)
at Object.Module._extensions..js (internal/modules/cjs/loader.js:789:10)
at Module.load (internal/modules/cjs/loader.js:653:32)
at tryModuleLoad (internal/modules/cjs/loader.js:593:12)
at Function.Module._load (internal/modules/cjs/loader.js:585:3)
at Function.Module.runMain (internal/modules/cjs/loader.js:831:12)
at startup (internal/bootstrap/node.js:283:19)
at bootstrapNodeJSCore (internal/bootstrap/node.js:623:3)

Explanation:

Here we gave colons two times(::) instead of once(:) to separate the key-value pairs 
so,the SyntaxError: Unexpected token : occurs

Example5: index.js (Giving an extra comma)

// Create an object and store it in a variable
const obj = {
  // Here we gave an extra comma(,) 
  // Hence the SyntaxError: Unexpected token occurs
  Website: "Btechgeeks",,
}

Output:

Website: "Btechgeeks",,
^

SyntaxError: Unexpected token ,
at Module._compile (internal/modules/cjs/loader.js:723:23)
at Object.Module._extensions..js (internal/modules/cjs/loader.js:789:10)
at Module.load (internal/modules/cjs/loader.js:653:32)
at tryModuleLoad (internal/modules/cjs/loader.js:593:12)
at Function.Module._load (internal/modules/cjs/loader.js:585:3)
at Function.Module.runMain (internal/modules/cjs/loader.js:831:12)
at startup (internal/bootstrap/node.js:283:19)
at bootstrapNodeJSCore (internal/bootstrap/node.js:623:3)

Fixing the “Uncaught SyntaxError: Unexpected token” Error

To resolve the “Uncaught SyntaxError: Unexpected token” error, make the following changes:

  • We should not have a <script/> tag that points to an HTML file, instead of a JS file.
  • Instead of requesting an HTML file from a server, you are requesting JSON.
  • There is no <script/> tag pointing to an incorrect path.
  • There must be no missing or excessive brackets, parenthesis, or commas.
  • Do not forget to close a <script tag.

Javascript get object class name – How to Get the Class Name of an Object in JavaScript?

How to Get the Class Name of an Object in JavaScript

Javascript get object class name: To obtain the class name of the object, such as obj.constructor.name, access the name property on the object’s constructor.

The constructor property returns a reference to the constructor function that created the instance object.

index.js:

// @@ Create a contsructor say Employ
class Employ {}

// Create an object for the above class using the new keyword
const obj = new Employ();
// Get the name of the contsructor using the Object.constructor.name attribute by applying it on the above object
console.log(obj.constructor.name);

Output:

Employ

Explanation:

Here we accessed the name property on the Object.constructor property.

The Object.constructor property returns a reference to the constructor function, that was used to create the object.

// @@ Create a class say Employ
class Employ {}

// Create an object for the above class using the new keyword
const obj = new Employ();
// Get the reference to the constructor using the constructor attribute by applying it on the above object
console.log(obj.constructor);

Output:

[Function: Employ]

Javascript get class name of object: Another option is to create a method on the class that returns the object’s class name.

// Create a class say Employ
class Employ {
  // Inside the class create a function say getClassName()
  // which returns the name of the class using the constructor.name property
  getClassName() {
    return this.constructor.name;
  }
}
// Create an object for the above class using the new keyword
const obj = new Employ();

// Apply getClassName() function on the above object 
// to get the class name of the above created class
const class_name = obj.getClassName();
// Print the class name 
console.log(class_name);

Output:

Employ

If you frequently need to access the Object.constructor.name property, you can create a method to hide it.

NOTE:

All objects (excluding those created with Object.create(null)) have a constructor property.

Objects that are created without a constructor function have a constructor property that refers to the main/primary Object constructor for the particular type.

index.js:

// Get the type of the contrusctor using the constructor.name
// Property. Here {} represents object hence it returns Object
console.log({}.constructor.name); 

// Get the type of the contrusctor using the constructor.name
// Property. Here [] represents an array hence it returns Array
console.log([].constructor.name); 

Output:

Object
Array

Javascript array contains object – How to Check if Array Contains an Object in JavaScript?

How to Check if Array Contains an Object in JavaScript

Javascript array contains object: In this article, we are going to check if the javascript array contains an object or not.

Checking if Array Contains an Object in JavaScript

We can check whether the array contains an object in javascript in a number of ways. The following are the ways to check:

Method #1: Using Array.some() Method

  • Invoke/call the Array.some() method by passing it a function.
  • The function should verify whether the object’s identifier is equal to a specific value and return true if it is.
  • If the conditional check is satisfied at least once, Array.some() method will return true.

Example1:

// This supports in IE 9-11

// Create an array of objects and store it in a variable
const websites = [
  {sno: 1, websiteName: 'Btechgeeks'},
  {sno: 2, websiteName: 'Python-Programs'},
  {sno: 3, websiteName: 'SheetsTips'},
];

// Check whether the array contains any specific object using the 
// Array.some() function
const objectFound = websites.some(element => {
  // If the object is found return true
  if (element.sno === 2) {
    return true;
  }
    // Else return false
  return false;
});

console.log(objectFound);

if (objectFound) {
  // object is contained in array
}

Output:

true

Example2:

// This supports in IE 9-11

// Create an array of objects and store it in a variable
const websites = [
  {sno: 1, websiteName: 'Btechgeeks'},
  {sno: 2, websiteName: 'Python-Programs'},
  {sno: 3, websiteName: 'SheetsTips'},
];

// Check whether the array contains any specific object using the 
// Array.some() function
const objectFound = websites.some(element => {
  // If the object is found return true
  if (element.sno === 4) {
    return true;
  }
    // Else return false
  return false;
});

console.log(objectFound);

if (objectFound) {
  // object is contained in array
}

Output:

false

Explanation:

Here sno 4 does not exist in a given object, hence it returns false
  • The function that we passed to the Array.some() method will be invoked with each value of the array.
  • The Array.some short circuits and returns true, If it returns a truthy value at least once.
  • In our condition, we check to see if the object’s identifier field equals a specified value. If it is, we know the object is there in the array.

Method #2: Using Array.find() Method

To check if a JavaScript array contains an object, use the following steps:

  • Invoke/call the Array.find() method by passing it a function.
  • The function should verify whether the object’s identifier is equal to a specific value and return true if it is.
  • If the conditional check is satisfied at least once, Array.find() will return the object.

Example1:

// This does NOT supports in IE 6-11

// Create an array of objects and store it in a variable
const websites = [
  {sno: 1, websiteName: 'Btechgeeks'},
  {sno: 2, websiteName: 'Python-Programs'},
  {sno: 3, websiteName: 'SheetsTips'},
];

// Check whether the array contains any specific object using the 
// Array.find() function
const objectFound = websites.find(element => {
  // If the object is found return true
  if (element.sno === 3) {
    return true;
  }
    // Else return false
  return false;
});

console.log(objectFound);

if (websites !== undefined) {
  // Then object is contained in an array
}

Output:

{ sno: 3, websiteName: 'SheetsTips' }

Explanation:

Here sno: 3 exists in the given array, hence the Array.find() method returns that object
  • The function that we passed to the Array.find() method gets invoked with each array element until it gives a true value or iterates over all array elements.
  • If the condition is met, Array.find returns the array element; else, undefined is returned.
  • Since the condition in the above example returns true, the find() method returns the object.

NOTE:

When you need to access additional properties on the object, use 'Array.find' 
instead of 'Array.some'; unfortunately, 'Array.find' is not supported in IE 6-11.

Method #3: Using Array.findIndex() Method

To check if a JavaScript array contains an object, use the following steps:

  • Invoke/call the Array.findIndex()method by passing it a function.
  • The function should verify whether the object’s identifier is equal to a given value and return true if it is.
  • Array.findIndex returns the index of the object if meets the condition and -1 if none do.

Example1:

// This does NOT supports in IE 6-11

// Create an array of objects and store it in a variable
const websites = [
  {sno: 1, websiteName: 'Btechgeeks'},
  {sno: 2, websiteName: 'Python-Programs'},
  {sno: 3, websiteName: 'SheetsTips'},
];

// Check whether the array contains any specific object using the 
// Array.findIndex() function
const objectFound_index = websites.findIndex(element => {
  // If the object is found i.e, true then it returns index value
  if (element.sno === 1) {
    return true;
  }
    // Else if false return -1
  return false;
});

console.log(objectFound_index);

if (objectFound_index !== -1) {
  // Then object is contained in an array
}

Output:

0

Explanation:

Here sno: 1 exists in the given array, hence the findIndex() method returns the index of sno1 i.e 0

Example2:

// This does NOT supports in IE 6-11

// Create an array of objects and store it in a variable
const websites = [
  {sno: 1, websiteName: 'Btechgeeks'},
  {sno: 2, websiteName: 'Python-Programs'},
  {sno: 3, websiteName: 'SheetsTips'},
];

// Check whether the array contains any specific object using the 
// Array.findIndex() function
const objectFound_index = websites.findIndex(element => {
  // If the object is found i.e, true then it returns index value
  if (element.sno === 5) {
    return true;
  }
    // Else if false return -1
  return false;
});

console.log(objectFound_index);

if (objectFound_index !== -1) {
  // Then object is contained in an array
}

Output:

-1

Explanation:

Here sno: 5 does NOT exist in the given array, hence the findIndex() method returns -1

The Array.findIndex method is identical to the Array.find method, except that it returns the index of the element that meets the conditional check rather than the element itself.

Array.findIndex executes its callback function with each element in the array until a true value is returned or the array’s values are exhausted.

NOTE:

This Array.findIndex() method returns -1 if all calls to its callback function return a false value.

Method #4: Using Array.filter() Method

To check if a JavaScript array contains an object, use the following steps:

  • Invoke/call the Array.filter() method by passing it a function.
  • The function should verify whether the object’s identifier is equal to a given value and return true if it is.
  • The Array.filter method will return an array of objects that satisfy the conditional check (if any)

Example1

// This supports in IE 9-11

// Create an array of objects and store it in a variable
const websites = [
  {sno: 1, websiteName: 'Btechgeeks'},
  {sno: 2, websiteName: 'Python-Programs'},
  {sno: 3, websiteName: 'SheetsTips'},
];

// Check whether the array contains a specific object using //the  Array.findIndex() function
const objectFound = websites.filter(element => {
  // If the object is found i.e, true then it returns that corresponding object values
  if (element.sno === 2) {
    return true;
  }
    // Else if false returns an empty array
  return false;
});

console.log(objectFound);

if (objectFound.length > 0) {
  // The object is contained in a given array
}

Output:

[ { sno: 2, websiteName: 'Python-Programs' } ]

Example2

// This supports in IE 9-11

// Create an array of objects and store it in a variable
const websites = [
  {sno: 1, websiteName: 'Btechgeeks'},
  {sno: 2, websiteName: 'Python-Programs'},
  {sno: 3, websiteName: 'SheetsTips'},
];

// Check whether the array contains a specific object using //the  Array.findIndex() function
const objectFound = websites.filter(element => {
  // If the object is found i.e, true then it returns that corresponding object values
  if (element.sno === 5) {
    return true;
  }
    // Else if false returns an empty array
  return false;
});

console.log(objectFound);

if (objectFound.length > 0) {
  // The object is contained in a given array
}

Output:

[]


JavaScript — Breaking Down The Shortest Possible FizzBuzz Answer

JavaScript — Breaking Down The Shortest Possible FizzBuzz Answer

Fizzbuzz solution javascript: FizzBuzz is a classic programming task, usually used in software development interviews to determine if a candidate can code.

The Question

Write a program that prints the numbers from 1 to 100. But for multiples of three print “Fizz” instead of the number and for the multiples of five print “Buzz”. For numbers that are multiples of both three and five print “FizzBuzz”.

We just need to loop through each number from 1 to 100. So, one of the simplest solutions can be achieved with a for loop:

for (var i=1; i < 101; i++){
    if (i % 15 == 0) console.log("FizzBuzz");
    else if (i % 3 == 0) console.log("Fizz");
    else if (i % 5 == 0) console.log("Buzz");
    else console.log(i);
}

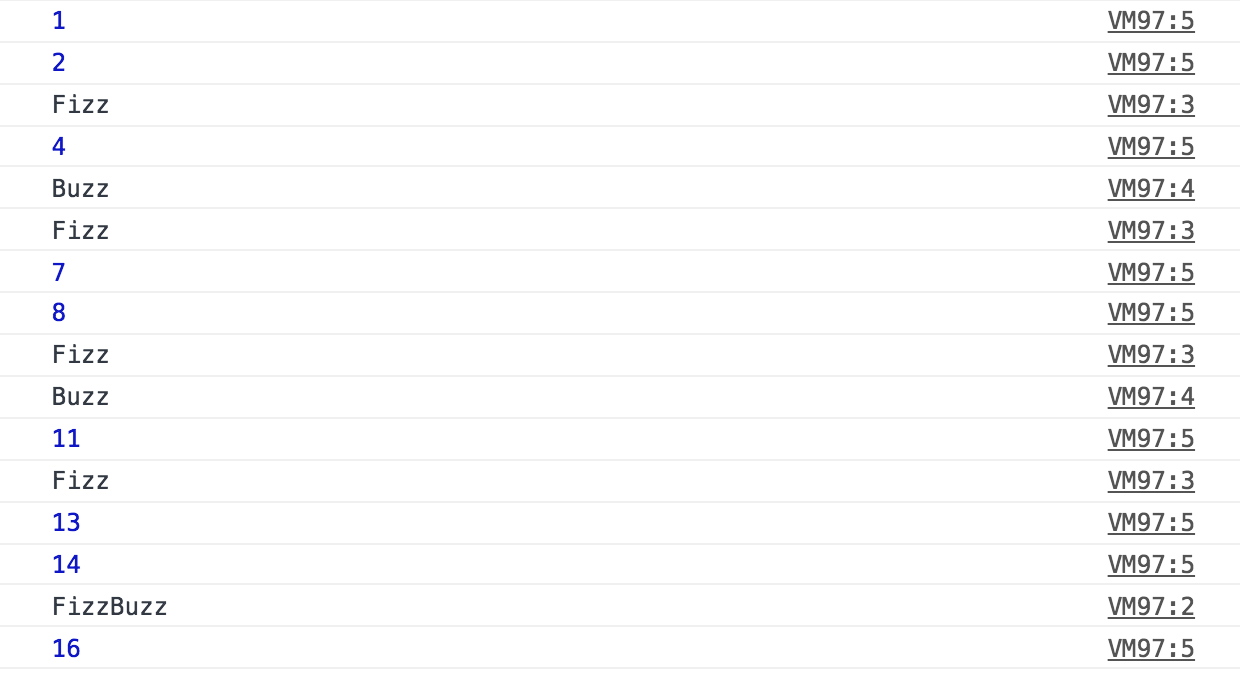
If you run this code in your console, you’ll see this works just fine. Here’s a snippet of the first 16 iterations through the loop:

FizzBuzz Output

There are probably hundreds of different ways to solve FizzBuzz. Some are cleaner, faster, and better than others. Some are just plain crazy.

for(let i=0;i<100;)console.log((++i%3?'':'fizz')+(i%5?'':'buzz')||i)

JavaScript Concepts You Need to Understand

Fizzbuzz javascript solution: This code utilizes many different JavaScript concepts to solve FizzBuzz. I’ve written about all of these concepts in the past — so I’ll give minor explanations in this article, but feel free to use these links to further your understanding if something isn’t entirely clear:

  • Logical OR / Short Circuit Evaluation
  • The Ternary Operator
  • Truthy & Falsy Values
  • The Increment Operator
  • Type Coercion

Breaking Down The Solution

The first thing we’ll do to better understand our code is to space things out a bit.

Here’s the same code with some breathing room added:

for(let i=0;i<100;)
  console.log(
    ( ++i%3 ? '' : 'fizz' ) + ( i%5 ? '' : 'buzz' ) || i
  )

Ok. Now we can start to see what our code is attempting to do. We clearly have a for loop that goes from 0 — 100. And within our for loop, we are attempting to console.log something.
Let’s take a deeper look at our first set of parenthesis within our console.log:

++i%3 ? '' : 'fizz'

If we recall the syntax for ternary operators, it is:

condition ? true result : false result ;

In this example, the condition that we’re testing is ++i%3. If that is true, then '' will be returned. If ++i%3 is false, then fizz will be returned.

++i%3

Above, the increment operator is being used. Using the operator before the operand ++i will increment the operator i before returning it. This means that on our first pass through the loop, i will increase from 0 to 1.
Now that i has increased to 1, our code will then check to see if 1%3 is true or false.
1 % 3 utilizes the remainder operator. The remainder operator returns the remainder of one number divided another. In this case we’ll check to see what the remainder of 1/3 is.
The remainder is 1 and thus our ternary condition is now simplified to 1:

1 ? '' : 'fizz'

A ternary condition is a Boolean Context. This means whatever we are testing must coerce to a true or false value.

true ? '' : 'fizz'

Since we have a true value in our ternary condition, the first expression is returned and the result of our first set of parenthesis is a blank string: ''.

Here’s where we’re at now:

for(let i=0;i<100;)
  console.log(
    ( '' ) + ( i%5 ? '' : 'buzz' ) || i
  )
i%5 ? '' : 'buzz'
console.log( '' + '' || i )

Since an empty string plus an empty string is still an empty string, our code will reduce further:

console.log( '' || i )

Now our code utilizes the JavaScript Logical OR Operator ||. Because an empty string is one of the seven falsy values in JavaScript, we skip over that operand entirely and accept whatever the second operand is. In this code, it is i.

console.log(i)

React native sqlite – Getting started with SQLite in React-Native | Creating, Using & Integrating the React Native SQLite Database

Getting started with SQLite in React-Native

React native sqlite: React Native apps come with a simple user interface, code reusability, and allows for the production of stable apps. With React-Native being one of the most popular and ideal frameworks for creating cross-platform mobile applications, the vast majority of the developers and engineers depend on the structure of the framework to deliver high-performing local applications.

Because of this, it’s often challenging for developers to choose the right technology stack (including the appropriate database for React Native). In this article, we will be discussing SQLite as a local database for React-Native, and work on how to pre-populate data into the database so as to use it in the application.

React Native SQLite Database

Sqlite react native: The word “lite” in SQLite describes it as being a lightweight library-based database that requires minimal setup. SQLite can be coordinated with a versatile application, allowing us to get to the database in an easy, straightforward manner. It’s also helpful to note that SQLite was designed to provide local storage to mobile apps.

The two main benefits of using SQLite database are:

  1. It’s ACID-compliant (an acronym for atomicityconsistencyisolation, and durability)
  2. Its offline persistence (which means that it works even when the device is offline)

Also Check:

Creating a Database

Sqlite react native: First, we need to create a database and store some data in it. SQLite Online can help in creating an SQLite database.

CREATE TABLE table_name (
 column1 datatype,
 column2 datatype,
 column3 datatype,
 ….
);

For example-

CREATE TABLE Users(
Title varchar(20),
Age number
);

Now we need to insert values to this table structure:

INSERT INTO table_name (column1, column2, column3, ...)
VALUES (value1, value2, value3, ...);

For example:

INSERT INTO Users(Title,Age)
VALUES ("Rohit" , 42);

Now your database is ready and you can download the user.db that you have created. For now, store the file in a temporary location.

How to Use React-native-SQLite-storage?

First, we have to import the library like shown below:

import { openDatabase } from 'react-native-sqlite-storage';

Then, open the database with the help of the below code

var db = openDatabase({ name: 'UserDatabase.db' });

Now, whenever you want to execute some database calls, you can utilize db variable to perform the database

query.db.transaction(function(txn)
{
txn.executeSql(
query, //Query to execute as prepared statement
argsToBePassed[], //Argument to pass for the prepared statement
function(tx, res) {} //Callback function to handle the result
);
});

Integrating the database with react-native

Step 1: After setting up your react native environment install the SQLite package

npm install react-native-sqlite-storage
react-native link

Step 2:

For iOS:

open ./ios/podfile
pod 'react-native-sqlite-storage', :path => '../node_modules/react-native-sqlite-storage'
cd ./ios && pod install

For Android:

Open and modify android/settings.gradle file as follows:

rootProject.name = 'react_native_sqlite_storage_exercise'
...
 include ':react-native-sqlite-storage'
 project(':react-native-sqlite-storage').projectDir = new    
 File(rootProject.projectDir, '../node_modules/react-native-sqlite-          storage/src/android')
...
include ':app'

Modify android/app/build.gradle file as follows:

...   
dependencies {    
implementation fileTree(dir: "libs", include: ["*.jar"])    implementation"com.android.support:appcompatv7:${rootProject.ext.supportLibVersion}"    
implementation "com.facebook.react:react-native:+"  
...    
implementation project(':react-native-sqlite-storage')   \
} 
...

Open and modify MainApplication.java file as below:

...   
import org.pgsqlite.SQLitePluginPackage;   
...   
public class MainApplication extends Application implements ReactApplication { 
...   
...  
@Override
protected List<ReactPackage> getPackages() {
return Arrays.<ReactPackage>asList(
...
new SQLitePluginPackage(),
...
new MainReactPackage()
  );
 }
}

Step 3: Adding the database file to the correct location

For iOS:

Create ios/[project name]/www folder and copy the database on it.

For Android:

Create www folder in the main project directory and copy the database on it.

Step 4: Create a constructor and add these lines of code:

constructor(props) {
    super(props);
    this.state={
      userList:[],
    }
    db = SQLite.openDatabase(
      {
        name: 'user.db',
        createFromLocation : 1,
      },
      this.success.bind(this),  //okCallback
      this.fail                // error callback
    );
    }

The constructor consists of four parts:

  1. The state — which is initially declared as an empty array (this will later be populated with data from the database).
  2. SQLite is imported and openDatabase function is called where the argument it takes is the name of the database and the location of the database.
  3. The success callback function ( which is called if there are no errors).
  4. The error callback function ( which is executed if there is an error).

Step 5:

Now we have to add the success and the fail call back functions:

success=()=>{
      db.transaction(tx => {
        tx.executeSql('SELECT * FROM user', [], (tx, results) => {  // sql query to get all table data and storing it in 'results' variable
          let data = results.rows.length;                          
          let users = [];    //creating empty array to store the rows of the sql table data
  
          for (let i = 0; i < results.rows.length; i++) {
            users.push(results.rows.item(i));                   //looping through each row in the table and storing it as object in the 'users' array
          }
  
           this.setState({ userList:users});         //setting the state(userlist) with users array which has all the table data
        });
      });
      // alert("ok")
    }
  
    fail=(error)=>{ 
      console.error(error) // logging out error if there is one
    }

In the success function, we declare a function db.transaction wherein the first argument we run the SQL query Select * from table_name (this selects all the rows in the SQL database). These rows are stored in a variable called “results”. Now we have to loop through each row of the “results” so that we can store data row by row in the array, thus we use the for loop. Now, after all the rows are pushed to the array, we use setState to update the state value.

In the fail function definition, we console.error the error so that debugging can be easier

Step 6: 

<ScrollView>
        {
           this.state.userList.map(function(item, i){  //map through each element of array(each row of the sql table)
             return(
               <View key={i} style={styles.card}>   //we display the name and age of the user
                <Text>{item.Title}</Text>  
                <Text>{item.age}</Text>   
               </View>
             )
           })
         }    
</ScrollView>

We use Scrollview to make a scrollable view of the list of all items we stored in the database. Now, since the rows are stored as an array of objects in the userList variable, we have to map through each element of the array and print the title and the age of the person.

Run and Test React Native and SQLite Offline Mobile App

In the first step, we have to run the React Native and SQLite app with the help of the below command.

react-native run-android
react-native run-ios

Once the new terminal window opens, simply go to the project folder then run this command.

react-native start

Finally, you will observe the whole application on the Android/iOS Device as shown in below image:

sqlite database run on android device

react native SQLite Offline Android

Conclusion

That’s it! In just six simple steps we have the basic setup of an SQLite database that is rendering its data to the front-end using React-Native. As discussed earlier, React-Native can be an incredibly helpful tool for developers and engineers, but knowing which technology stack is right for the task at hand can be a complicated process.

Javascript convert date to mm/dd/yyyy – How to Format a Date as MM/DD/YYYY in JavaScript?

How to Format a Date as MMDDYYYY in JavaScript

Javascript convert date to mm/dd/yyyy: To format a date in the format mm/dd/yyyy  follow the below steps:

  • To obtain the month, day, and year of a date, use the getMonth(), getDate(), and getFullYear() functions respectively.
  • If the value is less than 10, add a leading zero to the day and month digits.
  • Add the above output result to an array and join them with a forward slash(/) separator.

Let us see an example to understand it more clearly.

index.js:

// Create a function say paddingDigits by passing the number
// as an argument to it which returns the digits padded
// value 
function paddingDigits(gvn_number) {
  // Here it adds a leading zero if the month or day only
  // contains a single digit (less than 10) using the
  // padStart() function.
  // The toString() functions converts it into a string(type conversion)
  return gvn_number.toString().padStart(2, '0');
}

// Create a function say formattingDate by passing the date
// as an argument 
function formattingDate(gvn_date) {
  // Return the above date in the mm/dd/yyyy format using the
  // getMonth(), getDate(), getFullYear() functions and
  // separate them with '/' with the help of join() function
  return [
    paddingDigits(gvn_date.getMonth() + 1),
    paddingDigits(gvn_date.getDate()),
    gvn_date.getFullYear(),
  ].join('/');
}

// Create a new date object and pass it as an argument to the
// formattingDate() function
// Here new Date() creates the date object of the current day
console.log(formattingDate(new Date()));

// Pass some random year, month, day to the above 
// formattingDate() function and print the result
// Here we are giving the date object manually.
console.log(formattingDate(new Date(2022, 7, 23)));

Output:

06/14/2022
08/23/2022

Explanation:

Here the new Date() creates the date object of the current day

Here the paddingDigits() function, adds a leading zero if the month or day only contains a single digit (less than 10).

// Create a function say paddingDigits by passing the number
// as an argument to it which returns the digits padded
// value 
function paddingDigits(gvn_number) {
  // Here it adds a leading zero if the month or day only
  // contains a single digit (less than 10) using the
  // padStart() function.
  // The toString() functions converts it into a string(type conversion)
  return gvn_number.toString().padStart(2, '0');
}

console.log(paddingDigits(2)); 
console.log(paddingDigits(5)); 
console.log(paddingDigits(11));

Here we used the padStart() function to ensure that the output is always constant and has 2 digits for the months and days.

Since the argument, we passed to the paddingDigits() function is the total length of the string, it will never pad the day or month if they already have two digits.

Functions used to Format Date:

gvn_date.getMonth(): It gives an integer between 0(jan) and 11(December) that indicates the month for a specified date. The getMonth method is off by 1.

gvn_date.getDate(): It gives an integer between 1 and 31 that represents the day of the month for a given date.

gvn_date.getFullYear(): It gives a four-digit number indicating the year corresponding with a date.

NOTE:

The getMonth function is zero-indexed and provides a month index ranging from 0 to 11,
indicating that January is 0 and December is 11.

Hence we added the return value of the getMonth function by 1 since it is zero-based.

The final step in the method was to arrange the results in an array so that we could join them with a forward slash( /) separator.

console.log(['04', '26', '2024'].join('/')); 
console.log(['12', '08', '2020'].join('/')); 

Output:

04/26/2024
12/08/2020

This formats the given date in mm/dd/yyyy format.


What is i++ in javascript – JavaScript Increment ++ and Decrement —

What is i++ in javascript: The increment and decrement operators in JavaScript will add one (+1) or subtract one (-1), respectively, to their operand, and then return a value.

Increment & Decrement operators

SYNTAX: Consider ‘x’ to be a variable:

Then,
Increment:  — x++ or ++x
Decrement:  — x– or –x

#NAME?: In the syntax we can see that the — and ++ have been used before and after the variable, so in terms of code, it might look similar to :

// Increment
let a = 1;
a++;
++a;
// Decrement
let b = 1;
b--;
--b;

Using ++/– Before the Variable

i++ javascript: If you want to make the variable increment and decrement before using it, this is the way it has to be done, and in terms of code and example it is demonstrated below.

// Increment
let a = 1;
console.log(++a);    // 2
console.log(a);      // 2
// Decrement
let b = 1;
console.log(--b);    // 0
console.log(b);      // 0

As you can see, that the variable have been incremented/decremented before logging out the result in the first line.

Using ++/– After the Variable

x++ javascript: If you want to make the variable increment and decrement after using it, this is the way it has to be done, and in terms of code and example it is demonstrated below.

// Increment
let a = 1;
console.log(a++);    // 1
console.log(a);      // 2
// Decrement
let b = 1;
console.log(b--);    // 1
console.log(b);      // 0

As you can see, that the variable have been incremented/decremented after logging out the result in the first line.

Conclusion:

Hopefully, my article was helpful, and by now you are clear how the increment and decrement operators works in any programming language.