Singly Linked List: How To Find and Remove a Node

Prerequisites

To learn about singly linked lists, you should know:

  1. Python 3
  2. OOP concepts
  3. Singly linked list – inserting a node and printing the nodes

What will we learn?

In the last tutorial, we discussed what singly linked lists are, how to add a node and how to print all the nodes. We strongly recommend you to read that first if you haven’t as we will be building off of those concepts.

This tutorial is about how to remove a node and how to know if a particular element exists in the linked list or not. Both these methods belong to the LinkedList class. Let us see these one by one.

How to find an element?

Like in most data structures, the only way to find if an element exists is by traversing the entire linked list. Note that if the linked list is sorted, we can use binary search. But here we are going to consider an unsorted linked list. The way this works is that the user will give us an element and we return True if we find the element else we return False. You can also use a counter and return the index of the element if it exists.

Algorithm

  1. Set a pointer curr to the head
  2. Compare curr.data to the input value:
    1. If equal, return True
    2. Else, move to the next pointer
  3. Repeat steps 1-2 until the element is found or the end of the linked list is met

Code

def findNode(self,value):

       curr = self.head
       while curr:
           if curr.getData() == value:
               return True
           curr = curr.getNextNode()
       return False

How to remove nodes from singly linked lists?

Now that you know how to find a node, we can use this to remove a node. Again, there are several approaches to do this. You can remove the first node or you can remove the last node by maintaining a tail pointer that points to the last node of the linked list. The approach we are discussing here is that we get a value from the user, find the element in the linked list and remove it if it exists. It is very important to let the user know if the element was successfully removed. For this purpose, we return True for success and False otherwise. Remember to decrement the size attribute by 1.

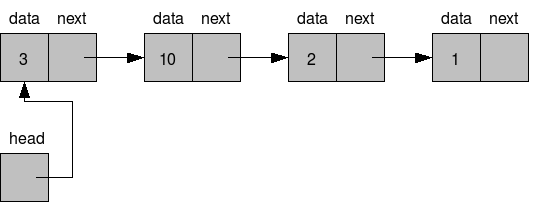
Let us call the node to be deleted as the current node. The idea is to link the previous node’s next to point to the current node’s next node. For example, let us say we want to delete 4 from the given linked list:

Linked list: H-->3-->4-->5 

Remove 4: H-->3-->5

We made the 3’s next node point to 4’s next node which is 5.

Let us say we want to delete 3

Remove 3: H-->5

We made the head pointer to point to 3’s next which is 5.

Note: To do make a connection between the previous node and the current node’s next node, it is important to keep track of the previous node.

Algorithm

  1. Have two pointers:
    1. curr – Initially points to head
    2. prev – initially points to None
  1. If inputted value matches the data of curr:
    1. Check prev exists:
      1. If yes, set next node of prev to next node of curr
      2. If no, simply point the head to next node of curr (this happens when you want to delete the first node)
      3. Decrement size by 1
      4. Return True
  2. If inputted value doesn’t match the data of curr:
    1. Proceed to next node by:
      1. Pointing prev to curr
      2. Pointing curr to next node of curr
  3. Repeat steps 1-3 till the end of the linked list
  4. If the end of the linked list is reached, return False indicating no element in the linked list matches the inputted value

Code

def removeNode(self,value):

        prev = None
        curr = self.head
        while curr:
            if curr.getData() == value:
                if prev:
                    prev.setNextNode(curr.getNextNode())
                else:
                    self.head = curr.getNextNode()
                return True
                    
            prev = curr
            curr = curr.getNextNode()
            
        return False

Conclusion

That’s it for this tutorial. In the future tutorials, we will see how to reverse a singly linked list. Happy Pythoning!

Singly Linked List: How To Insert and Print Node

Prerequisites

To learn about a singly linked list, you should know:

  1. Python 3
  2. OOP concepts

What are singly linked lists?

In this tutorial, we will learn about what singly linked lists are and some very basic operations that can be performed on them.

Before we get into the details of what singly lists are, we must learn what nodes are. This is because nodes are the building blocks of a linked list. A node consists of two parts:

  1. Data part – contains the data
  2. Address part – this is pointer that points to location of the next node

In a singly linked list, each node’s address part contains the information about the location of the next node. This forms a series of chain or links. The first node of the linked list is kept track by the head pointer. The last node points to None.

Let us see the following diagram to understand this better:
What are singly linked lists

Note: In the above figure, the last element 1 points to None. Even though these nodes are drawn contiguous to each other, in reality, they may or may not be in contiguous memory locations.

Check out this animation for the visualization of the working of a linked list.

Tip: Always try to draw these data structures to get a clear understanding.

How to create a Singly Linked List?

Creating classes

Firstly, you must create a node in order to create a singly linked list. To do this, we create a class Node with data and nextNode attributes. As discussed earlier, the data attribute will contain the data and the nextNode will simply point to the next node in the linked list. We will make the default value of nextNode to be None. You can use getter and setter methods to do this.

Now that the Node class is created, it is time to create the LinkedList class. This has only one attribute, head. By default, this will point to None. If the head points to None it means that the linked list is empty. To keep track of the number of nodes in the linked list, we can add a size attribute to the LinkedList class and default it to 0.

Inserting a Node

This is a method of the LinkedList class. Remember, to make the coding simple and efficient we will always add the new node to the beginning of the linked list. In other words, the head will always point to the most recently added node. If we add the new node to the end of the list, we need to do the extra work of finding the end of the list and then adding it. This is a wasteful operation. However, if you maintain another pointer, let’s call it the tail pointer such that it points to the last node, this can be done. You can insert a new node anywhere in the linked list. We have discussed the former approach i.e insertion at the beginning of the linked list.

Let’s say we need to add 7 to a linked list, we need to do the following steps:

  1. Create a node object with 7 as the data and the next node pointing to head node
  2. Point the head pointer to this new node

Finally, increment the size attribute by 1. It is always a good practice to return True if insertion was successful. This way the user knows what is happening.

Print Nodes

This is a method of the LinkedList class. To print the data present in all the nodes of the linked list, we need to traverse one node at a time and print each node’s data part.

Coding a Singly Linked List

class Node:

   def __init__(self,data,nextNode=None):
       self.data = data
       self.nextNode = nextNode

   def getData(self):
       return self.data

   def setData(self,val):
       self.data = val

   def getNextNode(self):
       return self.nextNode

   def setNextNode(self,val):
       self.nextNode = val

class LinkedList:

   def __init__(self,head = None):
       self.head = head
       self.size = 0

   def getSize(self):
       return self.size

   def addNode(self,data):
       newNode = Node(data,self.head)
       self.head = newNode
       self.size+=1
       return True
       
   def printNode(self):
       curr = self.head
       while curr:
           print(curr.data)
           curr = curr.getNextNode()

myList = LinkedList()
print("Inserting")
print(myList.addNode(5))
print(myList.addNode(15))
print(myList.addNode(25))
print("Printing")
myList.printNode()
print("Size")
print(myList.getSize())

What are the advantages and disadvantages of Singly Linked Lists?

Advantages

  1. It’s a dynamic data structure in which insertion and deletion are simple as we don’t need to shift the elements. Just updating the next pointer will do the job for us.
  2. Stack and Queue data structures can be easily implemented using linked lists.

Disadvantages

  1. Additional memory is used up by the next pointers.
  2. Random access is not possible. You must traverse the linked list from the beginning to get to a particular node.

Conclusion

That’s it for this tutorial. In the future tutorials, we will see how to remove an element from the linked list, how to find if an element exists in the linked list etc. Happy Pythoning!

What is python used for: Beginner’s Guide to python

Prerequisites

If you’re looking forward to learning python, chances are that you will find this post quite useful. Here you will learn about Python. What it is used for? where to learn it?

To know more about any language, you need to know a little bit about its history. by knowing its history you will know a lot about language main focus and it’s development directions.

Python is one of the most popular programming languages used according to the StackOverflow 2019 survey. In this article, we will know more about

  • The History of python
  • How long does it take to learn
  • The main usage of python
  • Where to learn python for free

Programming language popularity chart according to StackOverflow 2019 survey

History of python

Python is an interpreted, high-level, general-purpose programming language. Created by Guido van Rossum and first released in 1991. Guido’s goal of python is to be open-source and interactive programming language. He wanted to encourage other developers to use it. Python is based on C Language, which helps python in performance. CPython’s goal is to translate a Python script into C and make direct C-level API calls into the interpreter. Python’s code readability makes it useful for long term projects. It is a good choice for different companies. And beyond the usage of python in large business projects, developers started to use python for side projects. Now you know the main goal of python. Python focus on readability, performance. Python supports different operating systems. Let’s start looking at its main usage.

The main usage of python

The support of multiple programming paradigms object-oriented and functional programming and the huge community behind are helping the language to be adapted in different development fields. Let’s talk more about Python’s popular usage.

Web development

In Web development there are a lot of programming languages options.  Python is widly adoabted in web development with frameworks like Django, Flask and Pyramid. Or with scrapping tools  like scrappy, BeautifulSoup4 that fetch the data from different websites.

Django is the biggest python web framework. It’s an MVC (model-view-controller) framework that encourages rapid development. it provides well-structured files with standard architecture. Django gives you out of the box project:

  • Scalable architecture with a lot of customizations.
  • A settings module that contains project configurations.
  • ORM (object-relational mapper) that translates your python code into SQL.
  • Admin portal with a user management system.
  • Template engine for HTML rendering.
  • Built-in form validation.
  • Vulnerabilities prevention like (SQL injection, cross-site scripting, clickjacking, and password management )

You can know more about Django in our introduction to Django.

Flask is a microframework, it called that because it doesn’t require particular tools or libraries to be installed. It has no default database or form validation, you have full control over the project architecture. You can add the tools according to your needs. Flask is a quick solution for big projects or micro-services based projects. This does not mean that Flask is not a good option for scalable projects. Flask meant to be an easy choice for

  • Projects that need detailed customization
  • Microservices systems.
  • Creating web applications quickly with the minimum amount of configurations.

Note: We did a full comparison between Django and other frameworks in the previous article. Python usage isn’t just for building web applications only, other fields like machine learning and data science.

Machine Learning and Data Science

Python is very good at resources management (RAM, CPU, and GPU). Data scientist & Machine learning engineers are using it With libraries like:

  • Tensor flow, an end to end python platform for machine learning.  it handles complex computations. it used in NLP, voice recognition with an out of the box user-friendly responses.
  • Pytorch,  A production-ready machine learning library. It takes advantage of machine CPU and GPU to enable applications to accelerate the calculations
  • NumPy, Python’s most popular library for complex mathematical operations. It has a lot of linear algebra equations like Fourier transformation.

Data science and Machine learning are heavily used recently in academic researches and in companies. You need a good Mathematical background and you’re ready to start learning it.

Automation scripts

DevOps and security engineers are using it to write automation scripts to help them in their daily work. check our article about using boto with python for access AWS services

You can use it in almost all kinds of applications except mobile and gaming it’s not good at it.

How long does it take to learn?

Apparently, the time of learning a new language isn’t fixed for everyone. It was designed to be human-readable like English. we can say that it could take about 2 weeks to learn it’s basics and start using it.

Here is an example of python syntax

# define variables
language = "english"

# check type the type
type(language)  # str

# python boolean
is_readable = True

# List Data structure
numbers = [1, 2, 3, 4, 5]

# conditional statment
If language == "english":
   print("Welcome to english language")
else:
   print("Invalid language")

# iteration and for loop
for num in numbers:
    print("current number is : ", num)

# we can use ptyhon funtions to isolate logic
def get_number_type(number):
    if number % 2 == 0:
       return "Even number"
    else:
       return "Odd number"

# calling function

number_type = get_number_type(2)
print(number_type)
# Output : Even number

number_type = get_number_type(3)
print(number_type)
# Output : Odd number

The above code was an example of easy to read Python code. that’s why Python is easy to learn. check out tips for clean python code.

Where to learn python for free?

There are tons of resources to learn it for free, we will list the best learning resources.

  • Documentation docs tutorial
  • Udacity Course Introduction to python programming
  • Coursera Specialization Python for everybody
  • Tutorialspoint tutorial
  • W3Schools tutorial
  • Sololearn course

Conclusion

From the above explanation, it must be clear that you can use python with different applications. There is a wide usage of python in different industries and fields. it’s compatible with all operating systems. It is a good start if you want to start your career with programming.  Python is a very useful tool to use as a mathematician who wants a couple of scripts in his daily work. And if you are looking for scalable web application python is a good choice too.

How to install python on windows installation guide

Prerequisites

In this article, we will talk more about how to install python on windows. If you’re new to python. You can check our beginner guide to python to know more about its usage. In this article, we will talk about:

  • Downloading Python
  • How to install it
  • Install Python in windows OS
  • How to uninstall python

First, let’s get started with

Downloading Python

It depends on which operating system you’re using. Downloading Python is an easy process. This is one of Python’s main goal. To be easy to run, easy to install. You can download python from different resources. The official Python website is the go-to to download python. It has the download links for all operating systems. It has detailed release notes for differences between versions. You need to take a look at the release notes if you’re upgrading your python version. It’ll help you know the changes exactly.

To download python you need to

  1. Go to the download page on the official website.
  2. Select your operating system. (WindowsMacUnix)
  3. Click on the exact version you want to download. (latest version is recommended)

Your download will start automatically. Now It’s time to install Python.

Installing Python on windows

After downloading Python. Now we will install it. In this article, we gonna focus on installing python on windows. There are two ways of installing python on windows. The first one if you have Bash ubuntu installed. Bash ubuntu is an ubuntu terminal in the windows operating system. It allows you to run ubuntu commands in windows. It’s very helpful if you need a bash shell to work with. Keep in mind it’s not fully ubuntu terminal. It has some windows restrictions.

To install Python in bash ubuntu. You need first to have to download the ubuntu terminal. You can download it from the Windows store. After downloading it you will need to open the terminal. It might take some time, in the beginning, to download and install terminal necessary packages. After it finished you will find the normal ubuntu terminal. That you can run all the commands you want in it.

  1. Install dependencies.
    $ sudo apt install software-properties-common
    $ sudo add-apt-repository ppa:deadsnakes/ppa
  2. Update the OS package manager
    sudo apt update
  3. Install the latest version
    $ sudo apt install python3.8

To check python is installed. You should type the below command.

python --version

output:

Python 3.8.2

Now you have installed python successfully. Note that you installed Python in this shell. This means it’s not installed globally on the system. which means if you have a python script and tried to run this script outside the terminal. You need to run it from the shell. It’ll not run. Let’s explain why.

Your python is installed only on the Ubuntu subsystem. Ubuntu terminal is a container running in windows. It helps to translate your commands into binary system calls to Windows. By installing python. You install it on the subsystem only.

Install Python in windows OS

If you want to install python Globally on windows. You should follow these steps. After downloading Python. In your downloads, you’ll have a .exe file. Open it will open this screen.

Install Python in windows OS

You can choose to install it now. It will add the python path in your system partition. You can customize the installation path and user access.

The final step of windows installation.

After Finishing the installation. You will have the setup success screen. It’ll have links to documentation and getting start guide. After close this screen you will find a python shortcut on your desktop or windows menu. Now you can run any python script.

How to uninstall python

As you can see installing Python is easy. What about remove it. To remove Python from your device You have two options if you’re using Windows. The simplest way is:

  1. Go-to control panel
  2. Search for python
  3. Right-click and choose uninstall

This will remove python entirely from your system.

If you installed python through the ubuntu subsystem. It means that it’s not globally installed. Now You should open a new terminal window. Run the below command.

$ sudo apt remove python3.8

This will uninstall python from the subsystem. The dependencies package will be installed. This command will not delete the data files of python are still exist on your system. If you want remove it completely from your system. You should run:

$ sudo apt autoremove python3.8

This will remove python dependencies too from your system.

conclusion

Installing or uninstalling python is an easy process. Python was designed to be that from the beginning. You can install it in windows with a simple GUI. Or you can install it using the Ubuntu subsystem. Removing python as easy as installing it. You can uninstall it via the GUI or the terminal.

How to create dictionary in python

Today we will get more into how to create a dictionary in Python. It requires that you already have basic knowledge of Python syntax. Go check our introduction to python usage to know more about Python. You need to have Python installed in your machine. To know how to install python on your system check our installation guide.

  • What is the dictionary data structure
  • Create a dictionary in Python
  • Python dictionary usage

What is the dictionary data structure

Python dictionary is a key-value pair data structure. Each key has a single value. The key must be unique to avoid the collision. Dictionary is heavily used in python applications. If you have students and classes and each student has a class. Python dictionary will help you define the student name as a key and the class as a value. It will help you know the student course from his name value.

Dictionaries are the hash table implementation in Python. Hash table uses a hash function to map the key to its value. Each slot can store one entry. It’s the same as the python dictionary did. The image below explains how it works.

What is the dictionary data structure

We used Python dictionaries to retrieve the value if we knew it’s key. The same as we did in the above student’s example. Behind the scene What python does is reserve a memory place with a key and point to its value. It helps with memory optimization and efficiency. Now let’s create a python dictionary.

Create a dictionary in Python

To define a Python dictionary you should define it between curly brackets ex: {}. To Assign the value to it’s key you should add columns.

data = {"key": "value"}

continuing with the student’s courses example Let’s check how we can implement this:

class_data = {
    "sam": "Intro to Python",
    "Jack": "Intro to data science",
    "Emma": "Machine Learning course",
    "Wattson": "Web development."
}

The Class dictionary has students’ names. Each name has the course he enrolled in. This is a very basic and simple example of creating a python dictionary. We need to know how to use a python dictionary to insert, delete, retrieve values from it.

We mentioned that it’s a key-value store. This means that to get the item value you need to know it’s key. To get Jack course from the class dictionary you need to do:

print(class_data['Jack'])

# output
"Intro to data science"

What if the key is not in the dictionary. In such a case Python will raise a key error exception.

class_data['holo']

# ourtput
KeyError Traceback (most recent call last)
<ipython-input-4-73376fec291d> in <module>()
----> 1 class_data['holo']

KeyError: 'holo'

You need to handle this exception using the try/catch block. There is another more safe way to access dictionary data without raising an exception if it does not exist.

print(class_data.get('hoho', None))

# output
None

The get() methods provide an easy way to check if the key exists in the dictionary. It’ll return it else it’ll provide a default value. This approach lets you always provide a default value if the key is missing.  Now Let’s insert data into our dictionary.

# add new key and value to dictionary.
class_data['new_student'] = 'Ronaldo'
print(class_data)

# output
{
    'Emma': 'Machine Learning course',
    'Jack': 'Intro to data science',
    'Wattson': 'Web development.',
    'sam': 'Intro to Python',
    'new_student' : 'Ronaldo'
}

You can set the value of any key to none by updating it like above. You can delete the item key and value form the dictionary using the pop() function.

class_data.pop('new_student')
# output
'Ronaldo'

print(class_data)

# output
{
    'Emma': 'Machine Learning course',
    'Jack': 'Intro to data science',
    'Wattson': 'Web development.',
    'sam': 'Intro to Python'
}

Python provides a function to delete all dictionary items. Using the clear() function, you can all dictionary items.

class_data.clear()
print(class_data)

# output
{}

In the next section, we will talk more about the usage of the Python dictionary with some tips.

Python dictionary usage

Dictionary keys and values can be any value type. You can create a key and make its value a dictionary or an array. Some of the dictionary usage in real-world examples is nested dictionaries. check the example below.

school = {
    "students":[
        {
            "id": "1",
            "name": "Sam",
            "classes" : ["Web development"]
        },
        {
            "id": "2",
            "name": "Clark",
            "classes" : ["Machine learning", "Data science"]
        },
        {
            "id": "3",
            "name": "Watson",
            "classes" : ["Game development"]
        }
    ],
    "teachers":[
        {
            "id": "1",
            "name": "Emma",
            "Courses" : ["Data science", "Machine learning"]
        },
        {
            "id": "2",
            "name": "Jack",
            "Courses" : ["Game development", "Web development"]
        }
    ],
    "staff": [
        {
            "id": "1",
            "name": "Jo",
            "Profission" : "Office admin"
        },
        {
            "id": "2",
            "name": "Raj",
            "Profission" : "Cleaning"
        },
        {
            "id": "3",
            "name": "Ronald",
            "Profission" : "sales"
        }
    ]
}

Let’s explain the above code. We have a school, that has teachers, students, and staff. Each one has a name and ID. The student will have a class that he enrolled in. The Student can be enrolled in multiple courses. Teachers have Courses that he teaches them to students. The school staffs have a name and profession. It’s a single profession per user.

This is a simple design for school data arranged in the Python dictionary. If you’re the system manager and you need to get the name and class of each student. Using for loop Python statement. You can do this:

# get all students
students  = school['students']

for student in students:
    print("Studnet name: {0} is enrolled in classes: {1}".format(student['name'], student['classes']))

# output
Studnet name: Sam is enrolled in classes: ['Web development']
Studnet name: Clark is enrolled in classes: ['Machine learning', 'Data Science']
Studnet name: Watson is enrolled in classes: ['Game development']

This will get all the student’s data. If You want to update student’s data to add a new student all you need to do is add a new key and it’s value.

students  = school['students']

# add student dictionary to students list.
students.append({
    "id": "4",
    "name": "Holmes",
    "classes" : ["Web development"]
    })

print(students)

# output
[
    {
        "id": "1",
        "name": "Sam",
        "classes" : ["Web development"]
    },
    {
        "id": "2",
        "name": "Clark",
        "classes" : ["Machine learning", "Data science"]
    },
    {
        "id": "3",
        "name": "Watson",
        "classes" : ["Game development"]
    },
    {
        "id": "4",
        "name": "Holmes",
        "classes" : ["Web development"]
    }
]

You appended a new student dictionary to the student’s list. You can do the same logic to teachers and staff too.

conclusion

Python dictionary is a very powerful data structure. It has a lot of usages. It’s the flexibility to add any key and value types makes it easy to use in different applications. You can easily update and delete data from the Python dictionary easily using its functions. Working with dictionaries in python is a very important skill you need to have. It’ll get you out of a lot of problems. If you’re interested to know more about its implementation you can check the official documentation.

what is the string in python

The string is a Python data type. In this article, we will know what is the string in python, How to reverse, concatenate, and compare the string in Python. To get the most out of this article, you need to have the basic knowledge of Python. If you don’t check our intro to python here. Let’s start with what is the string in python.

What is the string in Python?

The Python string is a data type. Python doesn’t have a character data type. That’s why it has a string it’s a list of characters in Unicode representation. Python deals with string as an array of characters.

This means that you can apply all list functions to string too. Declaring a python string is very easy you can simply add the word between single or double-quotes. This will tell Python to create a list in the memory with the string length. Let’s see an example of defining a Python string.

text = 'Hello'
message = "Python string"

print(text)
print(message)

# output
'Hello'
"Python string"

The above example shows how you can define a string in python with single or double-quotes. The Python string has some functions that make use of the string. Let’s say that users registered to your application with their email. You need to validate that this the email string is lowercase. To avoid duplication in the user’s data. Python provides a built-in function lower() that convert string to lowercase.

email = "Email@Mail.com"

print(email)
# output
'Email@Mail.com'

print(email.lower())

# output
'email@mail.com'

We mentioned that string is a list and we can execute some of the list functions to it.  This includes the reverse functionality that the list had.

How to reverse a string in Python

To reverse a string in python you need to understand that python read the string as a list of characters. The functionality of the reverse is pretty simple. First, iterate through the string. Create a new string with staring at the end of the original string. You will understand with an example.

text = 'Hello world'
new_text = ''

index = len(text)
while index > 0:
  new_text += text[index -1]
  index -= 1

print(text)
print(new_text)

# output
Hellow world
dlrow olleH

In the above code, we created an index with the length of the string. Use the loop to go through each item in the text from back to front. The final part is to add the characters to the new string and decrease the counter. This solved our problem to reverse the string. Python supports a more efficient way to reverse the string.

How to reverse a string in Python

text = 'Hello world'
new_text = text[::-1]

print(new_text)

# output
dlrow olleH

What the text[::-1] code did? It slices the string to make it starts with the length of the string and ends with a zero index. This reversed the string and stored it in the new_text string. You might have noticed in the previous example that we created an empty string and starts adding to it. This leads us to the question How to concatenate Python’s string?

Concatenate String in Python

Concatenation Python’s string is merging strings together. In a more simple explanation, if you have text_1 = “Hello” and text_2 = “world”. concatenating them will be my merging them to formulate the “Hello world”. There are many ways to concatenate strings in Python. The simplest one is using the plus signs.

text_1 = "Hello"
text_2 = "World"

print(text_1 + " " + text_2)

# output
Hello World

The more your codebase gets bigger the more you need to customize the concatenation. Python provides a couple of functions to help you concatenate the string in a more elegant and readable way. The first method is the format() function.

username = "John"

welcome_message = "Welcome {username} this is a test text".format(username=username)

print(welcome_message)

# output
Welcome John this is a test text

The format function is very handy in the large test if you needed to add spaces and you have multiple variables to add inside the text. All you need to do is to put the variable name between curly brackets. Python will get the value of this variable from the parameters passed to the format function.

The second method is using the join function.  The join function is useful if you have a list and you want to concatenate the list data to a string. Let’s take an example to understand.

full_name_parts = ['John', 'Jack', 'Watson']
full_name = "-"

full_name.join(full_name_parts)

print(full_name)

# output
John-Jack-Watson

You Can see that the join function iterated through the list and added the items to the full_name string. It added the items with a -  between them.

The third method it’s only available in python in Python 3.6 and above. It’s the f-string method. It’s a more improved version of the format function.

name = "Jack"
age = 72

f"Hi, {name}. You is {age}."

# output
'Hello, Eric. You are 74.'

The f-string method allows you to directly get the variable value in the string. If you added the f a character at the start of the string.

Compare two Python strings

Let’s assume that you have an application that stores the username. You want the username of each user to be unique. This means that you need to validate that this name is not matching any of the other registered usernames. Python provides The ability to compare strings. A basic example of this:

name = input('Enter Your Name:')

saved_name = 'Jack'

if name == saved_name:
  print('Sorry the name you entered is taken')
else:
  print('Welcome {name}'.format(name=name))


# output
Sorry the name you entered is taken

# output
Welcome John

Python compares the two string as text. This means that if the user enters a lowercase Jack name the condition will not be valid. This is very important. You need to know that Python doesn’t do automatic validation. You need to implement the validations you need manually. This was a very simple example in a more realistic example you will have a database that makes sure that the name is unique.

Conclusion

Python’s string is very handy and useful to work with. It has clear formating and contamination methods. You can work with it as a list. it supports different most of the Python list built-in functions. To reverse a Python’s string you can slice it and end with index 0. Concatenate strings in  Python provides different concatenation methods to choose from based on your need. Comparing strings in python are similar to compare two integers. You can know more about Python strings in the official documentation. You can get many more details about The string functions here.

RF and Microwave Engineering Notes and Study Material PDF Free Download

rf-and-microwave-engineering-notes-pdf

RF and Microwave Engineering Notes: Students who are trying to get a hold of the RF and Microwave Engineering Notes and Study Material can access the most credible and reliable notes for their preparation process from this article.

The article on RF and Microwave Engineering Lecture Notes act as the primary sources of reference that enhance and improves the preparation and helps students score high scores.

Students can access, download, and refer to the RF and Microwave Engineering PDF Notes according to the latest curriculum from this article on RF and Microwave Engineering PDF for free. RF and Microwave Engineering PDF Notes and Study Material give the students a head start on all the essential topics and concepts as they will acquire the latest Syllabus, subject-recommended Reference Books, and list of all Important Questions List.

Students can access and download the RF and Microwave Engineering Notes PDF and other reference sources from this article on RF and Microwave Engineering PDF for free and improve their preparation methods, and approaches with these enlisted below are credible study resources.

Introduction to RF and Microwave Engineering Notes

RF and Microwave Engineering is a subject which is a part of Electrical Engineering. It’s a course which is suitable for students who have an interest in radio frequencies, microwaves, and millimeter wave engineering. In RF and Microwave, Engineering students learn the design, construction and operation of devices that transmit and receives radio waves.

RF and Microwave Engineering Notes and Reference Sources PDF Free Download

Students who are pursuing Electrical Engineering can access the best and credible sources of reference materials from the RF and Microwave Engineering PDF available in the article.

The article on RF and Microwave Engineering PDF improves the preparation process of the students through the ultimate preparation tools mentioned below to help you score the best marks.

Students can access and download the best RF and Microwave Engineering PDF and Study Material for free and refer to them during their preparation process. Students should refer to and study from the Rf, And Microwave Engineering notes and study material frequently. When students study more frequently, they will be able to expand their knowledge and understanding of the topics and concepts. Graduates will be able to change their scores with improved knowledge of the concept.

Here is a list of a few critical RF and Microwave Engineering Notes for thorough preparation for the examination.

  • RF and Microwave Engineering Notes PDF
  • RF and Microwave Engineering Handwritten Notes PDFs
  • RF and Microwave Engineering Basic Notes PDF
  • RF and Microwave Engineering Past Year’sYear’s Question Paper PDF

RF and Microwave Engineering Reference Books

The reference books for the RF and Microwave Engineering are an essential and vital source of study material. Students can access the best and most essential books which provide students with RF and Microwave Engineering Reference Books according to the recommendation of the experts.

Students can refer to and go through the list of RF and Microwave Engineering Reference Books available in the list below during their preparation.

The list of the best and most recommended books for RF and Microwave Engineering preparation are as follows, and candidates should endure selecting the book that meets their knowledge and needs.

  • Microwave Mobile Communications
  • Microwave and Wireless Communications Technology
  • The RF and Microwave Circuit Design Cookbook
  • Microwave Communications
  • Microwave Resonators and Filters for Wireless Communication
  • Terrestrial Digital Microwave Communications
  • RF and Microwave Circuit Design for Wireless Communications
  • RFPower Amplifiers for Wireless Communication
  • Electromagnetics for High-Speed Analog and Digital Communication Circuits
  • RFPower Amplifiers for Wireless Communications

RF and Microwave Engineering PDF Updated Syllabus

The syllabus is a vital course planning tool that organizes structure and plans the entire RF and Microwave Engineering course programme. The best way to enhance and improve your preparation is by holding in an initial idea comprehensive overview of the RF and Microwave Engineering Syllabus.

The RF and Microwave Engineering updated syllabus provide a detailed view of all the essential topics and concepts to give a clear idea to the students as to what to study and how to study. This article on RF and Microwave Engineering PDF provided the unit-wise breakdown of all the essential topics that are below each unit for students to have enough time to prepare for their examination comfortably.

Students should cover all the important concepts before they attempt the RF and Microwave Engineering examination so that the paper is easy, and they can answer it comfortably. When students know what topics and concepts are a part of their syllabus, they will avoid studying irrelevant and redundant topics.

The updated unit-wise breakdown of the RF and Microwave Engineering Syllabus is as follows:

Units Topics
Unit I Two Port Network TheoryReview of Low-frequency parameters

Impedance

Admittance

Hybrid and ABCD parameters

Different types of the interconnection of Two-port networks

High-Frequency parameters

Formulation of S parameters

Properties of S parameters

Reciprocal and lossless Network

Transmission matrix

RF behaviour of Resistors

Capacitors and Inductors

Unit II RF Amplifier and Matching Network

Characteristics of Amplifiers

Amplifier power relations

Stability considerations

Stabilization Methods

Noise Figure

Constant VSWR

Broadband

High power and Multistage Amplifiers

Impedance matching using discrete components

Two-component matching Networks

Frequency response and quality factor

T and Pi Matching Networks

Microstrip Line Matching Networks

Unit III Passive and Active Microwave Devices

Terminations

Attenuators

Phase shifters

Directional couplers

Hybrid Junctions

Power dividers

Circulator

Isolator

Impedance matching devices

Tuning screw

Stub and quarter-wave transformers

Crystal and Schottky diode detector and mixers

PIN diode switch

Gunn diode oscillator

IMPATT diode oscillator and amplifier

Varactor diode

Introduction to MIC

List of RF and Microwave Engineering PDF Important Questions

Candidates who are pursuing Electrical Engineering can access them and read through the list of all the essential questions in the list of all essential questions enlisted below for the RF and Microwave Engineering PDF course programme. All the review questions enlisted below aim to help the candidates improvise their study and excel in the examination.

  1. What is meant by S-matrix? State it’s properties.
  2. State the reason why you would use s-matrix in the MW analysis?
  3. Write a descriptive answer on the properties of the scattering matrix for a lossless junction.
  4. Define ferrites.
  5. Write a short answer on the different ferrite devices.
  6. Explain in detail TWT amplifiers.
  7. What are magnetron oscillators? Explain.
  8. What is the reflex klystron? Explain.
  9. Define the ABCD Matrix.
  10. Write the advantages and disadvantages of the ABCD matrix.

FAQs on RF and Microwave Engineering PDF

Question 1.
What is RF and Microwave Engineering?

Answer:
RF and Microwave Engineering is a subject which is a part of Electrical Engineering. It’sIt’s a course which is suitable for students who have an interest in radio frequencies, microwaves, and millimetre wave engineering. In RF and Microwave, Engineering students learn the design, construction and operation devices which transmit and receives radio waves.

Question 2.
What are some of the reference materials available for students to download in this article on RF and Microwave Engineering PDF?

Answer:
Here are some of the reference material that students can download from this article on RF and Microwave Engineering PDF:

  • RF and Microwave Engineering Notes PDF
  • RF and Microwave Engineering Handwritten Notes PDFs
  • RF and Microwave Engineering Basic Notes PDF
  • RF and Microwave Engineering Past Year’sYear’s Question Paper PDF

Question 3.
Name some of the reference books that students can download from this article on RF and Microwave Engineering PDF.

Answer:
Here are some of the reference books that students can download from this article on RF and Microwave Engineering PDF:

  • Microwave Mobile Communications
  • Microwave and Wireless Communications Technology
  • The RF and Microwave Circuit Design Cookbook
  • Microwave Communications
  • Microwave Resonators and Filters for Wireless Communication
  • Terrestrial Digital Microwave Communications

Question 4.
List out some of the essential questions that students can review while preparing for the RF and Microwave Engineering examination.

Answer:
Here are some of the questions that students can refer to when they are preparing for their RF and Microwave Engineering examination:

  • What is meant by S-matrix? State it’s properties.
  • State the reason why you would use s-matrix in the MW analysis?
  • Write a descriptive answer on the properties of the scattering matrix for a lossless junction.
  • Define ferrites.
  • Write a short answer on the different ferrite devices.
  • Explain in detail TWT amplifiers.

Conclusion

The article on RF and Microwave Engineering PDF is a credible and reliable reference material that improvises preparation. The list of all the Reference Books, Study Materials, refer to the subject recommended Books, and practice all the essential questions from this article.

Scope of local and global variables in C

What is the scope of local and global variables in C.

Scope of local variables

  • Local variables can only be accessed by other statements or expressions in same scope.
  • Local variables are not known outside of their function of declaration or block of code.

Scope of global variables

  • Global variables can be accessed form anywhere in a program. The scope of the global variables are global throughout the program.
  • Any function can access and modify value of global variables.
  • Global variables retains their value throughout the execution of entire program.

What are the uses of main function in C.

  • Execution of any C program starts from main function.
  • The main function is compulsory for any C program.
  • C program terminates when execution of main function ends.

C program to print natural numbers in right triangle pattern

C program to print natural numbers in right triangle pattern
  • Write a C program to print natural numbers right angled triangle.

For a right triangle of 4 rows. Program’s output should be:

Natural_Number_Triangle_Pattern

Required Knowledge

Algorithm to print natural number right triangle pattern using for loop

  • Take the number of rows(N) of right triangle as input from user using scanf function.
  • Number of integers in Kth row is always K. 1st row contains 1 integer, 2nd row contains 2 integers, 3rd row contains 3 integers and so on. In general, Kth row contains K integers.
  • We will use a integer counter to print consecutive natural numbers.
  • We will use two for loops to print right triangle of natural numbers.
    • Outer for loop will iterate N time. Each iteration of outer loop will print one row of the pattern.
    • For Kth row of right triangle pattern, inner loop will iterate K times. Each iteration of inner loop will increment the value of counter and print it on screen.

Here is the matrix representation of the natural number triangle pattern. The row numbers are represented by i whereas column numbers are represented by j.
Natural_Number_Triangle_Pattern

C program to print right triangle star pattern

C program to print natural numbers in right triangle pattern

#include<stdio.h>
 
int main() {
    int i, j, rows, count = 1;
 
    printf("Enter the number of rows\n");
    scanf("%d", &rows);
 
    for (i = 0; i < rows; i++) {
        for (j = 0; j <= i; j++) {
            printf("%d ", count);
            count++;
        }
        printf("\n");
    }
    return(0);
}

Output

Enter the number of rows
4
1
2 3
4 5 6
7 8 9 10

What do you mean by prototype of a function

What do you mean by prototype of a function.

function declaration or prototype in C tells the compiler about function name, function parameters and return value of a function. The actual body of the function can be defined separately.
Here is the syntax of function declaration:

return_type function_name(type arg1, type arg2 .....);

Like variable in C, we have to declare functions before their first use in program.

Important points about function declaration.

  • Function declaration in C always ends with a semicolon.
  • By default the return type of a function is integer(int) data type.
  • Function declaration is also known as function prototype.
  • Name of parameters are not compulsory in function declaration only their type is required. Hence following declaration is also valid.
    int getSum(int, int);
  • If function definition is written before main function then function declaration is not required whereas, If function definition is written after main function then we must write function declaration before main function.

What is difference between Call by value and Call by reference in C.

Call by Value

In call by value method a copy of actual arguments is passed into formal arguments in the function definition. Any change in the formal parameters of the function have no effect on the value of actual argument. Call by value is the default method of passing parameters in C. Different memories are allocated for the formal and actual parameters.
Here is an example of call by Value

 
void getDoubleValue(int F){
   F = F*2;
   printf("F(Formal Parameter) = %d\n", F);
}

Call by Reference

In call by reference method the address of the variable is passed to the formal arguments of a function. Any change in the formal parameters of the function will effect the value of actual argument. Same memory location is accessed by the formal and actual parameters.
Here is an example of call by reference

void getDoubleValue(int *F){
   *F = *F + 2;
   printf("F(Formal Parameter) = %d\n", *F);
}